This post is brought to you by Minted and contains affiliate links, but nothing that I wouldn’t wholeheartedly recommend anyway! Read my full disclosure here.
If you’re new here, on Wednesdays I share tidbits that I learned while we were planning on our wedding. We’re making our way through The Ultimate Wedding Checklist and today we’re chatting about wedding websites and more specifically how to create a wedding website that will amaze your guests.
In today’s virtual-focused society wedding websites are becoming an assumed “must-have” for your wedding.
I am usually the voice that tells you, “NO you don’t have to do anything you don’t want to for your wedding” and “there are no ‘must-haves’ on your wedding date”, but seriously wedding websites are a huge help to your guests.
I’m not saying that you HAVE TO create a wedding website, but with easy-to-use website builders like Minted, it’s so simple, that I don’t see why you wouldn’t create a wedding website. If you really wanted to keep it simple, it could honestly take you 5 minutes to throw together.
Are you ready to learn how to create a Minted wedding website?

When I receive a wedding invite in the mail, it usually makes its way up onto our fridge. In my mind, the most important part of the whole invite is the URL for their wedding website.
I know that at the click of a button, I can quickly visit the couple’s wedding website to get the 411 on their wedding details, find out where they are registered, and get directions to the venue.
I don’t need to remember to grab the wedding invite off the fridge before we leave (and let’s face it – the last two weddings we attended I completely forgot it, even though I intended to bring it along). Maybe it’s just my #mommybrain, but I do believe that our society is morphing into one of forgetfulness because we can always find what we need on the go.
Most brides feel a little overwhelmed by the idea of creating a wedding website…I mean, really who has ever created a website before?
It can be intimidating at first and that is completely normal. I’m here to tell you that there is NO need to be scared or overwhelmed with how to create a Minted wedding website.
If you find yourself overwhelmed, it can be helpful to remember the purpose of your wedding website.
What is the purpose of a wedding website?
- One-stop shop for your guests to find your wedding registry and wedding details, RSVP to your wedding, learn more about you and your love story, meet your wedding party, and see some pretty pictures.
- A place for your guests to quickly find information about your wedding on the go…. by “on the go”, I mean while in-route to your wedding when they realized they forgot the wedding invite (shhhh… yes, this may have happened to me, not once, but TWICE recently).
Now, are you ready to see how to create a Minted wedding website that will wow your guests?!
How do we create a Minted wedding website?
If you’re stumped on how to create a wedding website, I’ve got news for you. Creating your wedding website on Minted is SO easy, it could seriously be done in 5 minutes if you wanted something simple. I created a “fake” wedding website for us as I was putting this post together so I could test all of Minted’s features out, check it out.
Step 1: Visit Minted.com.
You’ll find the wedding websites, under the Minted Weddings tab at the top and then under websites.
Step 2: Choose your unique website design.
This is the FUN part. There are hundreds of fun designs to choose from. All of the designs are created by independent artists (just like everything else on Minted, which is why I love them so much)! You will see fresh and unique designs.
Most of the designs have matching invitations, programs, and a whole suite of items you can order for your wedding so there is a cohesive theme and look.
It’s OK if you’re not sure about the website design yet, you can change it up later… as many times as you want!
Minted makes it easy to search for exactly what you want with the filters at the top. You can filter based on style, color, and even season! For our “mock” wedding website, I knew I wanted something that matched the Fall tones of our engagement pictures well. For our photoshoot, we were wearing lots of olive greens, browns, and neutral colors so I wanted something that would work well with our clothing (if you’re stuck on what to wear for your engagement pictures, read my tips here). I chose a Classic Floral Theme. There are three basic layouts for the first page (seen on the left panel below).
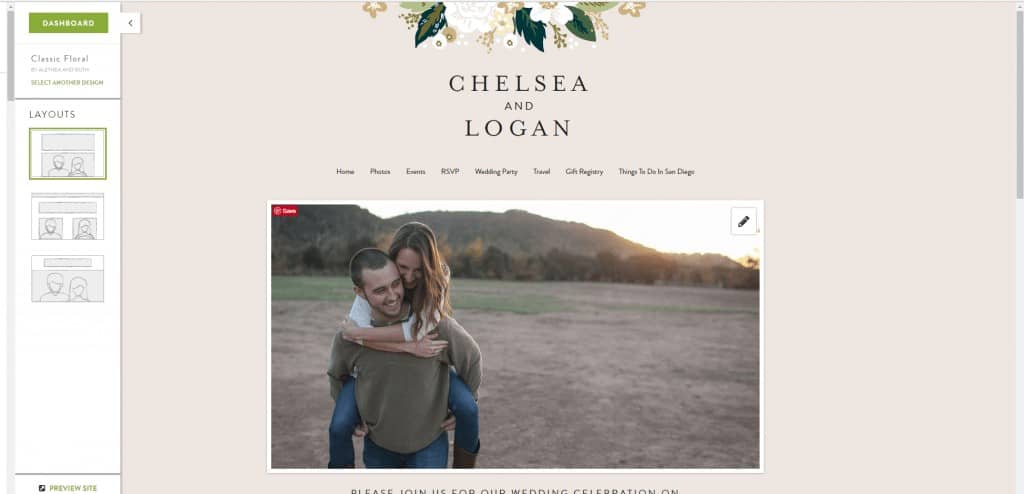
Step 3: Next you’ll choose your URL and fill in the basic information.
This will be on the first page of your wedding website: like your names, wedding date, and a little intro (which I used to tell part 1 in our little love story).
With Minted’s free wedding website option, you will have to include “minted.us” at the end of your URL (ie: loganandchelsea.minted.us). If you pay the one-time $35 premium fee (more on what’s included with the premium wedding website below), you’ll be able to have a custom URL (ie: logananchelsea.com).
Step 4: Enable the RSVP function.
When I was working on our “fake” wedding website, it did take me some time to figure out how to get the RSVP tab to appear. The trick here is, you have to first start a guest list. You can easily import your entire guest list from Excel or enter them manually.
Next, you’ll need to enable the RSVP option on the events page (after you add some more details about your event). When you add the RSVP, you can choose to add a response to their RSVP, like if they’d like Chicken or Fish. Once you’ve entered at least one person on your guest list and enabled the RSVP on the event page, the RSVP page will appear.
For the guest to RSVP, they will need to enter the name that was on their invitation on the RSVP page.

Fill out the other easy-to-use pages further with more details. Add some pictures. Tell a little love story (or any other type of introduction, it can be short and sweet) and… ta DA! You have a wedding website. Boom.

Frequently asked questions about wedding websites
What does the premium fee on a Minted wedding website include?
- Custom URL – otherwise you’ll need to include “minted.us” at the end of your URL (ie:loganandchelsea.minted.us)
- Photo gallery – otherwise the only photo you will be able to include is on your main page (shown above).
- Website privacy – password protect your site so only your invited guests can view it.
What should we include on our Minted wedding website?
- The when and where for your wedding ceremony and reception – This is obvious, right!?
- Special information about your venue (like tricky driving directions or where to park) – This is a great place to include helpful tips for your big day. See below for the extra info I added about our venue.

- Gift registry – They (whoever “they” are) say that it is not appropriate to put your gift registry information on your wedding invite, but let’s be real for a second here… I don’t think I’ve ever received a wedding invite that didn’t have this information. So if you want to follow “their” rules, don’t include on your wedding invitation, but DEFINITELY include it on your wedding website. Minted has a registry page ready to go, you just copy and paste the link to your registry. Speaking of wedding registries, I did a whole series about them, you can read lots more here.
- Travel – Like good hotel options nearby (or discounted hotel room blocks you’ve arranged), where the closest airport is, etc.
- Wedding party – This is optional, but I always love learning more about the wedding party, don’t you? That way you won’t find yourself whispering to your wedding date during the ceremony…”so who is the best man?!”
- Things to do in your city – Our wedding was on a holiday weekend. Since we both grew up in different areas, most of our wedding guests were traveling in and staying for a few days for the long weekend. We wanted to provide a little “guide” to our city, so we added a “things to do in San Diego” page to our Minted wedding website. We included our favorite restaurants and things to do (along with links to websites and other locals’ tips). It’s great to include something like this if you have a lot out-of-towners attending your wedding.
- Engagement pictures – You may remember a few weeks ago I talked about the decision of whether or not to get engagement pictures taken and followed up with what you should wear for your engagement pictures. Your wedding website is a great place to share some of your favorite shots from your engagement photo shoot. You’ll need to upgrade your Minted wedding website to the premium level, which is just a one-time $35 fee, to take advantage of their photo gallery option. You can check out how the photo gallery works on our “fake” wedding website here. Just remember to share just a sampling of the pictures. No one really wants to click through hundreds of pictures, haha. Do your guests a favor and just send the complete photo set to your mom. She’s the only one that seriously wants to look at all of them.
When should we create our Minted wedding website?
I’d recommend setting up your wedding website when you send out your save the dates (4-6 months before your wedding). That way you can add your URL on your save the dates! You can have it just be in “save the date mode” with a quick announcement of your wedding date until you nail down more details.
Once you’ve signed the contract with your wedding venue, you can add more details (more tips on finding wedding venue here).
You’ll definitely want to have the RSVP function up and running by the time you send out your wedding invitations. That way people can use your Minted wedding website to RSVP, which is so convenient.

I told you it was easy. I didn’t lie! Hopefully, this how to create a Minted wedding website guide helped you!
Is there anything that this how to create a wedding website guide is missing? Creating a Minted wedding website will take you no time and is super fun to put together.
Hop on over to Minted and check out all of the amazing themes to choose from and throw your simple wedding website together! Once you’re done, come on back and let us know how it went. What theme did you choose? Congrats on checking another item off of your wedding checklist!


great list .. i personally liked the 3rd one here… hope this information will help in my sister’s wedding..