Want to start your own garden? Learn how to build DIY cedar raised garden beds using cedar fence pickets so you can grow vegetables, fruits and flowers right in your backyard.
There’s something special about have a garden in your backyard! Not only are the fresh fruits and veggies great – but gardening tends to slow us down, connect with the earth and learn patience. If you’re renovating your entire backyard or just looking for a way to grow your own veggies, it’s always a good time to think about adding a garden! For all these reasons and more, you may be wanting to start a garden in your backyard!
In this tutorial we’re going to answer some frequently asked questions about raised garden bed, show you a chap and easy way for how to build DIY cedar raised garden beds – with leftover cedar fence pickets!
No room in your small backyard for a raised garden bed ? Try this vertical renter friendly garden with a pallet or this vertical garden pots on a plant wall or try growing in a smaller DIY planter box like this instead!
Table of Contents

Raised Garden Bed FAQs
Before we jump in to the step-by-step DIY cedar raised garden bed tutorial, let’s go over a few basics. Do you have another question that we didn’t answer here? Just comment below!
Are raised gardens different than in-ground gardens?
The quick answer is YES. They are definitely different. Essentially, raised garden beds allow you to create the right type of soil mixture that is balanced and prepare a garden bed with great drainage….two very important steps for gardening.
Ultimately, raised bed vs in-ground garden comes down to what is best for you. The choice between the two options definitely varies case by case, mostly depending on the soil in your area. Here’s a super informative resource about the advantages of both raised garden beds & in-ground gardens.
What type of material should you use to make raised garden beds?
If you are using wood to make raised garden beds, you definitely want to use a wood that is designed to be outdoors. Popular woods for garden beds are: cedar, yew, redwood, juniper, black walnut, white oak, locust wood, spruce, pine and douglas fir. Read more about choosing the best wood for raised beds in this article.
There are a lot of other suitable materials for raised garden bed material other than wood too…like vinyl, recycled plastic or composite material – which are all great options as well.
Why is cedar good for garden beds?
Cedar is a great type of wood for raised garden beds and this is what we used. Cedar is naturally resistant to rot from direct contact with the ground, which is why you see cedar used for so many outdoor projects like garden beds, patios, fences and outdoor furniture, like this kid’s picnic table. It’s also easy to find at home improvement stores and is moderately priced. Read more about different types of wood in this article.
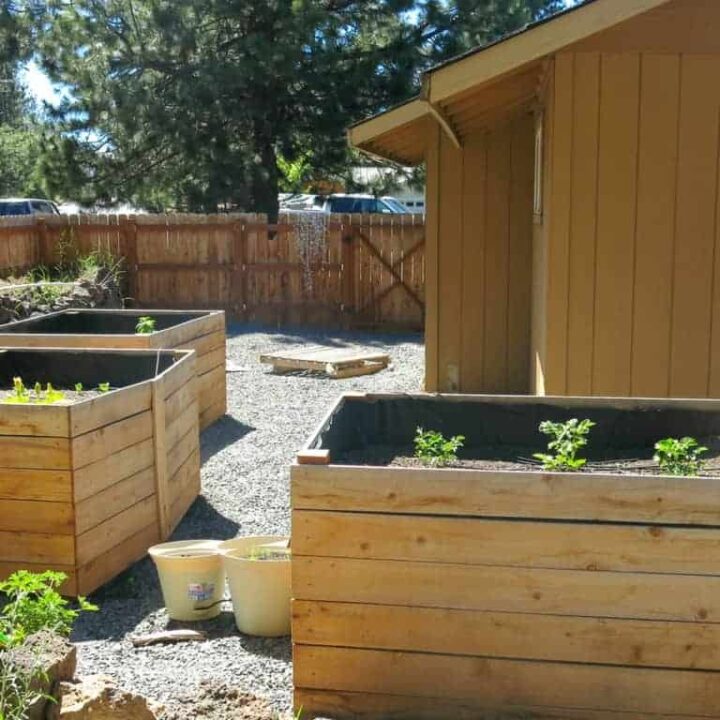
Why should you build waist high raised garden beds?
Gardening is much more convenient when the garden beds are taller and waist high is an ideal height. We build ours 3 feet tall. If the garden beds are tall you won’t have to hunch over and lean on your knees. You can water, prune, pick and tend to our garden all while standing up…. even with a busy body toddler on your hip!
However building taller garden beds will require extra time and supplies.

This DIY raised garden beds using cedar boards post contains affiliate links, but nothing that I wouldn’t wholeheartedly recommend anyway! Read my full disclosure here.
Supplies for DIY raised cedar garden beds:
- 4 – 4×4 pressure treated posts for the corners
- Plastic lining
- 1 5/8” inch deck screws
- Concrete mix
- Post hole digger
- Cedar fence pickets
- Miter saw
- Level
- Tape Measure

Step 1: Prepare ground for wood garden beds.
Before you get started building your cedar garden beds, you need to make sure the ground is ready. This is an important step because it will make the rest of the building much easier if you get this right.
- Level out uneven ground
- Remove rocks or other debris on the ground
- Prepare under-ground sprinkler supply lines to line up with your raised garden beds (Need help installing sprinklers? Start here!)

Step 2: Dig post holes for corners.
Using a post hole digger to dig the post holes will make your life much easier. Whichever way you dig the post holes for the corner of your garden bed, be sure to dig down 12” and make the hole at least 10” by 10”.

Step 3: Cut your posts to size.
We used pressure treated 4” x 4” posts and cut them to about 4 feet tall if you want your beds waist high, like ours (1′ was in the ground and 3′ above the ground). You’ll need 4 posts for each garden bed you made. The posts go in each corner of the garden bed.
Remember, we made our raised garden beds a lot taller than you normally see (see our explanation why at the top of this post). Although it was more money for supplies, I love that I don’t have to bend down to work in the garden.

Step 4: Set your posts in holes with concrete.
Mixing the concrete and water in the hole, rather than mixing it up and then pouring it in will save you time and clean up. Here’s the best way to set your posts with concrete:
- Wet all of the sides of the hole with a hose.
- Put your post in and make sure it’s level/straight.
- Pour in concrete mix.
- Run hose over the concrete until it’s above 1” below the dirt line.
The soil where we live is moist enough that it will harden the concrete at the bottom of the hole just fine. If you live in a desert like area, you may have to pour the concrete powder into the hole in layers adding water as you go.
Want to see more about setting your posts in the hole with concrete? We walk you through the whole process in this article and video – How to Build a Wood Fence In Your Backyard
Once your posts are set and you make sure they are nice and straight/level, step away for at least 24 hours to give the concrete a chance to set.

Step 5: Attach plastic liner.
When you concrete is harden, you can start working again.
To prolong the life of your DIY cedar raised garden bed, we recommend attaching a plastic liner or landscape fabric to the inside of the bed. The liner prevents the wood from rotting out. Even though we were using cedar, which is more resistant to rotting than other types of wood, you still want to do everything you can to block the moisture from the soil from touching the wood.
We attached the plastic liner to the posts using a staple gun. We covered all four sides and the corner posts.
Pro tip – It is MUCH easier to add the liner before the sides of the cedar raised garden beds have been attached!
Another reason we added the plastic liner was to protect the soil from getting contaminated by the chemicals used in the wood, especially the pressure treated posts. Never let those come in direct contact with your garden soil.


Step 6. Add cedar boards.
Adding the cedar boards to the DIY cedar raised garden beds was simple. All you do is cut them down to the right size with a miter saw (or circular saw) and screw onto the corner posts using 1 5/8” inch deck screws. We put two screws on each board in each post.
We opted for cedar fence pickets for the sides of our garden beds, mostly because we had a bunch left over from building a wood fence – but they are also very inexpensive to buy!
Step 7. Fill DIY cedar raised garden beds.
We had lots of leftover gravel from our landscaping projects, so we added that to the bottom 1/3 of the beds.
You definitely want to add a layer of rocks, gravel or sand to the bottom of your raised garden beds so they will drain well. We filled the rest of the beds with raised bed garden soil from our local landscaping company.

Step 8. Plant your garden and enjoy.
Lastly you can plant your garden and enjoy the fruits of your labor – quite literally.
We planted potatoes, onions, cilantro, squash, basil, peppers, green beans, kale, tomatoes, thyme and spinach in our DIY raised cedar garden beds. I also added some mint and carrots in separate containers. Fruits and veggies may not be quite as easy as planting succulents or new grass seed, but it’s not as tough as you might think!
Are you ready to make your own DIY raised cedar garden beds?! If you have a little bit of room to spare in your yard, building raised garden beds using cedar boards is an easy weekend project. By the end of the weekend, your garden will be ready to fill with herbs, veggies and fruits!
What would you plant in your DIY cedar raised garden beds?
Let us know in the comments below!

If you a newbie gardener like me, here are some great resources that I’ve found helpful:
- Jami at An Oregon Cottage has a great resource of gardening tips and tricks. Here’s her gardening page on her blog.
- How to Find Your Growing Zone by Home For The Harvest (I also love her tips on how to plan your garden layout)
- 11 Tips for a Successful First Garden by The Free Range Life (I love tip #2!)
How To Build DIY Cedar Raised Garden Beds
Materials
- 4x4 pressure treated posts (you'll need 4 per bed)
- Plastic lining or landscape fabric
- 1 5/8" deck screws
- Concrete mix
- Cedar fence pickets
Tools
- Post hole digger
- Miter saw
- Level
- Tape measure
Instructions
- Prepare ground for wood garden beds. Level out and prepare underground sprinkler supply lines if necessary.
- Dig post holes.
- Cut posts to size.
- Set posts in holes with concrete.
- Attach plastic liner.
- Add cedar boards.
- Fill garden beds.
- Plant your garden and enjoy!


What a great raised garden you’ve made, Chelsea! After years of bending over beds, I think your tall beds are genius. 😉
Thank you for giving a shout-out to my gardening page- I’m glad you’ve found the articles helpful!
Thanks Jami! 🙂
This is the ultimate guide to building and planting a raised bed, I love it! You’ve included almost every piece of information needed for raised beds. Very resourceful so thank you, Chelsea!
I’ll definitely be sharing this on twitter later today.
Thanks again 🙂
Glad you found it helpful !!