Thank you to DAP for sponsoring this DIY key holder! All opinions are entirely my own. This post also contains affiliate links, but nothing that I wouldn’t recommend wholeheartedly. Read my full disclosure here.
Last week I shared tons of entryway makeover ideas for small spaces and I mentioned that we are giving a corner of our living room a makeover to create a small entryway.
We use the front door 100% of the time to enter the house and our front door opens RIGHT up into our living room.
Not the most ideal of situations, but ya know – sometimes you gotta work with what you have. And there’s really nothing we can do about the layout, so we’re making it work!

If you want to catch up on our small entryway makeover, here you go:
Week 1 – 21 Small Entry Way Ideas
Week 2 – DIY Key Holder With Modern Farmhouse Style – you are here!
Week 3 – Easy DIY Bench For Small Entryway
Week 4 – Small Entryway Reveal!
What we really need is a place to drop our jackets, bags, shoes and KEYS when we walk in the door.
Since we’ve lived here over a year a half now, the keys are always floating around – which can be pretty frustrating when you’re trying to leave the house. Enter the DIY key holder!
With back to school around the corner, it’s the perfect time to get a little more organized on the key/jacket/shoes front – which will make coming and going from school a lot easier!
How to Make a DIY Key Holder with Farmhouse Chic Style

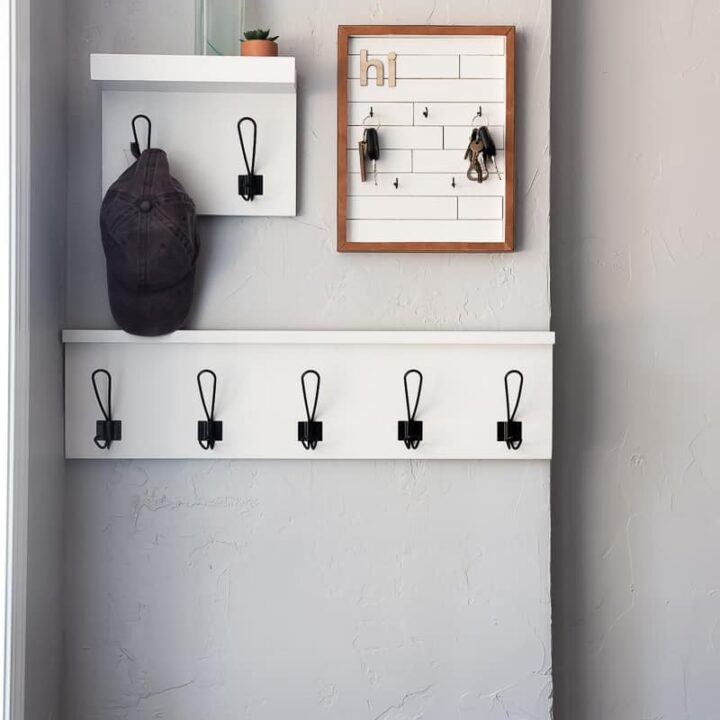
First of all…can you BELIEVE that I snagged this sign for $3 at the thrift store!? Combine that with some paint sticks to make mini shiplap, some scrap leather for a modern touch, and put it all together with Rapid Fuse, which is totally the strongest super glue around!
If you’ve been a while, you know that we are big fans of the RapidFuse glue! It’s great for fixing things around the house and even works great for simple craft projects like this DIY footed tray, DIY wood wall art with wood shims, plant pot cover, poster frames, marble coasters, and Christmas tassel tree.
Watch the DIY key holder video:
If you love DIY videos, be sure to subscribe to our YouTube channel here!
Supplies for this DIY key holder project:
- DAP Rapid Fuse All Purpose Adhesive
- Wooden wall sign (preferably with an open back like mine had)
- Paint sticks
- Miter saw
- White paint – I used some leftover of a paint sample in this color
- Foam paint brush
- Scrap leather – here’s how we got our leather for free
- Rotary tool
- Cutting mat
- Acrylic ruler
- Cup hooks
- Wooden letters
Step 1: Paint back of sign.
Just like when you’re installing faux shiplap on a wall, you definitely want to paint the wall behind the shiplap with the same color that you’re painting the shiplap.
This is so that when the little cracks between the shiplap peek through, they are the same color and don’t stick out like a sore thumb.
So just slap on some paint with a foam paint brush to the back of the wood sign.


Step 2: Cut paint sticks down to size to create mini shiplap background.
For the mini shiplap background on this DIY key holder, we’re using paint sticks!
We used these paint sticks that we got from Home Depot. We needed about 7-8 paint sticks to cover our sign.
Simply cut them with the miter saw at varying lengths. I cut them one by one and laid them out inside of the sign so everything fit perfectly.
For the last piece, it needed to be cut down a tad to become more narrow. Logan did this for me with a utility knife – it was a little too small to run through the table saw safely.
Step 3: Paint the wood.
Once all of the small pieces of wood are cut, paint them with the same white paint and a foam brush. I did two coats of paint.
Be sure to keep the layout together as you paint them so you’re not wondering what piece goes where when it is time to put them on.


Step 4: Attach wood to sign.
Once the paint is dry, you can attach them to the sign. You don’t even have to get the nail gun out for this one! You just glue them right onto the back of the sign using DAP Rapid Fuse All Purpose Adhesive.
The best part about Rapid Fuse is that it sets and dries so quickly! You really just have to hold the piece of wood in place for about 30 seconds and then you’re good to go! Couldn’t be more simple!
I also used this same glue on this DIY wood wall art to attach wood shims to a sign. It works great there too!
I used a little strip of nails as a spacer, which was a little thinner than a nickel – which is what I usually use when I’m doing a faux shiplap wall.


Step 5: Wrap frame with leather.
I definitely wanted the frame to stand out a bit against the white shiplap….I thought about painting it and then remembered that I had a bunch of leather still leftover from that time we literally skinned a leather couch (which, by the way, is a great way to get free leather for stuff like this)!
DAP’s Rapid Fuse works great on the leather too. Just be sure not to squeeze out too much so it bleeds out the edges of the leather because it will change the color.
Using the rotary tool, cutting mat, and acrylic ruler, you can cut the leather down to size and then attach it to the frame with the Rapid Fuse. Remember to hold it in place for about 30 seconds until it sets.
I found it easiest to do one side of the frame at a time. I wrapped the sides and the front of the frame.

Step 6: Attach wooden letters.
I wanted to incorporate some sort of word onto the DIY key holder. I thought about painting it, but when I came across these cute wooden letters, I just had to have them!
I ended up with a super simple short word that is PERFECT for a key holder – “hi”.
Again, DAP’s Rapid Fuse worked perfectly to glue the letters in place onto the mini shiplap.

Step 7: Add key hooks.
These simple cup hooks are the perfect size to hold keys but aren’t too big and distracting. They were super easy to just push into place and screw into the front of the DIY key holder by hand.

Step 8: Hang the key holder on the wall.
Since the back of the DIY key holder is really the front of the original sign, it was flat. It hung up perfectly with a couple of these picture hanging strips.

Enjoy this farmhouse style DIY key holder!
FINALLY the keys are in one spot! Every time we go to leave the house, I don’t have to spend time looking around for the keys. It’s the little things, guys.

This little DIY key holder turned out so freakin’ cute. I can’t believe just how easy it was to make it using an old thrifted wooden sign that only cost $3!

The shiplap background is the perfect touch of farmhouse and it couldn’t have been easier to create it with paint sticks and DAP Rapid Fuse.

I just love our entry way shelf & hooks that we made following along on this great tutorial!

What would you create for your house using DAP’s Rapid Fuse?
Let us know in the comments below!

How to Build A DIY Key Holder
No more searching for keys all over the house. This DIY key holder turned out so cute! Can you believe it was made from a thrifted sign, paint sticks and recycled leather and NO nails?
Materials
Tools
- Miter saw
- Foam paint brush
- Rotary tool
- Cutting mat
- Acrylic ruler
Instructions
- Paint back of sign.
- Cut paint sticks down to size to create mini shiplap background.
- Paint wood paint sticks.
- Attach wood to sign with DAP Rapid Fuse.
- Wrap frame with leather.
- Attach wooden letters.
- Add hooks.


This is very cute and definitely farmhouse style. Nice creation!
Thanks Shirley. I love it turned out 🙂