Dad will love a DIY bottle opener for Father's Day! They are so simple and inexpensive to make using reclaimed wood!
I’ve been having a blast sharing some Father’s Day gift ideas with you. We made these super simple DIY spice rubs that are sure to be a hit with BBQin’ Dads! I also shared unique Father’s Day gifts under $50 from Etsy.
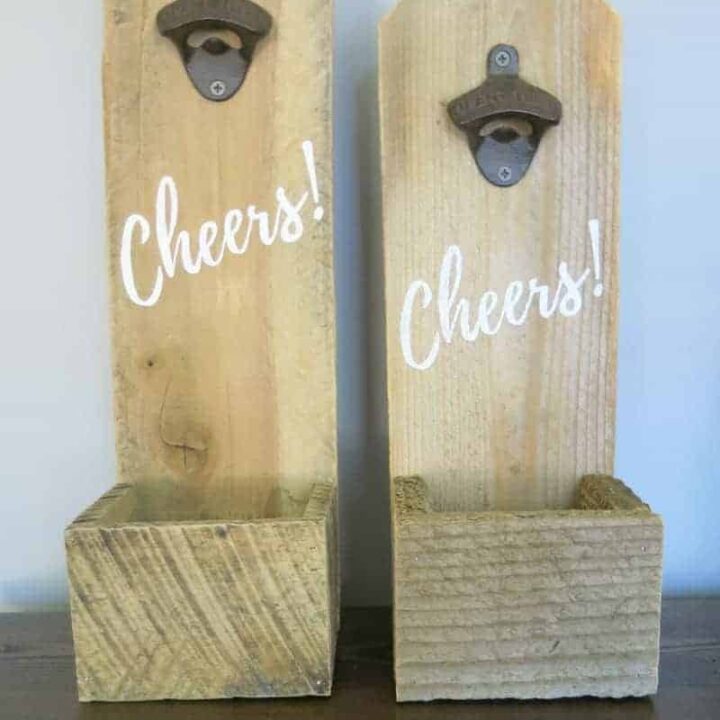
Today’s tutorial for this DIY bottle opener uses my favorite material – reclaimed wood! We made two versions of this wall-mounted DIY bottle opener.
One was made with pallet wood and the other was made with reclaimed cedar fence boards. Dads will love these rustic-looking wooden bottle openers for Father’s Day.
Table of Contents
Video Walkthrough
If you love DIY videos, be sure to subscribe to our YouTube channel!
This DIY bottle opener post contains affiliate links, but nothing that I wouldn’t wholeheartedly recommend anyway! Read my full disclosure here.

Supplies needed
- Reclaimed wood – pallet boards or old fence boards work great for this!
- Hand sander with 100 and/or 220 grit sandpaper
- Wood glue
- Nail gun and nails
- Silhouette Cameo
- Adhesive shelf liner / contact paper (to make the stencil)
- Acrylic craft paint
- Foam brush
- Bottle opener
- Drill
- UV resistant clear coat sealer
Step 1. Sand wood.

Since we are using reclaimed pallet wood, it does need light sanding. I usually just leave it at that though.
I love the old character of the wood to shine through, so I typically sand it using a hand sander with either 100- or 220-grit sandpaper until it’s smooth.
Step 2. Cut wood.

You will need 5 pieces of cut reclaimed wood, but we’re only going to cut the first 4 right now. Here’s your cut list:
- 1 piece 15”-16” long (for the back of the bottle opener)
- 2 pieces 3 3.4” long (for the sides of the cap catcher box)
- 1 piece as long as your back piece is wide, which will vary slightly depending on your reclaimed wood (for the front of the cap catcher box). Mine was about 5 inches.
Step 3. Build a cap catcher box.

Add a little wood glue to the ends of the side pieces and then lay the front piece of the box on top. Adjust it by hand until it is square.
Next, using your nail gun secure with a few nails on each side.
You could also use pocket holes here if you have a pocket hole jig!
Step 4. Attach cap catcher box.

Again, grab that wood glue and add a thin line on the edges of the sides on the back of the box. Lay it on the bottom of the box and adjust it by hand until everything is square.
Flip the bottle opener over and add nails on the sides.
Step 5. Add bottom to cap catcher box.

Remember in Step 2 when I said we were only cutting 4 of the 5 pieces needed? This is the last piece of wood you need to cut.
We found that it is easier to measure this after the cap catcher box is already built and attached.
Measure the opening on the bottom of the box and cut a small piece to fit.
Add a thin line of wood glue around the edges and slide it into the opening. Secure the bottom by nailing it around the sides.
Step 6. Cut stencil.

You could technically leave it as is without painting anything. The character of the reclaimed pallet wood shines through and it already looks awesome.
But I really wanted to make it look a little more unique and festive. I chose to stencil on “Cheers!”.
I cut the stencil out using my handy Silhouette Cameo and adhesive shelf liner / contact paper. This is a great material to make one-time-use stencils and it’s so affordable!
Here are the “Kiss cut” settings for Cameo with contact paper:
- Font – Playlist Script
- Material – New Material
- Action – Cut
- Tool – AutoBlade
- Cut Edge
- Blade Height (dial): 1
- Force: 8
- Passes: 1
- Speed: 8
- Note: I have a Cameo 3 machine.
- Note: Always do a test first when trying new settings or materials, they may need to be adjusted.
Step 7. Seal stencil.

Now we’re almost ready to paint the design, but first I’ve got an amazing tip for you guys!!! I have a new way to prevent stencils from bleeding.
During my last Hometalk LIVE video when I was making this wood sign, someone in the audience shared this tip with me and I don’t think my life will ever be the same!
Once you peel the backing off of your stencil and attach it to the wood, you add a bit of Mod Podge….yes, I said MOD PODGE.
I just put a little dab of it on my finger and rub around the front of the stencil, making sure I get all of the edges. By doing this, you create a seal on the lines of the stencil.
Let Mod Podge dry before painting. You can read more about this awesome Mod Podge sign making hack!
Step 8. Paint design.

I used a foam brush and white acrylic paint. Even though we have the stencil sealed, you still wanted to do light coats of paint on the stencil to avoid bleeding.

Seriously guys!!! Look at those fresh lines with NO BLEEDS.
Step 9. Attach bottle opener.

This bottle opener doesn’t come with screws and that’s ok. For the purpose of gift giving, you’ll probably want to choose a screw that is about just long to attach the bottle opener to the wood.
However, we recommend that when you mount the bottle opener on the wall, replace the screws with 1 5/8” long and place it in a stud.
This is the best way to secure the bottle opener to the wall. It will be MUCH more secure than adding a sawtooth comb to the back of the bottle opener as others say.
Step 10. Seal.

I finish most of my wood projects using this UV Resistant Clear Acrylic Coating. It’s an easy way to seal the DIY bottle opener for future use.


Let’s get a round of applause from mancaves everywhere! A rustic-looking salvaged wood bottle opener that will fit right in with the manly decor.


So, guys…cheers! Cheers to Dads!
Related Posts – Other Projects Using Reclaimed Wood:

How to Make A DIY Bottle Opener
Dad will love a DIY bottle opener for Father’s Day! They are so simple and inexpensive to make using reclaimed wood!
Materials
- Reclaimed wood
- Wood glue
- Nail gun and nails
- Adhesive shelf liner / contact paper
- Acrylic craft paint
- Bottle opener
- UV resistant clear coat sealer
Instructions
- Sand wood.
- Cut wood.
- Build cap catcher box.
- Attach cap catcher box.
- Add bottom to cap catcher box.
- Cut stencil.
- Seal stencil.
- Paint design.
- Attach bottle opener.


Love it!! Great idea Chelsea!!
Thanks friend !
I absolutely love your summer printable. I can’t wait to receive it in my inbox. Thanks for this free gift.
What is the best way to mount the opener to the wall??
Couple of drilled holes? Key slot?
I don’t want to use sawtooth hooks because I feel they will bend with tourqe of opening the bottles.
A key slot could work or simply screw through the bottle opener into a stud in the wall.