Earlier this week I spilled the beans and told you how to find FREE leather for crafting.…hint – it may involve destroying some furniture.
I also shared 14 amazing ideas for things to make out of leather that left you just itching for some free leather of your own so you can give them a try. There are so many fun ways to incorporate leather decor into your home!
I’ve got tons of leather crafts on my way to you in the coming months, and today is the first fun DIY project with my new leather hoard.
(UPDATE: See how I’ve used the leather in this braided leather keychain, this fun and super easy leather bookmark, and modern leather ornaments with a Christmas tree design + the 2nd design of leather Christmas ornaments this circles. I even wrapped leather around the frame for this DIY key holder.)
I wanted to create something with the rustic look of pallet wood….because you know how I feel about pallets. But, I also wanted to incorporate the leather look and tie it all together with a fall theme.
I think leather is the PERFECT addition to your DIY fall and Thanksgiving decor projects, so you can expect to see more fall leather projects coming soon! (UPDATE: Check out how I incorporated leather into this rustic fall tablescape!)
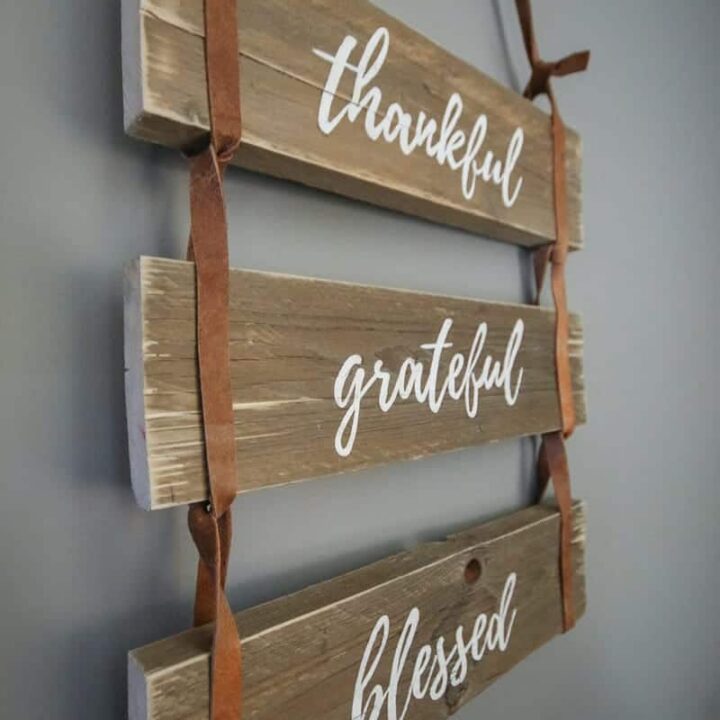
I’ve always loved the saying “thankful, grateful, blessed”….it sums up how I feel every day. All of the emotions together in one simple saying. I love this leather sign has a simple nod to Fall & Thanksgiving but is versatile enough to use in your home decor all year round.
Related: Check out these other Fall posts too!
- Living Room Shelf Ideas With Pumpkin Decorations For Fall
- Easy Boho Fall Decor with Sharpie Pumpkin Designs: Mud Cloth Patterns
- Decorating For Fall on a Budget
- White Pumpkin Decor (made from cheap foam pumpkins)
- DIY Fall Pumpkin Crafts
- Budget Friendly Fall Table Decorations To Create Rustic Fall Tablescape
- Fall Farmhouse Finds from T.J.Maxx
- 25 Free Fall Printables
- 17 Fall Decorating Ideas For Outside
- Leather Sign: Thankful Grateful Blessed Pallet Wood Sign
- Fall Pregnancy Announcement
- Toddler Halloween Costume Ideas
- Cheap Halloween Porch Decorations with Recycled Materials
This leather sign tutorial contains affiliate links, but nothing that I wouldn’t wholeheartedly recommend anyway! Read my full disclosure here.
“Thankful, Grateful, Blessed” Leather Sign Tutorial
Supplies Needed for DIY “thankful, grateful, blessed” leather sign:
- 3 pallet wood pieces about 13 inches long
- 220 grit sandpaper
- White acrylic craft paint
- Foam paint brush
- Matte Mod Podge for my sign-making hack
- Adhesive shelf liner / contact paper
- Silhouette Cameo
- Scissors
- 3-in-1 glue
- Leather strips (I used strips about 1/2 wide) – or learn how to get free leather here!
- If you need to make your own leather straps for crafts – you can cut your own…you’ll also need a clear acrylic ruler, rotary cutter and cutting mat
- Finishing wax or Aerosol sealer

Step 1. Lightly sand pallet wood.
Every time I work with pallet wood, I always give it at least a light sanding with 220 grit sand paper.
Sometimes I will sand it down more if the wood is going to be used for furniture (like the time I repurposed chairs into a bench or made this pallet wood side table).
Since this wood is going to be used in a farmhouse sign, I just wanted to get the rough edges sanded and remove any loose pieces of wood that would cause splinters.
I didn’t want to over-sand the pallet wood and get rid of all that awesome color that comes with the age.

Step 2. Cut out stencils on Cameo.
The Silhouette Cameo is my godsend when it comes to sign making projects like this. I love that I can design stencils in whatever font or size that I want.
I definitely think the investment was worth it because I use it all of the time. I used adhesive shelf liner from the Dollar Tree to cut out my stencils with the words “thankful, grateful, blessed”.
Leather Sign Stencil Cameo Settings:
- Font: Playlist Script
- Font Size: 150
- Cut Settings: Vinyl (no other adjustments made to the Cameo settings)

Step 3. Paint words on pallet wood.
For the full tutorial on how to paint stencils WITHOUT bleeding under your stencil to get these nice crisp lines, you want to hop over to this post. This sign-making hack has definitely changed the way that I DIY wood signs.
I also used this little sign-making hack on this DIY bottle opener, this fun DIY bathtub tray, this believe Christmas decor, this DIY farm sign, and farmhouse centerpiece!

After the paint is dry to the touch, you can gently remove the stencils. Seriously, will you just LOOK at those crisp lines on the stencils?
Step 4. Seal painted wood sign.
I rubbed on this finishing paste wax to seal the sign. Alternatively, I also love this spray sealer. It’s so easy to apply and works great too. I usually do 2 coats of this. I use either of these two ways of sealing wood signs every time.

Step 5. Cut leather strips.
Unless you purchased leather already in strips like this, you’ll want to cut your leather down to size.
Using a rotary cutter on a cutting mat and holding a clear acrylic ruler in place makes it easy to cut your leather quickly and straight!

Step 6. Tie leather on pallet boards.
This part was a little more confusing, and I played around with a few different ways before settling on this.
Start by laying your boards out in a vertical row (my order was Thankful, Grateful, and then Blessed…but you can do this any way you’d like).
Starting at one of the corners on the bottom board, lay the leather under the board at the bottom edge, wrap around to the top, and gently tie a knot under the next board up.
The middle wood plank will rest on top of this knot. Continue making your way up the boards adding a knot underneath the top board as well for it to rest upon.

Eventually, you will need to make your leather strips longer. To do this, I just added a dot of 3-in-1 glue to the leather and held two pieces together…overlapping about half an inch.
Hold the glue tightly for about 30 seconds so it sets, and then don’t put any heavyweight (like hanging the sign up) for about 24 hours. If you’re still having trouble having it hold, go back and sew some thread through the leather where it connects.
Once you get to the top, stop and go to the other side of the wood planks and start from the opposite wood corner.
Continue making your way up in the same manner that you did on the other side. Try to get the boards relatively straight but remember that you can adjust the knots later to get these perfect.
Add excess leather at the top for a hanger and connect the leather together.
Step 7. Secure leather straps to pallet sign.
Once you get the leather just right and the boards are level, you’ll want to secure the leather straps to the pallet wood to prevent the wood from not laying right or shifting around.
I just added a small dot of 3-in-1 glue between the leather and the wood. I added glue to each board on the front and back sides.
Hold the glued leather to the pallet wood for about 30 seconds until it sets. Then your leather sign should be ready to go!


I’m mildly obsessed with how the pallet wood & leather sign turned out. I love how it totally fits in with fall decor and the boho farmhouse style that is totally me.

The words “thankful, grateful, blessed” are a daily reminder to me of how incredibly blessed I am.

Leather is the perfect material to add to your fall decor this year.


Let’s celebrate the reasons we are blessed. What are you most thankful, grateful, and blessed for in your life?
Let me know in the comments below!!
How to Make a Leather Sign with Pallet Wood
This DIY "thankful, grateful, blessed" sign is perfect for anyone who loves rustic, upcycled wood decor. Remind yourself of your blessings every day with this simple DIY using pallet wood and leather straps.
Materials
- 3 pallet wood pieces about 13 inches long
- White acrylic craft paint
- Adhesive shelf liner / contact paper
- 3-in-1 glue
- Leather strips
- Finishing wax
- Aerosol sealer
Instructions
- Lightly sand wood pallet.
- Cut out stencils on cameo.
- Paint words on pallet wood.
- Seal painted wood sign.
- Cut leather strips.
- Tie leather on pallet boards.
- Secure leather straps on pallet sign.


Love these. You are my favorite pick for Waste Not Wednesday this week!
Awesome, thank you so much Deborah!
When using a vinyl stencil what is the trick for getting the center of a letter like O or D etc to stay with your stencil and stick on your wood without having to hand brush those letters?
I use a Cricut I’m not sure how different it is from the cameo but do you literally just place each letter center on the wood individually or is there some trick?
Yep, i just stick the centers on my hand. You can also use transfer tape to put the whole stencil on all together. You can just Google how to use transfer tape to see how it works, I don’t have a tutorial for it.