DIY Arrow Nursery Decor For Baby Boy Rustic Woodland Nursery

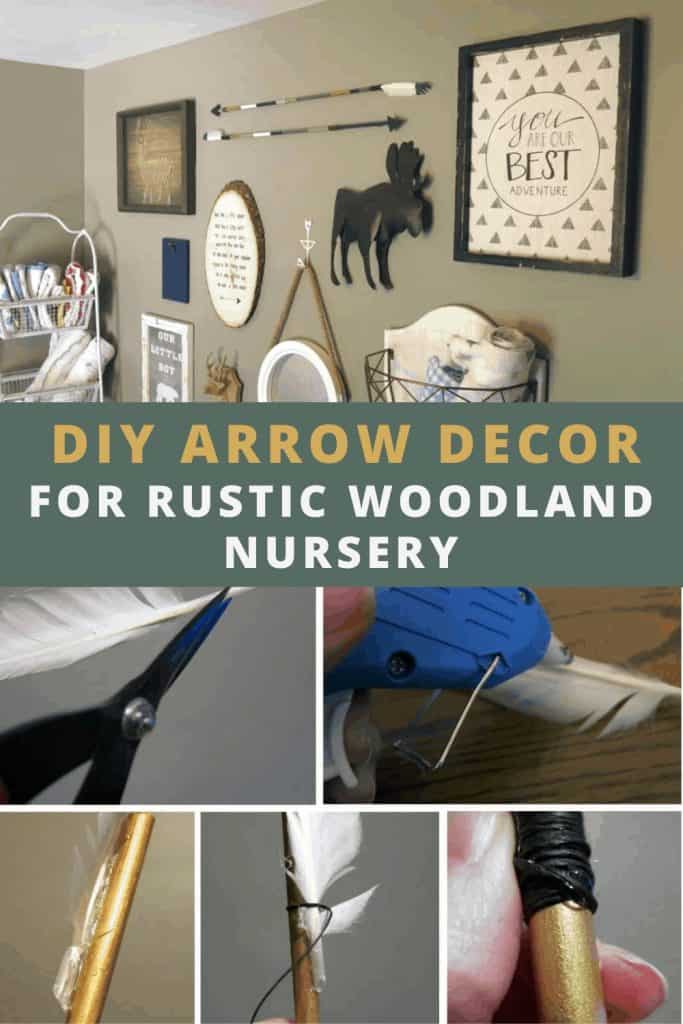
This DIY arrow nursery decor is the perfect simple project for your baby boy rustic woodland nursery. It fits in awesome in a gallery wall for adventure themed nurseries.
Arrows seem to be so trendy right now. They are everywhere. Are you a fan? I definitely am. Maybe we owe thanks to Katniss!
This DIY arrow nursery decor is the perfect fit for a rustic woodland nursery like we were creating. I knew I wanted to incorporate some kind of arrow in Cal’s nursery.
I thought about putting a wood sign with an arrow painted on it. But then I fell in love with the arrows in this adventure-themed nursery and decided to make some for myself. It was such a simple and easy craft.
This arrow nursery decor tutorial contains affiliate links, but nothing that I wouldn’t wholeheartedly recommend anyway! Read my full disclosure here.
I promise to start sharing some bits and pieces of Cal’s nursery, which is still not completely done (UPDATE: here’s the room reveal).
When you are pregnant and in the nesting phase, you want every little thing in the nursery done before the baby arrives. Every little piece of clothing was washed and folded just right. Everything hung on the walls just like you imagined.
Then reality sets in. You’re tired and exhausted from literally building a human. Everything hurts. You’re barely sleeping.
You are working extra hours at work trying to prepare for your maternity leave. You’re cleaning the house because let’s face it, who knows the next time when the oven will be cleaned. If you are anything like us, you are in the middle of trying to finish the major projects of a home renovation.
Those last-minute touches to the nursery get pushed aside. And then your little one arrives and EVERYTHING gets pushed aside.
Cal is three months old now and we’re just finishing things up in our baby boy rustic woodland nursery. A full room reveal is coming soon! (UPDATE: here’s the room reveal).
How to make your own DIY arrow nursery decor!
Supplies for Arrow Nursery Decor:
- Wooden dowel
- Acrylic paint
- Twine/thread
- Leather scraps – you only need a little for a small triangle at the tip. Alternatively you could use black cardstock paper.
- Feather
- Glue – I highly recommend the 3-in-1 glue! I was out of it at the time of making this, so I used my hot glue gun instead and it worked just fine too!
- Painter’s tape
- Paint brush
Step 1: Paint dowel with color blocks
Use painter’s tape to mark off certain color blocks and then apply acrylic paint with a small paintbrush
Once that color block was done drying, remove the tape and continued until the whole dowel is filled with the colors.
I left open areas where I wanted to put twine/thread. If you didn’t want to paint your dowel, you could also attach some fabric scraps (using mod podge) or decorate with washi tape.
Step 2: String on your twine/thread

used different textures and colors of twine and thread in different areas of the dowel in random increments and lengths.
To attach, tie the twine around the dowel with a knot. Holding the knot in place with your finger, then start wrapping very tightly.
When finished with that section, tie another knot, cut the thread, and secured it with a dot of glue.
Step 3: Attach your feather to the end of arrow

First I painted the tip of my feather with navy paint, but this part is totally optional!
Once that has dried, cut the base of the feather shorter so there is only about an inch below where the vanes end (and yes I had to look up what that part of the feather was called).
Use lots of hot glue on the shaft of the feather and attach that directly to the end of the dowel. You want about half of the length of the feather to hang off the back edge of the dowel.
Be sure to attach the feather to the dowel very quickly after putting on the hot glue. I learned the hard way and my glue was already cooled down a bit and didn’t stick the first time or two.
If you are using 3-in-1 glue, just be sure to hold it for about 30 seconds until the glue sets and you should be fine.
Once that is dried, you can add twine to the base of the feather to cover it up and make it more secure.
Step 4: Add leather to the other end of arrow
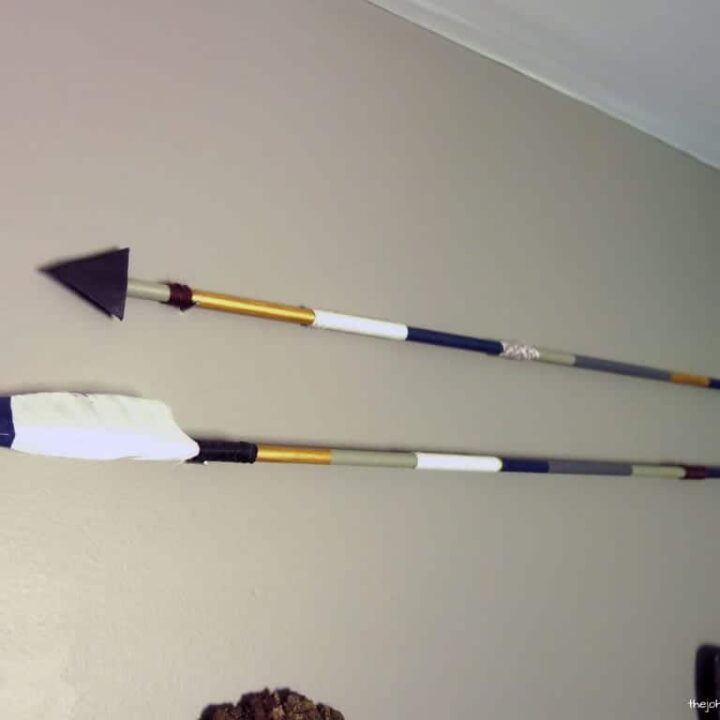
For the tip of the arrow, I opted for a black leather triangle.

Step 5: Hang arrow nursery decor on wall
I just set arrow nursery decor up so it was resting on top of a couple of nails, but if you wanted to hang them the other way (vertical instead of horizontal), you could always use some sort of sticky foam tape between the wall and the arrow.

I just love the way the DIY arrow nursery decor turned out and how well it fits in with our gallery wall in our baby boy rustic woodland nursery.

I’d love to see what you come up with and how you incorporate the arrow nursery decor in your space.
Check out the full woodland nursery reveal here!
How To Make Arrow Nursery Decor
This DIY arrow nusery decor is the perfect simple project for your baby boy rustic woodland nursery. It fits in awesome in a gallery wall for adventure themed nurseries.
Materials
- Wooden dowel
- Acrylic paint
- Twine/thread
- Leather scraps
- Feather
- Glue
- Painters tape
Tools
- Paint brush
Instructions
- Paint dowel with color blocks.
- Wrap on your twine/thread around wooden dowel.
- Attach your feather to the end to the end of the dowel.
- Add leather to the other end of the arrow.
- Hang arrow nursery decor on wall.

