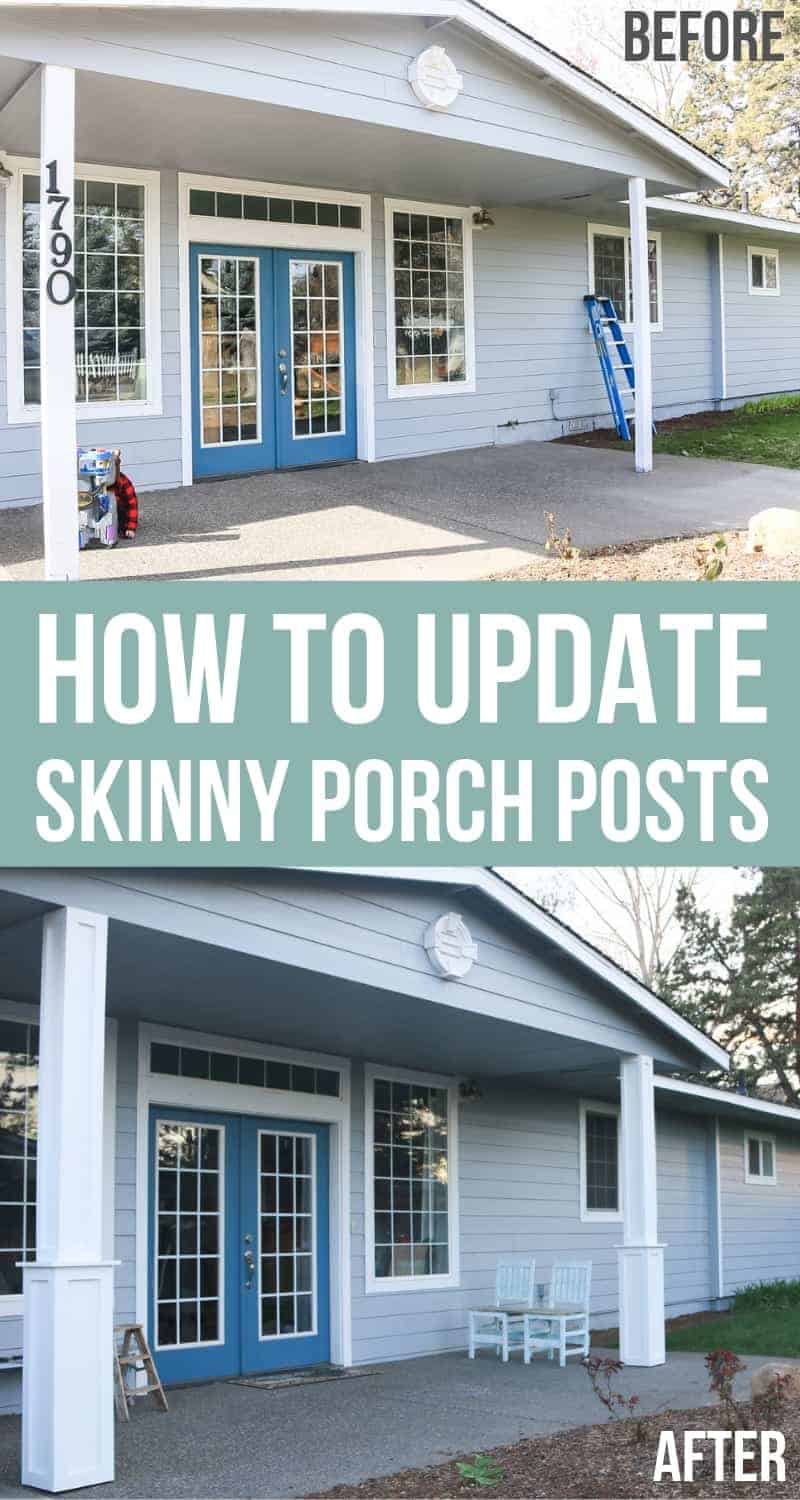
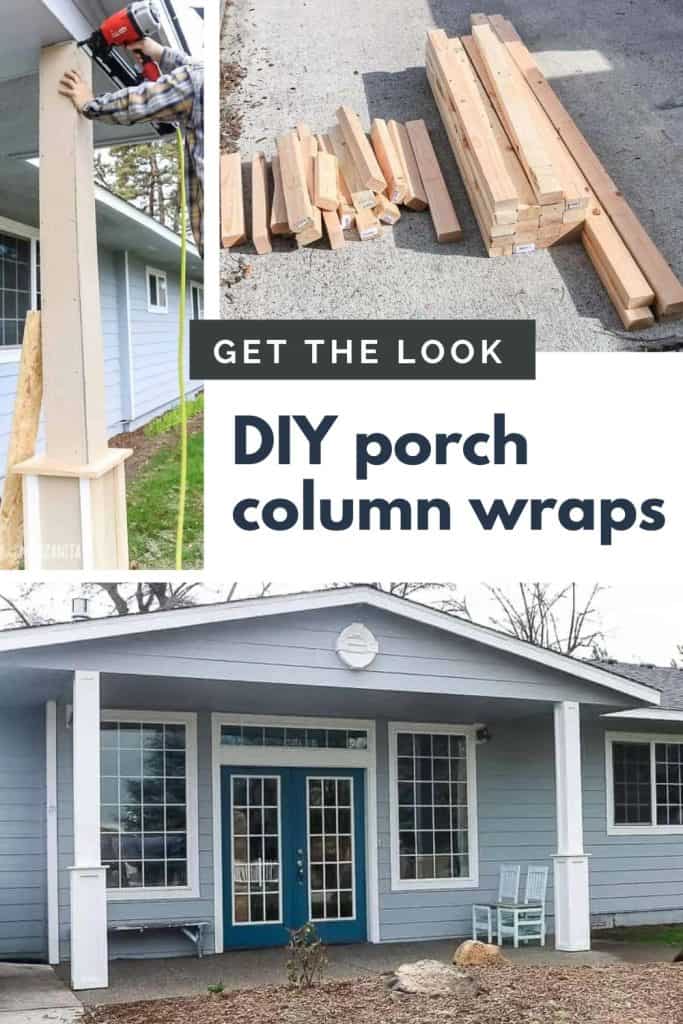
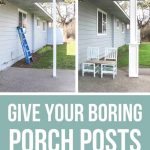
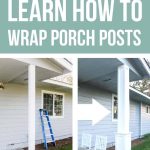
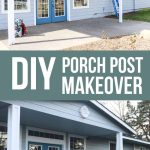
How To Update Your Skinny Porch Posts For Added Curb Appeal

Looking to add curb appeal to your house? Give your skinny porch posts a makeover! This tutorial will show you how to beef up your boring porch posts and add column covers for some major curb appeal!
Thank you to DAP for sponsoring this DIY porch columns tutorial! All opinions are entirely my own. This post also contains affiliate links, but nothing that I wouldn’t recommend wholeheartedly. Read my full disclosure here.
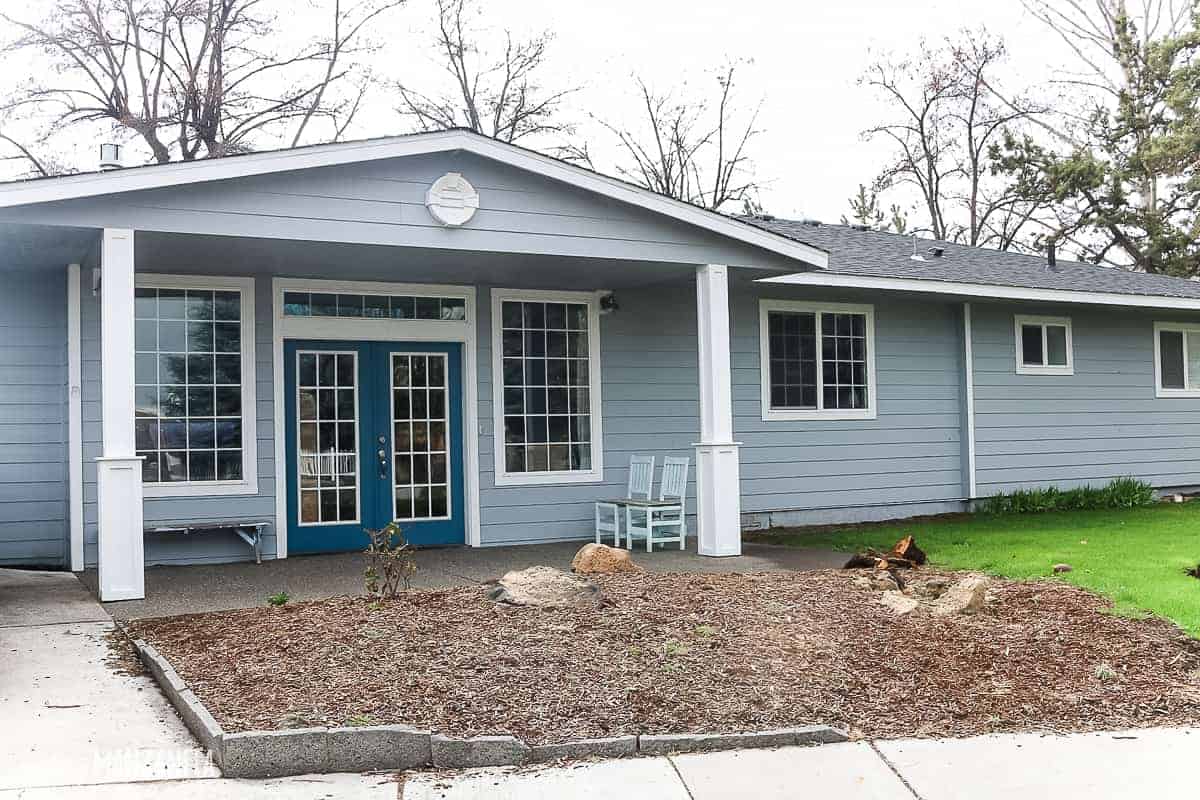
When we moved into our fixer upper last year, I knew the front porch needed some love. We’ve been mostly focused on interior projects so far (like building out our daughter’s nursery & adding this modern farmhouse bathroom), but the time has come!
Last year we did have a little bit of time in the fall before the weather got too bad for a super quick project out here and we added some gable decorations for a little added curb appeal, but it still has a long way to go.
Table of Contents
- Before Photos
- Protecting Your Porch Posts From The Elements
- How To Build Porch Post Column Covers: Step-by-Step Tutorial
- Supplies for porch posts column covers
- Step 1: Cut 2×3’s.
- Step 2: Apply wood preservative to the bottom of 2×3’s.
- Step 3: Square up porch posts.
- Step 4: Beef up the bottom portion of your front porch columns.
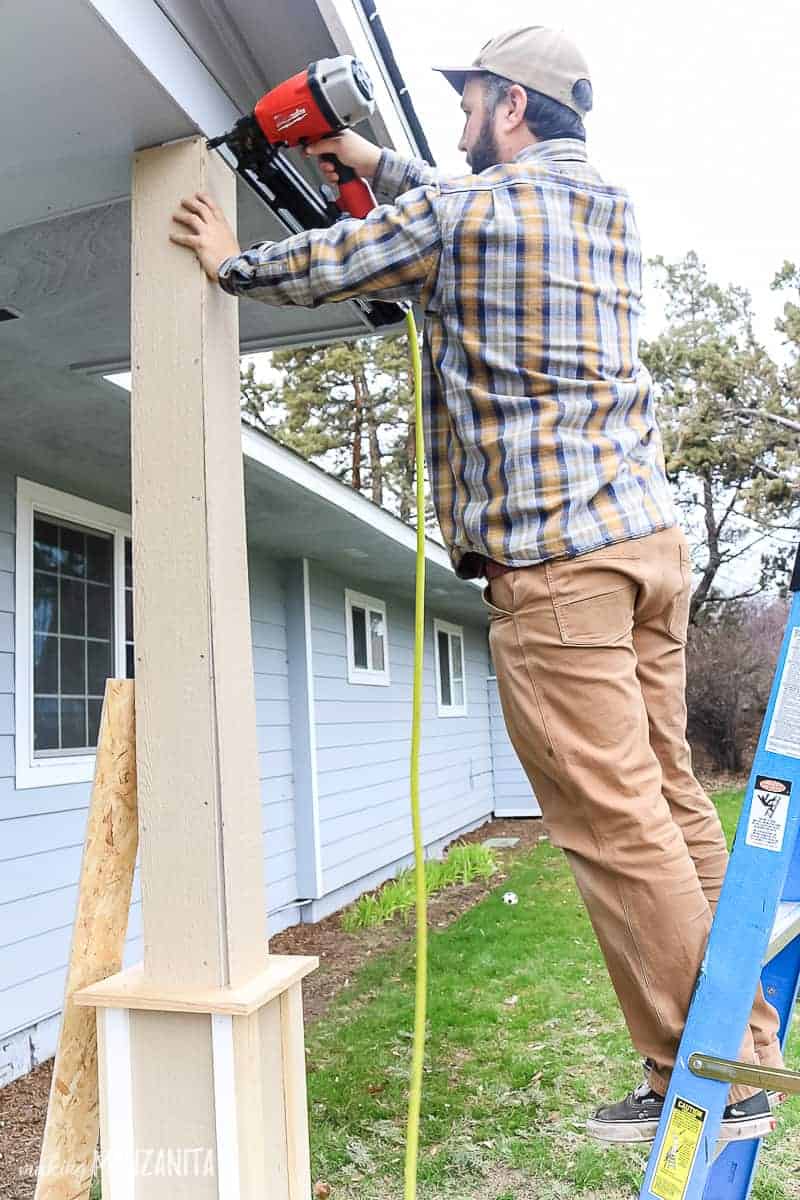
- Step 5: Add siding to each side of the porch posts on the bottom portion.
- Step 6: Add trim to all corners, top, and bottom of the porch pillars.
- Step 7: Add top platform.
- Step 8: Repeat column wrap steps on the top portion of the porch posts.
- Step 9: Seal all joints and nail holes.
- Step 10: Prime any surfaces that aren’t already primed.
- Step 11: Paint porch posts with exterior paint.

Before Photos
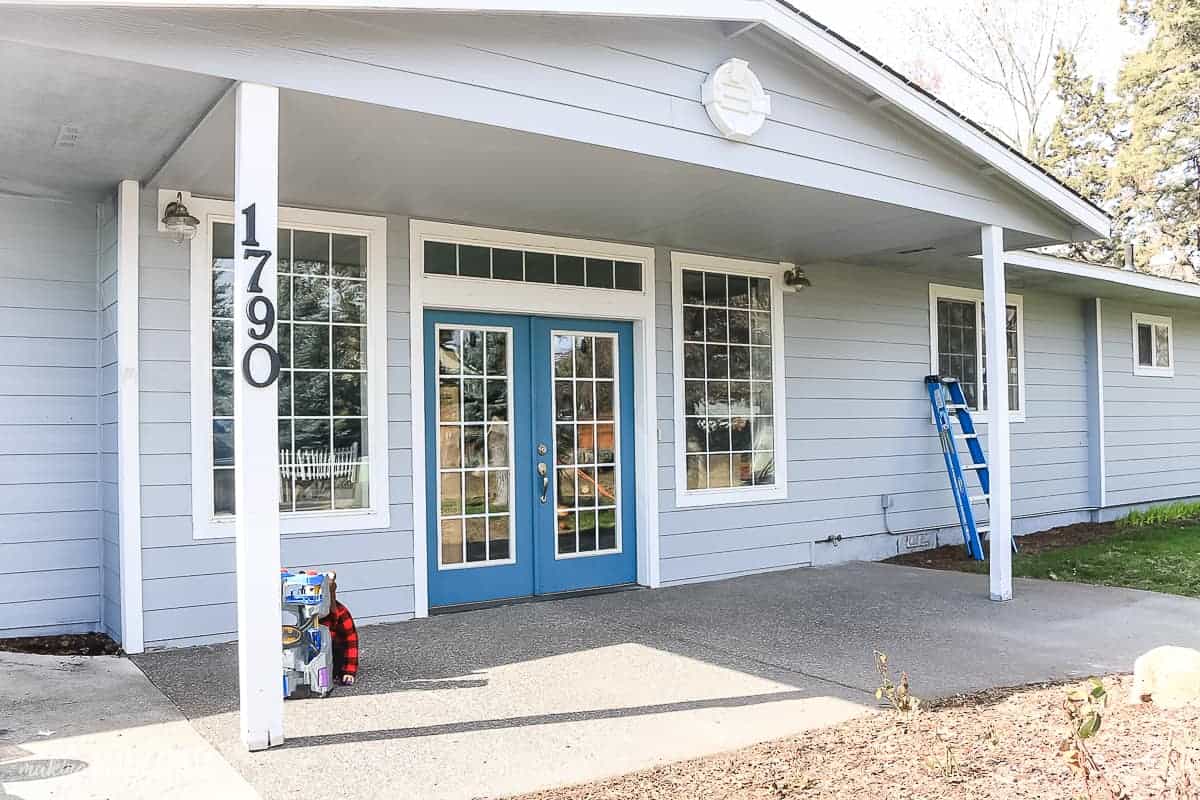
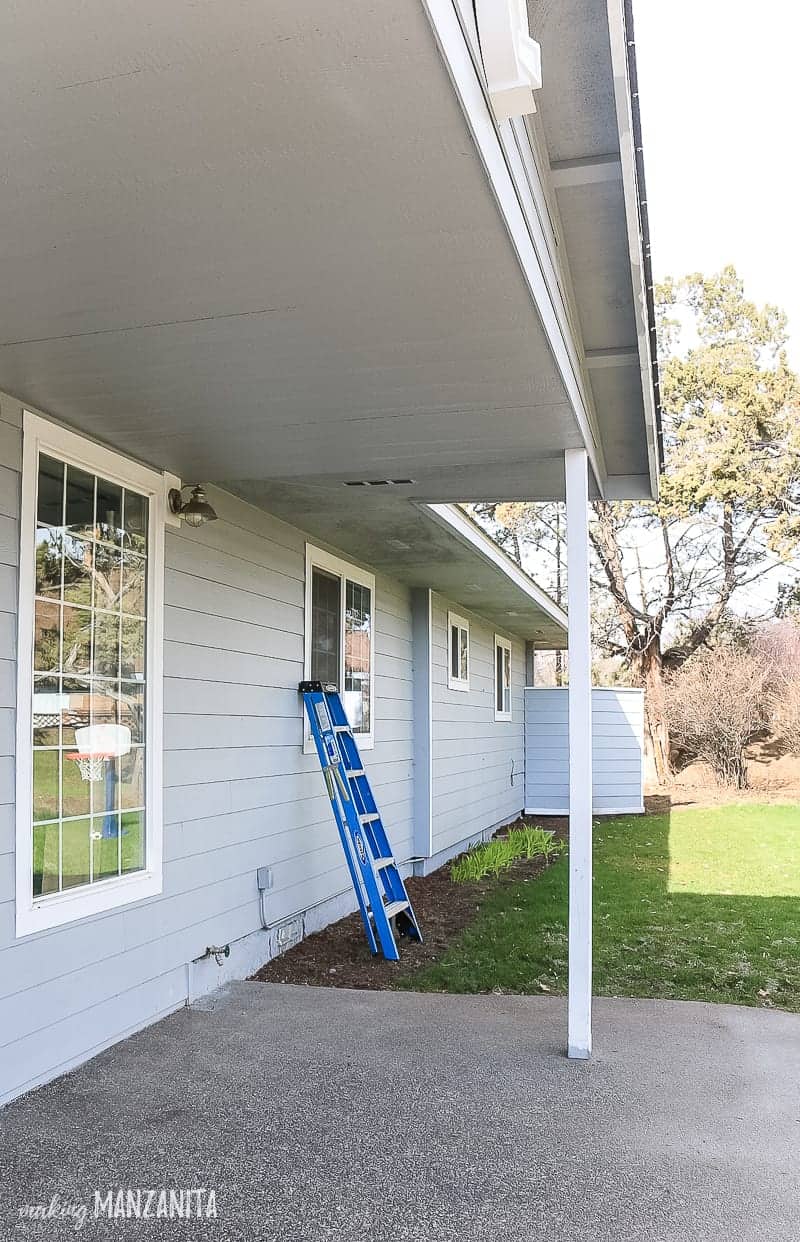
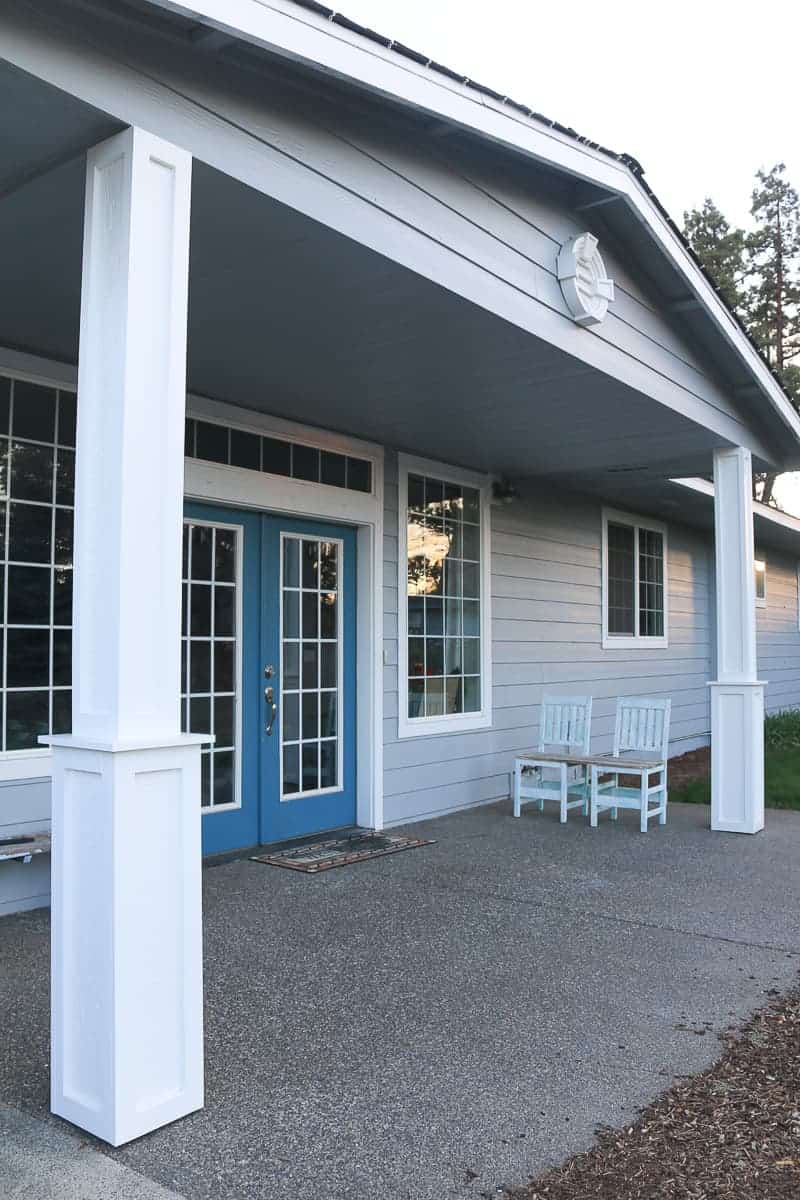
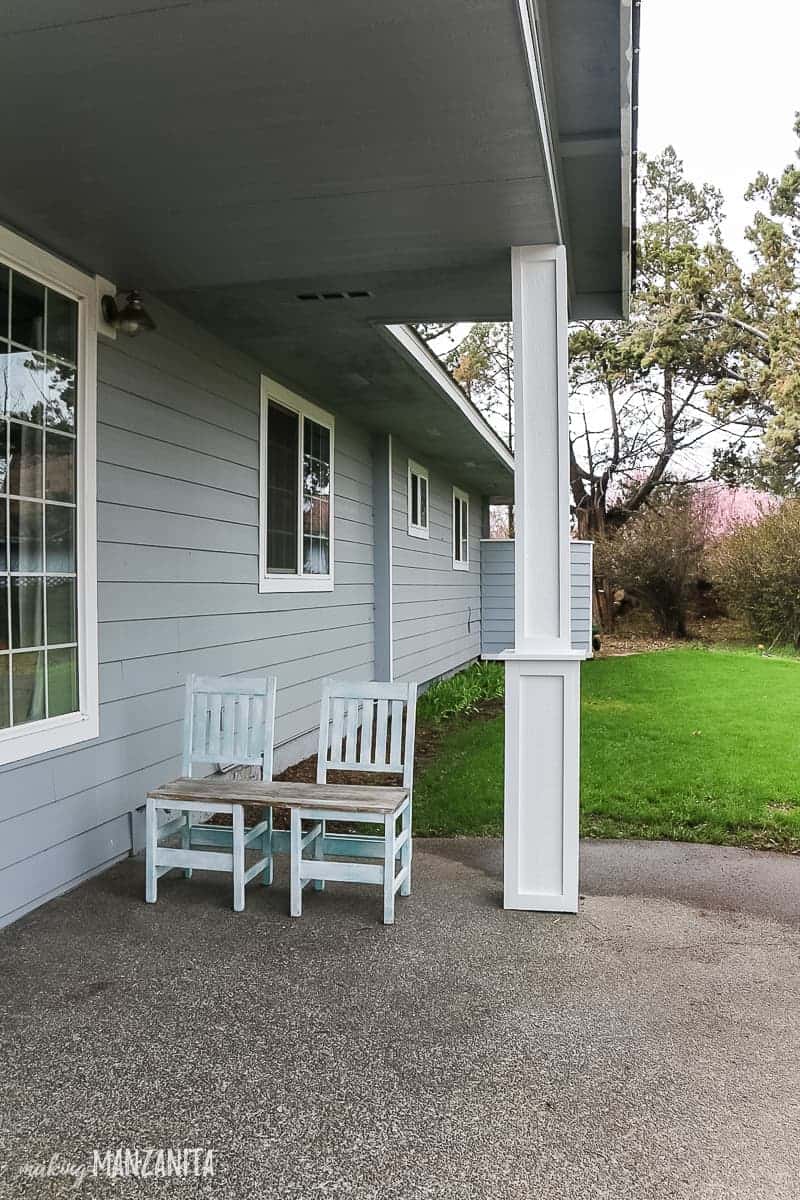
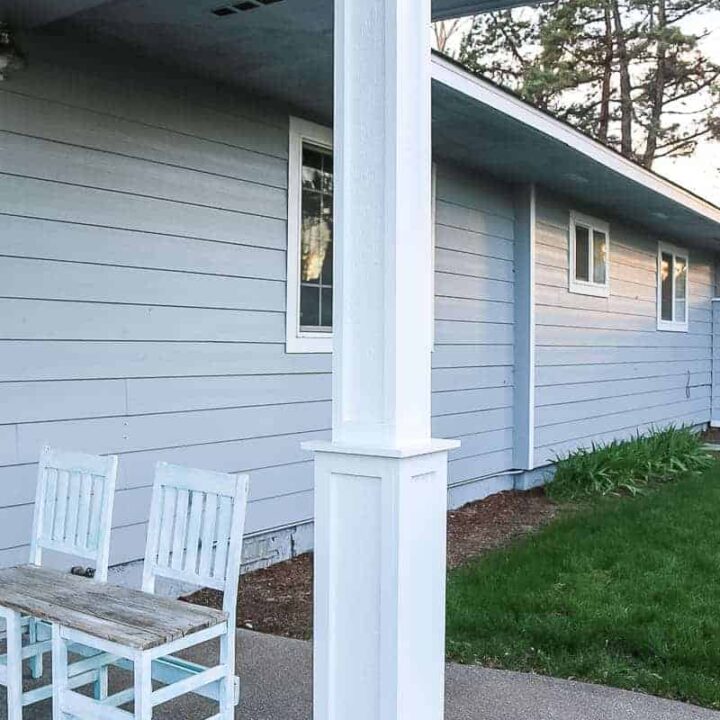
One thing that really stuck out to me on our front porch area was how boring and skinny the porch posts were. They also weren’t square, which was always a little pet peeve of mine. In one weekend, we gave them a big makeover and things are looking MUCH better out here!
This DIY project was pretty quick and easy. Granted, we did have to run to the store a few times mid-project for various reasons (changing our mind about the size of the trim, messing up a couple of angles on the cuts, ya know)… But, what kind of weekend DIY project doesn’t have you running back and forth to Home Depot, am I right or am I right?
Related – Other Outdoor Projects You’ve Gotta Check Out:
- Colorful Upcycled Chair Bench For Your Backyard
- 5 Ways to Enhance Your Exterior Home Design
- How To Install Gable Decorations
- Outdoor Decor from Etsy To Decorate Your Yard For Summer
- Simple Front Yard Landscaping and Curb Appeal Ideas
- Ways To Boost Your Curb Appeal This Summer (Welcome To The Woods Blog)
Protecting Your Porch Posts From The Elements
Before we jump right into the porch posts tutorial, I want to answer a couple of questions upfront…these were my first questions when Logan and I started talking about giving our front porch posts a makeover, so I am thinking that you just may be thinking the same thing as me!
What kind of wood should you use for exterior projects?
- For any exterior DIY project using wood that comes in contact with the ground, you need to use pressure-treated lumber.
- For other exterior DIY projects, be sure that the wood is not sitting on the ground and that everything has been sealed properly on all sides. For painted projects, this means primer and exterior paint. For stained wood projects, you’ll need to use stain and heavy-duty sealer that is made for exteriors.
How do you protect wood porch posts from the weather?
We did several things during this makeover to project these DIY wood porch posts from the weather:
- Keep all added wood off of the concrete porch ground at least 1/4″.
- Spray on wood preservative to the bottom of the 2x3s, which serve as the interior framing to the post (or you could use pressure-treated wood).
- Use pre-primed wood as much as possible. For any end cuts, add primer as well before installing.
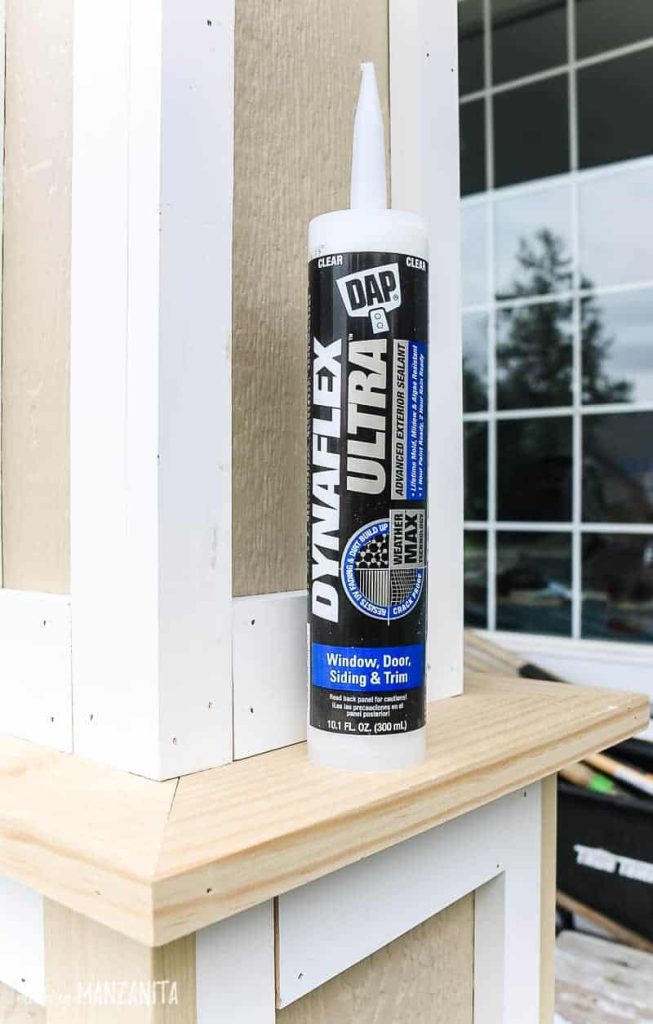
- Seal all joints, seams, and nail holes with DAP’s Dynaflex Ultra. It is a durable, 100% waterproof seal that stands up to the elements.
- Use a high-quality exterior paint applied to every visible surface of the porch posts.
How To Build Porch Post Column Covers: Step-by-Step Tutorial
Supplies for porch posts column covers
- DAP Dynaflex Ultra Exterior Sealant – Buy it here
- 2×3’s
- Drill
- Galvanized wood screws
- Sheet siding
- Galvanized nails
- Primed trim
- Caulk gun
- Miter saw
- Table saw
- Brad nailer
- Framing nailer
- Wood preservative
- Primer
- Exterior paint
- 4 inch paint roller
- Paint brush
- Tape measure
Step 1: Cut 2×3’s.
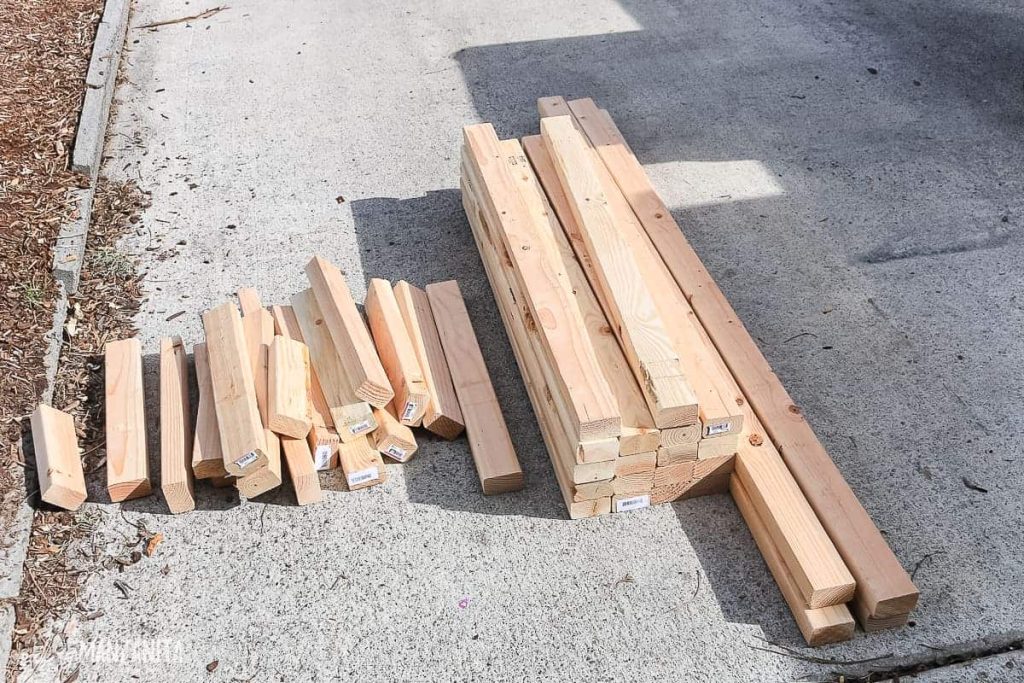
We precut all the 2×3 pieces before we got started, which made things go pretty quickly.
Step 2: Apply wood preservative to the bottom of 2×3’s.
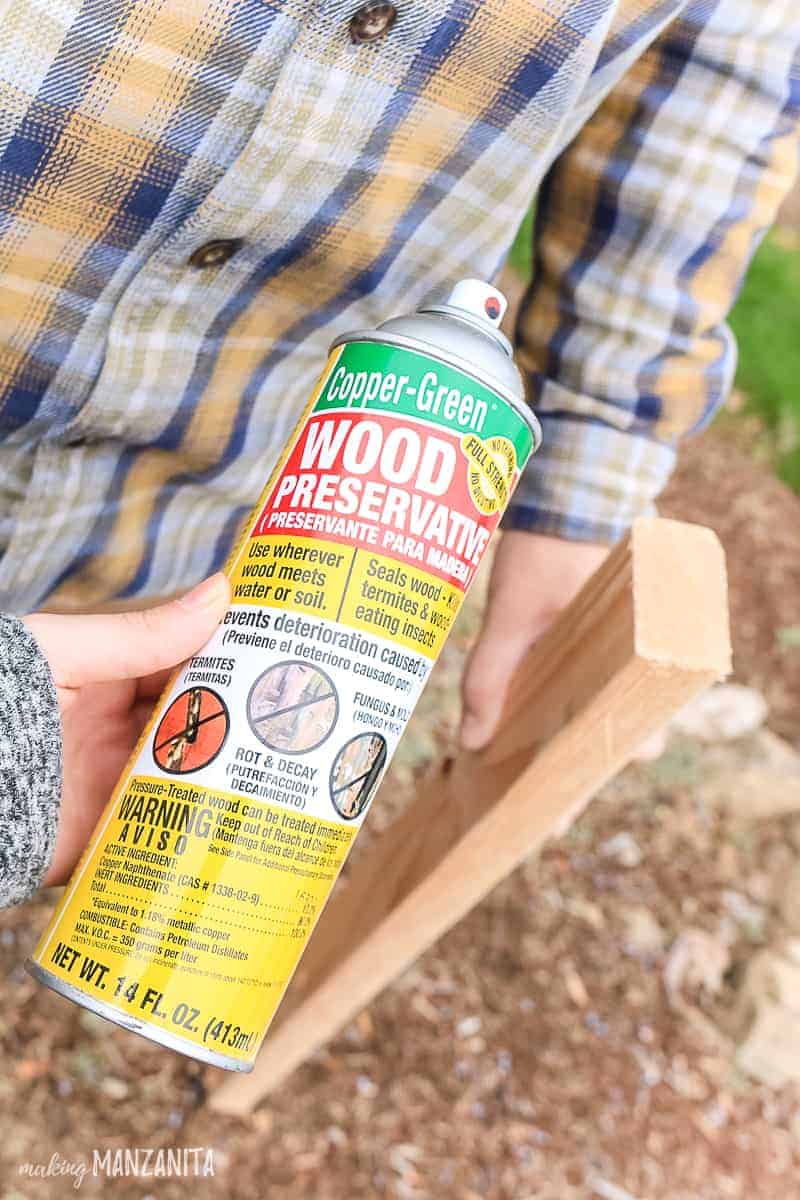
If you are using pressure-treated 2x3s for the interior framing of the porch posts, you don’t need to do this.
But we weren’t – so we applied some spray wood preservative to the bottom of the wood that MAY come in contact with moisture.
Warning, this stuff is pretty strong smelling so wear a mask and be prepared to let it sit for a bit before working with it. It is great though because it essentially pressure treats the portion of the wood that you spray it on. We definitely keep this stuff locked away in our locking storage cabinets in the garage to protect the kiddos.
As I explained in the video & above, all of the wood we added to the porch posts is lifted at least 1/4″ off of the ground, so it does not come in contact with the ground. If these porch posts were going to be making contact with the ground, the wood would definitely need to be pressure-treated.
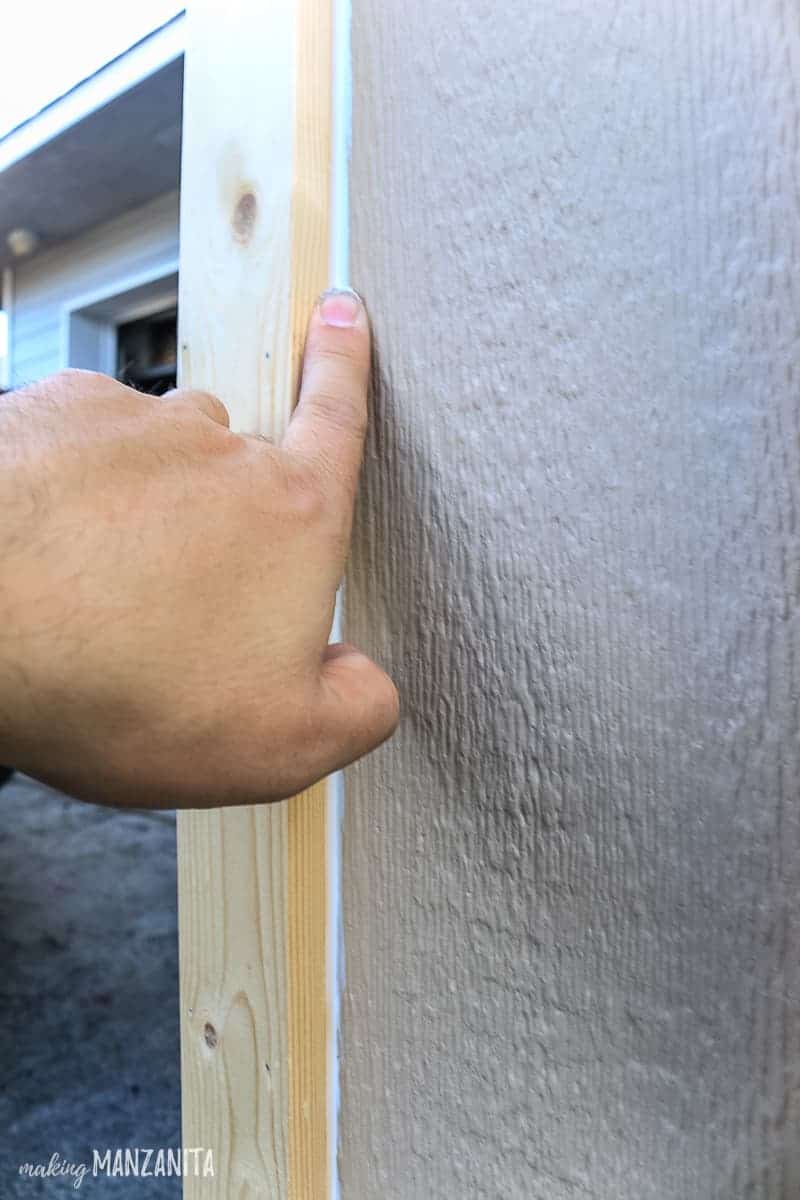
Step 3: Square up porch posts.
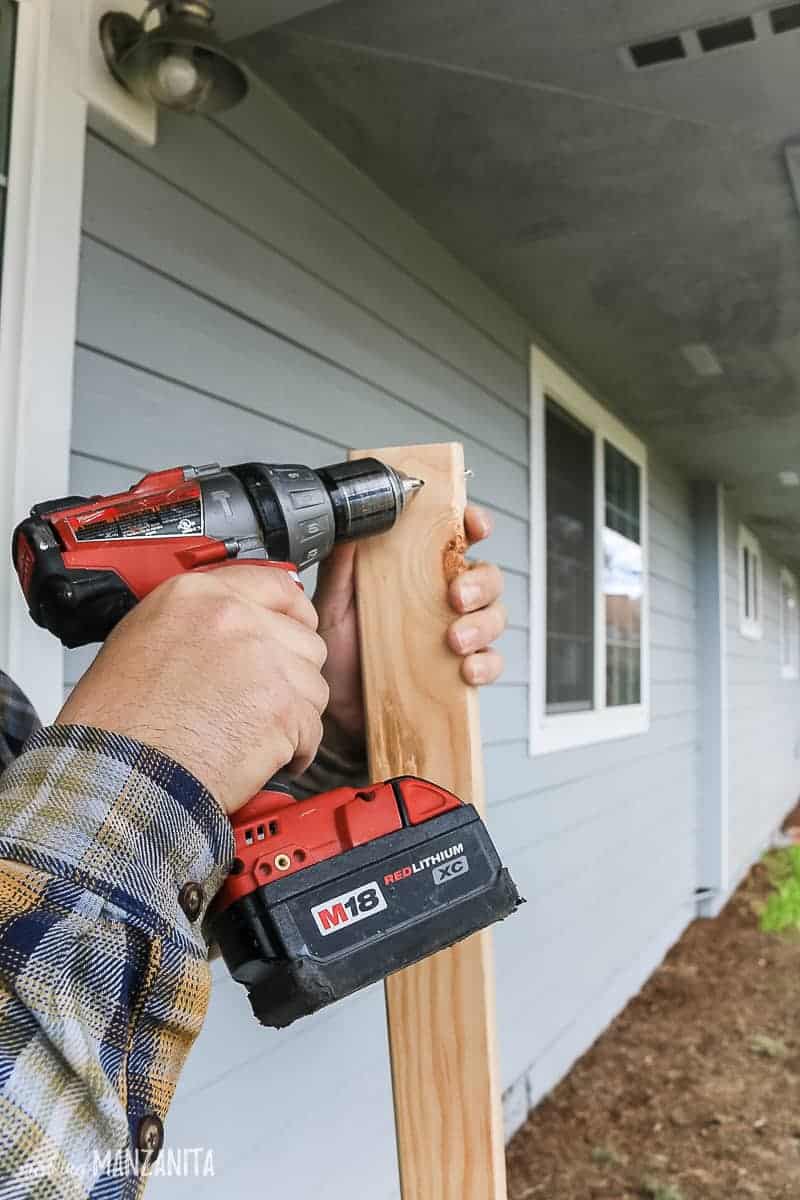
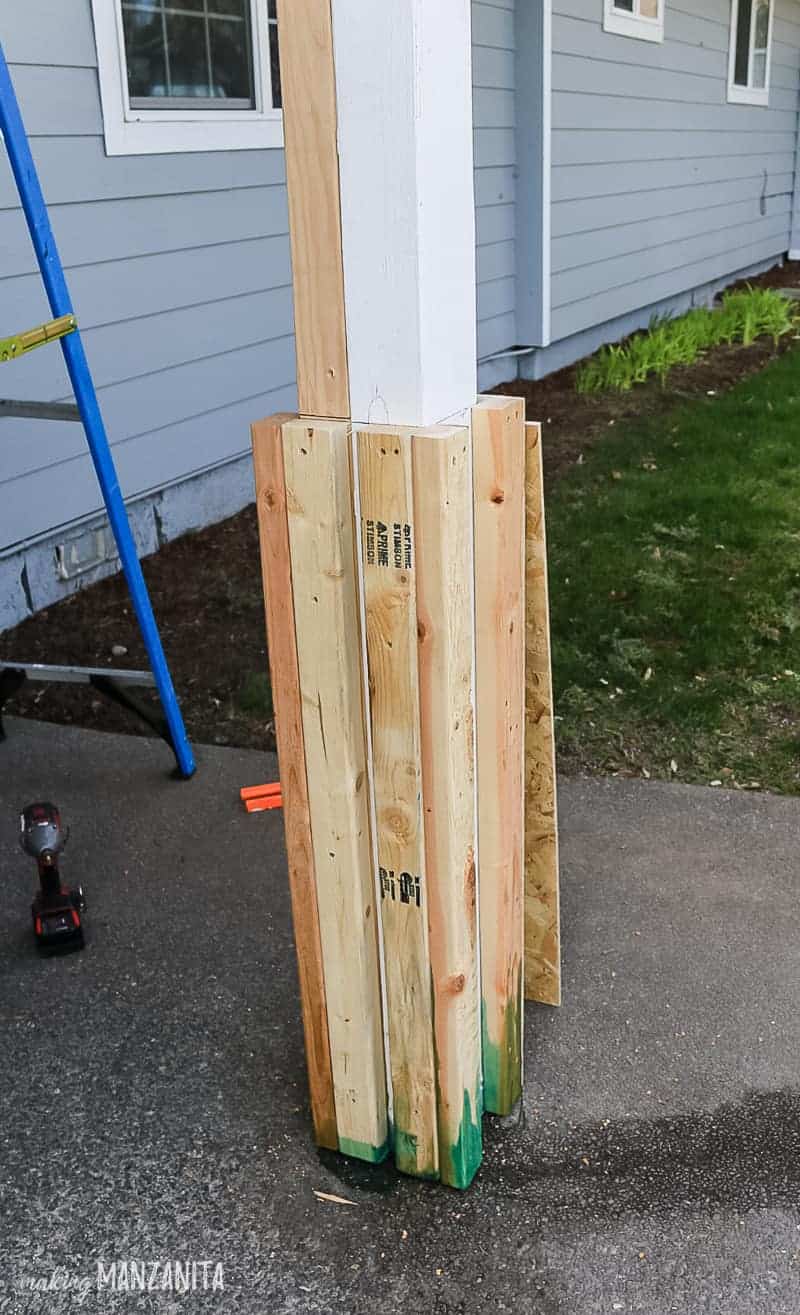
If your porch posts are already square, you can completely skip this step. Our porch columns were more of a rectangle shape, so we added some 2×3’s running along both corners of the back of the porch post to square everything up.
Once the porch posts were squared up, they measured approximately 6×6 inches.
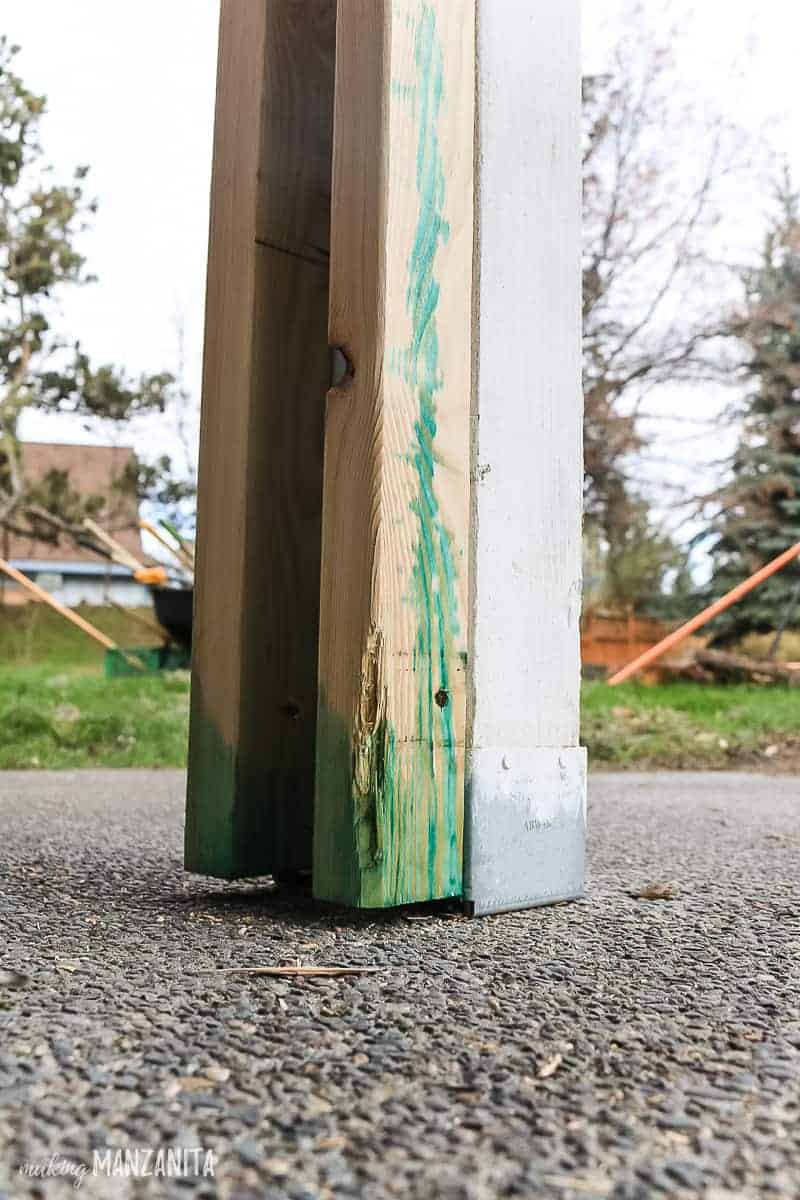
Remember….be sure the wood is pulled up at least 1/4″ from the ground before attaching.
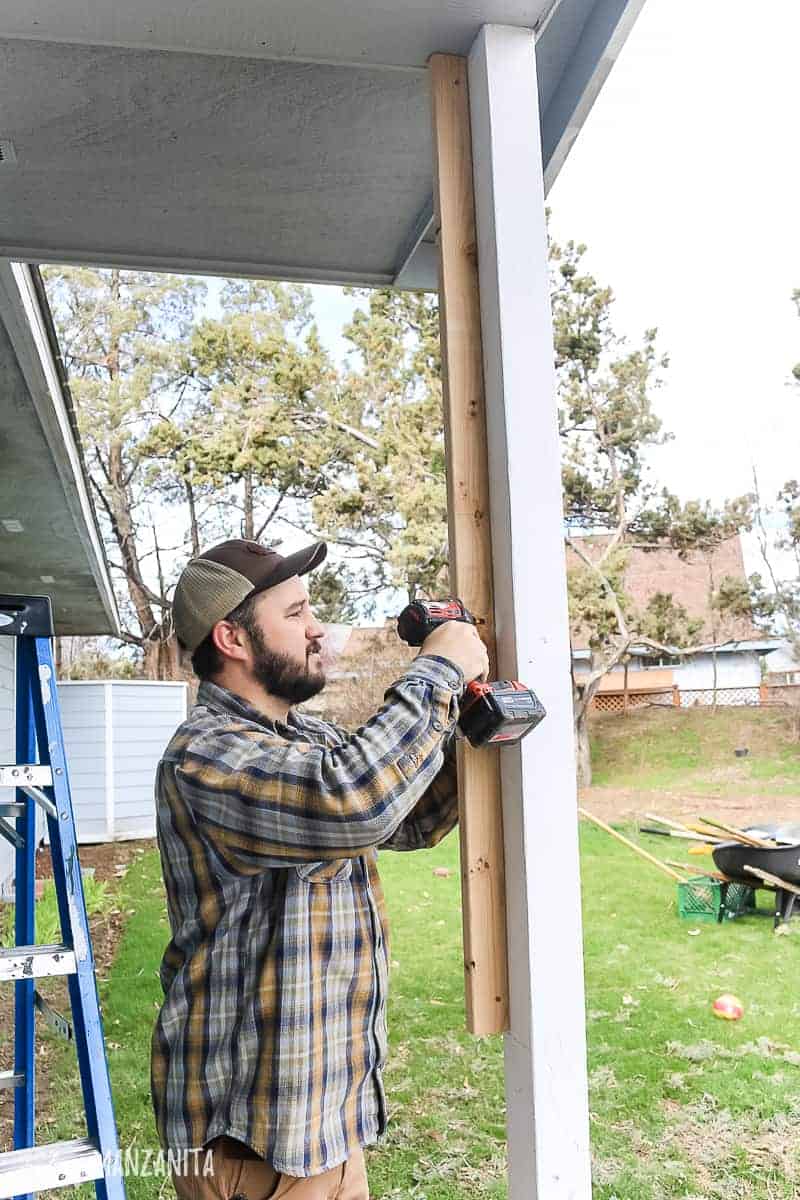
Step 4: Beef up the bottom portion of your front porch columns.
For the design of our porch posts, we wanted the bottom part to be larger than the top. This is purely stylistic and, in my opinion, looks better because it adds a bit of visual interest. That’s the whole point of this porch post makeover, right?
We decided to beef up the bottom portion of the posts. Add 2x3s to each order of the bottom portion of your front porch columns by predrilling some pilot holes and then screwing them into the original post using wood screws. We added 2 pieces to each corner to beef out the bottom. Once those pieces are added to the bottom of the porch pillars measure 9×9 inches.
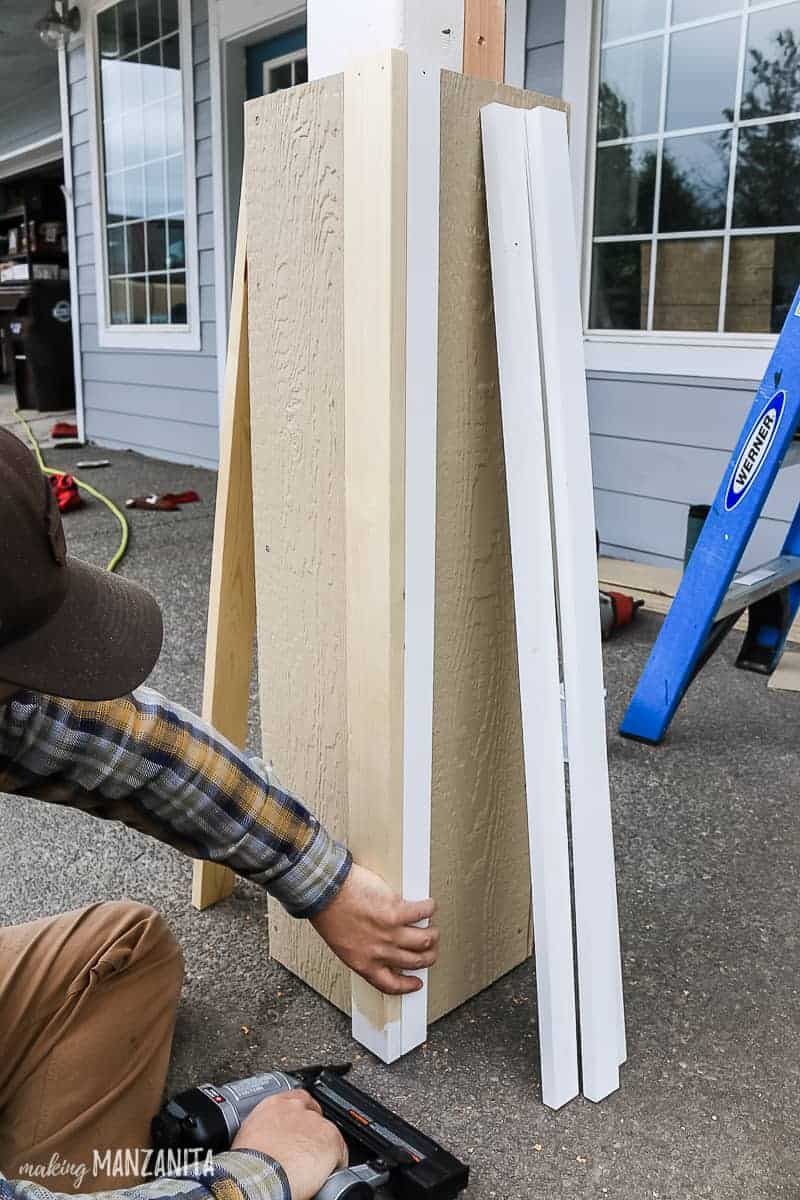
Step 5: Add siding to each side of the porch posts on the bottom portion.
Using a framing nailer and galvanized nails, add siding by nailing it directly into the porch posts.
Be sure that there is at least a 1/4″ gap at the bottom to avoid ground contact.
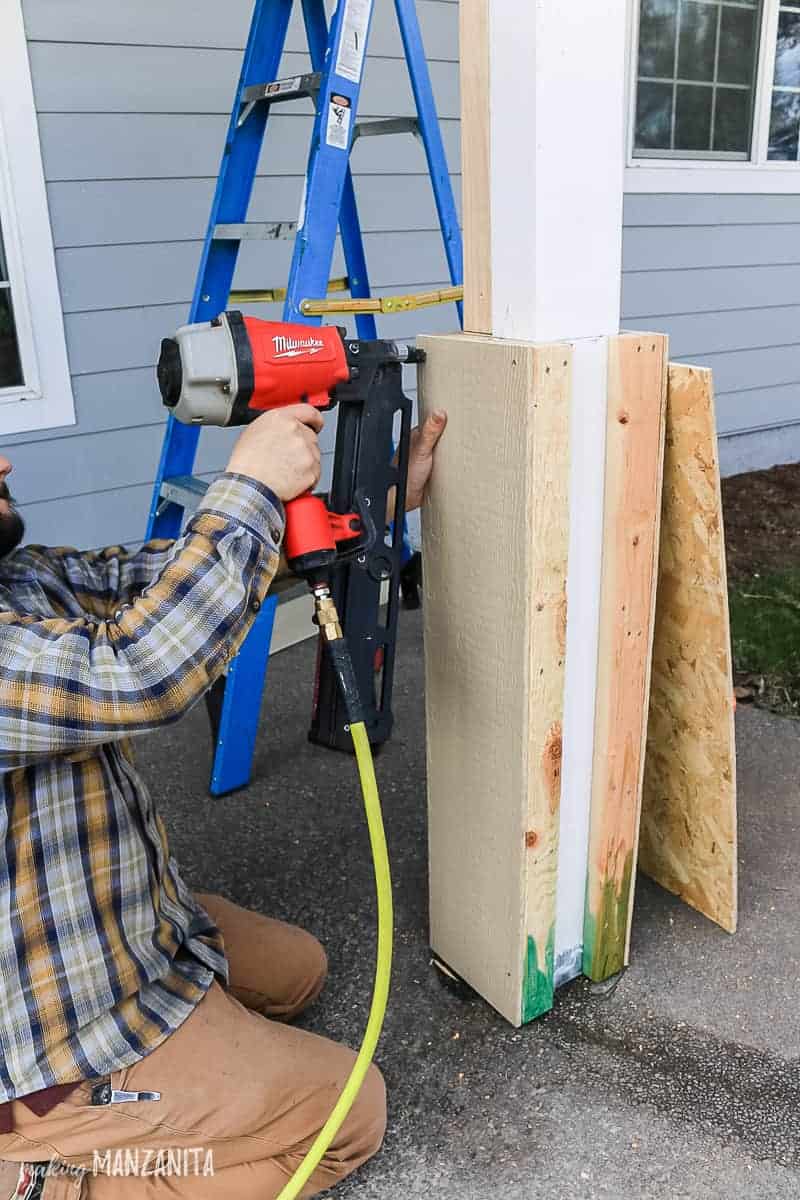
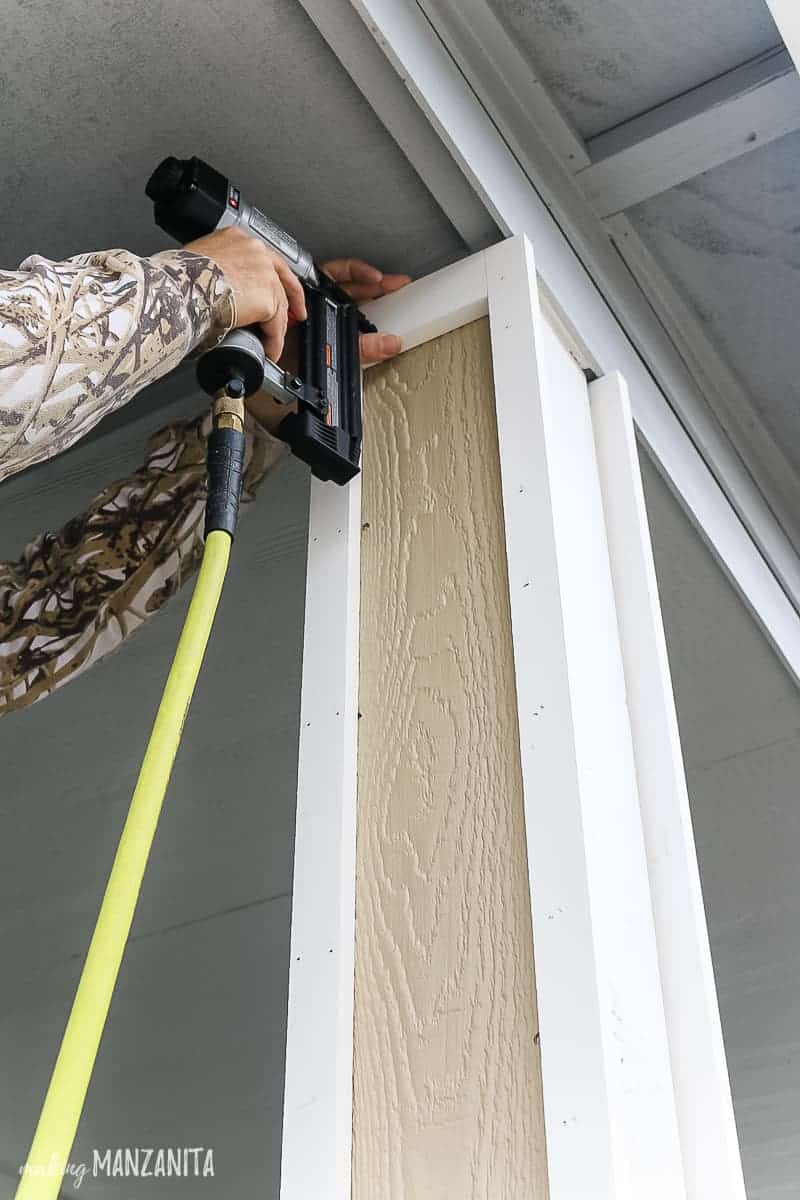
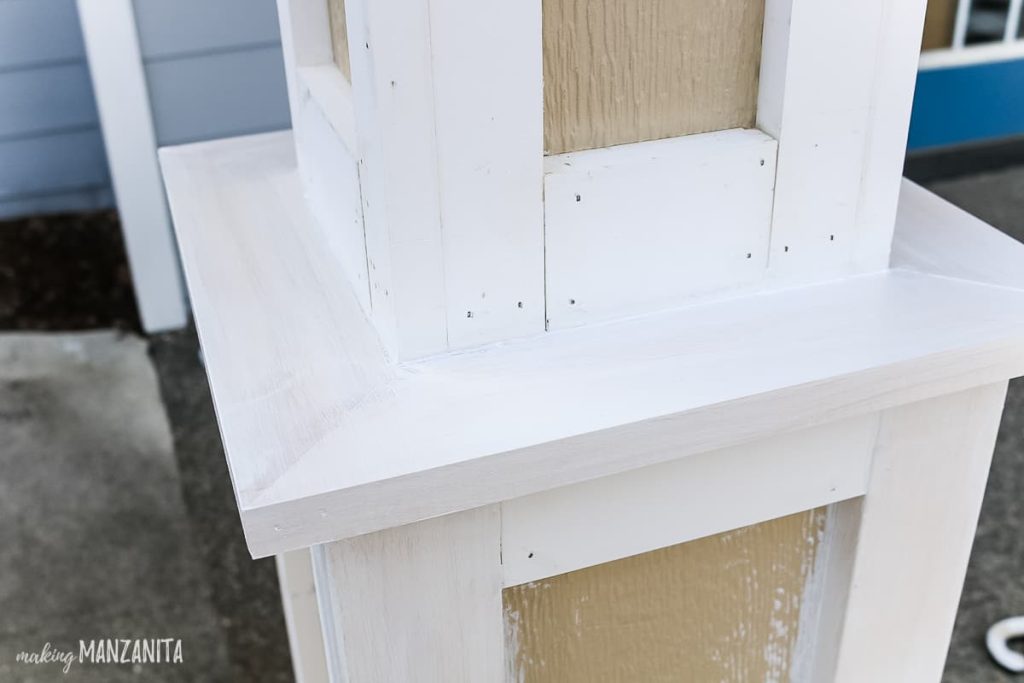
Step 6: Add trim to all corners, top, and bottom of the porch pillars.
Again using your handy brad nailer, add all trim to the corners of the porch columns being sure to hold them together flush at the corners and up off of the ground at least 1/4″.
We found it easiest to add one nail in the trim board so it is steady and then make small adjustments to make sure they are flush in the corner as you make your way down the board.
For any exposed end cuts that don’t have primer on them, be sure to add some primer to the bottom before you attach. It would be hard to get the paintbrush under there without getting paint/primer all over the ground if you waited.
If you are using pre-primed boards, be sure to use the end that has primer toward the ground – not a fresh end cut.
Step 7: Add top platform.
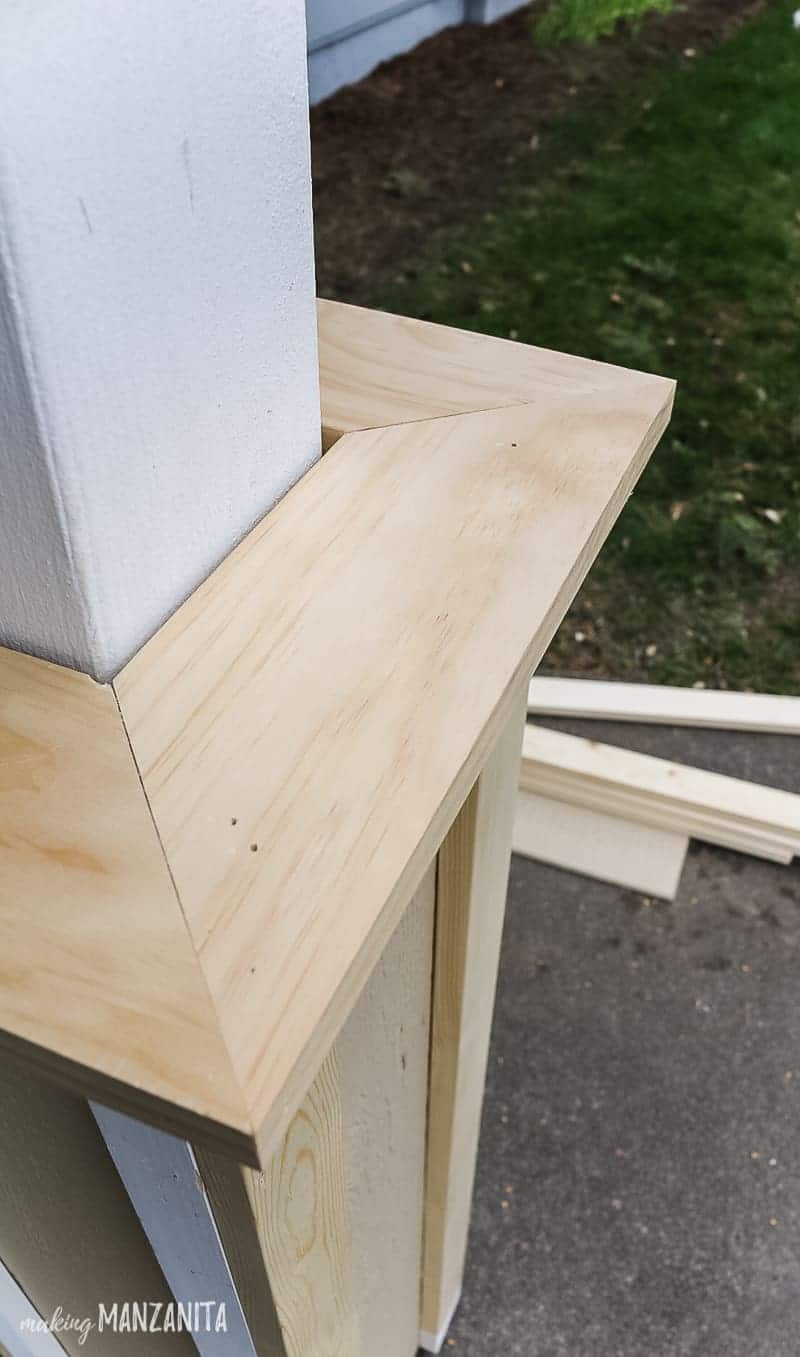
Using 45-degree angles in the corners, cut & add the top platform to the bottom portion. We used nails angled in on the inside edge of the wood pieces into the porch posts. Then we also nailed them together at the corners where the 45-degree angles met.
Angles can be tricky, so be sure to measure a couple of times before you cut. We had to run to the store to get more when we messed up the first cut… oops. It happens.
Step 8: Repeat column wrap steps on the top portion of the porch posts.
After the bottom portion is done, you can move up to the top. Repeat the same steps of adding the siding to all sides of the porch posts & trimming it out on the corners and top/bottom.
Step 9: Seal all joints and nail holes.
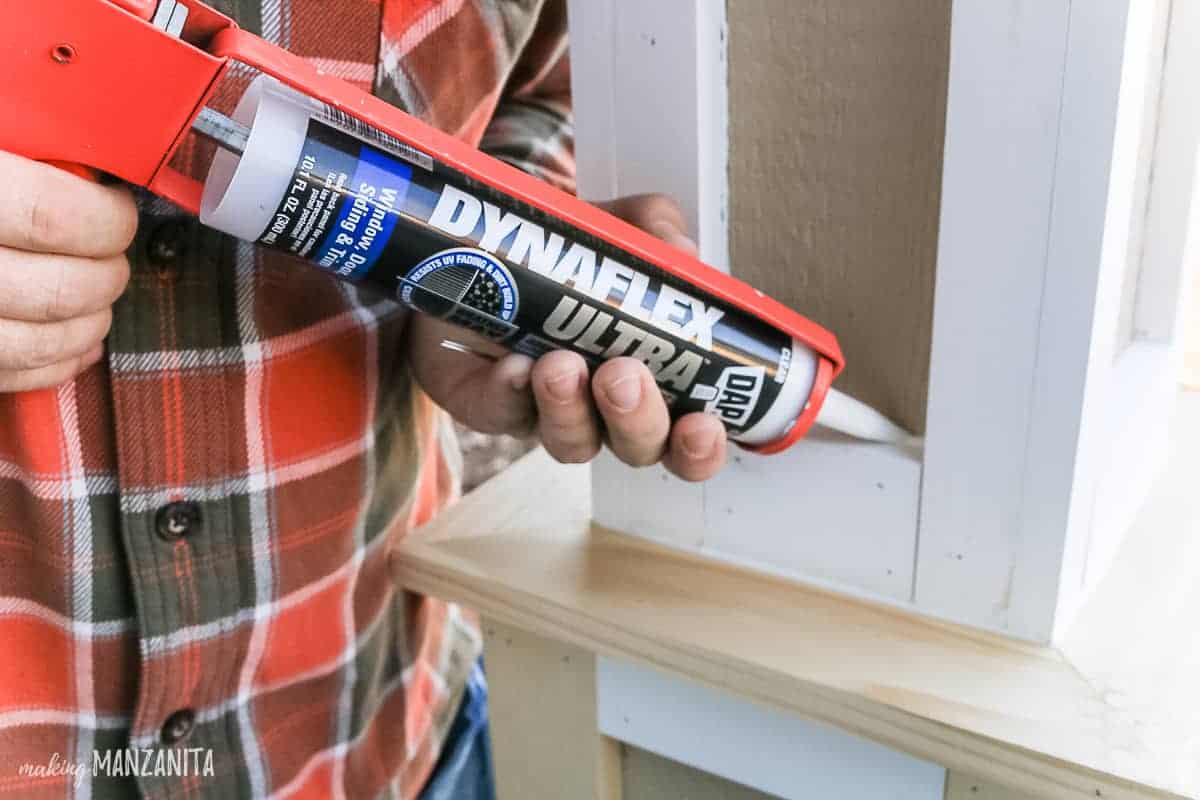
Since this is an outdoor project, you definitely want to make sure you’re working with a great sealant. We used DAP’s Dynaflex Ultra, which is an advanced exterior sealant.
Cut the tip of the sealant at a 45-degree angle and pop it into a caulking gun. Then run a thin bead of caulk over every joint and seam and add a little bit into every nail hole. This will ensure that the porch pillars are ready for any harsh weather that may come your way!
Quick tip: if it is cold outside (HELLO Spring in Oregon), be sure to keep the sealant indoors before using it. It needs to be at least 40-degrees to work properly.
Step 10: Prime any surfaces that aren’t already primed.
Most of the trim we used was pre-primed, but not everything. Our Home Depot didn’t have the correct size of pre-primed trim in stock, so that’s why you see a mix! No problem though. Just hit everything that is not already primed with a coat of primer first.
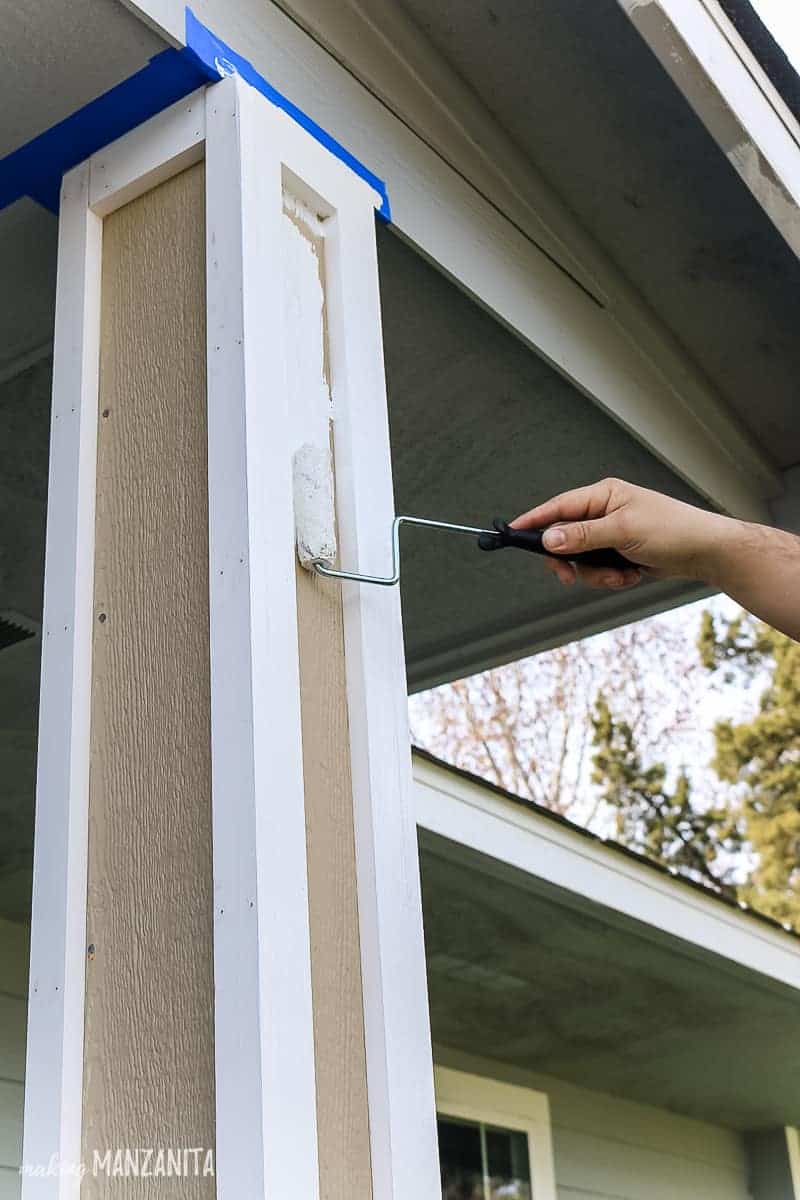
Step 11: Paint porch posts with exterior paint.
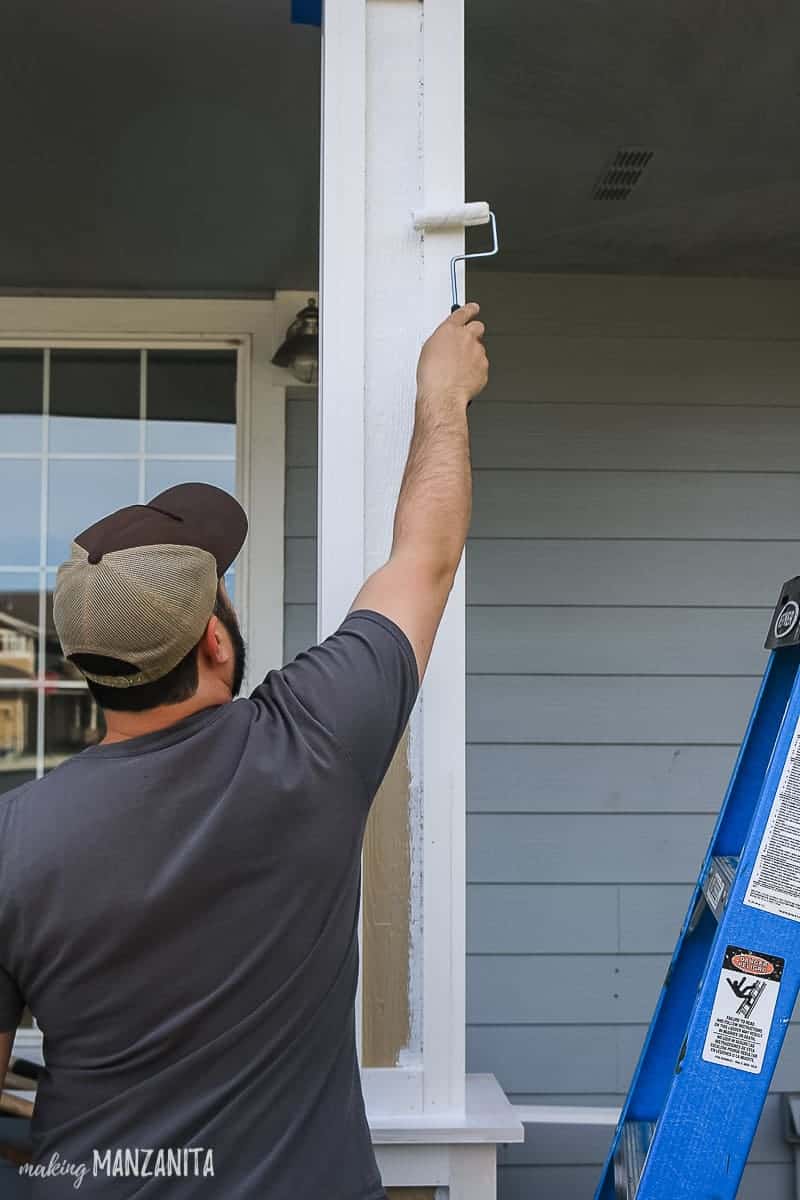
The last step is to paint the porch posts with exterior paint. This will not only add a color, but again seals everything. We used white exterior paint that matches our house trim. We did two coats.
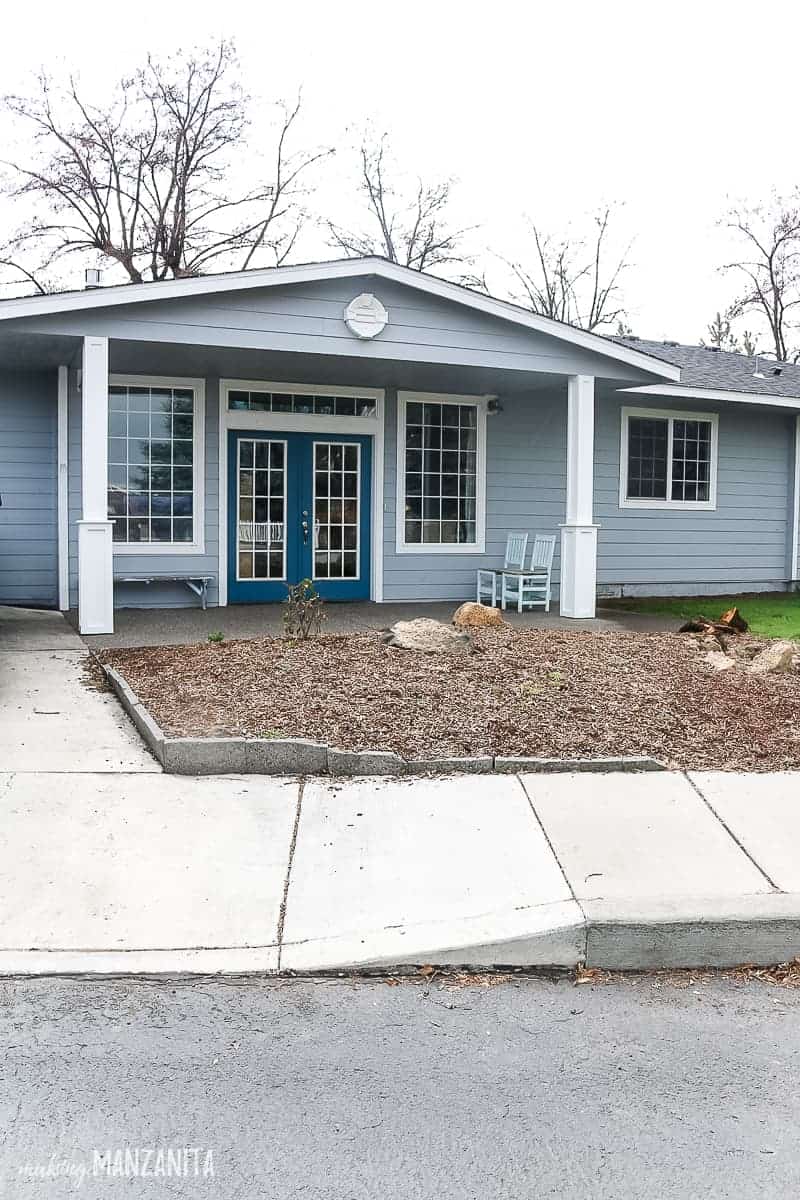
I’m shocked with how much character the porch posts added to our curb appeal after we gave them this little makeover! My first thought is, man…why didn’t we do this sooner?! Haha!
These column covers were so easy to DIY and they were pretty budget-friendly too. They cost us about $300 for supplies.
I can’t wait to finish some other outdoor projects this spring & summer. We’re planning on adding some DIY planters next to the porch posts, building a fence to enclose our backyard and making an outdoor chalkboard for our kiddos.
What are you going to do to add curb appeal to your house this spring & summer?
Let us know in the comments below!
How To Update Your Skinny Porch Posts For Added Curb Appeal
Materials
- DAP Dynaflex Ultra Exterior Sealant
- 2x3s
- Drill
- Galvanized wood screws
- Sheet siding
- Galvanized nails
- Primed trim
- Wood preservative
- Primer
- Exterior Paint
Tools
- Caulk gun
- Miter saw
- Table saw
- Brad nailer
- Framing nailer
- 4 inch roller
- Paint brush
- Tape measure
Instructions
- Cut 2x3s.
- Apply wood preservative to the bottom of 2x3s.
- Square up porch posts.
- Beef up the bottom portion of your front porch columns.
- Add siding to each side of porch posts on the bottom portion.
- Add trim to all corners, top and bottom of the porch pillars.
- Add top platform.
- Repeat column wrap steps on the top portion of the porch posts.
- Seal all joints and nails holes with Dynaflex Ultra.
- Prime any surfaces that aren't already primed.
- Paint porch posts with exterior paint.


Great job! Love the look.
Thanks!! 🙂 I love how it turned out.
They turned out great. I’ve been looking for some design inspiration to reno those boring 4×4 posts on our covered patio and your design is it. I’m going to be putting in an outdoor fireplace and converting the covered area to a screened in porch/room. I have the plans for everything sans the columns. So thank you. The little details make all the difference. Plus having a nice indoor/outdoor area for my little ones to play definitely makes it worth it 🙂
Awesome. Everything sounds great. Let me know when you’re finished. I’d love to see a picture! Good luck.
They look great, but why create the inset if you were going to paint them all white? A darker color inside would have really made them stunning! ?
Thanks Sherry! Totally personal preference. I love the bright white look, but you’re right they would also look great with a darker color too!
Love this – we have plain posts that need a pick me up! Thanks for sharing
So glad you were inspired by this! Hopefully your post turn out great.
Looks great and this is an idea I have been wrestling with. What are your concerns with maintenance going forward? I live in the northeast and feel that I will be redoing this posts often if I don’t go
With a fiberglass solution.
This is definitely something that we considered when we were creating the plan, which is why we preprimed every surface of every piece of wood, used a high quality caulking on every seam, applied wood preservative to the bottom side of the wood near the ground and installed off of the surface of the ground. Our porch is already graded so that no water sits there and they are mostly covered under the eaves, so it’s rare that the posts will sit in water or snow. Hope that helps!
It looks great! We are starting this project this weekend and using your technique for inspiration. I would love to know what size wood you used for the lip between the 6×6 and 9×9 columns? What is the height of your wider section on the bottom? What was the size of your trim pieces? Thanks! I cannot wait to get started!
Hi there! So glad you’re giving this project a try. The platform at the top of the bigger section is made with 1×3 wood. The trim was a combination of 1×3 and 1x2s. The wider section on the bottom is approximately 40″ tall. Hope that helps! I’d love to see your finished product when you’re done! You can come back and upload a picture here or tag me on Social Media @MakingManzanita!!
Hello,
For some reason I can only see the comments on this post. I tried searching your site for the original post but no luck.. do you have a link to the original post with the pics / instructions?
Thanks!
Hmmm sorry you’re having troubles viewing the post. Everything looks fine on my end. Are you able to see the post now? https://www.makingmanzanita.com/porch-posts-curb-appeal/ If not, maybe try clearing the cookies on your web browser.
i’m having the same issue. were you ever able to see the post b/c all i see are comments as well
Sorry about this Sheila, I have a tech team working on trying to figure out the issue. Stay tuned.
Great tips! I love the idea of adding some decorative trim to the porch posts for a quick and easy update. Can’t wait to try some of these ideas to enhance my home’s curb appeal!