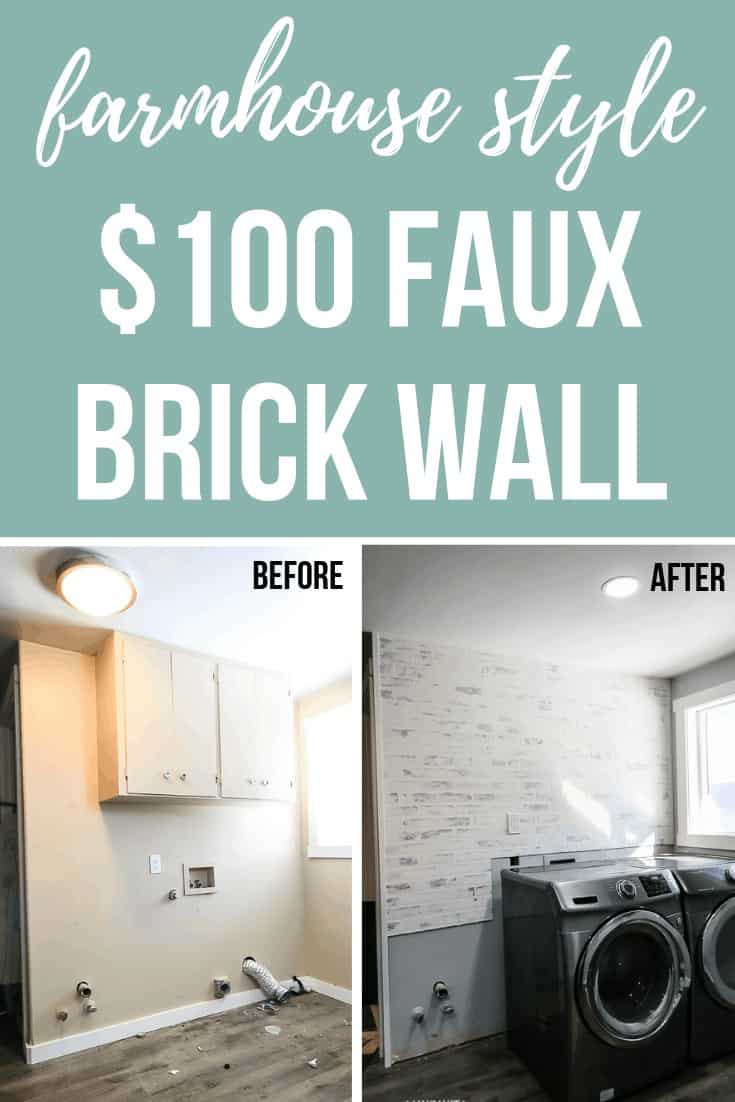
Easy German Schmear Tutorial On A Faux Brick Wall

When we were planning our modern laundry room design, I had my heart set on a fun accent wall to put behind the washer and dryer. I considered peel-and-stick wallpaper, like this, and Logan is still not on that train yet, so he vetoed that idea….(maybe someday I can talk him into wallpaper somewhere!).
After looking at tons of different ideas, we decided on a budget-friendly DIY brick wall.
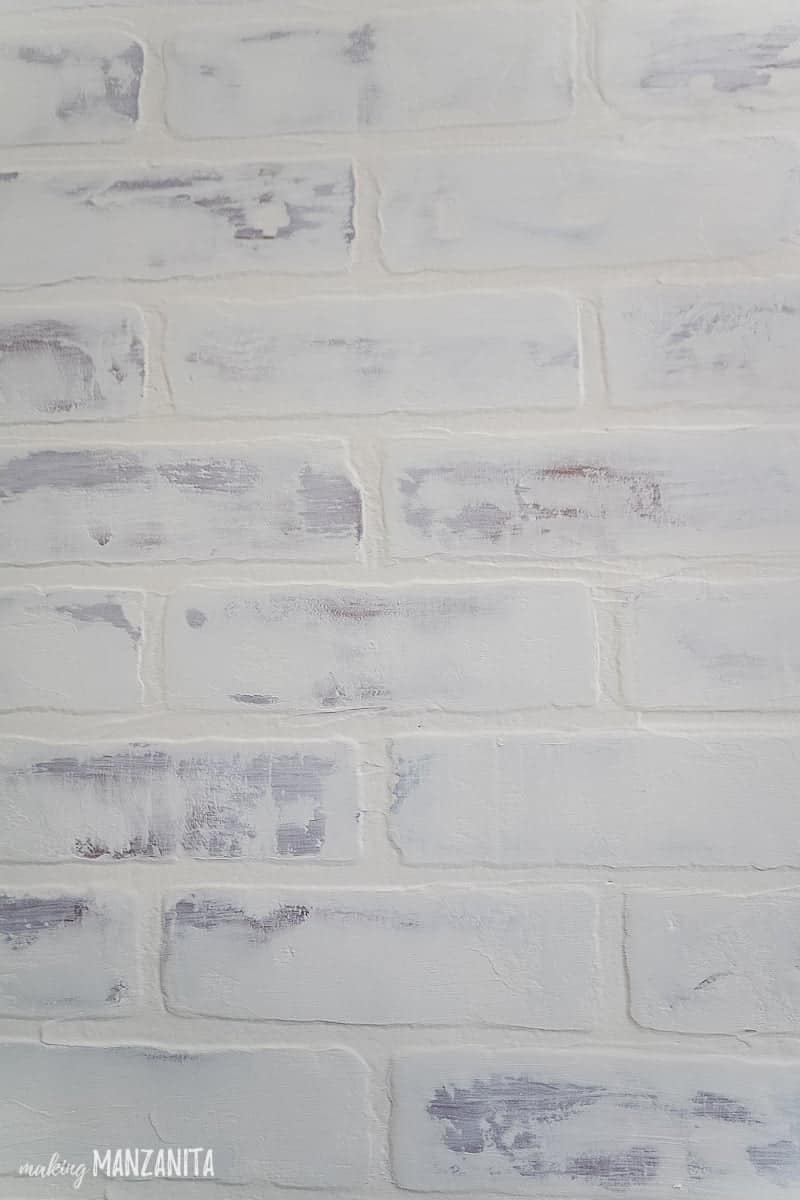
And in pure farmhouse style fashion, I insisted on a German schmear (also sometimes called German smear) finish. It is basically just a whitewashed brick look that is meant to look aged and rustic.
Table of Contents
- Before Picture
- Faux brick wall: YouTube Video
- How to create a faux brick wall with German schmear finish: Step-by-Step Tutorial
- Supplies needed:
- Step 1: Remove anything from the walls and the area in front of the wall.
- Step 2: Cut brick wall panels.
- Step 3: Cut brick wall panel seams to fit together.
- Step 4: Hang brick wall panels.
- Step 5: Caulk joint between brick wall panels.
- Step 6: Apply joint compound to create a German schmear finish.
- Step 7: Wipe off some joint compound with a wet rag.
- Step 8: Seal with watered-down white paint.
- Step 9: Trim out the edges of the faux brick wall.
- Price list for faux brick wall with German schmear finish:
Before Picture
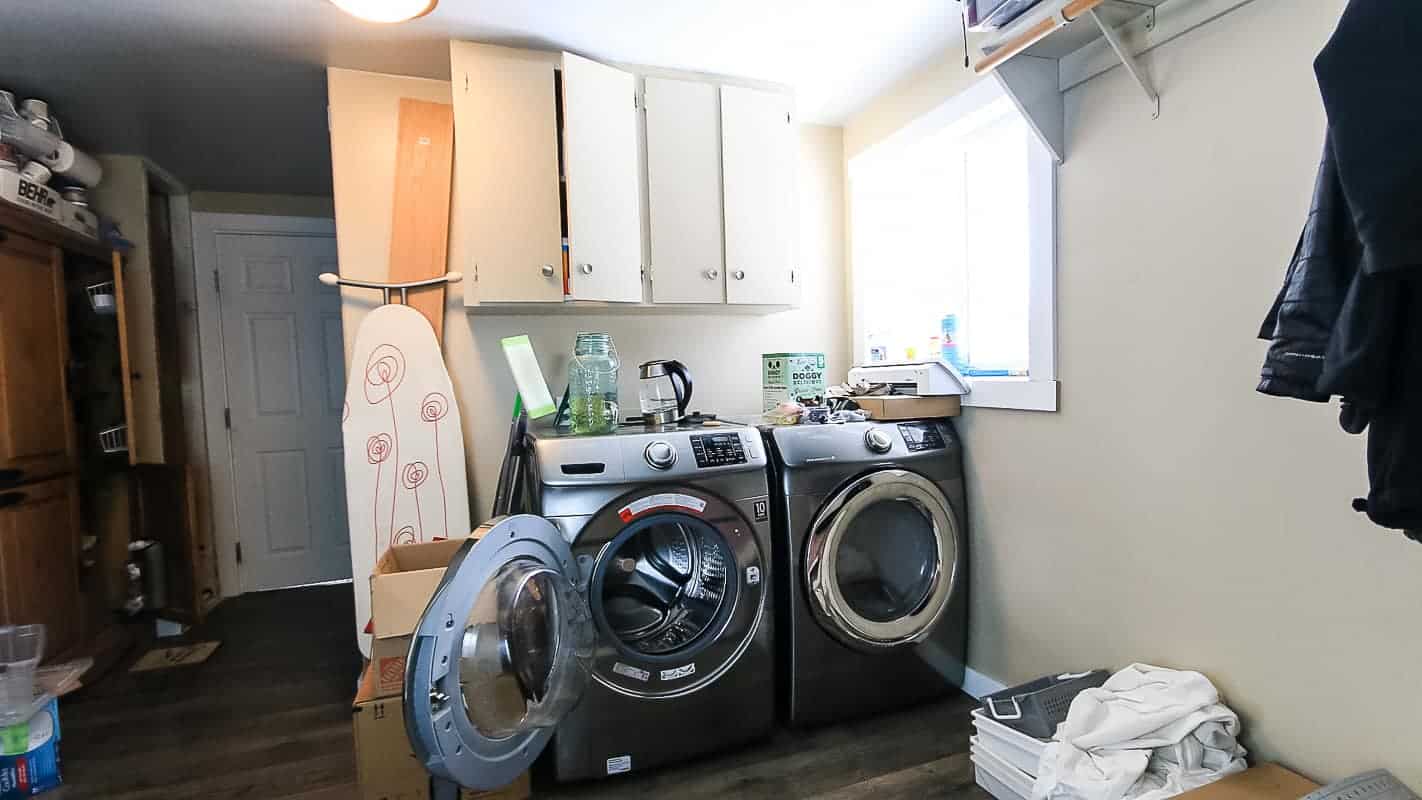
Here’s what we were starting with…..what a cluttered, ugly mess…right?! I’m so embarrassed.
I turned to Pinterest for inspiration and started reading up on lots of different faux brick wall tutorials and ways to create that German schmear look.
The Restoring House provided some great inspiration for us with the idea of how to handle the seams on the faux brick wall. Definitely go check out her tutorial and brick wall too!
I definitely love how cheap this DIY brick wall was! It was less than $100 for us because we had quite a bit of supplies on hand already. For full details on the prices, scroll down for the price list.
Faux brick wall: YouTube Video
I’ve summed everything up for you in a video tutorial and also detailed out the step by step tutorial below.
If you love DIY videos, be sure to subscribe to our YouTube channel!
How to create a faux brick wall with German schmear finish: Step-by-Step Tutorial
Supplies needed:
Step 1: Remove anything from the walls and the area in front of the wall.
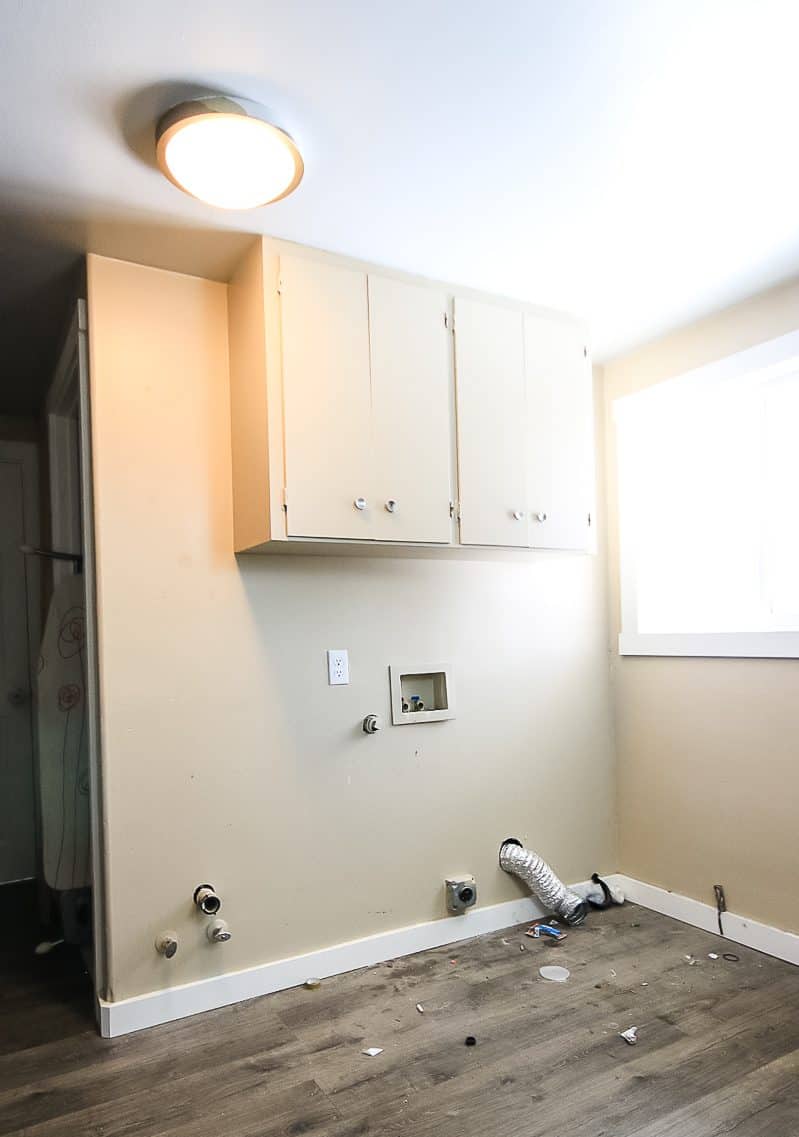
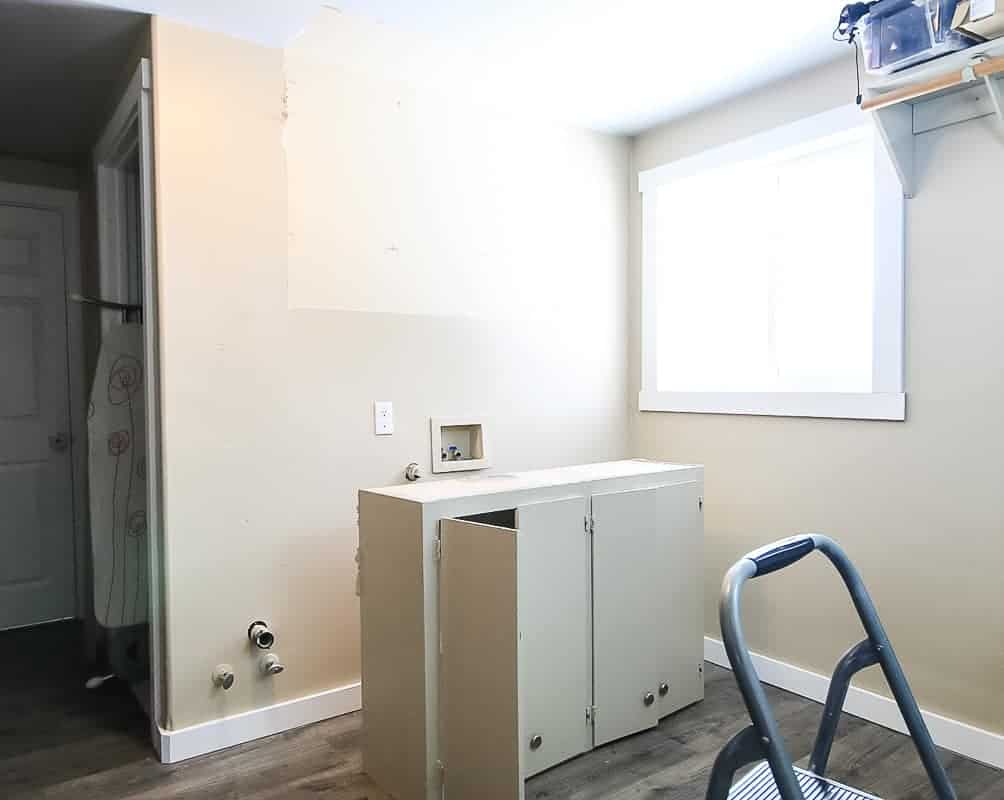
In our case – the faux brick wall we were installing was in our laundry room, so we needed to move our washer & dryer and remove a wall cabinet that was hanging on the wall.
Step 2: Cut brick wall panels.
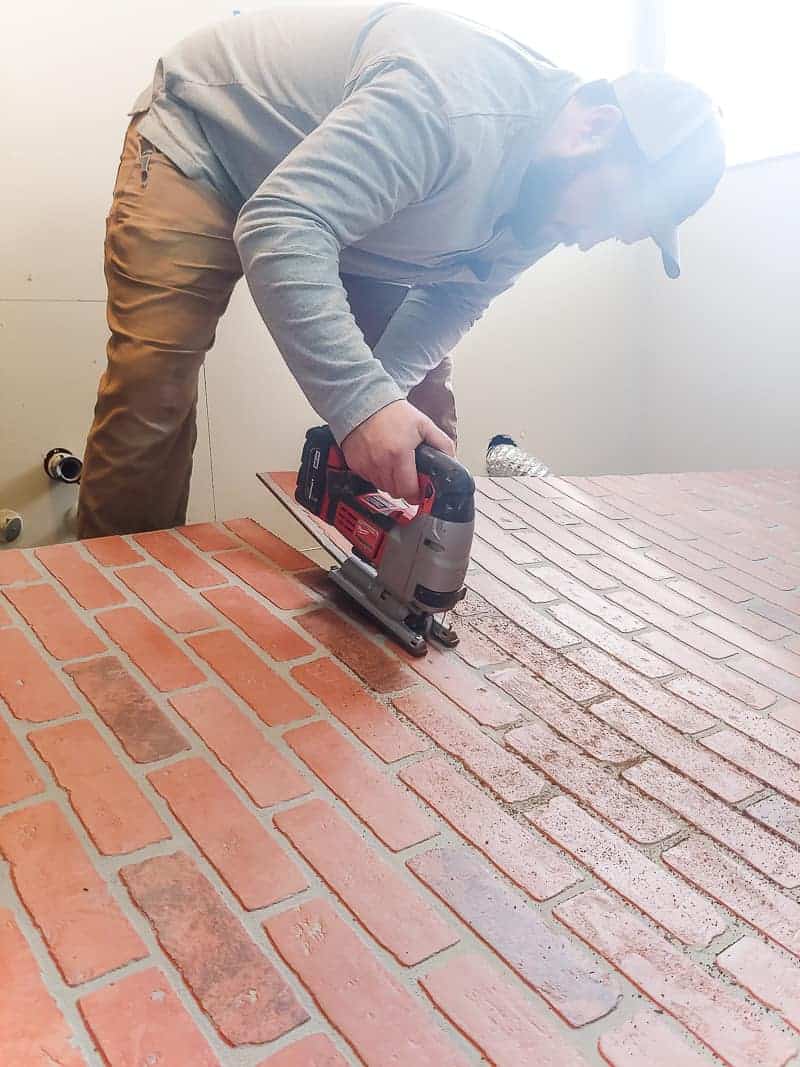
Plan out the brick wall panels and cut them down to size if necessary.
You’re probably wondering…..why in the heck didn’t they finish the wall or make the panels go to the floor? The reason our panels don’t go all the way to the floor here is that we’re adding a folding counter over the washer & dryer and a cabinet with a sink on the left (read more about our modern farmhouse laundry room plans here & see how the folding counter & farmhouse sink cabinet turned out here).
This is just “Phase 1” of our laundry room renovation. There was no need for the faux brick wall panels to go to the floor behind those things, so we cut them down to size using a jigsaw.
You may also need to cut around any outlets on the wall too. For this, we marked it on the wall panel with a Sharpie, then used a keyhole saw to make a small hole in one of the corners, and then used the jig saw to cut it out.
Step 3: Cut brick wall panel seams to fit together.
If you are doing a DIY brick wall with similar faux brick wall panels and finishing with a German schmear finish, my number one piece of advice for you is to cut the brick wall panel seams to fit together like a puzzle with a jig saw.
Otherwise, the seams are pretty noticeable! There would be tons of bricks that would look like they were cut right down the middle….no bueno.
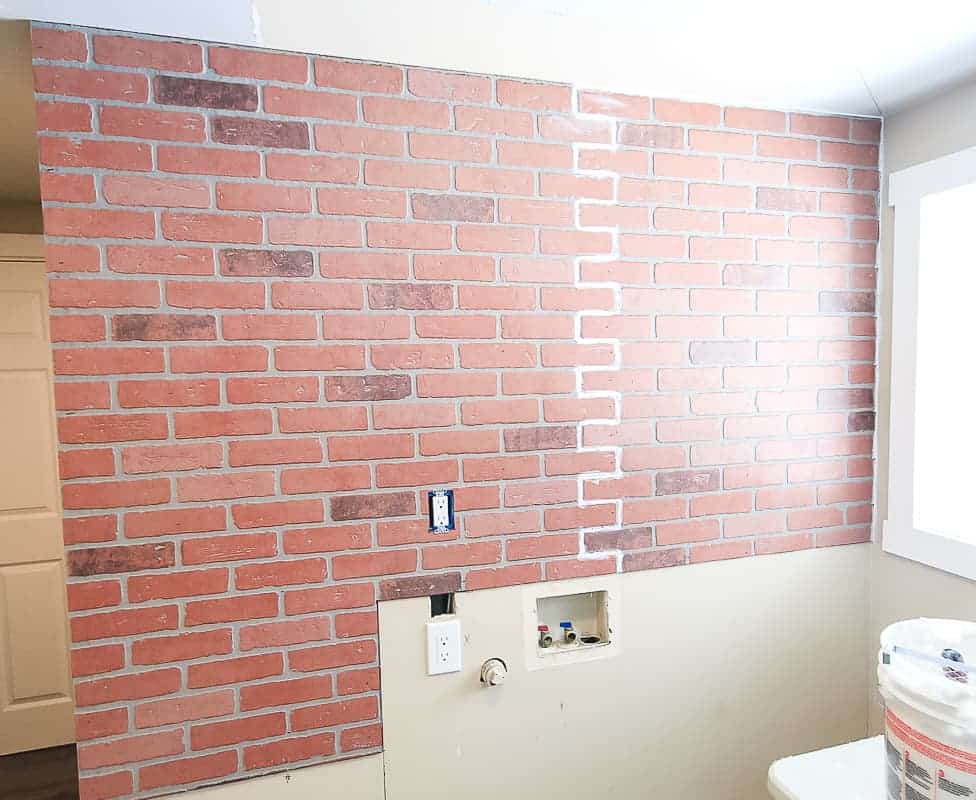
By cutting the seams like a puzzle and then finishing off the wall with German schmear, the seam between the two panels disappears!
Step 4: Hang brick wall panels.
We found where the studs were and stapled the brick wall panels into the studs throughout the wall. It really helps to have two people for this part.
One to hold the panel in place and the other to check if everything is level and staple it to the wall.
Step 5: Caulk joint between brick wall panels.
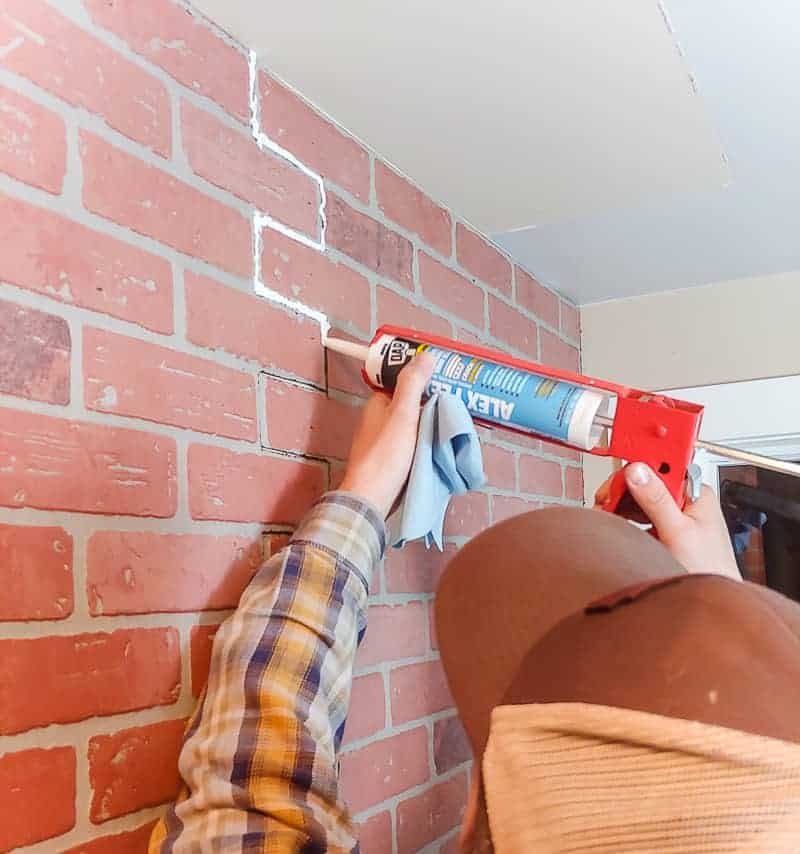
This isn’t absolutely necessary – you could probably just fill the gap between the brick wall panels with joint compound, but caulk is a better solution because it is more flexible. Learn the difference between caulk and joint compound here!
Since it is in the laundry room and near a window, it stands a better chance of not cracking with temperature changes.
If the gap was filled with joint compound, you run the risk of it cracking over time.
We also caulked the edge of the brick wall where it met with the corner by the window.
If you’re confused about what type of caulk to use and how to apply it – check out our full article of caulking tips and tricks!
Step 6: Apply joint compound to create a German schmear finish.
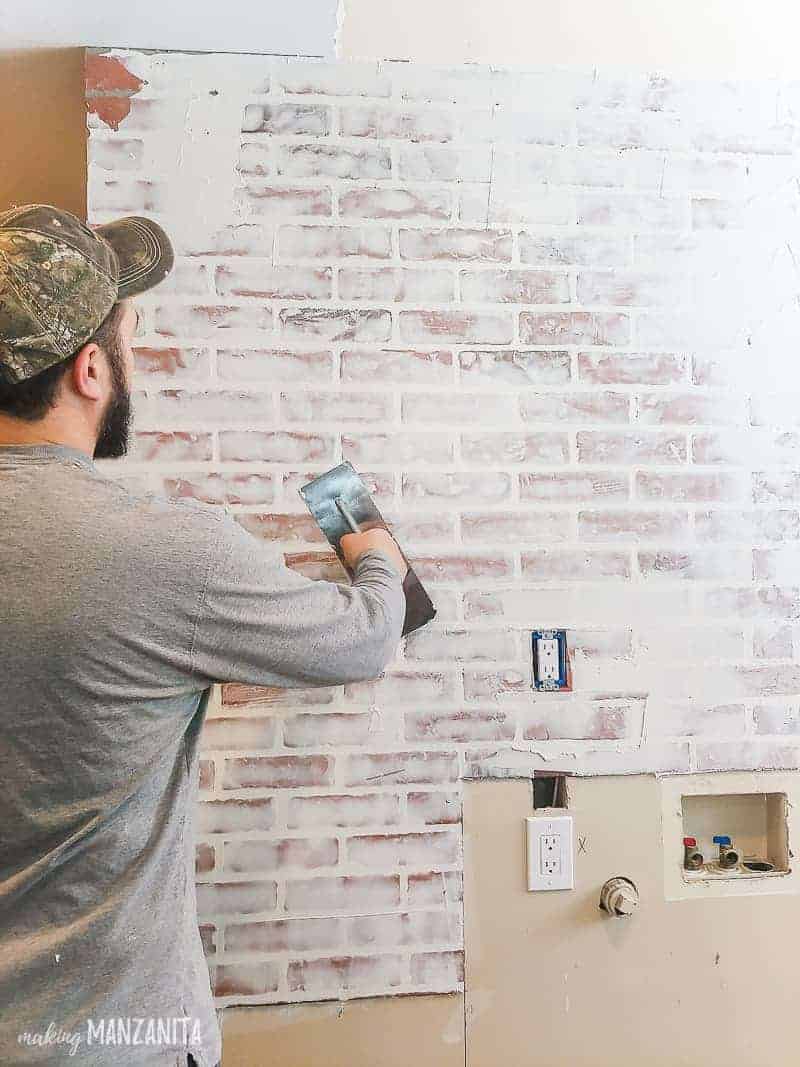
The joint compound is really what makes the German schmear finish. Grab a putty knife….or better yet a hawk and trowel if you want to work quickly.
You’ll see in the video that when we were trying things I started by applying the joint compound with the small putty knife….and it worked fine, it really did. But it was going to take forever.
So Logan went out and grabbed the hawk and trowel and I think it only took him about 10 or 15 minutes to German schmear the entire wall.
Applying the German schmear is really pretty easy. You just plop the joint compound onto the wall and then scrape it off.
Then let it dry for several hours before moving on.
Step 7: Wipe off some joint compound with a wet rag.
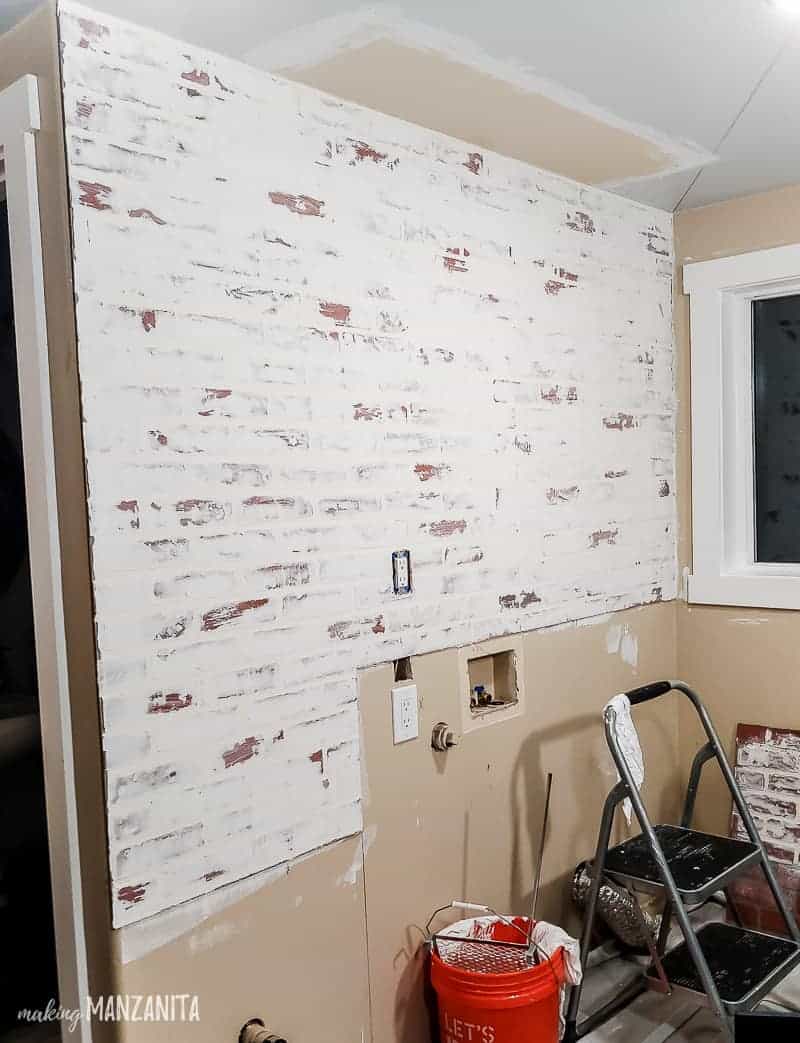
The joint compound wipes off with just simple water, so you can just get a rag damp and wipe off the joint compound to get the desired look that you want for your German schmear finish.
One thing that I did notice because we were using the faux brick panels was that the more you scrape and wipe off the joint compound, the more colored the joint compound becomes.
You’ll notice that it had a slight orange tint when we were done and before we sealed it with the white paint. This is the coloring coming off of the brick wall panels.
That’s the downside to using the faux brick. But for me, it wasn’t that big of a deal because I wanted to lighten everything up at the end anyway so my watered-down white paint did that just fine.
Step 8: Seal with watered-down white paint.
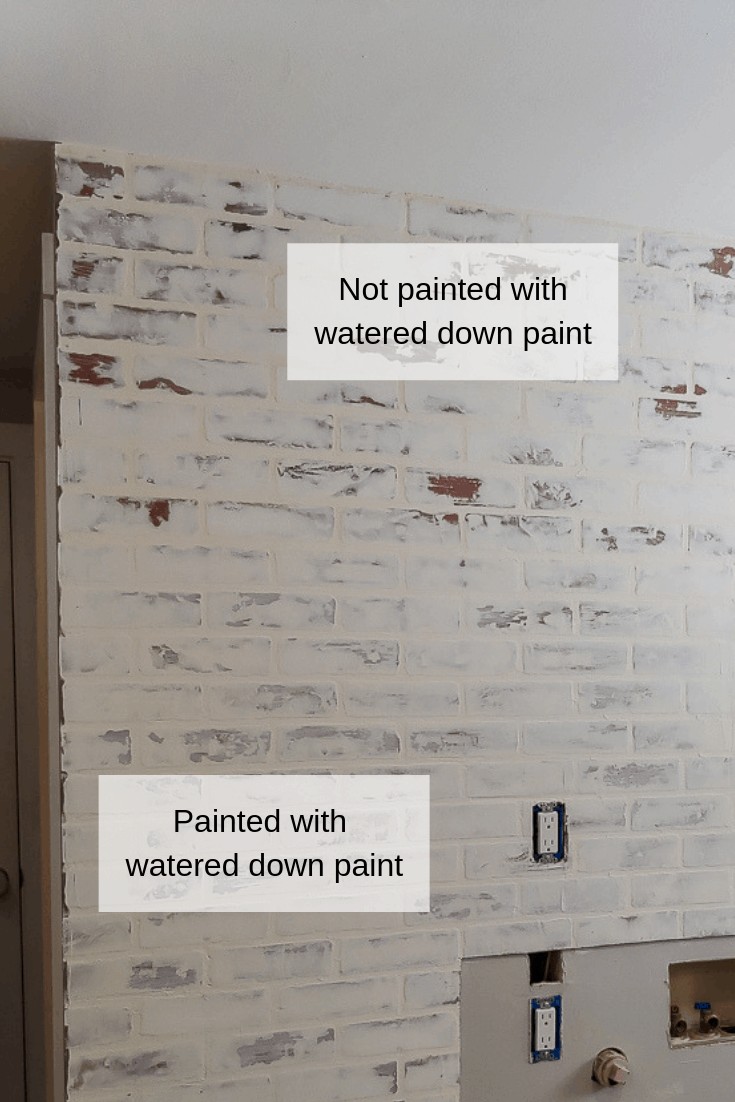
Because joint compound wipes off with water, you definitely need to seal your whitewashed brick wall. I used watered-down white paint to do this.

I mixed about 50% paint and 50% water and brushed it on. I focused mostly on the spaces between the bricks to lighten up the orange tone and then lightly brushed the watered-down paint over the bricks to seal.
If you didn’t want to lighten your faux brick wall, you could apply something like water-based Polycrylic which would seal it, but not discolor it.
Now I haven’t tried this personally and can’t vouch for it (although my Pinterest inspiration, The Restoring House, used this method and it looks great on theirs). I would definitely try it out on a small piece of scrap first to make sure you get the look you’re going for!
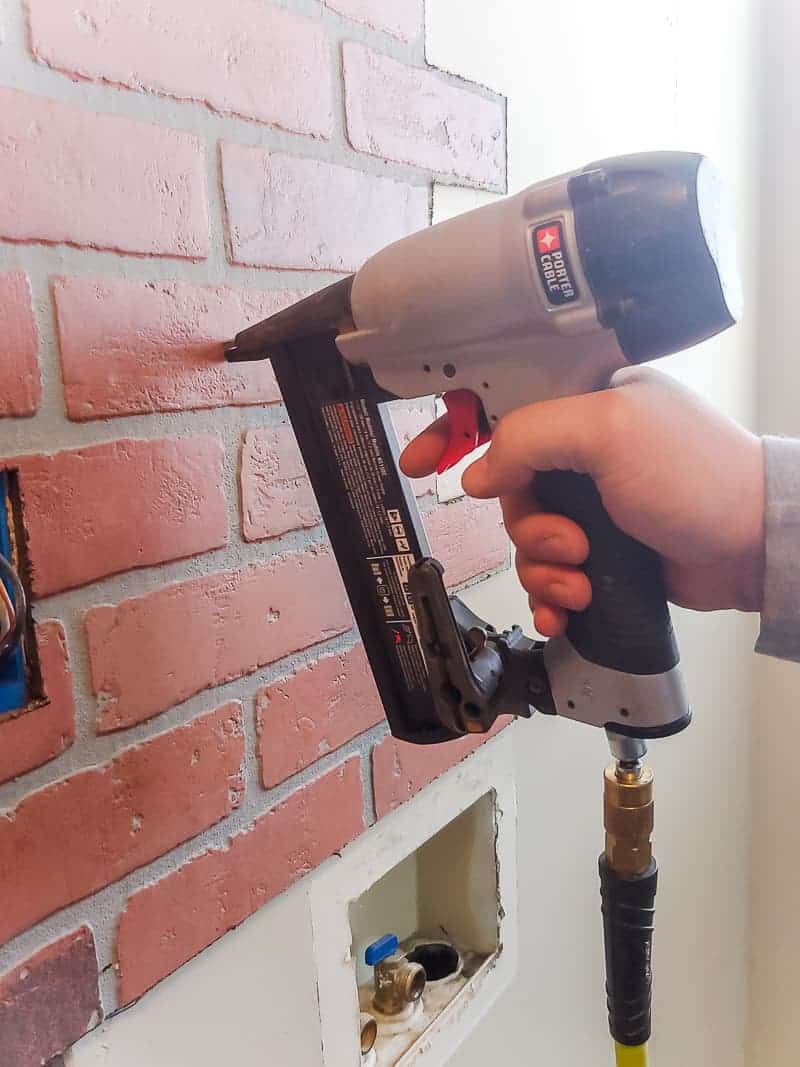
Step 9: Trim out the edges of the faux brick wall.
The last step to get a real finished-off look to the faux brick wall is to trim out the edges and any corners with painted wood trim.
For our corner the wall had a rounded (aka bullnose) corner, so we opted for this square corner trim to cover that up.
For the other corner near the window, we used this trim. We painted the trim before installing it with white paint and attached it with a brad nail gun.
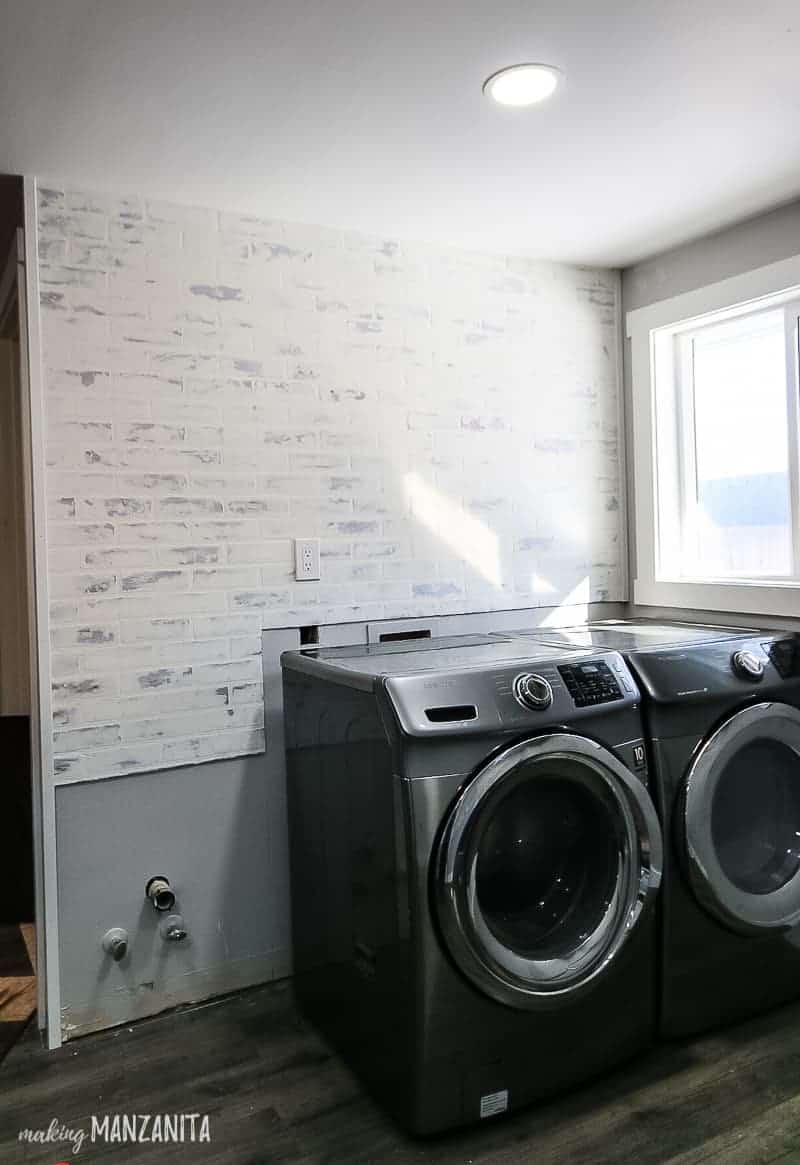
I’m shocked at just how easy and cheap it was to create this faux brick wall with whitewashed bricks in our laundry room!
Price list for faux brick wall with German schmear finish:
I know you’re probably wondering what I mean when I say “cheap”, so I decided to give you a full price list so you have all the details!
Keep in mind that prices may vary in your neck of the woods and will definitely change (#inflation). We also had a lot of supplies on hand, so I noted those too.
- Brick Panels (2) – $57.94
- 5 Gallon Bucket – $3.67
- Moulding/Trim – $22.37
- Joint Compound – $13.27
- Materials & tools we already had
- Paint, tray & paint brush
- Nails & staples
- Nail gun
- Staple gun
- Jig saw
- Caulk
- Hawk & trowel
- Total cost for our faux brick wall = $97.25
Looking for more ways to add character to a wall in your house??
- Learn how to make a board and batten wall (on textured walls!)
- Wallpaper is making a comeback! Learn how to hang wallpaper with this tutorial.
- Cover your wall with DIY faux shiplap (bonus: this is pretty cheap!)
- Or install shiplap vertically!
- Use beadboard on the lower part and paint it black!
- I love this modern looking geometric wood accent wall, it’s so unique!
- Add a DIY wood slat wall, like this!
- Sponge painted walls are making a comeback too! Learn how to do modern sponge painting.
- Green is totally in, check out these green accent wall ideas.
Where are you going to install a faux brick wall in your house??
Let us know in the comments below!


Amazing transformation! I always wondered how to do the German Schmear, thanks for the tutorial. Looks very easy to do now that you showed me.
So glad you found this help. I was pretty shocked at how easy it was to do the German Schmear technique and I’m loving how it turned out. Have a great day 🙂
Wow! It really does look like a brick wall. I can’t believe how easy and inexpensive the entire project was. Already Pinned this! Love this idea especially in the laundry room.
Thanks Shirley! Ya I was pretty surprised just how real the fake bricks looked too! 🙂
Your laundry room looks great! That wall looks like it cost a lot more than $100. I love the farmhouse look and this looks aged and like it’s been there forever. I can’t wait to see the room finished.
Thanks Jenny!! I’m so glad you think it looks aged too, thanks what I was going for 🙂
That is a really pretty accent wall. What a great addition to the washroom. Pinned.
Thank you!! I’m loving the way it turned out.
This looks fantastic! My laundry room could use something like this! Pinning!
Thanks girl! It really make it easier to do countless loads of laundry when the space is pretty 🙂
That looks really pretty. Are those brick sheets made like paneling? I wouldn’t mind having those in my kitchen-if we ever get around to re-doing it. I love the old world look!
Ya, they are called “hard boards”. They are made from a composite material.
I’m in the process of doing this in my kitchen right now. It’s looking really good so far. The brick paneling was already there when we moved in and I wanted to do something with it. After searching the internet for ideas I found the German Schmear technique and decided to try it. I’m just finishing spreading the spackle now and so far it’s been a pretty easy project. Just messy!
So fun! Just be sure you seal it if it’s going to be in a kitchen. We used watered down paint to seal, but if you didn’t want to lighten it up – you could use polycrylic.
The faux brick looks really nice. Can’t wait to see it with the shelf and the sink installed.
Thanks 🙂
What a wonderful way to get a brick wall. Wonderful job.
Thanks Maria! It certainly makes doing laundry suck a little less.
This looks great, a total transformation!
I’ve never heard of German Schmear before but I love the look, it’s kind of like a whitewash but a bit more texture isn’t it? Very cool.
Hey Julie, yes exactly!
Nice project and not as complicated to do as I thought it would be. Looking forward to seeing your ironing and folding table.
I always love that look – and the DIY looks so easy! I can’t wait to see what else you do with the laundry room.
Thanks 🙂 I was totally surprised with how fast the german schmear part went 🙂
What a difference – it turned out so nice!
Thanks 🙂 I love how it easy it was!
I just did this project and also had a problem with the compound turning a little orange. I was glad to see someone else had this problem as well. I was thinking I was going to have to redo the entire wall. Does the white wash really hide the orange tint?
Yes, the watered down does hide the orange, but it also lightens the entire wall up as well.
Why did you buy the brick panels? I want to do a faux brick wall around my fireplace.
The faux brick panels are from Home Depot, here’s a link: https://rstyle.me/+nNI2fRvjW2o1wD0McEfqgA
Do you think applying a poly or other clear sealer (anti yellowing kind) on the brick panel before applying the joint compound would prevent the brick color from bleeding and avoid the orange discoloration?
Maybe? But that could lead to the joint compound not wanting to stick. It is worth a try on a small piece of scrap before you do it on the whole wall. Let us know if you do try it!