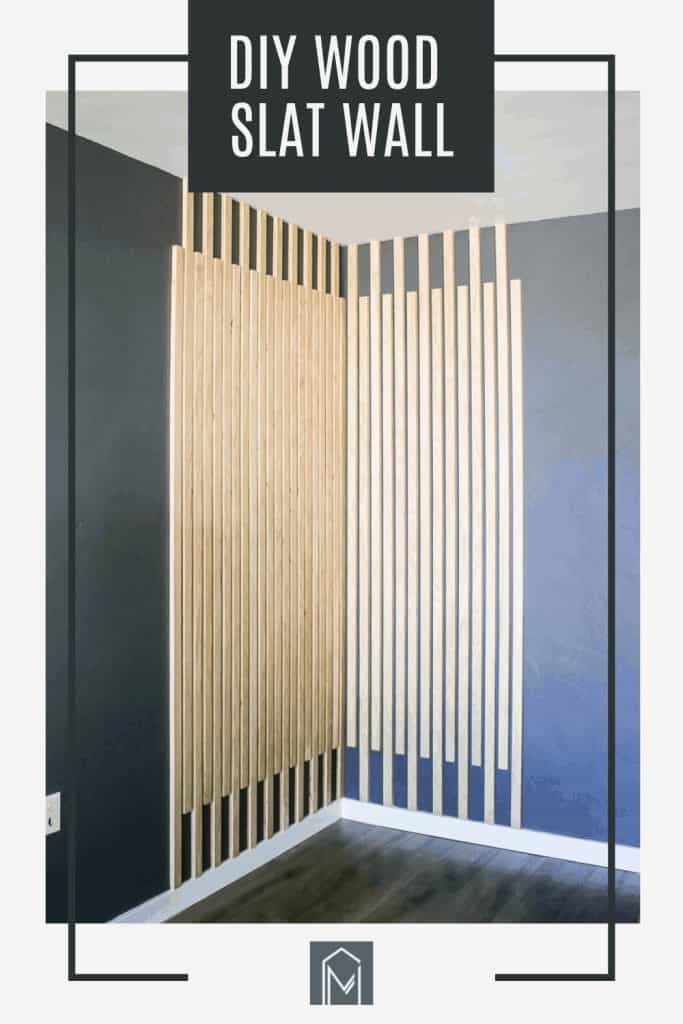
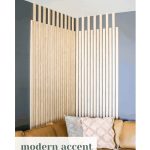
How To Install A DIY Slat Wall | Easy Modern Accent Wall Idea

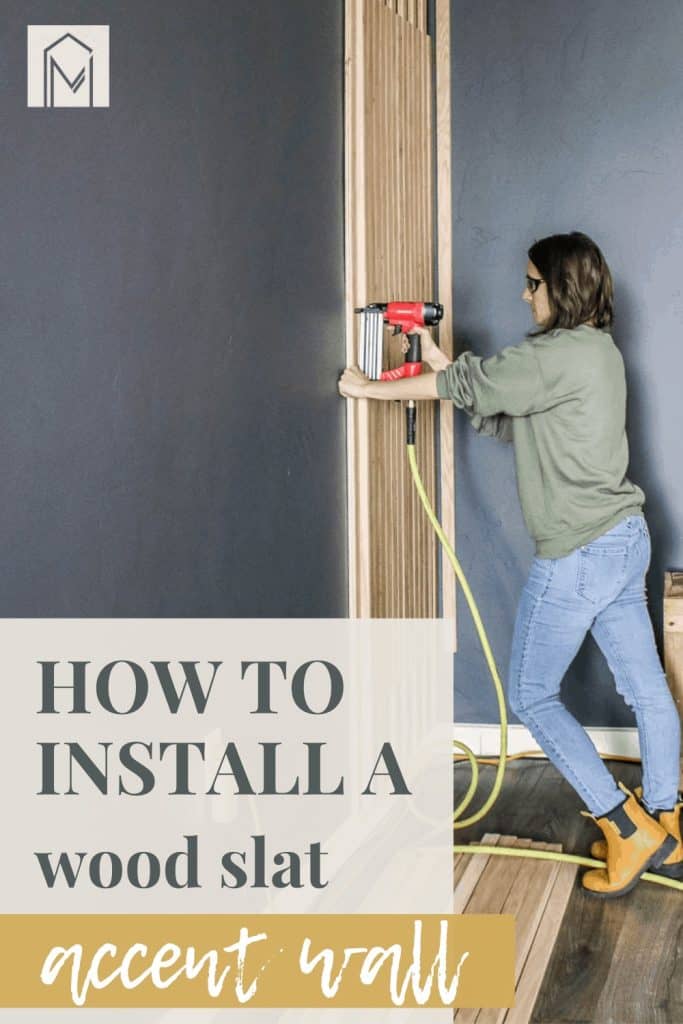
This DIY slat wall makes a big impact and was easy to create! In this step by step tutorial we'll walk you through the whole process of installing a vertical wood slat wall in your home and share a hack with you for how to build this modern wood accent wall cheaper!
Thank you to Arrow Fastener for sponsoring this DIY slat wall project! All opinions are entirely my own. This post also contains affiliate links, but nothing that I wouldn’t recommend wholeheartedly. Read my full disclosure here.
Have you seen the DIY slat wall trend yet? Instagrammers and bloggers everywhere are adding wood slats to their walls and it creates such a modern and fun look. I love that, unlike the shiplap trend that is usually painted, people are letting those natural wood tones shine through!
When I was planning our modern bohemian living room design, I knew I needed to figure out how to incorporate this awesome vertical wood slat wall into our room. It would also look great in a dining room, master bedroom, or home office (or basically anywhere you wanted to create more visual interest in your room).
This modern wood accent wall was SO easy and is definitely a beginner project. Honestly, the hardest part is ripping the plywood sheets down into slats with a table saw. And that is just because a table saw can be a more advanced type of saw. But alternatively, you could use a track attachment with a circular instead!
Alright, are you ready to see how to create a DIY slat wall in your home? Let’s jump in.
Table of Contents
Want to see more of our living room renovation?
- Modern Bohemian Living Room Mood Board & Layout (our next renovation!) – you are here!
- Removing Baseboards: Tips and Tricks
- How To Remove Carpet Tack Strips – 2 Easy Ways!
- How To Install Laminate Flooring on Concrete
- How To Fill Nail Holes in Wall
- How To Paint A Room For Beginners | Ultimate Guide
- Laying Large Format Tiles | Tile Entryway Reveal
- Easy DIY Tapestry Frame | 6 Simple Steps To Create Fabric Wall Art!
- DIY Slat Wall | Easy Modern Wood Accent Wall Idea
- Faux Concrete Wall Panels Behind Fireplace (No tools required!)
- Modern Boho Living Room Reveal
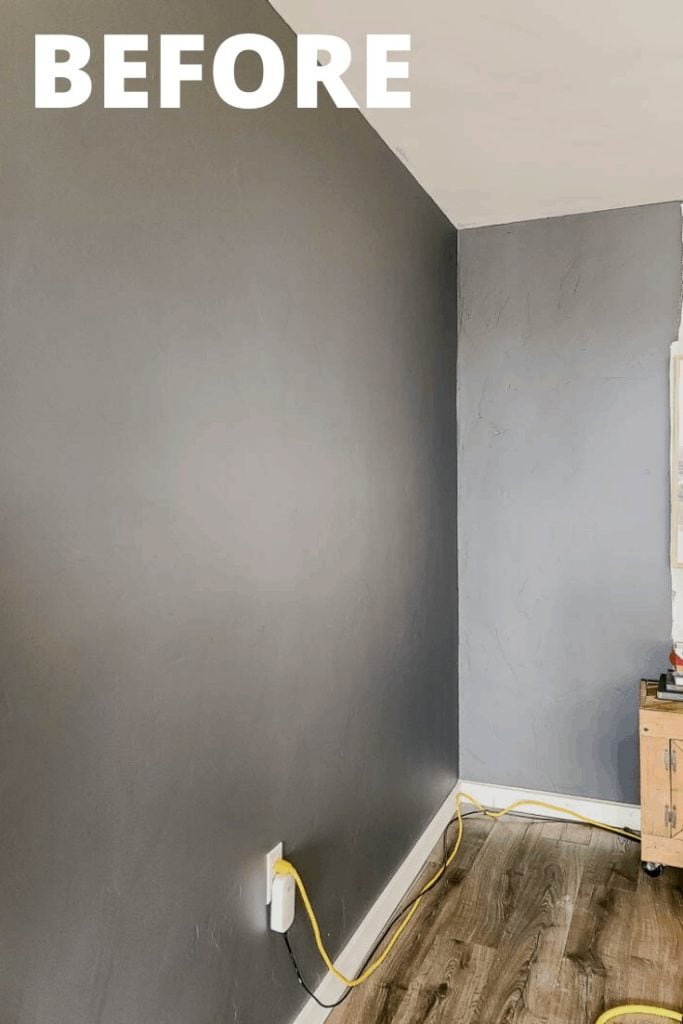
Wood Slat Wall – Before Pictures
Here’s the corner of our living room that we’re going to be transforming as a part of our big living room makeover.
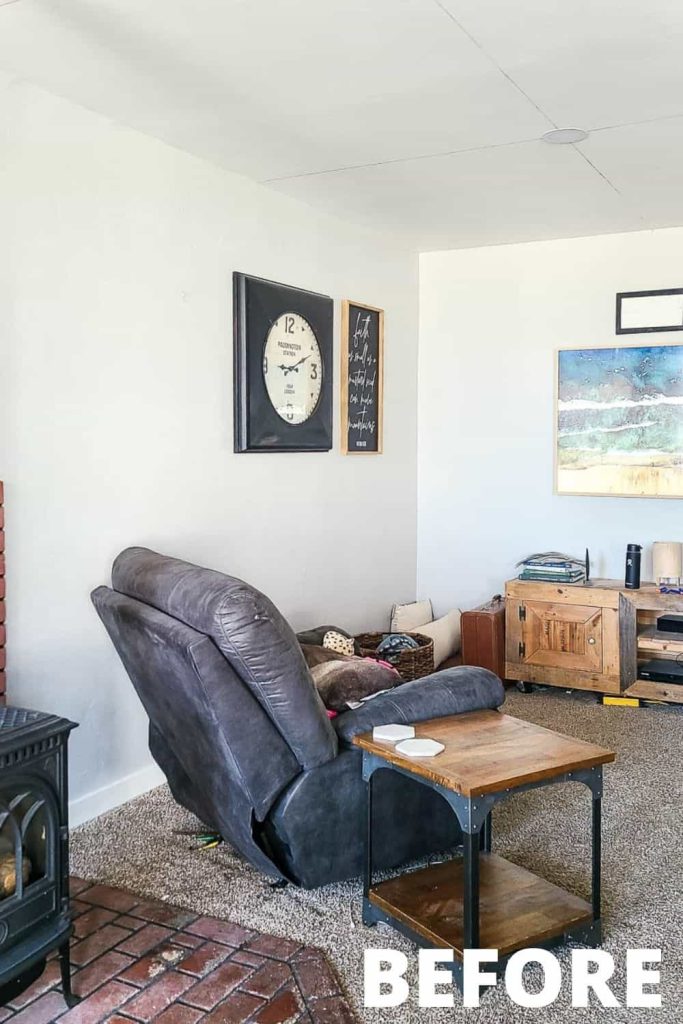
We’re making our way through a lot of fun DIYs in the living room (see our whole living room mood board here). Before we started the wood slat wall, we already painted the walls with this dark gray paint color and installed the new laminate floors, among other things.
So this is how things looked when we started – a pretty blank slate.
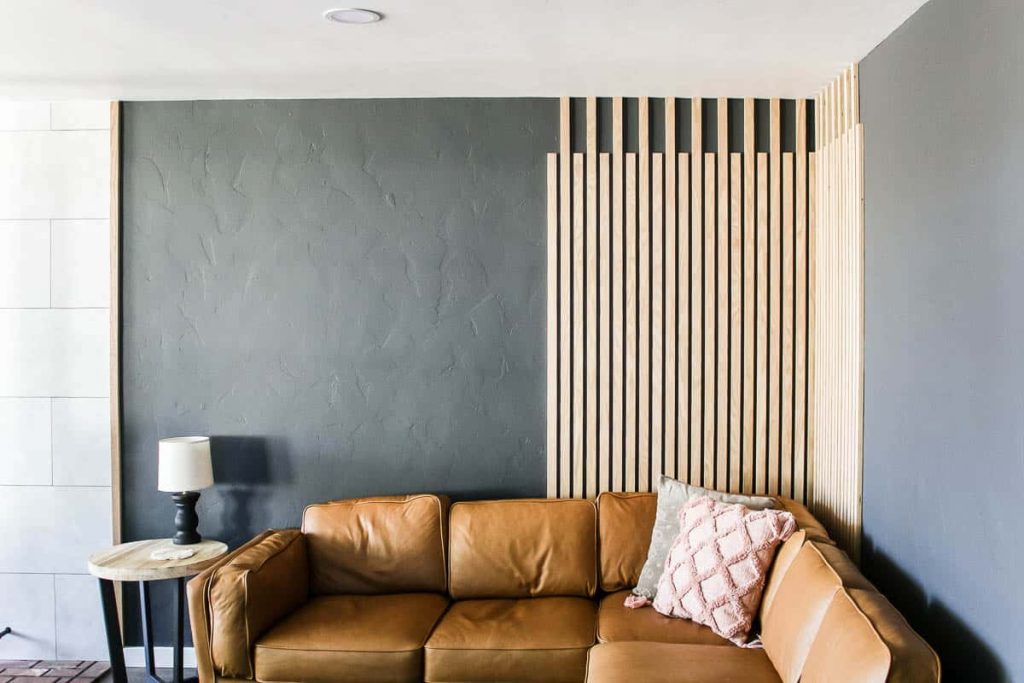
We are going to be putting a new sectional couch on this wall, so the slat wall will be a fun backdrop for furniture and really draw your eye into that corner!
How we made this DIY slat wall cheaper
Lumber prices are literally insane right now. Even since we worked on this project a few weeks ago, the costs have gone up even more! We’re doing all we can to try to keep lumber costs down over here, which means getting creative on the type of wood we’re using for our woodworking projects!
Originally when I imagined adding a DIY slat wall to our living room, I was planning to use 1 by 2 oak boards for our lumber stock (which by the way, a 1×2 does not actually equal 1 inch by 2 inches…read up about the confusing lumber dimensions).
When I went to plan out the supplies we needed for this wood slat wall, I was flippin’ shocked when I realized that just the wood for this tiny little corner accent wall was going to be over $670. The sticker shock got me and I had to pivot this entire project.
Instead of using 1×2 hardwood, we ripped down large 4′ x 8′ sheets of plywood into 1 1/2″ wide strips! This was the best way for us to save money on this DIY wood slat wall.
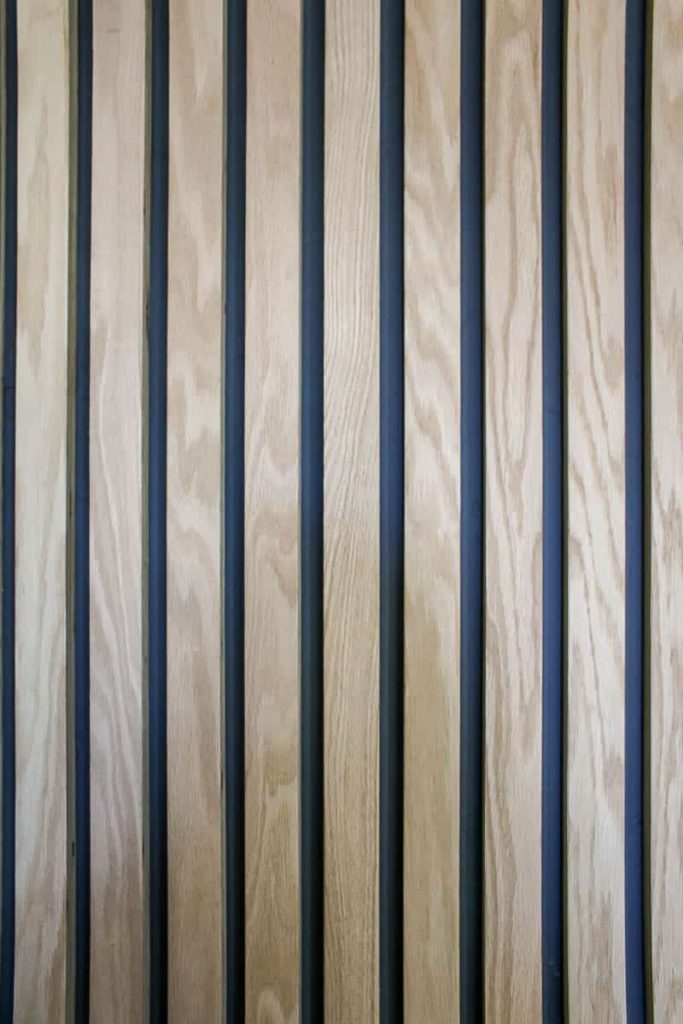
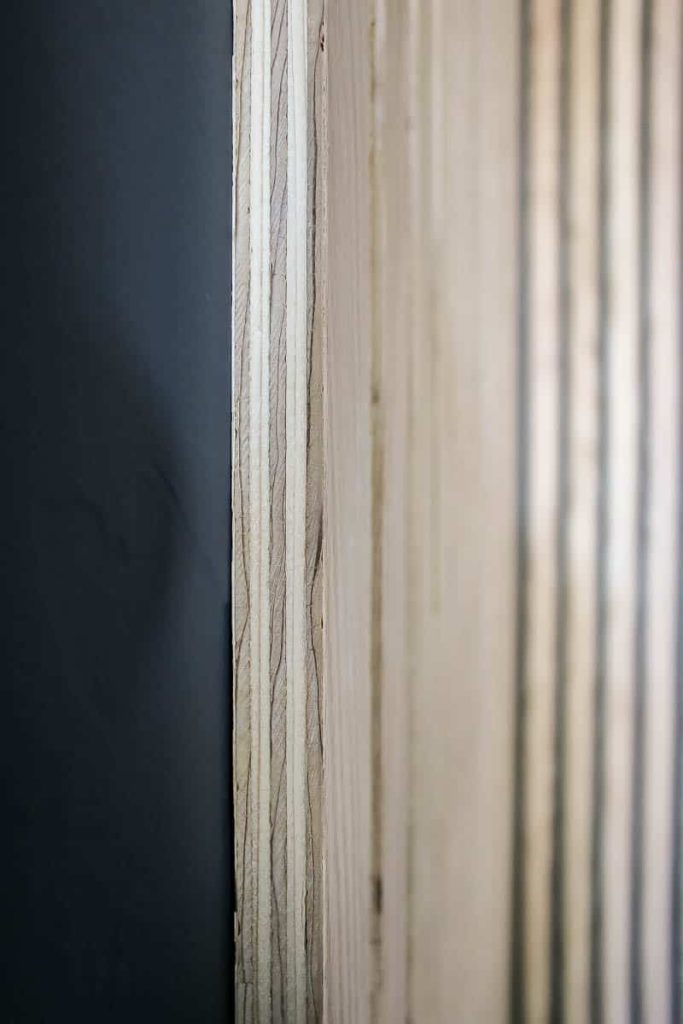
From the front view of the wood slat wall, you can’t even tell the difference between plywood and oak hardwood. From the side angle, you can see the layers of plywood veneers, but honestly… it’s pretty cool-looking.
By ripping down wood slats from plywood, we saved about $500. Can you believe that??
Arrow Pneumatic Brad Nailer (PT18G)
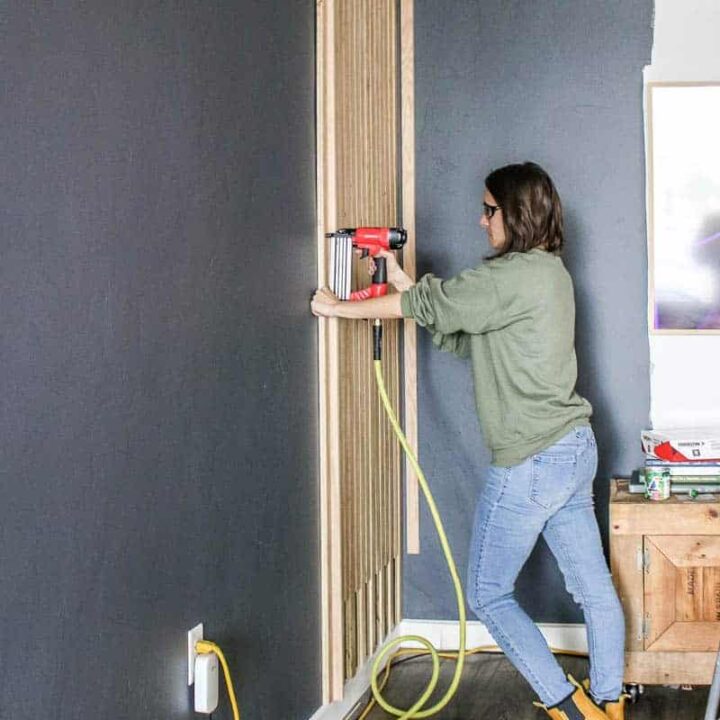
To attach the wood slats to the wall, we’re using Arrow Fastener’s Pneumatic Brad Nailer, which is incredibly easy to use.
It’s an 18 gauge brad nailer, which means the size of the holes that the nail leaves are smaller than a finish nailer – which is usually 15 gauge or 16 gauge (the higher the number of the gauge, the smaller the hole). Read more about the difference between brad and finish nailer here.
What does pneumatic mean?
When you say that a nail gun is pneumatic, it means that it operates using the pressure of air rather than a battery. So in order for pneumatic nail guns to work, they have to be plugged into an air compressor.
DIY Slat Wall – Video Tutorial
If you love DIY videos, be sure to subscribe to our YouTube channel!
How To Make A DIY Slat Wall – Easy Step-by-Step Guide
Supplies for DIY slat wall:
- 4′ x 8′ sheet of plywood ( we needed about 1 1/2 sheets for this corner accent wall )
- Table saw
- Miter saw
- Orbital sander with 150-grit sandpaper
- Matte polyurethane
- Foam paint brush
- Arrow pneumatic brad nailer
- 1 1/2″ brad nails
- Wood filler
Step 1. Cut plywood down into slats.
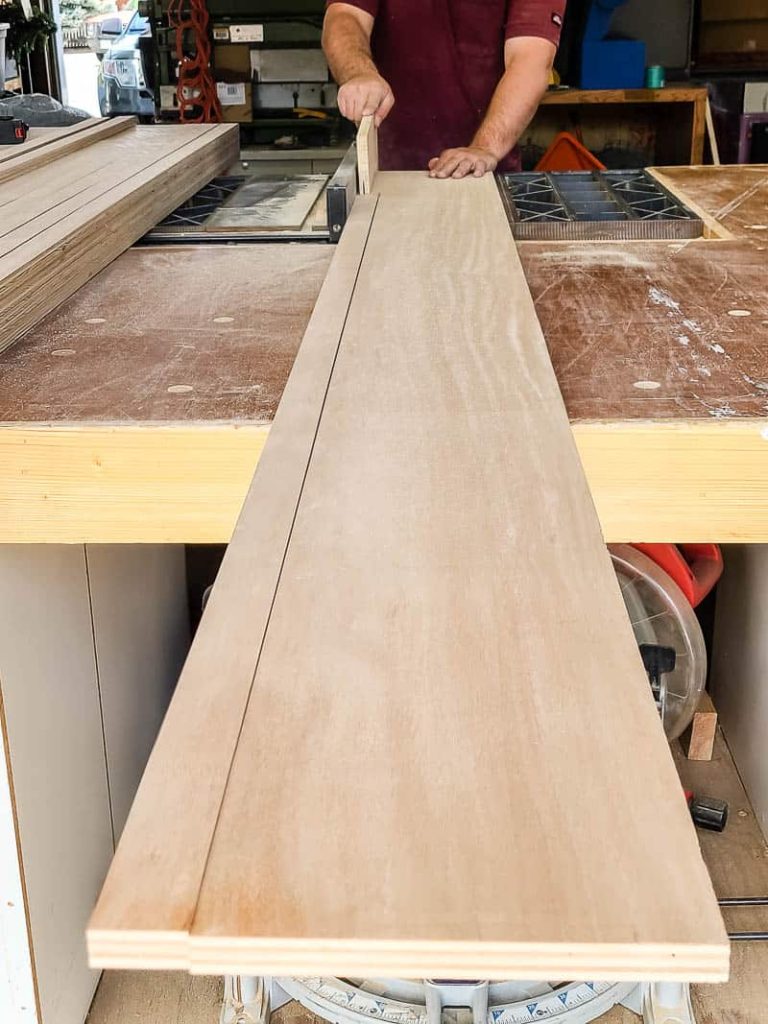
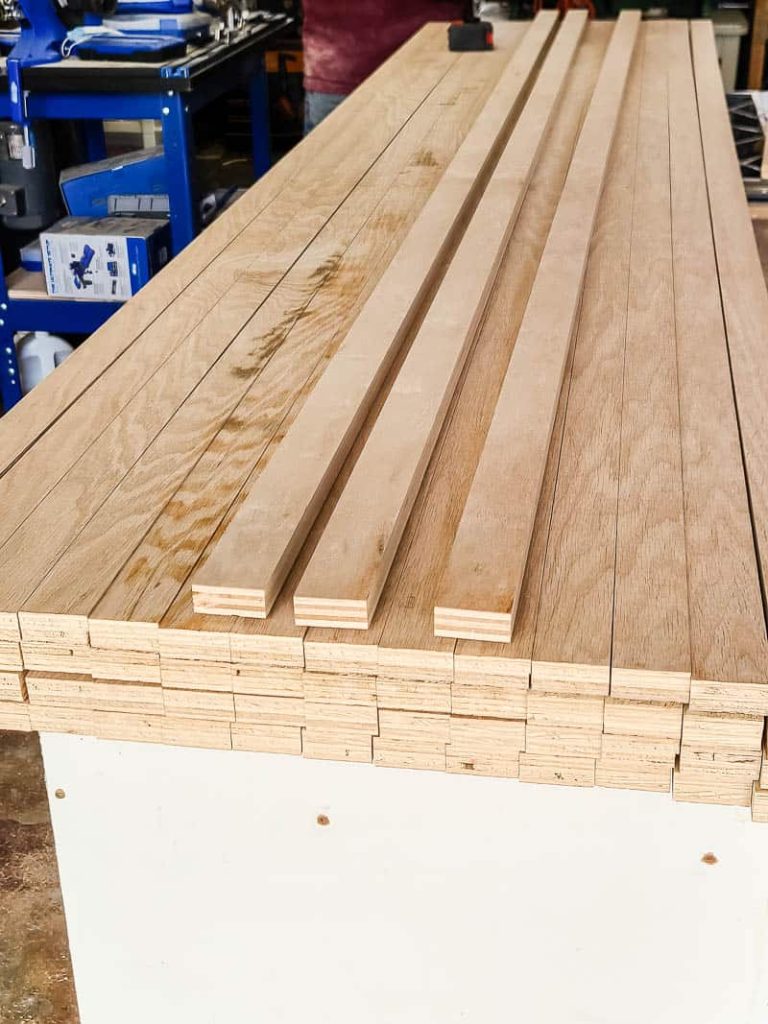
The first step was to cut down the vertical strips of wood from the plywood with our table saw. We made the width of the slats 1 1/2 inches, so they are the same size as a 1×2.
Alternatively, you could just use 1×2 boards. But, as I mentioned earlier, this will cost ya about $500 more.
If you want to avoid the additional cost on your DIY slat wall, we definitely recommend starting with plywood sheets and ripping them down to 1.5 inch slats with a table saw.
Don’t have a table saw? You could use a track attachment with a circular saw!
Step 2. Sand wood slats.
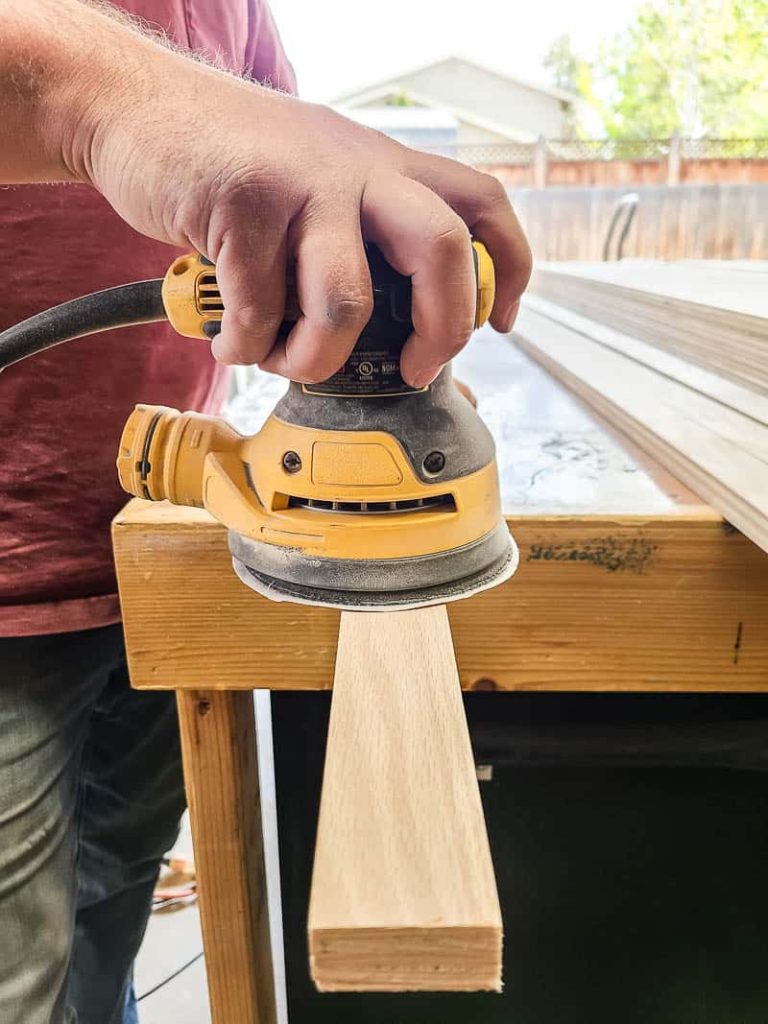
We recommend starting with sanded plywood sheets, so the wood should already be pretty smooth. But it helps to quickly run the orbital sander over the surface with 150- or 220-grit sandpaper and then lightly sand the corners of the slats so they aren’t as sharp.
Step 3. Seal wood.
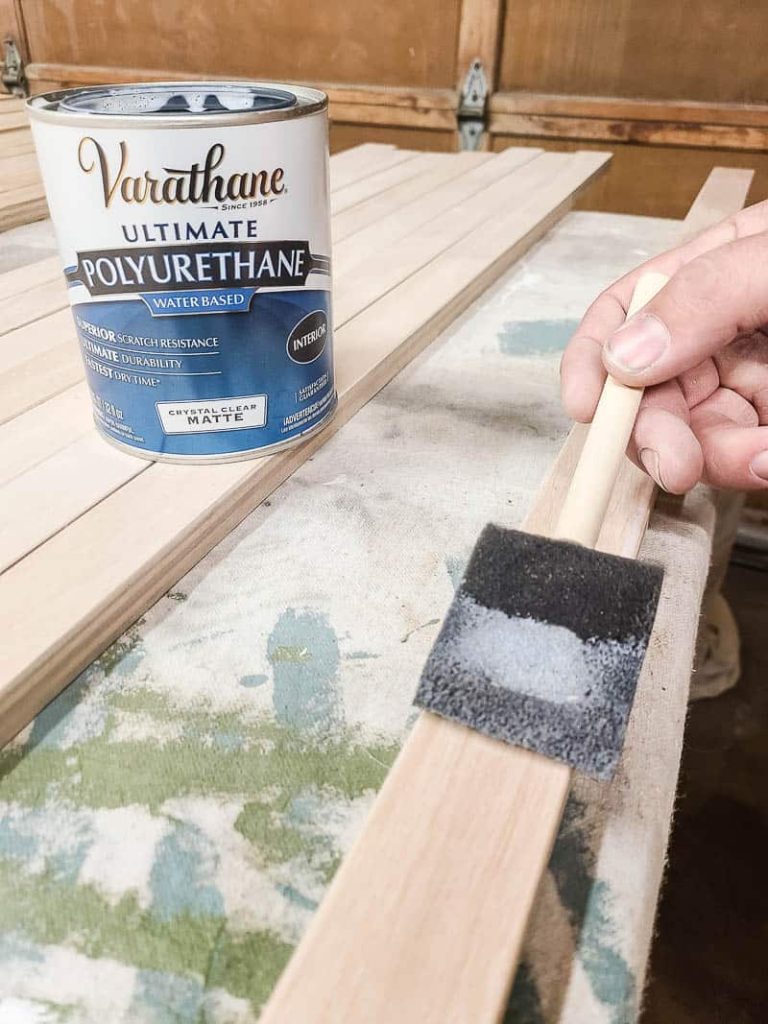
After you’re done sanding, wipe everything down to remove the sawdust. Next brush on matte polyurethane with a foam brush. We did two coats.
I wanted a matte finish to the wood slats on the wall. If you want something with a little more shine, feel free to choose a different finish to the poly.
If you’re trying to decide whether to use polyurethane vs polycrylic for your project, check out this article with an overview of each.
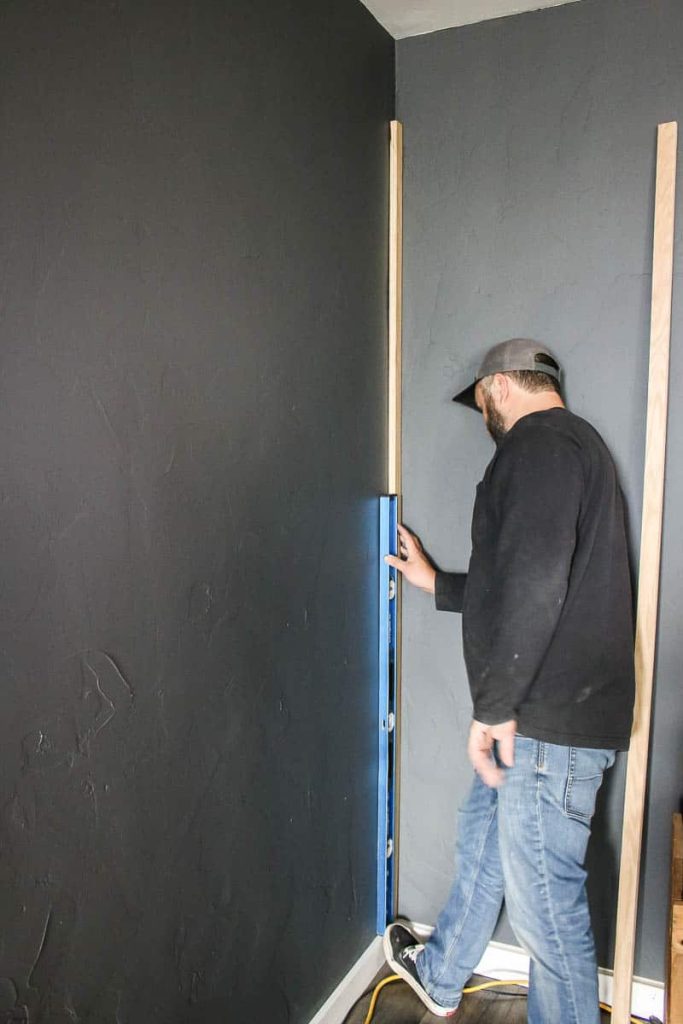
Step 4. Install vertical wood slats on the wall.
Now the fun starts! You can start adding the wood slats to the wall!
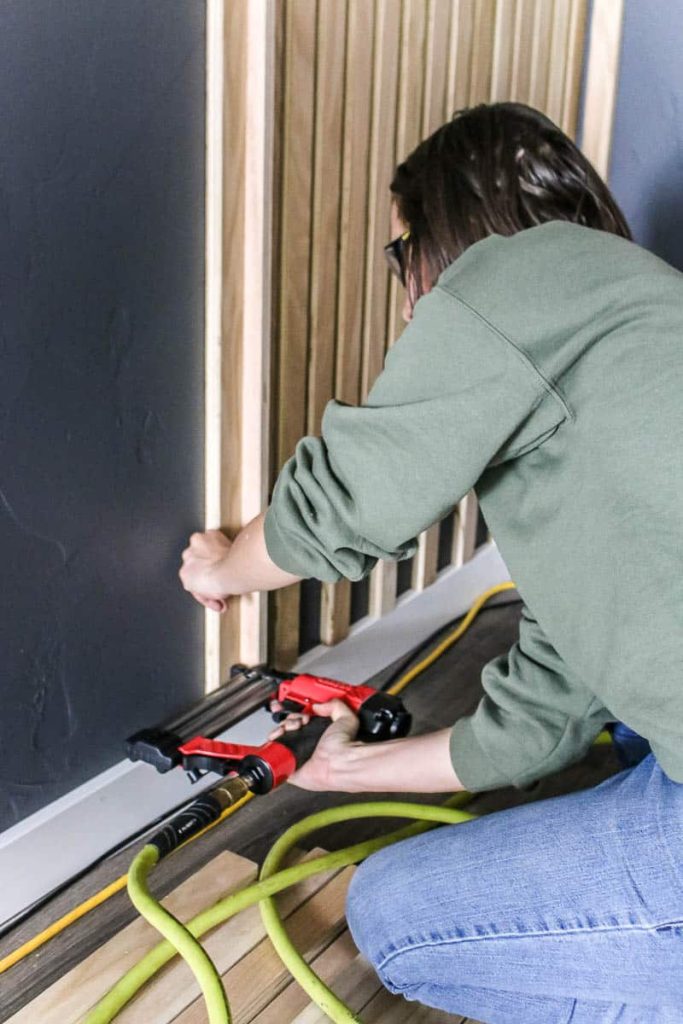
Grab your Arrow Fastener brad nailer and load it up with 1 1/2″ 18 gauge brad nails. Hook it up to your air compressor and turn the air compressor on.
The first slat is the most important to get nice and level. Even if you live in a new house and not an old one like us, chances are that your walls are not 100% perfectly straight, so don’t rely on them.
Hold the first wood slat in the corner along with a 4′ level to make sure that the first board is level before attaching.
Add nails in a few spots on that first slat while keeping it level. You will need one nail at the top of the board and a couple spread out evenly in the middle and one more nail at the bottom of the wood slat.
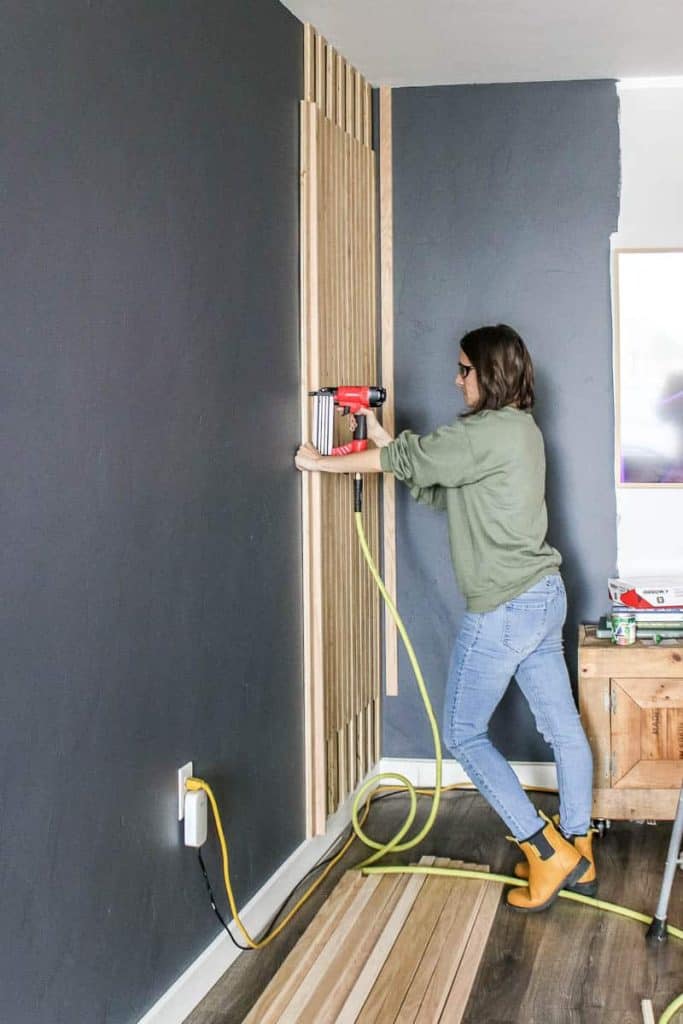
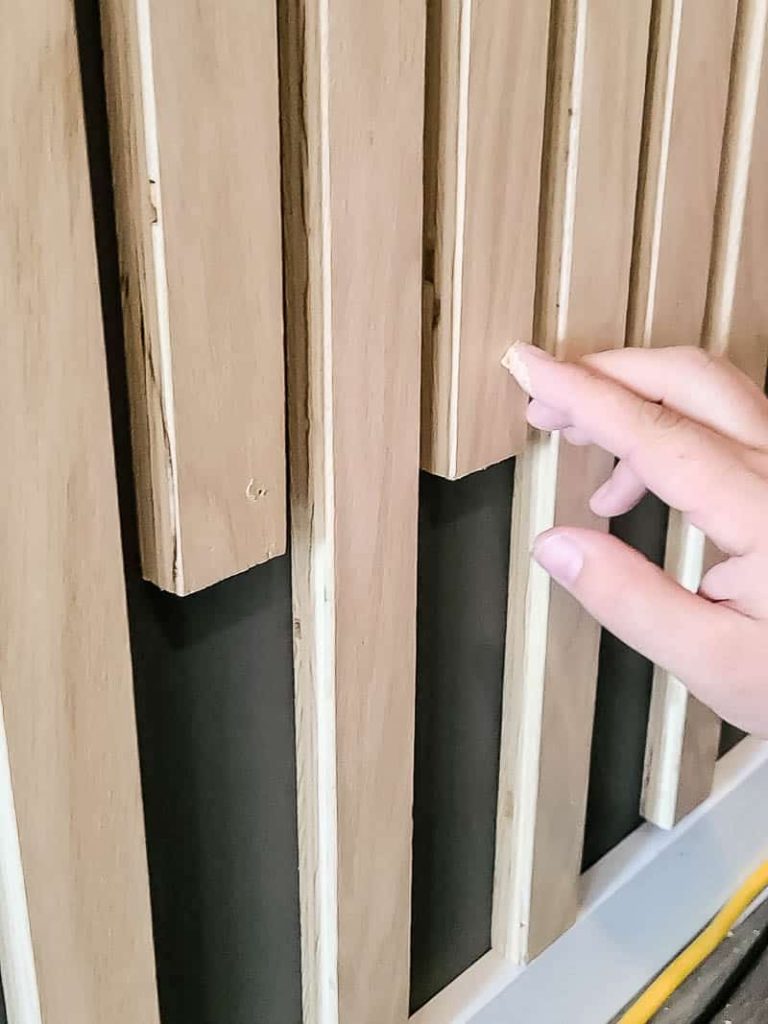
Now that you know that the first slat is level, you can set aside the level and simply use a spare wood slat turned on its side as your spacer between the boards for the rest of the DIY slat wall.
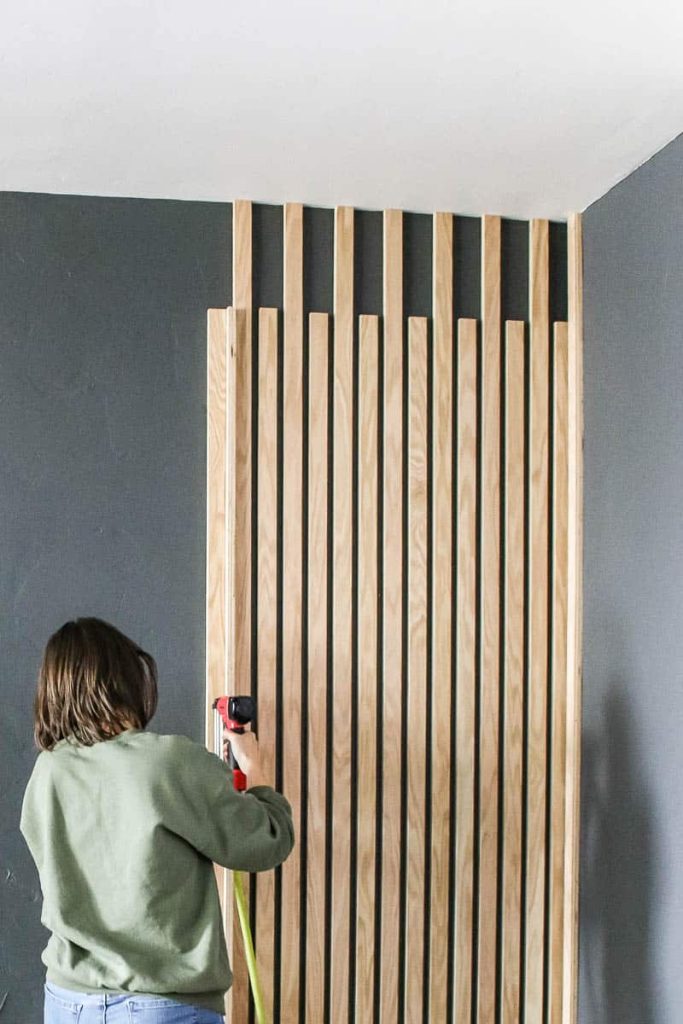
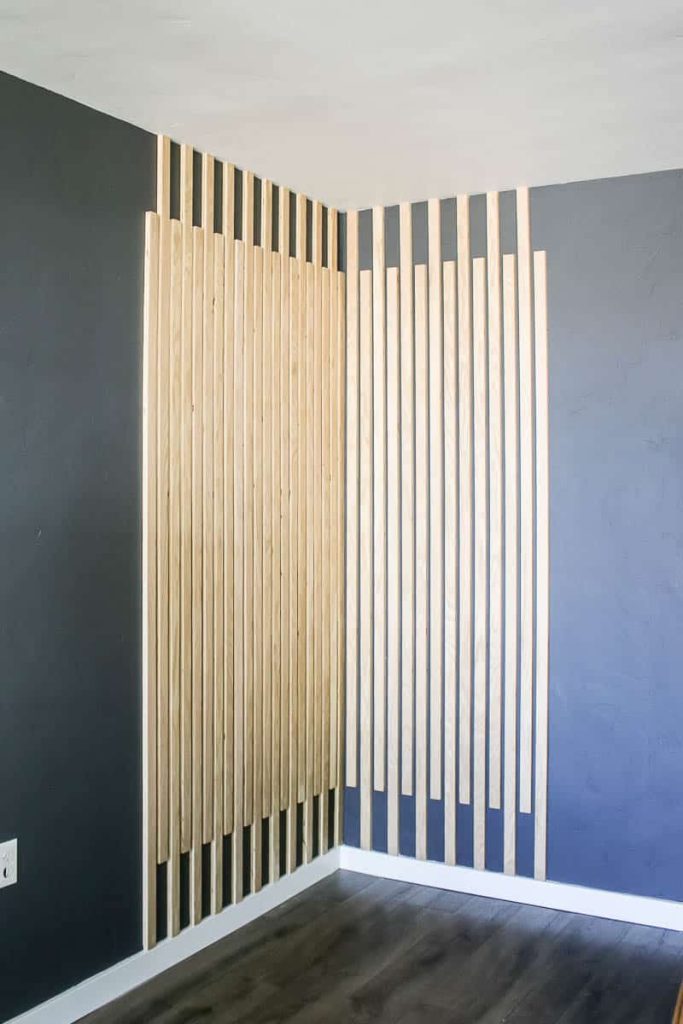
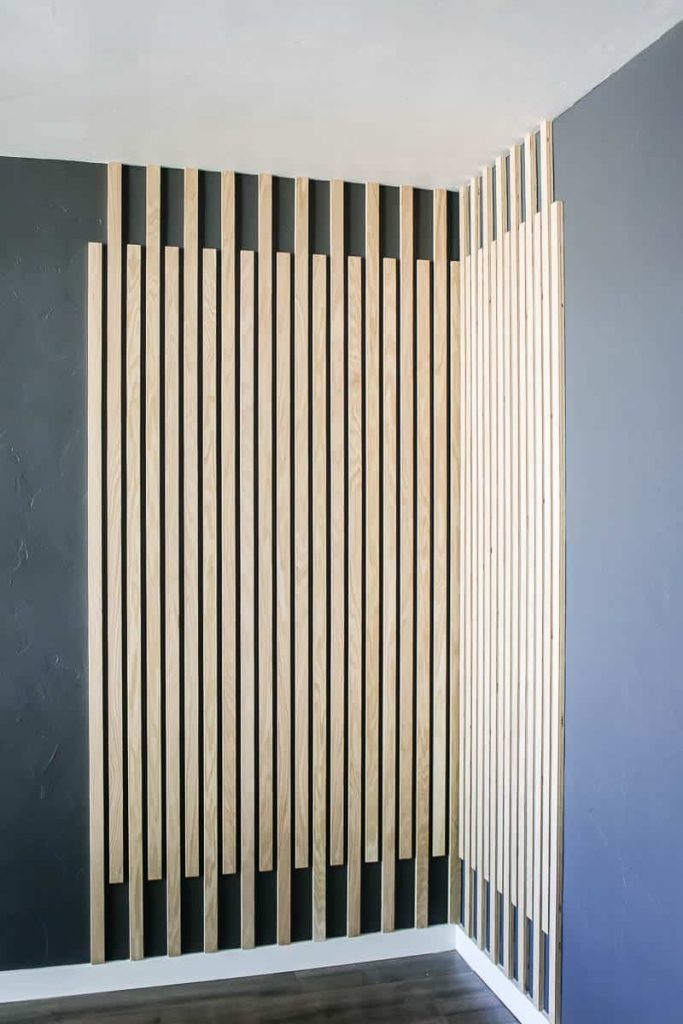
Here’s the deal… the walls in our living room are just over 8′ tall so the 8′ wood slats from the plywood sheets weren’t going to reach from the top of the baseboards to the ceiling. So what we did instead we embraced that into our design!
We chopped about 8″ off of each one and then alternated the wood slats so they were either touching the ceiling or touching the baseboards. I love the unique character this adds to our wood slat wall!
Don’t worry, we were able to use up the scrap we cut off each wood slat…stay tuned for the full reveal of the living room to see how we creatively used them!
Using an extra wood slat as the spacer between boards on the wall makes this so easy! You just turn the extra wood slat sideways and hold it up against the most recently attached slat. This will be your spacer.
Grab your next wood slat and hold it flush up to your spacer and nail it into place! It’s seriously that easy!
The thickness of the plywood is 3/4″ so once you turn the slat on its side to use as a spacer, that will be the distance between the boards on the slat wall.
Step 5. Fill nail holes on wood slats.
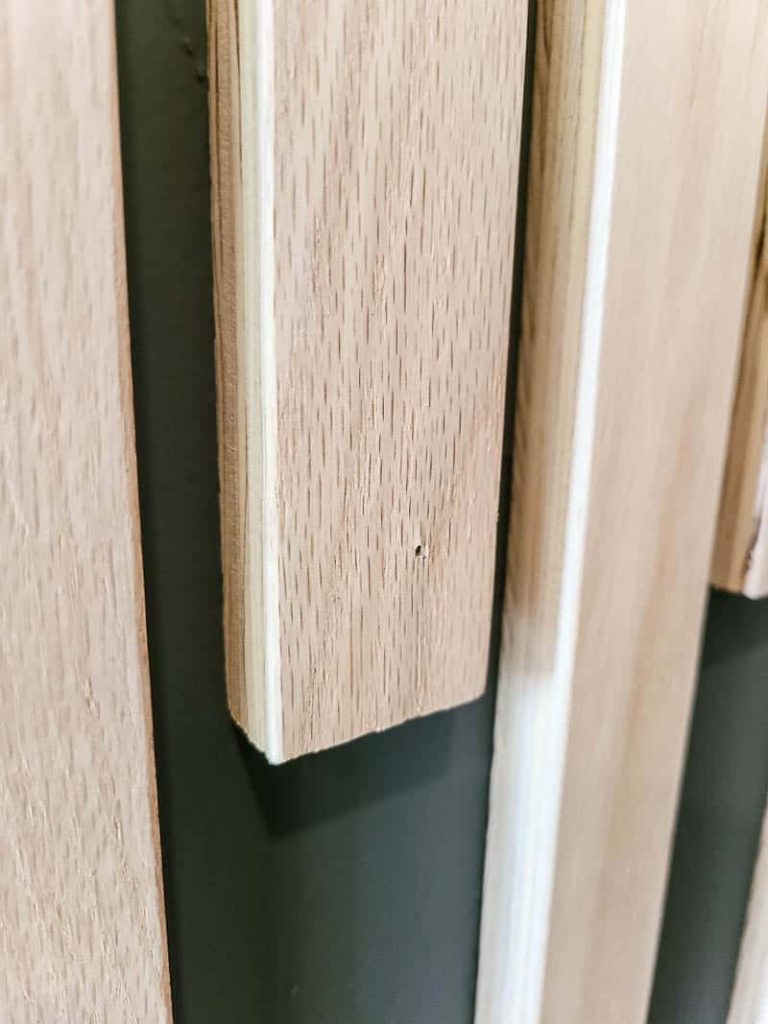
The hole that the 18 gauge Brad nail gun leaves behind on the wood slats is pretty dang small. You could totally get away with just leaving it and not filling the holes, but we decided to fill them.
We used this wood filler, which was a great match for the natural plywood color. We rubbed it on with a finger and immediately wiped it off as smoothly as we could with the palm of our hand.
By doing this, we avoided the need to sand the filled nail hole later. Because when you sand the wood, you’ll also sand off that poly finish and we didn’t want to have to reapply that.
DIY Slat Wall – After Pictures
Simple as that, guys! I told you this DIY slat wall was easy! All you do is cut the wooden slats down to size and nail them to the wall.
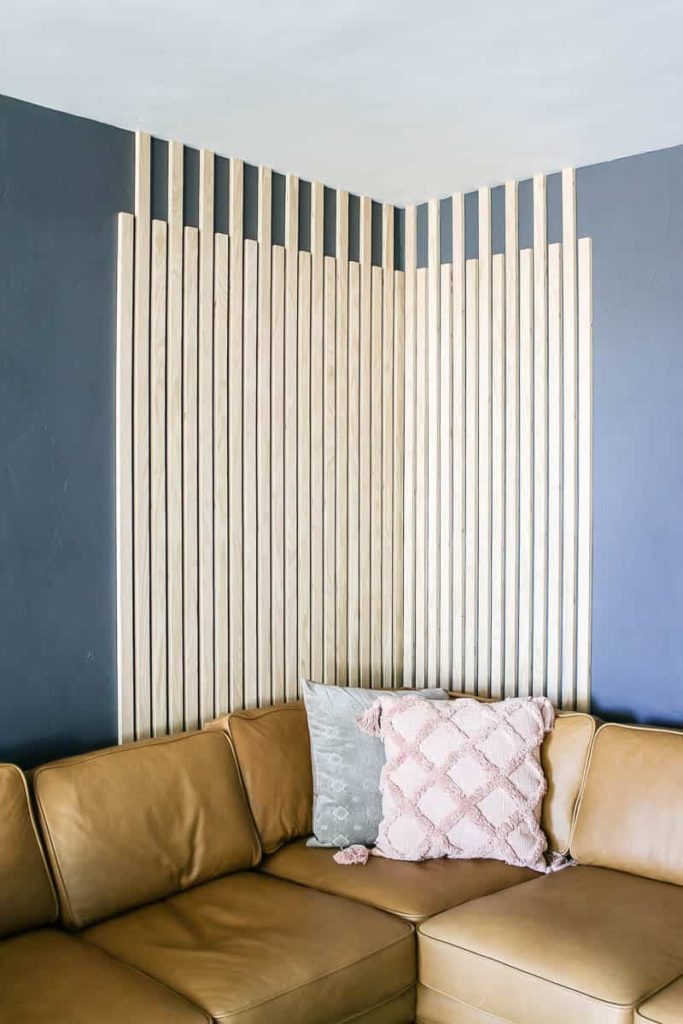
And the impact that the vertical slats have on the entire room is amazing!
Can’t wait until we get the rest of our new furniture and decor in here so the feature wall can really shine.
Stay tuned as we continue sharing our living room makeover tutorials and get ready for the big reveal!
How To Create A DIY Slat Wall
This DIY slat wall makes a big impact and was easy to create! In this step by step tutorial we’ll walk you through the whole process of installing a vertical wood slat wall in your home and share a hack with you for how to build this modern wood accent wall cheaper!
Materials
Tools
- Table saw
- Miter saw
- Orbital sander
- 150 grit sandpaper
- Arrow brad nailer
- Foam paint brush
Instructions
- Cut plywood into with 1.5 inch slats with table saw.
- Lightly sand the slats with 150 grit sandpaper and orbital sander.
- Seal slats wood matte polyurethane applied with a foam paint brush.
- Install vertical wood slats on the wall with Arrow's brad nailer and 1 1/2" nails. Be sure to use level on the first slat. Use a spare wood slat turned on its side as a spacer before the boards for the rest of the DIY slat wall.
- Fill nail holes with wood filler (if desired).

Your Walls are Beautiful. I love it!!!!! Jean
Thanks!
Is it part of the current style to just put slats on a portion of each wall? Just to be curious, why didn’t you call it an accent corner? I must confess I haven’t spent much time on Instagram, or other sites that show what tastes are popular now. I am so glad to see the painted wood style lose favor. I always have and always will like natural wood better. A little stain is fine, as long as the natural grain beauty still shows through. I like watching your house evolve, and I enjoy your taste. You often surprise me, but each project turns out gorgeous. ?
HI, can i use wood glue to attach my wooden slab to the wall as a subtitute for nail?
Wood glue would be tough because it takes a while to dry to set and there is no way to clamp the slats to the wall. Construction adhesive could work, but you still probably would need nails to secure while it dries.
Did you use glue? And if so what kind worked for you? I was thinking lock tight instant set to put them up as my walls are concrete and stucco and nailing would be a nightmare.
Since you’re not hitting a stud with each slat, how does it not pull out? I’m doing one too and don’t want to use adhesive so it’s easy to remove.
We haven’t had issues with it because it’s purely decorative and nothing is hanging from it. You can simply slightly angle the nail gun as you go to help prevent that!
What was the thickness of the sheet of plywood? 3/4 inch? 1 inch? Thanks! It looks beautiful!
We used 3/4 inch plywood sheets.
Looks great as I’m about to embark on a similar project!
Just curious, what type of plywood it is? Poplar, pine…?
The grain looks nicer than the junky plywood on the HD link.
Thanks for the info!
Good catch, I think that link changed! I’ll update. We used Red Oak Plywood like this: https://rstyle.me/+3350I2_s50YqYcLwfH2seg
Following your blog to make a slat wall. But it’s been a nightmare for me. I used sanded aspen plywood but when I cut it into slats its chipping off from the sides. Would love your advice on this. Thanks in advance
Sorry, you’re having trouble Sonali! I would recommend using painter’s tape along the cut line to prevent chipping when cutting the plywood and getting a Trim saw blade. A trim saw blade just has more “teeth” to prevent chipping. If you are still having chips you can use a piece of scrap wood over your cut line which will take the chips and leave your plywood chip free.
Hmm. Wonder how many nails pierced electrical wires that you couldn’t see? Even if you had no outlets or switches in that corner, wires may still run through the studs. That’s why I’m hesitant to blind nailing. Looks great!
We are confident there were no electrical wires behind this wall. This is a converted garage with concrete block walls covered with drywall. I would recommend that your nail size be so long that it goes through the wood and drywall to pierce any unseen wires.
I ran across your article while planning the slat wall project in my home. Love your design, I’ll have to contemplate this. I do want to make one comment, unless I misunderstood what you meant “(the higher the number of the gauge, the bigger the hole)” , nail holes will be LARGER with lower the gauge number, NOT the higher the gauge number. They’re inversely related.
Silly me, yes! I’ve adjusted.
You didn’t worry about hitting studs? Have they stayed in the wall well?
Both of these walls were concrete under drywall, so we didn’t really have studs. However to help them stay better in the walls, you can angle the nail gun as you go. That helps a ton.
Both of these walls were concrete under drywall, so we didn’t really have studs. However to help them stay better in the walls, you can angle the nail gun as you go. That helps a ton.
Your project turned out amazing. I like your detailed and in depth tutorials and even bookmarked it so I can refer back to it as needed.
I’m getting ready to do some different projects using this idea. In my minds eye, I want to use a mostly natural look like this project has but I currently have a few different colored stains such as dark walnut, ebony, and navy blue that I would like to weave into the design. My idea is to stain only one board in each color then dry fit one into the project about every 6th or 7th slat. My thinking is it would be just enough to add some variation and at the same time if I don’t like the look then I can still use the stained slats as a frame or for something else… in other words it wouldn’t be a wasted idea.
I love this idea and hope it turns out for you. If you can come back and share a picture of it, I’m sure others would love to see it too!
One tip if you don’t want the ply showing on the outside boards you can use iron on edge banding, not expensive.
Yes for sure! I don’t mind the ply but you could definitely cover it if you wanted.