DIY Hello Sunshine Sign For Spring & Summer
This DIY Hello Sunshine sign made with reclaimed wood will brighten up your front door porch as you decorate for Spring and Summer.
Did you know that a sunny day is proven to lead to more happiness? It’s a fact, the brain produces more of the mood-lifting chemical serotonin on sunny days than on darker days.
As we sit right in the middle of Spring and stare down Summer as she fast approaches, hopefully, you’re getting some beautiful rays of sunshine.
Even if there is still snow where you are, this DIY hello sunshine sign will help you dream of the warm weather up ahead.
Since I work from home, it’s really important that when the sun is out, I get out of the house even just for a few minutes a day.
A breath of fresh air, a walk around the block, or even a trip to the grocery store does wonders for my mind. I definitely have to get out and say “hello sunshine”.
Related Posts – Other Wood Projects:
- Ombre Painted Wood Sign For Farmhouse Master Bathroom
- DIY Reclaimed Wood Bed
- Pallet Wood Side Table With Rustic Style
- 17 Awesome DIY Woodworking Projects ANYONE Can Do
- DIY Scrap Wood Projects
- 10 Pallet Wood Project Ideas
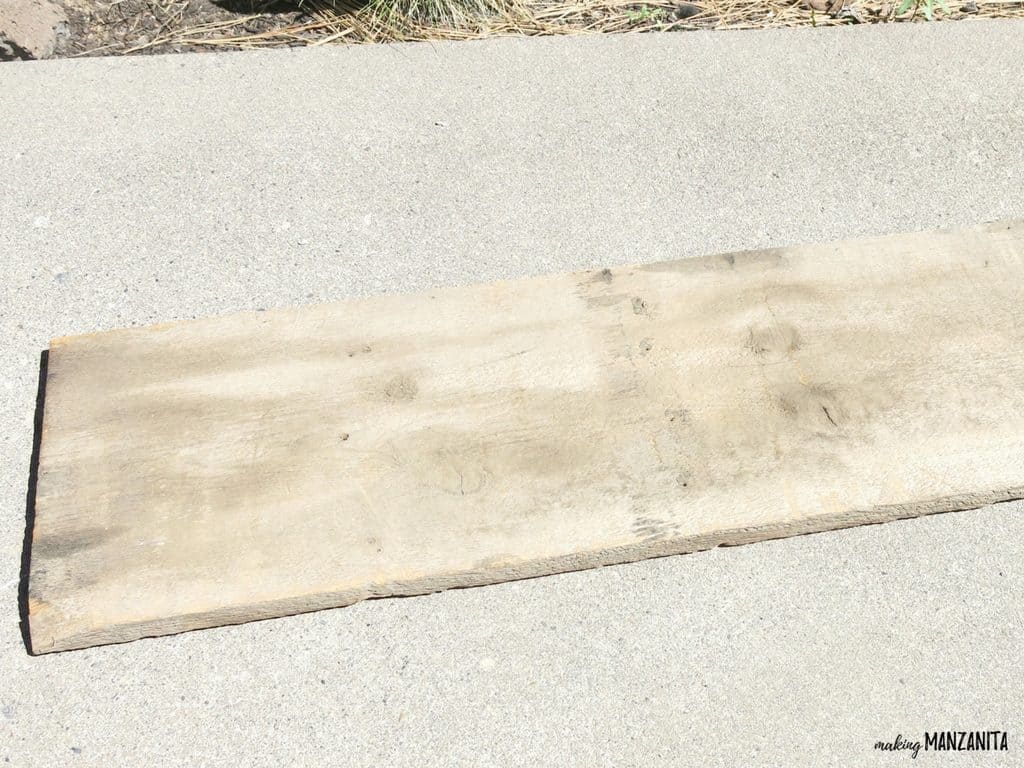
I’ve been sitting on this amazing reclaimed wood for a while now and to be honest, I don’t even know where my hubby picked it up. But I knew it would make a perfect large sign for the front of our house.
You’ll have to excuse the horrendous exterior that you see in these pictures. There is definitely a reason that I haven’t shared many pictures of the exterior of our house. It is in desperate need of a painting job.
The good news is that we have that DIY project slated for later this Summer and can’t wait to share the whole process with you. It’s going to make a WORLD of difference. (UPDATE: See how our new exterior paint turned out here!)
Until then, just turn your little head and look the other way… ok maybe don’t look the other way. Just focus your attention on the beautiful DIY hello sunshine sign instead.
Watch our Hello Sunshine Sign video tutorial below!
This Hello Sunshine sign tutorial contains affiliate links, but nothing that I wouldn’t wholeheartedly recommend anyway! Read my full disclosure here.
How to Make a DIY Hello Sunshine Sign from Reclaimed Wood
Supplies for DIY Hello Sunshine sign:
- Reclaimed wood board (or new wood, up to you) – mine is about 12” by 50”
- Hand Sander
- Silhouette Cameo (or another type of cutter)
- Adhesive shelf liner (used to make stencil)
- 2 different colors of acrylic craft paint
- Foam paint brush
- Chalk
- 100 & 220 grit sandpaper
- UV Resistant Clear Coating
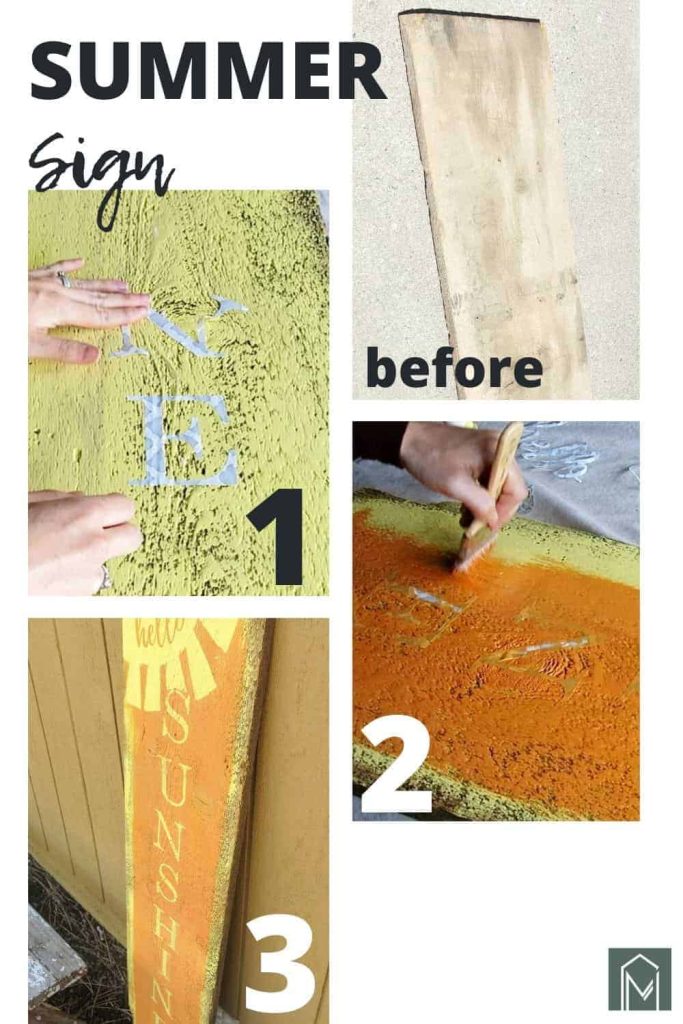
Step 1. Sand wood board.
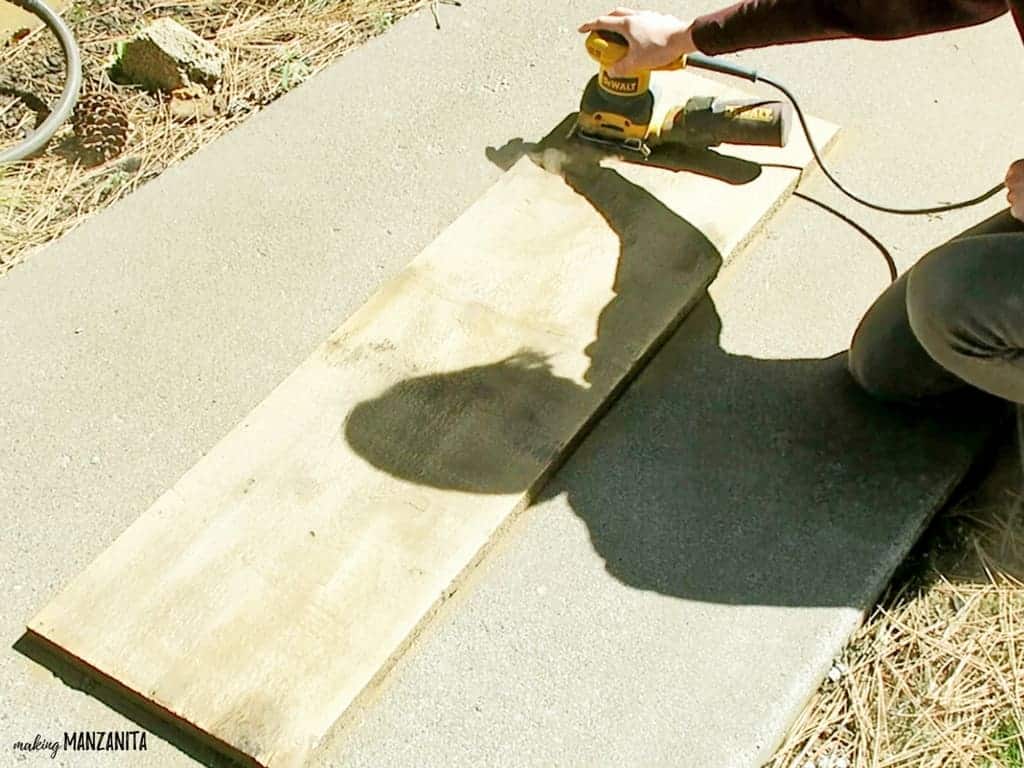
If your wood board is as dingy as mine was you definitely want to give it a good sanding with a hand sander and a 100 grit sandpaper.
I’m all for keeping wood rustic normally, but you’ll have a much easier time applying the stencil and painting on a sanded surface.
Once sanded, wipe clean or blow off all of the sanding dust.
Step 2. Paint sign with 1st color.
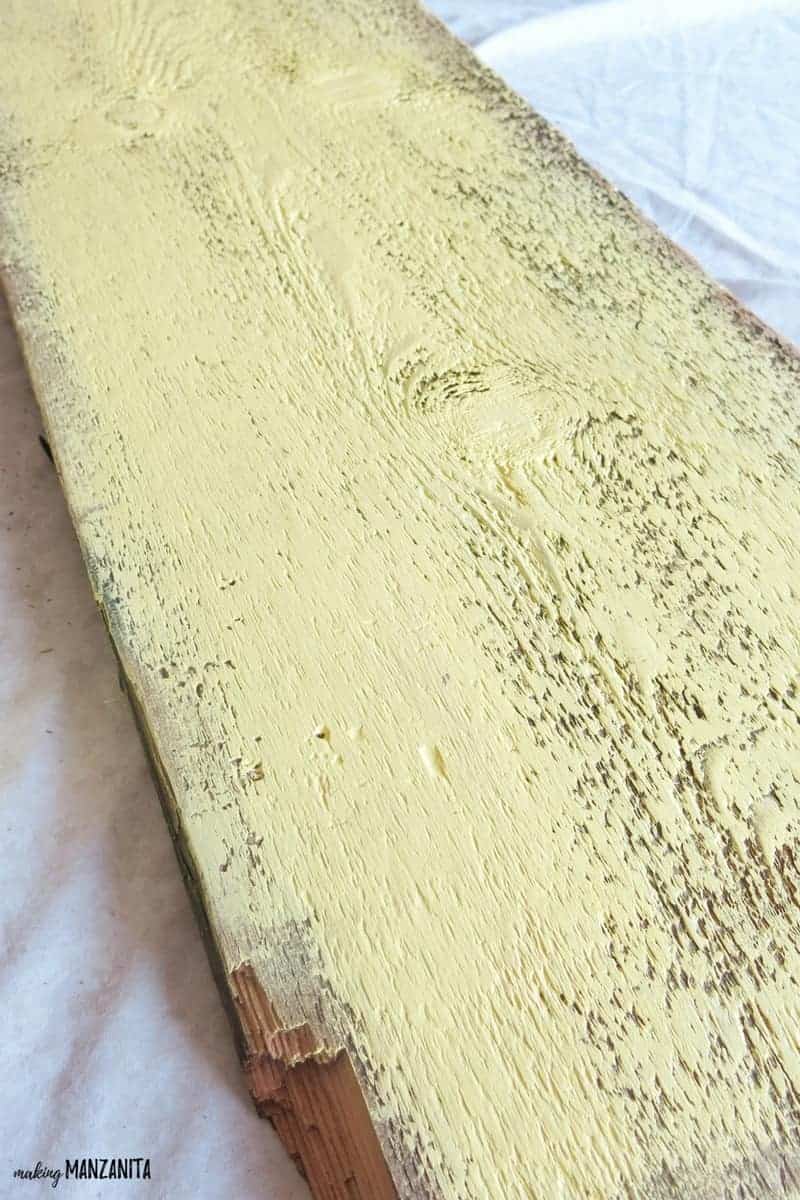
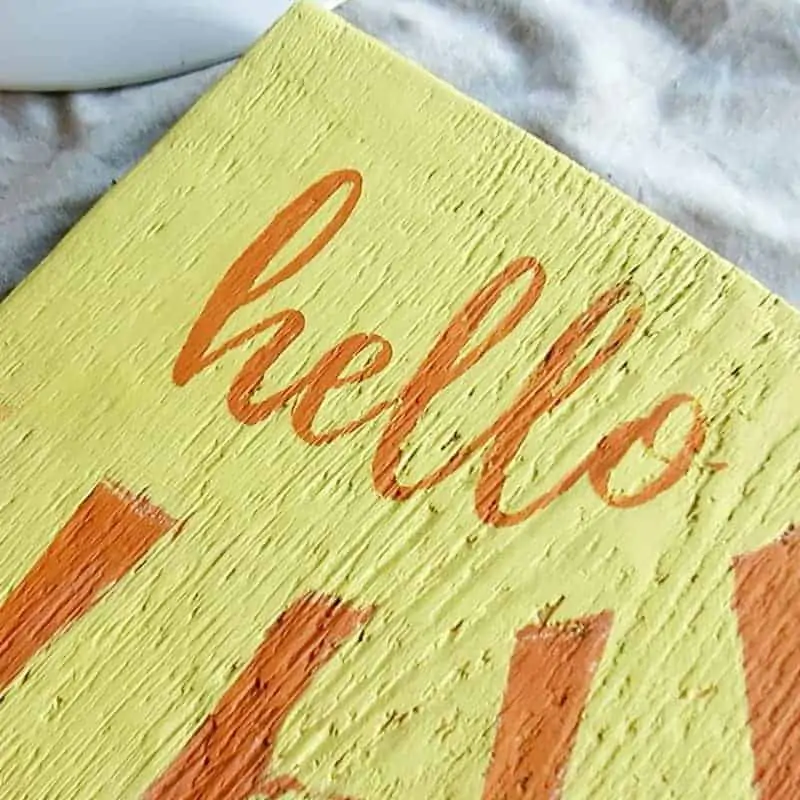
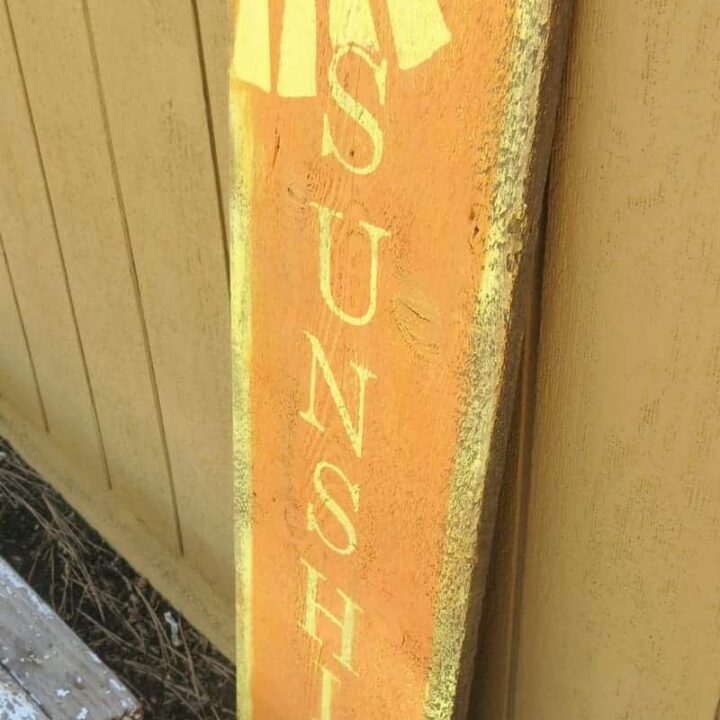
This undercoat of paint will be the color of the letters. I chose to go with this fun shade of yellow.
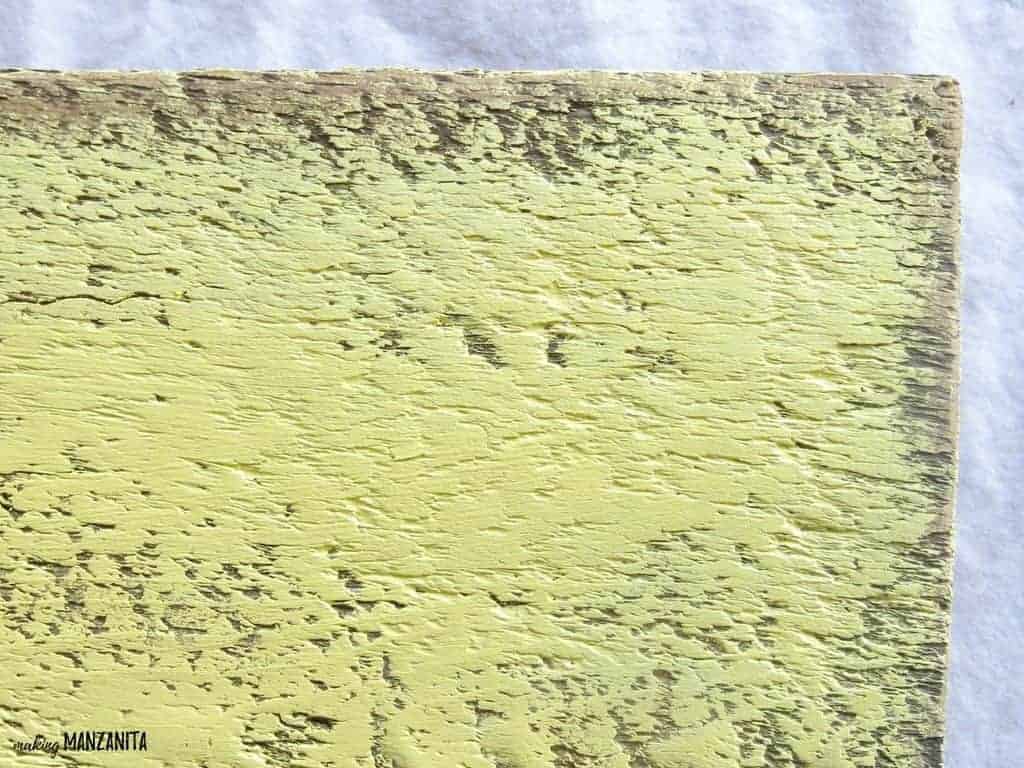
When I was painting the sign, I left a small border around the outside of the wood board. I think it makes it look a little more rustic. Once painted, let dry (approximately 1 hour).
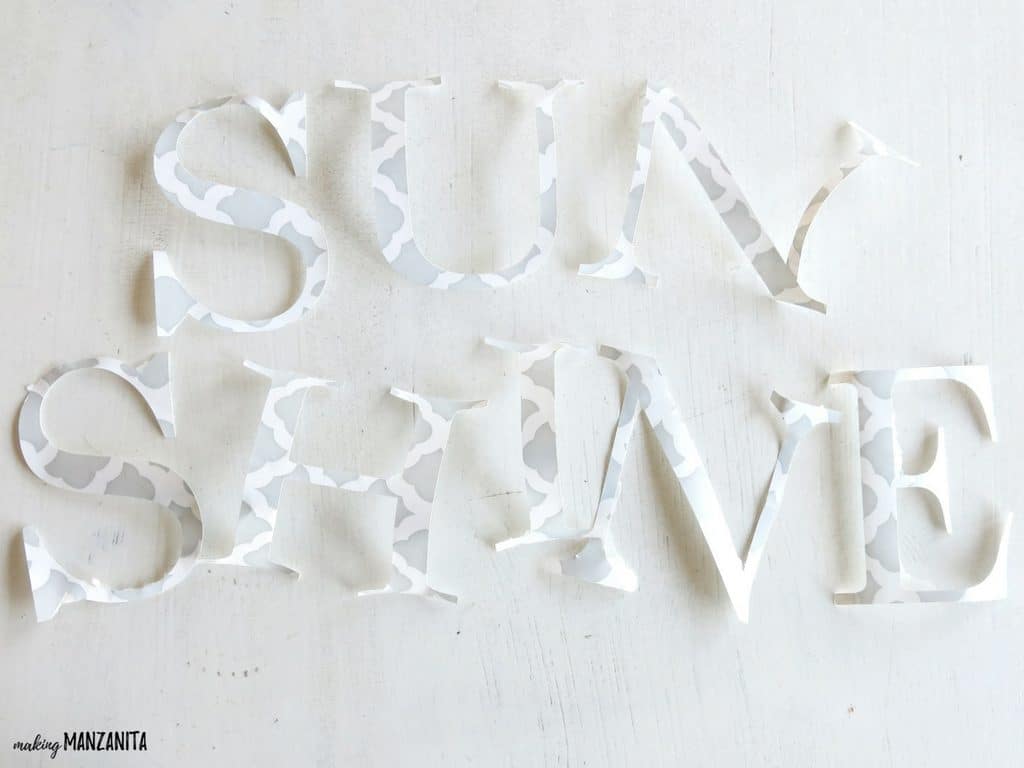
Step 3. Cut letters with Cameo
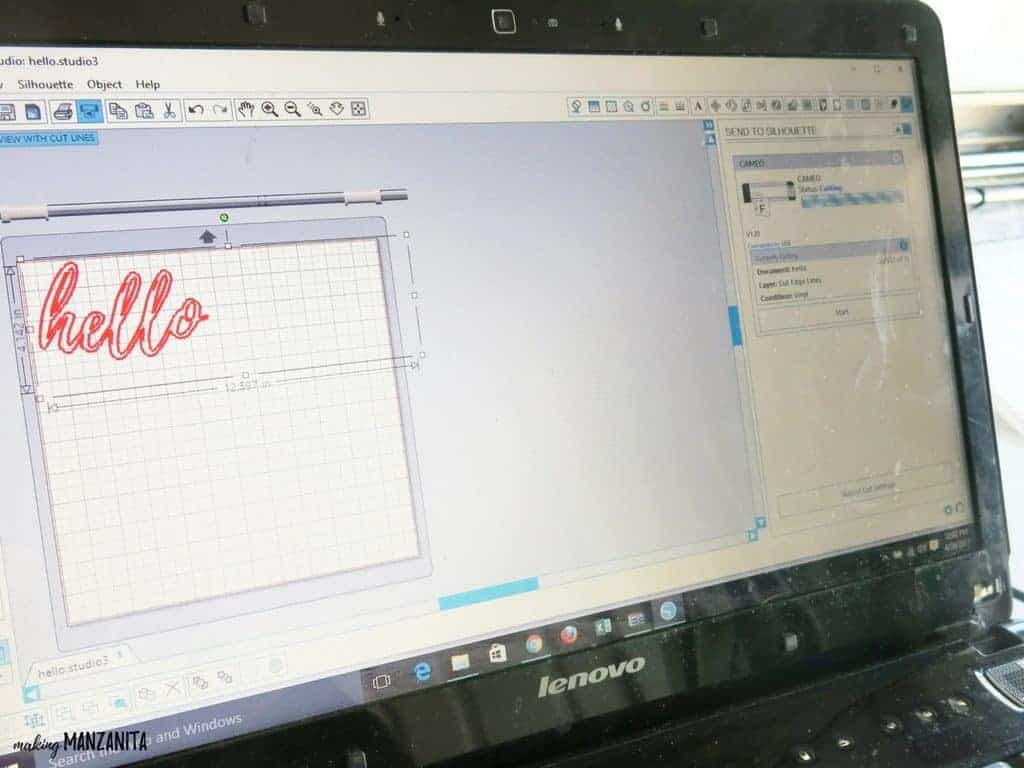
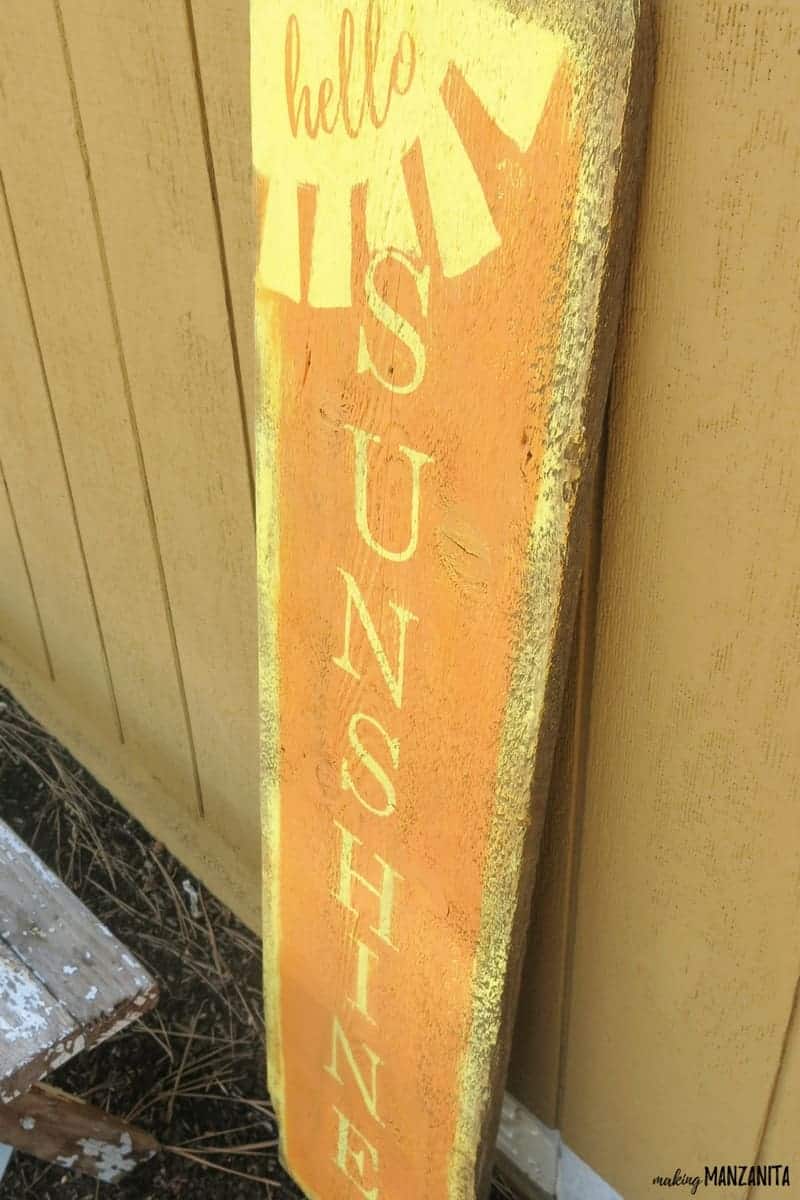
The design of the hello sunshine sign is to have a small sun in the top left corner of the sign with “hello” written in it and then have the letters “sunshine” coming down vertical in large block letters. I used shelf liner to make my stencil with my Silhouette Cameo.
Cameo Settings for “hello” letters
- Font: Playlist Script
- Font Size: 200
- Material Setting on Cameo: Vinyl
Cameo Settings for “sunshine” letters
- Font: Century Schoolbook
- Font Size: 350
- Material Setting on Cameo: Vinyl
You definitely want to adjust the size of the letters according to the size of the wood board you are using.
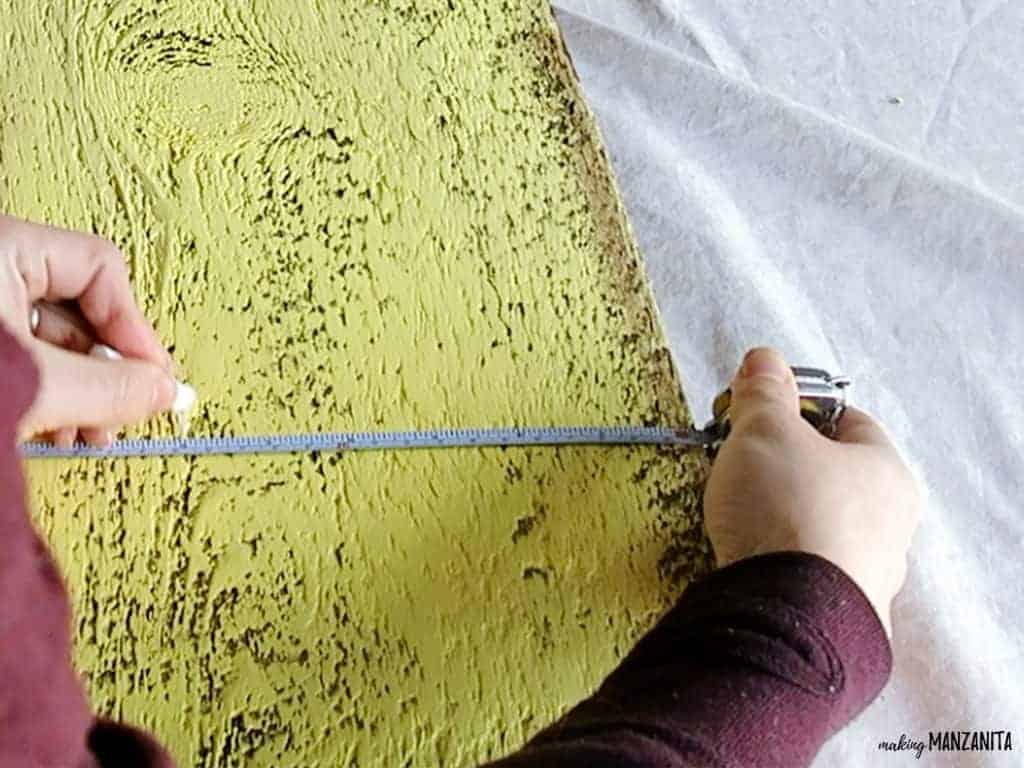
Step 4. Mark the middle of your sign.
I measured the width of the sign and made a few marks with chalk down the middle of the sign. This helped serve as my guide when I was applying the letters.
Or you could just wing it, but winging in and paint never tends to work out for me. Hehe.
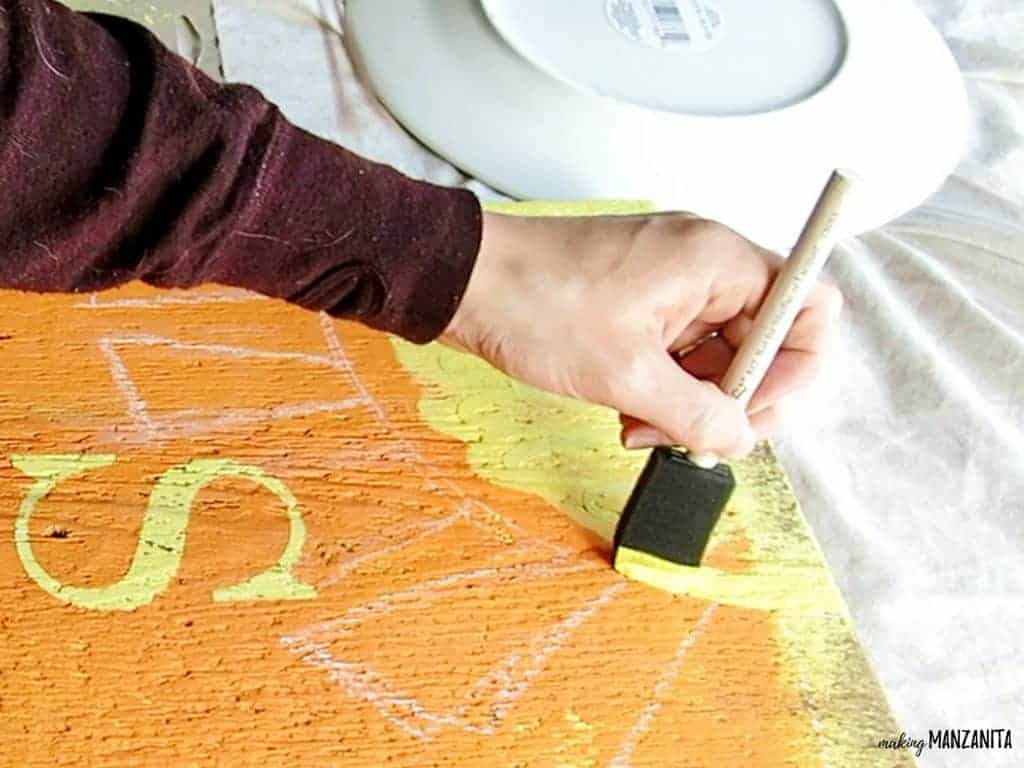
Step 5. Apply “sunshine” letters on wood sign.
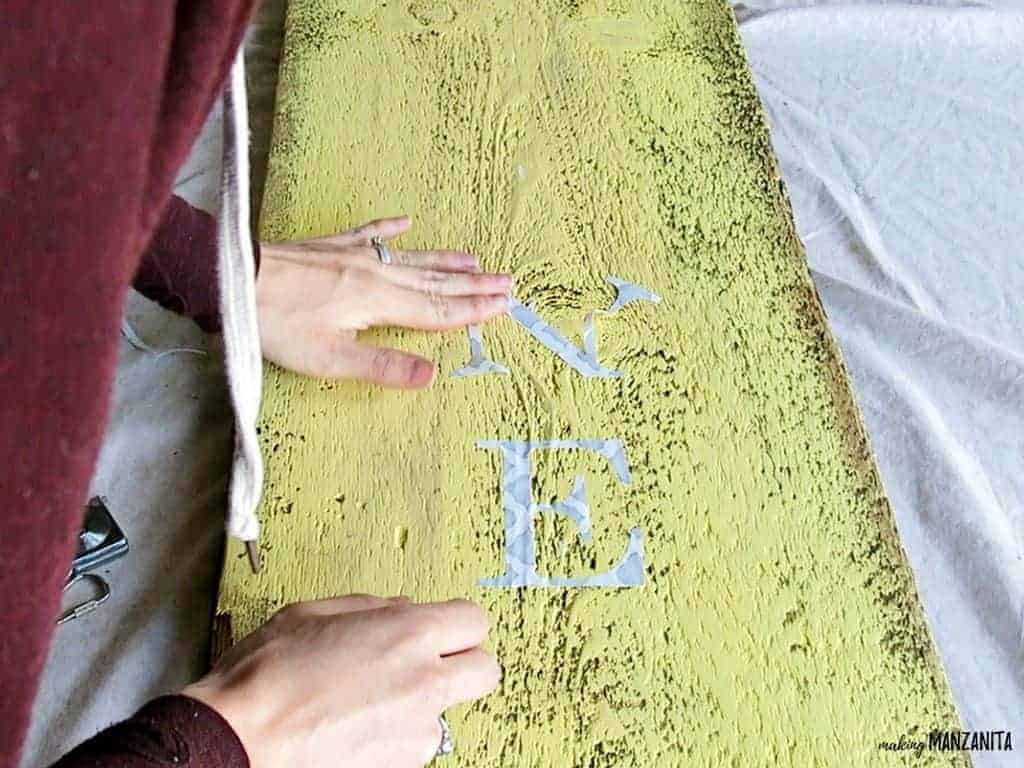
Leaving about 7 inches at the top for the sun shape, you can apply your “sunshine” letters going vertically down the board spaced out evening. Yes, you may need to get the measuring tape out and do some math here. It won’t kill you, I promise.
Be sure to push the letters on to the sign hard. You’re going to be painting over them, so this helps prevent the paint from bleeding.
(UPDATE: Since I made this hello sunshine sign, I’ve figured out a full proof way to prevent stencil bleeding, read all about it here).
Step 6. Paint over letters with your 2nd shade.
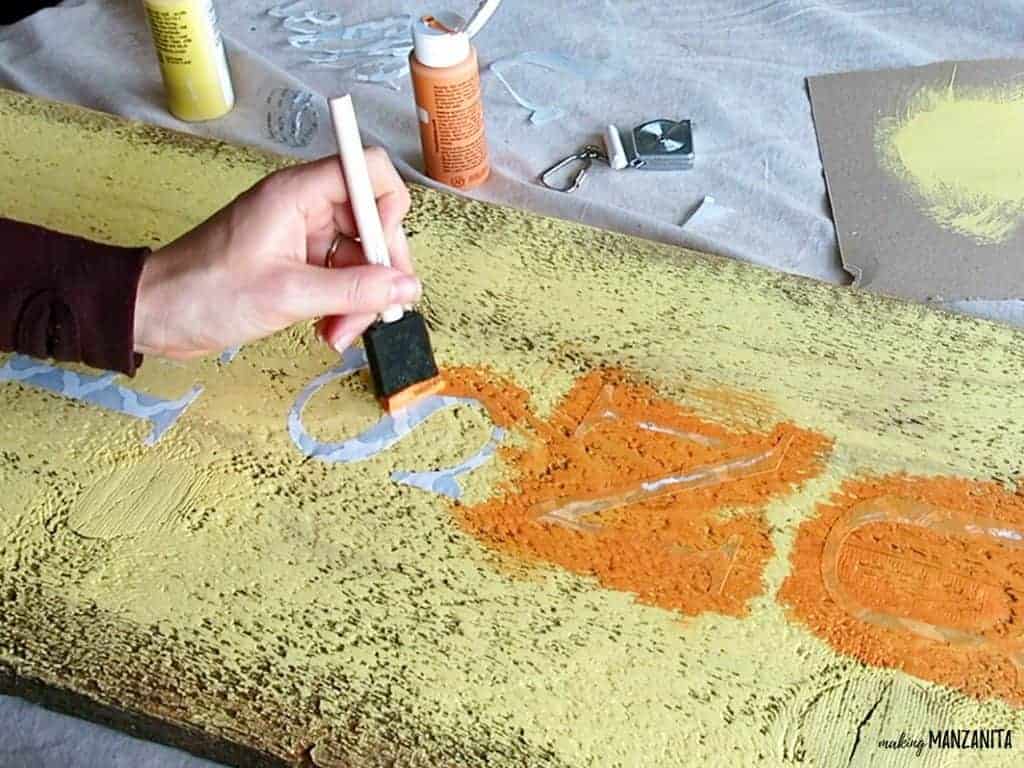
You will paint the entire sign with the 2nd shade of acrylic craft paint. I used this shade of orange.
When you’re painting over the stenciled letters, I try to paint away from the sticker using a foam brush and start with a light coat of paint.
This (along with pushing the letters on hard when you apply) tends to help with the bleeding through the letter. But, it may bleed a little. Once painted, let dry.
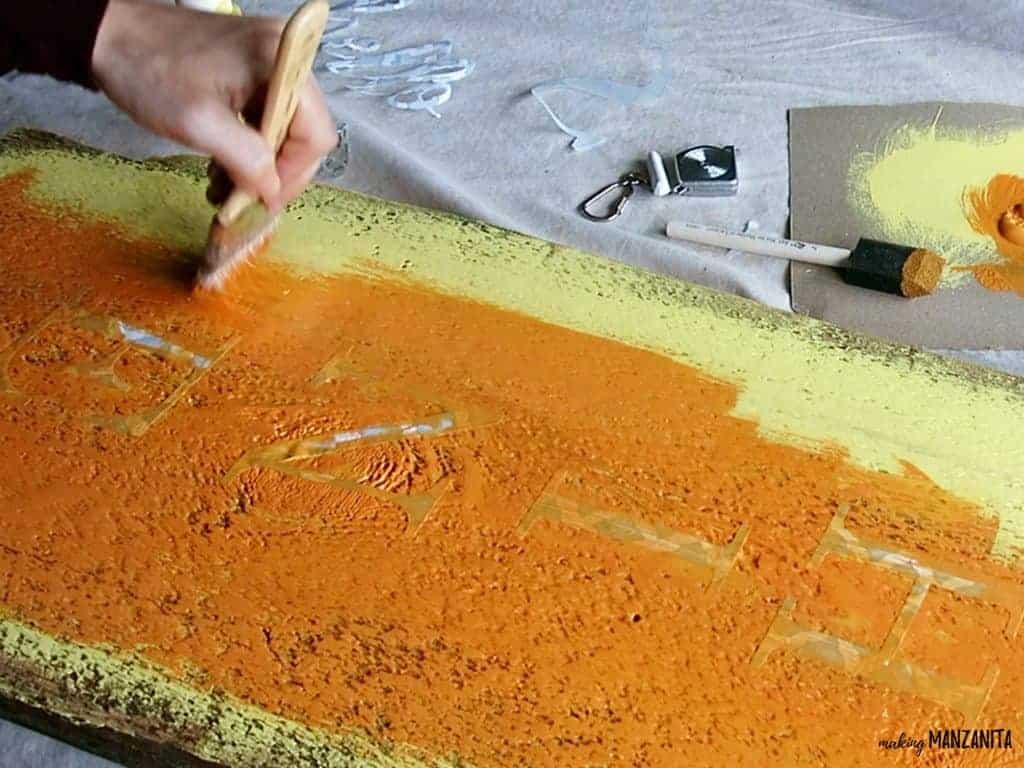
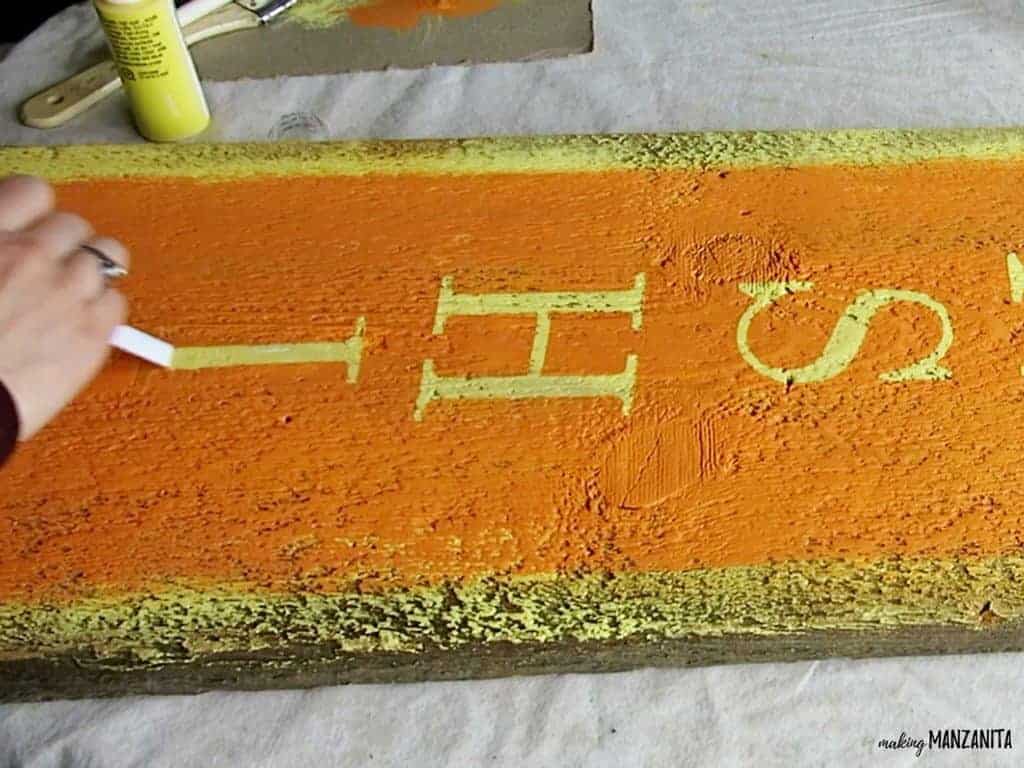
Continue painting the rest of the wood sign with the 2nd paint shade. I left a small border around the outside so that you can see the lighter shade poking through.
To paint the rest of the reclaimed wood sign, I used an old bristle paint brush rather than a foam brush.
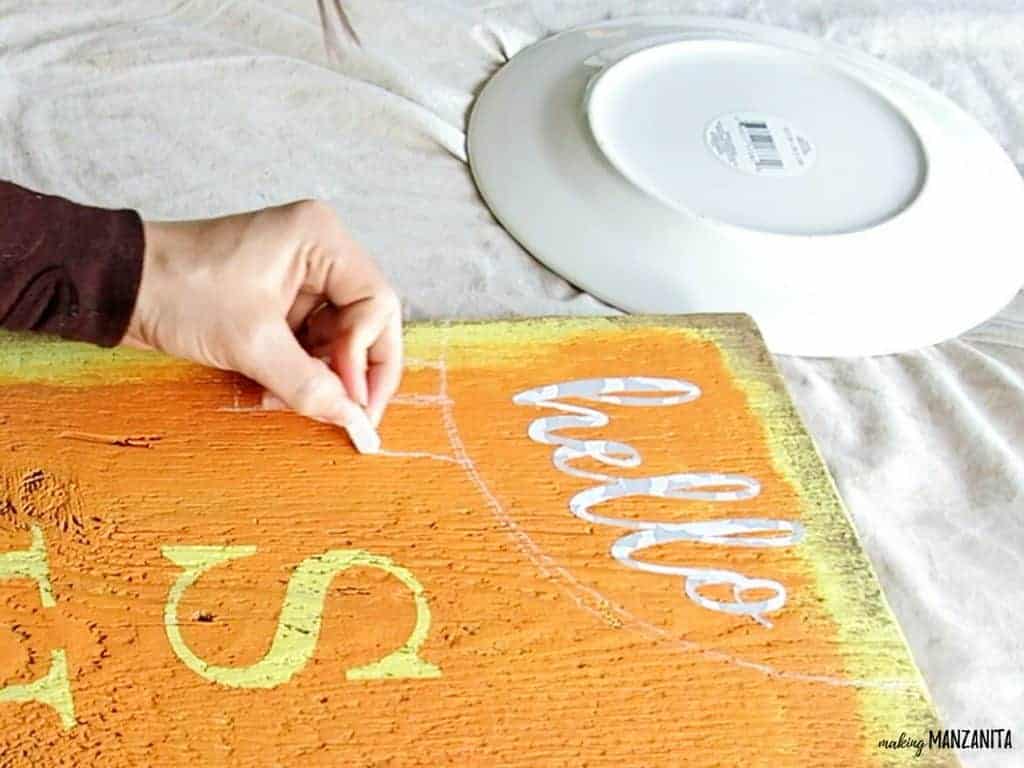
Step 7. Paint sun shape in top left corner.
I used chalk to make my guidelines for the sun in the top left corner of the sign. For the circle, I traced a dinner plate and then I drew the rays of the sun by hand.
Before you start painting the sun, be sure to put down your letters for “hello” in the middle of the sun. Again, press the letters down hard because you’re going to be painting over them.
Use the 1st shade of paint (in my case, yellow) to paint the sun. You may need to do 2 coats. Once painted, let dry.
Step 8. Peel off letters.
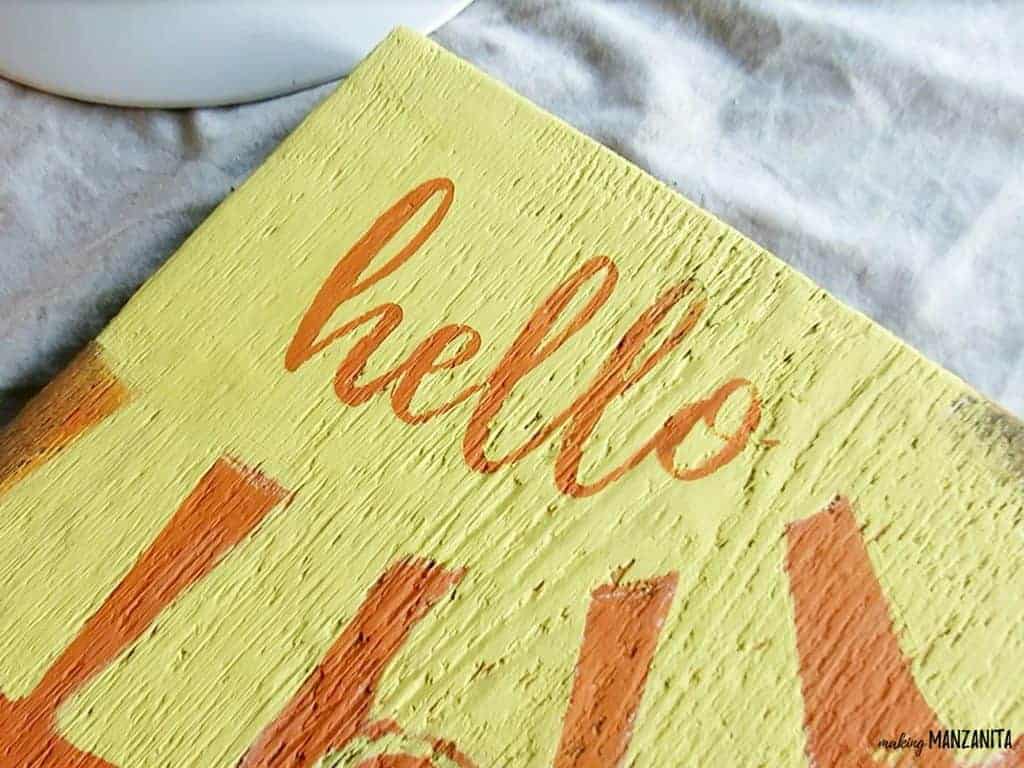
This is the fun part because the whole hello sunshine sign starts coming together. After everything is dry, you can peel off the letters.
There are some tools that are made for the Cameo that can help with this. Or you can just use your nails or a tweezers if you’re having trouble getting the letters to come up.
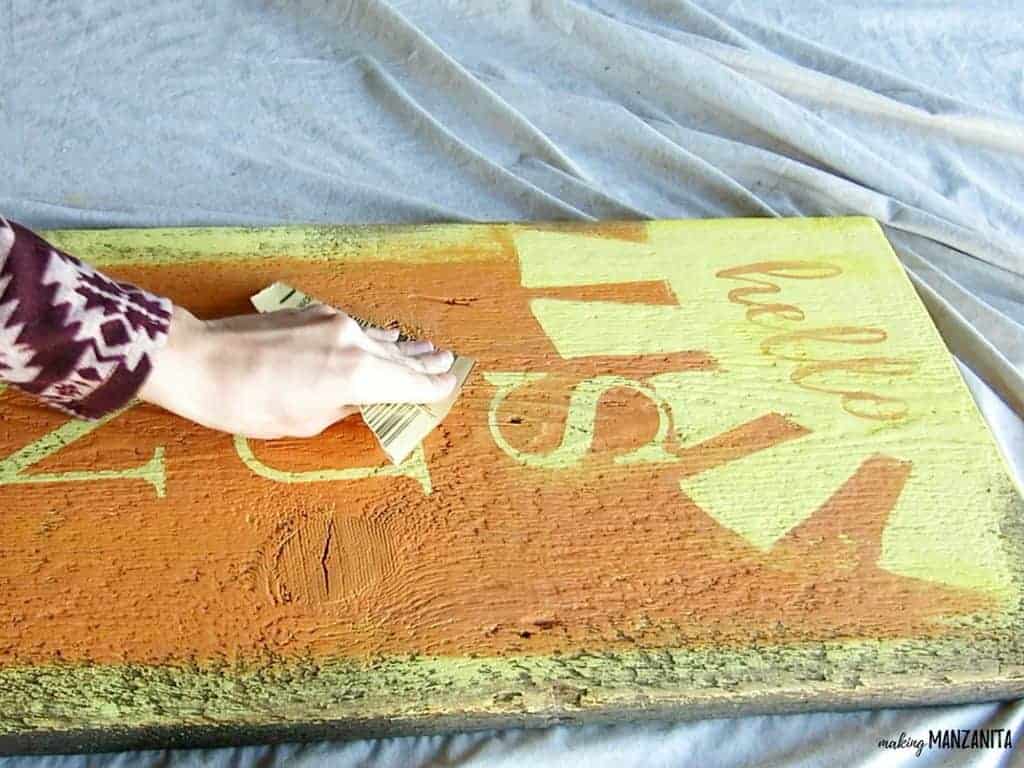
Step 9. Lightly sand.
Because I was going for a rustic look, I gave the sign a very light sanding. This also helps if you had any bleeding on the letters, which is usually pretty light if you follow these steps.
Step 10. Spray with clear coating.
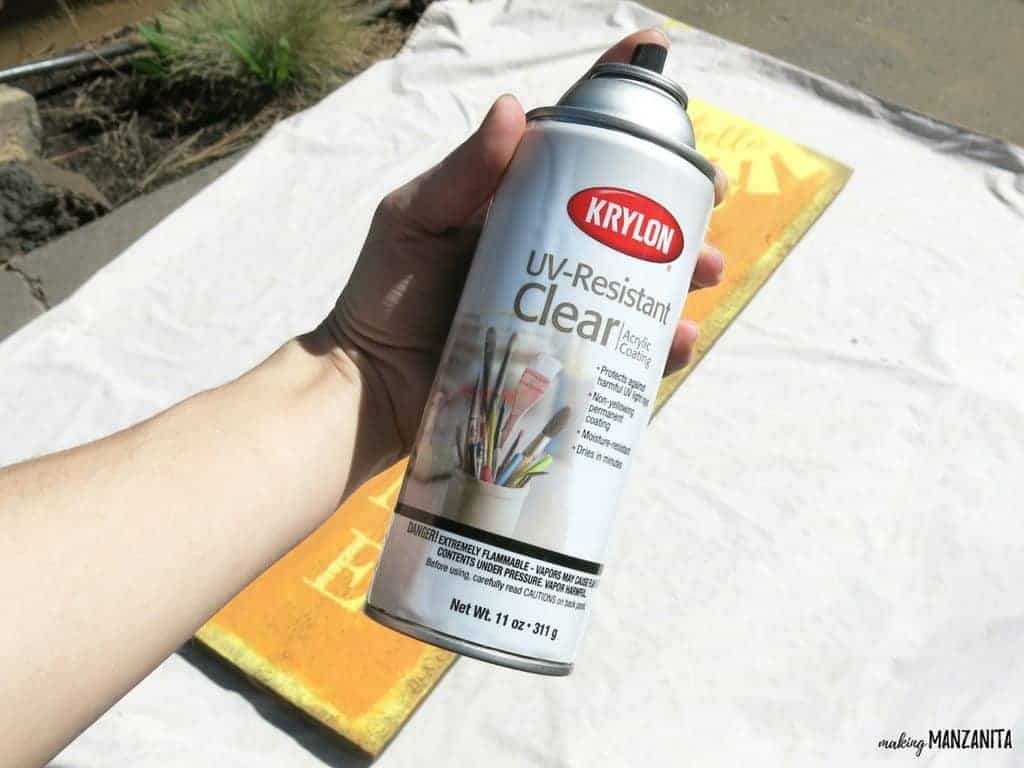
Take your pretty ‘lil sign outside and give it a good coating of UV Resistant Clear Coating. I sprayed it about 5-6 times.
This DIY Hello Sunshine sign has me SO ready to welcome the wonderful Summer months.
I love that this reclaimed wood sign is so simple to make and it adds so much cheer to the front of our home.
Can’t wait to get the exterior painted later this year. This sign will really POP on the new paint color we have planned.
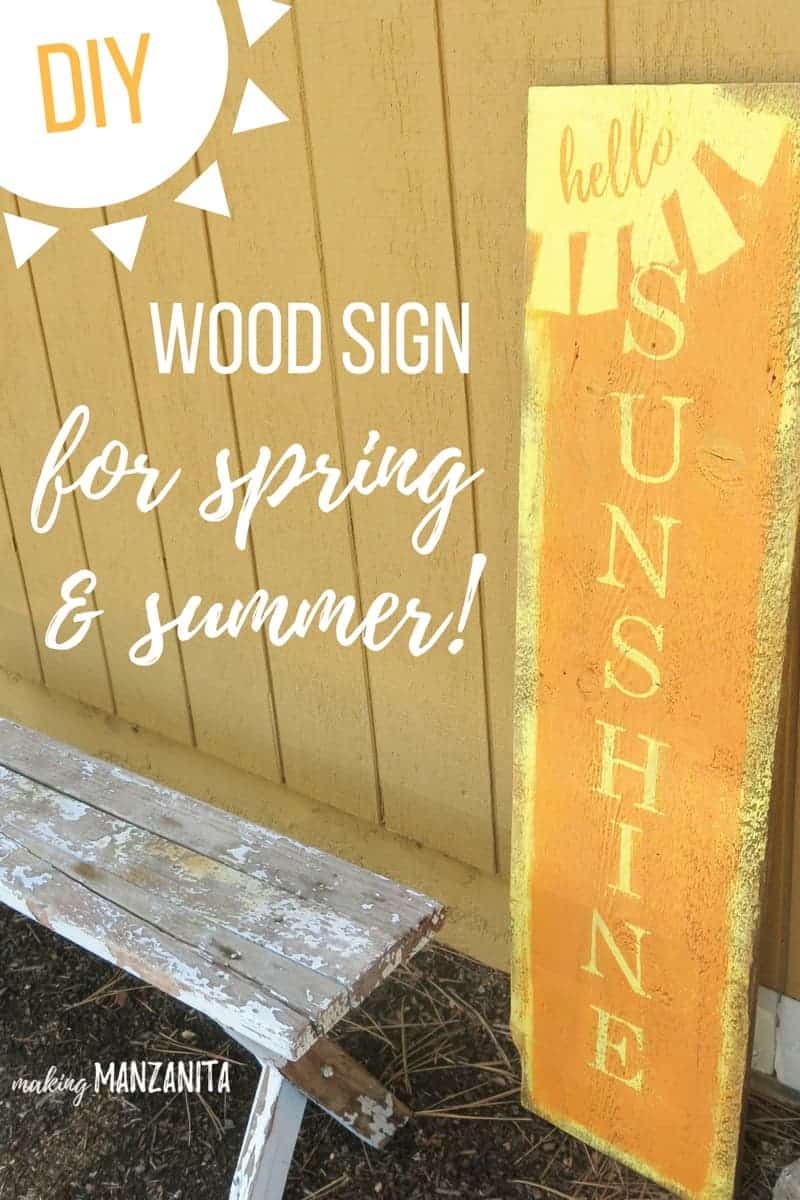
So whether you are basking in the sun today and saying hello to the sunshine or you are sitting inside staring at the rainfall, I hope this easy DIY hello sunshine sign for Spring and Summer brightens your day!
And remember, when the sun is out – be sure to take a few minutes and go outside and say hello to that sunshine! It’s good for your brain!
How to Make a Hello Sunshine Sign
Brighten up your Spring or Summer Hello Sunshine sign made with reclaimed wood! This easy DIY wood sign is quick to make and affordable, colorful decor.
Materials
- Reclaimed wood board
- Adhesive shelf liner
- 2 different colors of acrylic craft paint
- Chalk
- UV Resistant Clear Coating
Instructions
- Sand wood board.
- Paint sign with 1st color.
- Cut letters with Cameo.
- Mark the middle of your sign.
- Apply ''SUNSHINE'' letters on wood sign.
- Paint over letters with your 2nd shade.
- Paint sun shape in top left corner.
- Peel off letters.
- Lightly sand.
- Seal sign.

The sign is terrific. I bet you smile every time you see it.
Thanks Debra! I totally do! It brightens my day.
This sign turned out great. Love the sentiment you chose too. Thanks for the inspiration.
Thanks Denise! 🙂
This is a GREAT use for that reclaimed wood! I love how you swapped the colors, it looks beautiful!
Thanks Megan!
Won’t be able to go out to dig for appropriate sized board for at least couple days, has been raining – again- for two days and our backyard gets pretty muddy in some spots. This has been the weirdest Spring since we moved here in late August, 2004. Also means can’t have hubs cut any wood for me for other projects. No garage or basement to work in makes it hard in Winter to do wood projects so by Spring am chomping at bit to make things.
Love this sign, is so happy looking, would be hard to ignore. Would make whole neighborhood happy to look at it.
We live few miles west of Grand Junction, CO out in rural area.
I have a Cricut but have yet to get it installed, stopped at the first point, grrrr. Will have to figure out some other way to make letters.Won’t tell you how long have had Cricut, am embarrassed. I tend to be pretty digitally challenged, DUH!.
Anyway when weather decides to get nice again, have had several false starts for Spring this year, will go out digging for board or talk mr. into buying one at Lowes. How big is your board, dimensions please. Usually our lumber is from pallets.
Thanks for great inspiration, I love making signs.
Thanks JaneEllen. I am the same way during the Winter and by Spring, I’m so ready for some DIYs!
Don’t be embarrassed about the Cricut, you want to know what? I cried when I tried to work my Cameo for the first time and almost returned the thing. I’m so glad that I powered through it and figured out how to use it for the things I wanted. It’s really paid off and then some! Give it a try again on a rainy day with a fresh perspective and maybe check out some YouTube videos, those always seem to help me when I get stuck on things like this.
An alternative way to stencil the letters is to print them out on the computer. Then you can either cut them out and trace them or cover the back of the paper with chalk and then trace the front of the paper around the letter. The chalk will imprint on the wood and voila!
Sorry about the missing dimensions, I’ve updated the post now! My board was 12 inches wide by 50 inches tall. If you’re using pallet wood, you’ll probably need to attach a few pieces together if you want a large sign like this one. We LOVE pallet wood too! In fact, most of the furniture in our house is built with it. Check out our bed made from pallet wood here: https://www.makingmanzanita.com/diy-reclaimed-wood-bed/
Thanks for taking the time to comment. Best of luck with your sign making. I’m wishing a little sunshine your way!
Hi, I know this is an old post, but if by chance you still haven’t gotten your Cricut up and running, please let me encourage you to try again! If you have ANY ISSUES whatsoever, Please call Cricut! I have every machine they have put out except the ones for Cake decorating, and one sat in the box for 4 1/2 yrs! They were so very helpful when I had to contact them, and anytime I’ve had to call since then, they are ALWAYS so very helpful!! No matter what the question may be, they’ve been a pleasure to deal with! Hope this helps you out!
It’s so cute! I have a pile of reclaimed wood in my garage AND shed! I need to start using it up.
Go for it Emily! There are so many fun DIY projects out there using reclaimed wood!
What a great project! I love the colors and the design is just adorable 🙂 I’ll bet it brightens up the space.
Thanks so much Lydia. It definitely brings a smile to my face when I walk in the front door.
I make wood signs and several of my designs require me to layer the stencils. For example I have a sign where I have the state silhouette all painted in, I use Sherwin Williams latex acrylic paint. Then I layer a saying with another stencil on top of it. The problem I am having is the stencil not sticking to the painted surface. This is in a workshop setting so we don’t have hours to let it dry. I do coach the person to not put too much paint down and we use a hair dryer to dry the state background first. I use Oramask Stencil Film 813 with the spacing tape to hold it all together when applying it to the sign. We squeegee down the stencil and when we go to pull up the spacing tape the stencil does not want to stick to the painted surface. It is driving me crazy. It doesn’t happen every time. I’ve had some workshops where it stays put but the last class I had two ladies had the worst time with this layered sign.
Would love to know what you ended up doing to get this fixed!