Thank you to Inventables for sponsoring this tutorial for how to make wooden letters for walls! All opinions are entirely my own. This post also contains affiliate links, but nothing that I wouldn’t recommend wholeheartedly. Read my full disclosure here.
A few months ago we announced that we were working on converting this house (our 2nd fixer-upper) to a short-term vacation rental. We’ve been busy working on prepping things left and right – like this DIY cane headboard we made for Quinn’s room and this upholstered DIY bench cushion.
While we continue to look for a new house, we continue to work our way through this house adding unique and special experiences throughout. Instead of just mismatched furniture from Facebook and boring decor, we are aiming to create a fun place for visitors to stay with “Instagrammable” moments throughout the home.
When it comes to Calloway’s room, we knew it was going to be the “bunk room” in the house, most likely where the kids will stay. We definitely want to keep the fun mountain mural accent wall, but we’re taking that theme one step further to create a real Pacific Northwest camping theme in this bedroom.
To bring in that theme, we are adding wooden letters to the wall with a twist on a fun and famous quote from John Muir. I know you’ve heard it: “The mountains are calling and I must go.” It’s on t-shirts, mugs, and home decor.
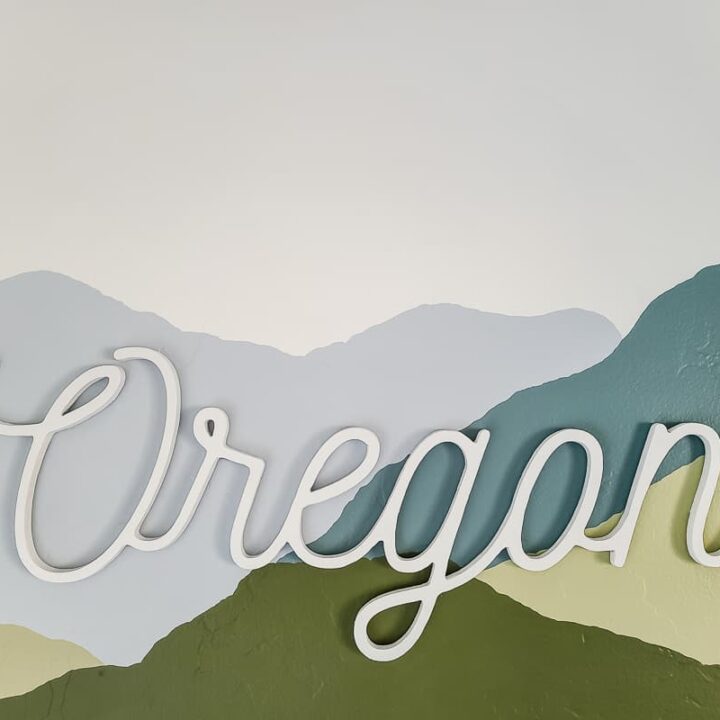
But we’re changing it up. Instead of the mountain are calling – our quote wall will say: “Oregon is calling & I must go”. Cute right?
Table of Contents

Wondering how to make wooden letters for walls?
We’re always looking for new ways to create projects efficiently and something that we’ve had our eye on for quite a while is a CNC machine.
What is a CNC machine?
A CNC machine means that the tool is controlled by a computer – rather than a person’s hands.
“CNC” stands for computer numerical control, but it’s very commonly known as CNC.
Way back in CNC machines were huge and not reasonable to have in a home workshop – they were only found in big commercial-sized woodshops.
But technology has come a long way! This means that getting a budget-friendly CNC machine is achieved for DIYers – like us. Yay!

X-Carve by Inventables
So when we had the chance to team up with Inventables and feature the X-Carve CNC system in our projects, you better believe that we jumped at the chance.
You may remember our first project with our X-Carve CNC System a few months. We made these DIY wood coasters and just LOVE how they turned out.
The X-Carve is “the easiest and most affordable CNC machine on the planet”. It is very easy to use and requires no CNC knowledge or experience.
The X-Carve machine links up with the software called Easel (also developed by Inventables) to create your design.
It’s great for DIYers that want to scale the production of small projects to sell on Etsy or other places. And you can rapidly carve products in batches if you want!
Do I need an X-Carve (CNC machine) to make wooden letters for walls?
You may not have a big need for a CNC machine in your woodshop, so with the projects we create on our X-Carve we’ll always let you know if there’s another way to make it if you don’t have an X-Carve.
If you’re trying to figure out how to make wooden letters for walls like this and you don’t have access to a CNC machine or X-Carve, you can totally use a jigsaw to cut out letters like this too!
It’s definitely a lot quicker, easier and you’ll get a more professional look with the X-Carve for wooden cut-out letters.
Wooden letter accent wall – video
If you love DIY videos, be sure to subscribe to our YouTube channel!
How to make wooden letters – Step by step tutorial
Supplies for wooden letters:
- Inventables X-Carve
- 1/8″ Upcut Bit
- 1/2″ MDF Panel (learn more about what MDF wood is here)
- Dremel Tool
- 150 Grit Sandpaper Sanding Bit for Dremel
- Spray Primer (learn more about why you need primer here)
- White Spray Paint (get tips for spray painting here)
- 3M Command Picture Hanging Strips
- Scissors
- Level
Step 1. Design your wooden letters
If you want the same quote we used “Oregon is calling & I must go” – all you have to do is hop over to the project we’ve created on Inventables website and click “Open in Easel” and you’ll be ready to carve in minutes!
If you want something different, you can follow the instructions here in Step 1 to design your own quote wall.
1a. Start in Canva
You can either start designing your quote layout directly in the Easel Pro program using their Pro fonts, or InkScape or another vector graphic program, or something else like Canva with a picture of the wall to get a quick visual of how it will look in the room.
I opted to start with Canva and a picture of the wall that I was planning on adding the wooden letters – this wall with the mountain mural in Cal’s room.
Canva has a ton of great font options to play around with and it’s easy to use (like resize the words and move around the layout).
Once I was confident of the size and fonts used, we measured the wall with a tape measure to get an idea of how big of an area we wanted the letters to cover on the wall. We wrote down those dimensions and used that to get started.
1b. Design file in Inkscape
Since I was picky about the fonts I wanted to use on the 3D wooden letters and they weren’t already loaded into the Easel Pro program, we instead started the design in Inkscape, which is a free vector graphic program that can be used to create your graphics before importing into in the Easel Pro program – which hooks up to the X-Carve.
Once we installed the fonts onto our computer, we were able to use them in Inkscape – which pulls the fonts from your computer.
In Inkscape, type out the quote with your selected fonts and resize until you’re happy with the layout.
** Pro Tip – Be sure to push and hold CTRL on your keyboard while you’re dragging the letters to resize so you don’t change the aspect ratio (stretch) of the letters. If you miss this step, your letters will start looking all wonky and you’ll have to start from scratch.
Next, you will need to select Object > Object to Path to prepare the file to be imported in Easel Pro. Then save it as an SVG file.
For more info on this process, check this awesome YouTube video that walks you through it. It was helpful for us because we were doing this step for the first time.
1c. Import file into Easel Pro
Open the SVG file in Easel Pro. The file should open right up.
Next, we resized the material in Easel Pro to match the measurements that we took on the wall for the area that we want to cover.
Resize your letters inside the material boundary lines to get them sized appropriately.
** Pro Tip – Be sure to push and hold CTRL on your keyboard while you’re dragging the letters to resize so you don’t change the aspect ratio (stretch) of the letters. If you miss this step, your letters will start looking all wonky and you’ll have to start from scratch.
Once you have your quote all set and sized correctly, you can simply move the words around to fit on the MDF panel more efficiently. Rotate if necessary and move the words closer to lay it out and not waste a lot of extra wood.
Remember, if you want the same quote we used “Oregon is calling & I must go” – all you have to do is hop over to the project we’ve created on Inventables website and click “Open in Easel” and you’ll be ready to carve in minutes!


Step 2. Carve wooden letters
After you have your quote in Easel ready, you enter the type of wood you are using and the size. We opted for an MDF panel because it is inexpensive, we already had it on hand, and it’s a great material if you’re planning on painting your finished piece like we were. Learn more about what MDF wood is here.
Next, clamp down your wood stock on the X-Carve cutting mat, turn on the dust collection system to your ShopVac and run the carve on your Easel Pro program.
Don’t have an X-Carve CNC machine?
You could also use a jigsaw to cut out the letters, but it will take longer and won’t be as quick and easy as it is with the CNC – that’s for sure. Learn more about your options for different types of saws for woodworking here.

Step 3. Remove tabs and clean up letters
We used our Dremel tool and cutting bit to slice through the tabs that the X-Carve leaves behind. Then carefully smooth out the edges of the letters with a Dremel and sanding bit where the tabs were.
You may need to do some more cleanup on other parts of the edges as well. You can do this with a Dremel and/or sandpaper by hand.
Be careful however because some of the spots on the wooden letters are thin and very fragile. We actually had to fix a few with superglue that broke because we weren’t careful enough.

Step 4. Prime and paint wooden letters
Next apply several light coats of primer to the letters, focusing mostly on the edges because they will soak in the primer. I did about 5 coats of primer before moving on to white spray paint. Check out our spray painting tips here.
Let dry thoroughly before handling.

Step 5. Hang wooden letters on wall
Getting the letters up on the wall was probably the easiest part! But it does help to have two people for this step. We cut down Command picture hanging strips to smaller sizes and put several on the backs of the letters.
We spaced everything out on the floor in front of the wall to get an idea of the spacing we wanted before starting to hang the wooden letters on the wall.
Have one person hold a level on the wall to align the bottoms of the letters and the other person attach it to the wall with the picture hanging strips. Press into place for 30 seconds to secure.

TaDA! That’s it, folks! Doesn’t it look like a million bucks!

I’m already crossing my fingers that our visitors love it as much as I do!


Since this is, after all, the “kid’s” room, I couldn’t resist this adorable little felt campfire set. Any extra touch that I hope many littles have fun playing with on their vacations!

Our kids have already fallen in love with this, so I think it will be a big hit.

We added some floor pillows and stuffed animals to the corner with the campfire for a fun little vignette.

What would you have your quote wall say?
Let us know in the comments below!

How to Make Wooden Letters for Walls
Learn how to make wooden letters using a CNC machine for a unique accent wall idea.
Materials
- Inventables X-Carve
- 1/8″ Upcut Bit
- 1/2" MDF Panel
- Dremel Tool
- 150 Grit Sandpaper Sanding Bit for Dremel
- Spray Primer
- White Spray Paint
- 3M Command Picture Hanging Strips
- Scissors
- Level
Instructions
- Design your wooden letters. You can use Canva, or Design file in Inkscape to design your own and import into Easel Pro.
- Once your quote is ready in Easel, enter the type of wood you are using and the size. Clamp down your wood stock on the X-carve cutting mat, turn on the dust collection system and run the carve on your Easel Pro Program.
- Use a Dremel tool and cutting bit to slice through the tabs that the X-Carve leaves behind. Then carefully smooth out the edges of the letters with a sanding bit where the tabs were.
- Prime and paint. Apply several light coats of primer to the letters, focusing mostly on the edges because they will soak in the primer. Let dry completely before handling.
- Hang your wooden letters on the wall using Command picture hanging strips and you're done!
Recommended Products
As an Amazon Associate and member of other affiliate programs, I earn from qualifying purchases.


