Thank you to Arrow Fastener for sponsoring this DIY bench cushion project! All opinions are entirely my own. This post also contains affiliate links, but nothing that I wouldn’t recommend wholeheartedly. Read my full disclosure here.
Now that we’re converting this home to a short-term vacation rental, we’re attempting to add in even more little handmade and unique touches to each room. We’re also trying to keep things uber functional throughout the home.
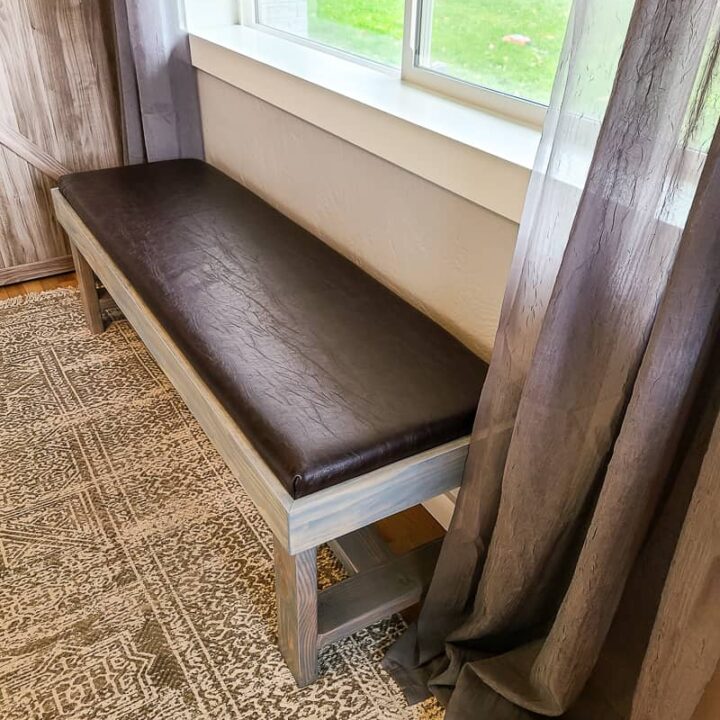
One thing that I wanted to add to the bedrooms was a convenient place to put luggage so you don’t have to put it on the floor or (worse) put the dirty luggage up on the nice clean bed.
We’ve snagged a few folding luggage racks for some rooms, but for Quinn’s room, we decided to make a custom bench to sit under the window that is large enough to hold two suitcases.
Table of Contents

In addition to serving as a luggage rack in the guest room, the bench also looks great and features a comfy DIY bench cushion that is upholstered with faux leather.
In today’s post, we’re going to teach you exactly how to build this wooden bench and show you the process of upholstering a DIY bench cushion with a staple gun.
Spoiler alert, it’s super easy. So even if you’re a beginning woodworker, this one’s for you!
How to build a bench and DIY bench cushion
If you love DIY videos, be sure to subscribe to our YouTube channel so you don’t miss the next one!
Supplies for DIY upholstered bench build
- Tape measure
- Two 8-foot 2x4s
- Two 8-foot 1x4s
- One 8-foot 1×4
- 3/4″ x 4′ x 8′ sheet of particle board
- Miter saw
- Table saw or circular saw
- Pocket hole jig (optional)
- 2 1/2″ pocket hole screws to attach the bench base
- Impact driver
- Drill
- Foam cushion – 2 inches thick
- Batting
- Upholestry vinyl
- Scissors
- Spray adhesive
- Utility knife
- Arrow PT50 Pneumatic Staple Gun
- 1/2″ staples (#508)
- Arrow PT18G Pneumatic Brad Nailer
- 1 1/2″ brad nails
- Oribtal sander
- 150 grit sandpaper
- Wood filler
- Putty knife
- Pre-stain conditioner
- Gel stain
- Rag
- Spray lacquer finish
- 1 1/4″ pocket hole screws to attach the top


Step 1. Cut wood down to size
Start by cutting the wood for the bench down to size using a miter saw to cut the lengths and a table saw (or circular saw) to cut the sheet of particleboard. If you want to follow along and build your bench just like this, you can grab the detailed woodworking plans here.
We used a combination of 2x4s and 1x4s for the bench base and a sheet of particle board for the bottom of the DIY cushion.
Did you know that 2x4s and 1x4s aren’t actually 2 inches by 4 inches? Learn more about confusing lumber dimensions here!
Since we weren’t 100% sure what the thickness of the leather vinyl wrapped around the cushion base was going to be, so we waited to cut the 1×4 edges for the trim to make sure it was going to be a perfect fit.
If you’re using the exact same upholstery vinyl that we are and following along with our woodworking plans, you should be good to precut these pieces now according to the plans, but if you’re unsure, just wait to cut these.
Step 2. Drill pocket holes
For the connections of the 2x4s on the bench base, we opted for pocket hole joinery to avoid having to patch a bunch of screw holes. Learn more about pocket hole joinery in our guide here.
As an alternative, you could opt for screws and wood glue to assemble your bench base.

Step 3. Assemble bench base
We designed a modern base for the bench with an extra support beam at the bottom that is both functional and stylish. The sides of the bench are in the shape of a “U” with the bottom sitting roughly 3 inches from the ground.
Assemble the bench pieces together using 2 1/2″ pocket hole screws.

Step 4. Upholster DIY bench cushion for top
Next, we need to get the top of the DIY bench cushion upholstered. We used a foam cushion 2 inches thick, batting, and upholstery vinyl that looks like leather.
We have a bunch of recycled leather that we got for free using this hack, but unfortunately, we didn’t have a piece big enough for this bench.
You really should probably have two people for the upholstering part. It helps to have one person pull and hold it into place while the other staples the vinyl.


- If needed, cut down the foam cushion to size with a straight board to push it down and a utility knife. The goal is to get the cushion to have about 1/4″ overhang over the particleboard on all sides.
- Place the batting on top of the cushion and fold over the edges. Cut the batting to size along the bottom edge of the cushion. Also, get rid of excess at the corners, cutting straight down at the corner.
- Attach the batting to the cushion with spray adhesive, while smoothing to avoid wrinkles.
- Next, lay the vinyl flat, face down, and center the cushion and particle board on top. Starting with the short sides, have one person pull tight and the other person add 1/2″ staples spaced roughly 1 inch apart using the Arrow pneumatic staple gun.
- We definitely recommend a pneumatic staple gun for this job becuase you need some extra power behind the staples that you won’t get with an electric or hand operated stapler.
- Continue in the same way on the long sides, but leave about 6 inches unstapled at the corners.
- On the bottom side of the bench we tapped the corners of the particle board in a hammer lightly so they weren’t quite as sharp to avoid peircing through the vinyl.
- For the corners, we cut the excess off and the folded in the long side and aligned the crease to the corner and pulled as tight as we could making sure there were no wrinkles on either side. While one person holds, the other staples until secure. Don’t be shy… get lots of staples on the corners for extra support!
- Cut any extra vinyl off on the underside with a utility knife.


Step 5. Attach trim sides.
Measure the upholstered bench cushion to length and width. Then, cut your 1×4 trim pieces to be 1/4″ longer and 1/4″ wider than the cushion base. That way, you’ll have roughly 1/8″ wiggle room for the cushion. We opted for 45-degree miter cuts on the corners of the trim for a professional finish.
Attach the trim pieces to the bench base using the Arrow pneumatic brad nail gun and 1 1/2″ (or bigger) brad nails at the corners (nailing into the 2x4s) and into the other trim piece in each corner. We added the trim pieces to sit 1 inch above the top of the base so that the cushion has a little platform to sit in.
Are all the different kinds of nail guns confusing you? Learn the difference between and brad nail gun and a finish nail gun here.
Step 6. Add support pieces.
Measure the distance between the inside edges of the bench trim and cut two pieces of 1×3 wood to the correct length. These will be added to the middle of the bench for some extra support.
To attach the support pieces, use the brad nailer and 1 1/2″ brad nails.

Step 7. Fill and sand.
Fill all nail holes, imperfections, and joints with wood filler and wait until it is dry. Then sand smooth with 150 grit sandpaper and an orbital sander. Sand the entire bench until smooth with the 150 grit sandpaper.
Wipe clean with a tack cloth or slightly wet rag.

Step 8. Stain
Since we used pine for the 1x4s and fir 2x4s, the coloring between the two types of wood was pretty different. I did some test stains on scrap wood and they both took the stains very differently.
For that reason, I opted to go with a gel stain that provides more coverage to help even out the different wood tones.
Start by applying a pre-stain conditioner and follow up with 2 coats of gel stain. We went with a gray color called Slate. Apply the gel stain heavily in the direction of the wood grain with a rag and wipe excess off within 3 minutes. Wait for 8-10 hours before applying 2nd coat of stain.

Step 9. Seal
After the appropriate waiting time after staining (we waited 24 hours), you can move on to sealing the wood bench. We applied 4-5 coats of a spray lacquer finish with a satin sheen.
Lacquer is a great option for a wood finish as an alternative to polyurethane or polyacrylic. It is a little easier to apply than both of the poly products and provides a clear finish that does not yellow.
Wait 24 hours before handling the bench after sealing.

Step 10. Attach DIY bench cushion
The last step is to set the DIY bench cushion into place and secure it with pocket hole screws in the corners.

This bench turned out better than I even imagined it and it’s just perfect here under the window in Quinn’s room, don’t you think?

This easy wooden bench with a fun upholstered DIY bench cushion is seriously SO simple to build. You can follow along with the woodworking plans and our tutorial to make this come to life in your home.


Next up in Quinn’s room, we’re continuing the makeover with a “big girl” bed (Queen sized) with a DIY headboard that we’ll be sharing soon! Stay tuned for that project!
Where would you put this bench in your home?
Let us know in the comments below!

Easy Wood Bench with DIY Bench Cushion
How to make a wood bench with DIY bench cushion.
Materials
- Two 8-foot 2x4s
- Two 8-foot 1x4s
- One 8-foot 1x4
- 3/4" x 4' x 8' sheet of particle board
- 2 1/2" pocket hole screws to attach the bench base
- Foam cushion - 2 inches thick
- Batting
- Upholestry vinyl
- Spray adhesive
- 150 grit sandpaper
- Wood filler
- Pre-stain conditioner
- Gel stain
- Rag
- Spray lacquer finish
Tools
- Tape measure
- Miter saw
- Table saw or circular saw
- Pocket hole jig (optional)
- Impact driver
- Drill
- Scissors
- Utility knife
- Orbital sander
- Putty knife
- Arrow PT50 Pneumatic Staple Gun
- 1/2" staples (#508)
- Arrow PT18G Pneumatic Brad Nailer
- 1 1/2" brad nails
Instructions
- Cut the wood for the bench using a miter saw and a table saw or circular saw. Get the detailed plans here.
- Drill the pocket holes using a pocket hole jig.
- Assemble the bench base using 2 1/2" pocket hole screws.
- Cut the foam cushion to size using a utility knife.
- Place the batting on top of the cushion and fold over the edges. Attach the batting to the cushion using spray adhesive.
- Lay the vinyl flat, face down, and center the cushion and particle board on top. Starting with the short sides, have one person pull tight and the other person add 1/2" staples spaced roughly 1 inch apart using the Arrow pneumatic staple gun.
- Continue in the same way on the long sides, but leave about 6 inches unstapled at the corners.
- For the corners, cut the excess off and then fold in the long side and align the crease to the corner and pull as tight as you can making sure there were no wrinkles on either side. Staple using lots of staples to make sure it is secure.
- Cut any extra vinyl off on the underside with a utility knife.
- Attach trim using an Arrow pneumatic brad nail gun and 1 1/2" brad nails.
- Attach support pieces using a brad nailer and 1 1/2" brad nails.
- Fill nail holes with wood filler. Once it's dry sand with 150 grit sandpaper.
- Stain your bench frame. Once the stain is dry, apply 4-5 coats of spray lacquer finish.
- Attach the DIY bench cushion using pocket hole screws and you're done!


