Installing a vanity light is a pretty standard part of any bathroom remodel or makeover! It will complete the look of your makeover, so it’s really the perfect finishing touch.
A dated bathroom vanity light can really bring down the space, so don’t forget to do something about it during your bathroom makeover.
When you’re giving your bathroom a makeover, it usually consists of:
- fresh paint (check out our best interior painting tips here)
- maybe new or updated flooring (or even painting the tile floor to update it on a budget as we did here)
- adding an accent wall like faux shiplap or even choosing to install the shiplap vertically like this one
- replacing hardware (learn how to install new cabinet hardware here and how to fill holes when you replace hardware here)
- updating the decor
- changing bathroom light fixtures
Related Reading
Looking for more bathroom makeover ideas? Check out this post to get inspired with 21 modern bathroom ideas & these 29+ Inexpensive Bathroom Remodel Ideas!

All of that seems achievable for even the most beginner DIYer…except installing the vanity light. Many DIYers tend to shy away from any and all electrical work and they hire it out. Now I’m ALL FOR calling a professional when there is a job over your skill level, don’t get me wrong.
But something like attempting to change a bathroom light fixture can be a pretty simple job and you can still DIY safely and easily. However, if any time you get stuck or confused, keep the power off and call in a professional. (Please also read the safety disclosure at the bottom of this post).
Not ready to try installing a new vanity light yet? No worries, learn how you can update your existing builder-grade lights with a simple spray paint hack for less than $20!
BEFORE PICTURES
When we started working on our guest bathroom remodel, I was really excited to be able to get rid of this outdated light! If your light is still in good working condition, be sure to save all of the pieces and drop it off at your local Habitat for Humanity ReStore to be used again!

Ready to watch how to install vanity light?
If you love DIY videos, don’t forget to subscribe to our YouTube channel!
This how to install a vanity light tutorial also contains affiliate links, but nothing that I wouldn’t recommend wholeheartedly. Read my full disclosure here.
Supplies need for installing a vanity light:
- Step ladder
- Screwdriver
- Wire Cutters/Strippers
- New Vanity Light
- Wire Nuts
- Voltage Detector
Step 1. Turn off power to light.
The first thing you’ll want to do is make sure the power is off at the light or the breaker is off. In our video, the power was at the switch so when Logan turned the switch off, no power was being sent up to the light fixture.
Power can also be run to the light fixture and then down to the switch. When in doubt, it’s always easiest to just turn the power off at the breaker just to be extra careful. You can also use one of these handy voltage detectors.
We did this job from start to finish in about 10 minutes and didn’t stop. However, it may take you some more time and you may step out of the room for a minute.
One simple little accident could be inadvertently switching the light back on when you step back into the room. To avoid this…put a piece of painter’s tape over the switch as a little reminder.
If there are other people in the house, we always recommend turning it off at the breaker to be safer and putting a note on the box that says not to touch the breaker box. Alternatively, you can lock the box to avoid having anyone mess with it while you’re working on installing the new vanity light.
Step 2. Remove old vanity light fixture.
Once the power is off, begin removing the light fixture that you are going to replace. Typically there’s a small screw cap on the front of the vanity light that you need to unscrew to pop the light off.
Step 3. Reveal wires behind the light. Separate old light fixture from wires in wall & remove the bracket.
Once you have the light fixture detached from the wall, separate it from its support bracket and reveal the wires.
At this point, you should act like the fixture is still hot (“hot” is another way of saying power is still running through the wires), which means that you should avoid letting the wires touch each other if possible.
Now, I know what you’re thinking….”I just turned the power off to the light in Step 1!” In a perfect world, everything is wired correctly behind your old bathroom vanity light, but just in case there’s something wonky going on, it is safest to act like the power is still on and not let the wires touch each other.
At this point, if you’re a beginner and/or unsure about installing new bathroom light, we’d recommend taking a quick picture of how the wires are connected to your old light. This may come in handy if you get confused when you go to hook up the new vanity light.

Step 4. Separate old light fixture from wires in wall & remove bracket.
Next start removing the wire nuts that are connecting the light fixture to the house power wires. The wire nuts are the little plastic cones that twist over the ends of two wires to connect them.
Start by disconnecting the ground wire (which is the bare one without a plastic coating around it…or in some cases it will be green), then move on to the neutral wire (which is always white) and lastly you can disconnect the black wire. By doing it in this order you “break the circuit”.
Once the wires are disconnected, go ahead and remove the old bracket that is attached to the box in the wall. You’ll need to loosen the green screw that the ground wire (bare) is wrapped around in order to remove the bracket.
Step 5. Secure the new bracket to the wall and connect ground wires.
Begin putting your new bathroom vanity light fixture up by securing the new bracket to the electrical box in the wall. The new bracket will be provided in the box with your new vanity light. Be sure it is centered in the middle of the box on the wall.
Once the new bracket is on the wall, you can connect the grounding wire (which is the bare one without plastic coating) to the bracket. There will be a little green screw on the bracket for this. Simply loop the grounding wire around the screw at least one time and tighten it back up. Be sure to leave enough ground wire at the end to connect it to the light fixture as well, which you’ll do in the next step. Check out the video tutorial above for a close-up of exactly how this is done.
Grounding is a safety feature used in home electrical wiring. In the event a live electrical wire comes in contact with metal, power will go back to the electrical panel in the garage (and then down into the ground via the “grounding rod”) as an important safety measure.

Step 6. Connect new vanity light fixture’s wires.
With the new bracket in place and the ground wire connected to the bracket, you are ready to connect your new light fixture’s wires to the wires on the wall.
Start with the ground (bare) then move to the neutral (white) and connect the black wire last with wire nuts. To use a wire nut, all you have to do is insert the ends of both wires in the cone and turn the wire nut clockwise until it is tight.
Shove all the wire connections into separate quadrants of the electrical box in the wall.
Step 7. Attach new light fixture to the wall.
Now you can attach your new light fixture to the wall! Get all of the excess wire in the cover of the light fixture and keep adjusting until you can get the bracket screws through the cover on the front of the light fixture.
Be sure to check if the light is level before tightening the screws.
When they are showing through the front of the light when you hold it in place, you can screw on the nuts to secure your light fixture to the wall. You may need to make a few adjustments here to get a snug fit.
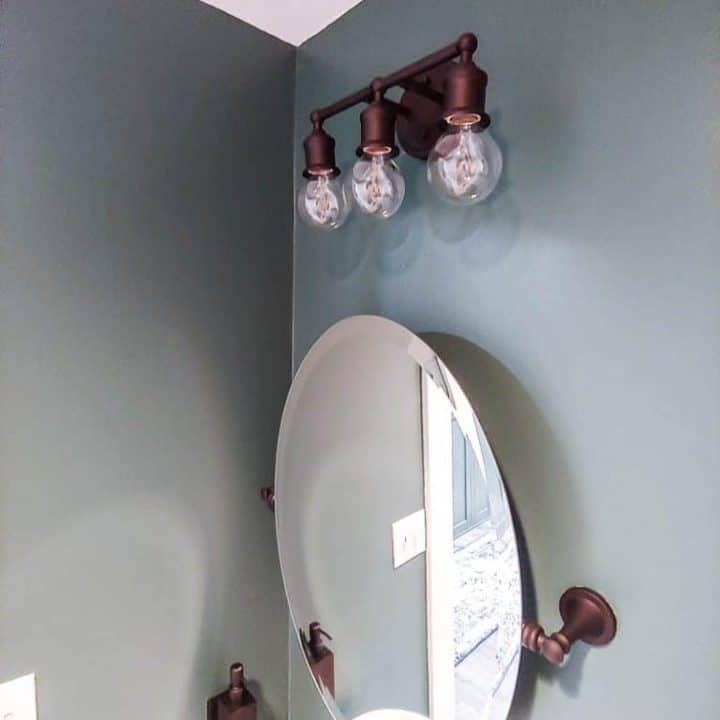
Add any needed trim to your light fixture and, of course, attach some light bulbs, and you are done!

Installing a new vanity light in your bathroom is a quick and budget-friendly way to instantly update your space, even if you’re not doing a full bathroom makeover! Now by following these simple steps in this how-to install a vanity light tutorial, you can do it yourself!

Important Safety Disclosure:
Be sure to read your vanity light’s manufacturer’s instructions thoroughly before beginning to change your bathroom light fixture because they may differ from our tutorial if they have different wires or connections.
This video and blog post is for informational, educational & entertainment purposes only. Electrical work can be a tricky DIY, so please be smart and safe. We will not be responsible for any injury or damage incurred. Please consult a professional when needed, read all safety and instruction manuals, and take all safety precautions. All projects performed following instructions found on this site are done at your own risk. Read our full disclaimer here.
Was this vanity light installation tutorial helpful for you? Do you have any more questions?
Let us know in the comments below!

How To Install A Vanity Light
In the process of a bathroom makeover? Here's how to install a vanity light in a few simple steps, with pro-tips to make it easy and fool-proof!
Materials
- New Vanity Light
- Wire Nuts
Tools
- Step ladder
- Screwdriver
- Wire Cutters/Strippers
- Voltage Detector
Instructions
- Turn off power to light.
- Remove old vanity light.
- Reveal wires behind light. Separate old light fixture from wires in wall & remove bracket.
- Separate old light fixture from wires in wall & remove bracket.
- Secure new bracket to wall and connect ground wires.
- Connect new vanity light fixture's wires.
- Attach new light fixture to wall.


