How To Build Bathroom Floating Shelves

We needed some extra bathroom storage in our small bathroom and these bathroom floating shelves above our toilet solved our storage issues. Here's a tutorial on how to build bathroom floating shelves.
No matter the size of your bathroom, you could always use more storage, right? It is the same thing in the kitchen, right?! Bathrooms and kitchens always need more storage for some reason!
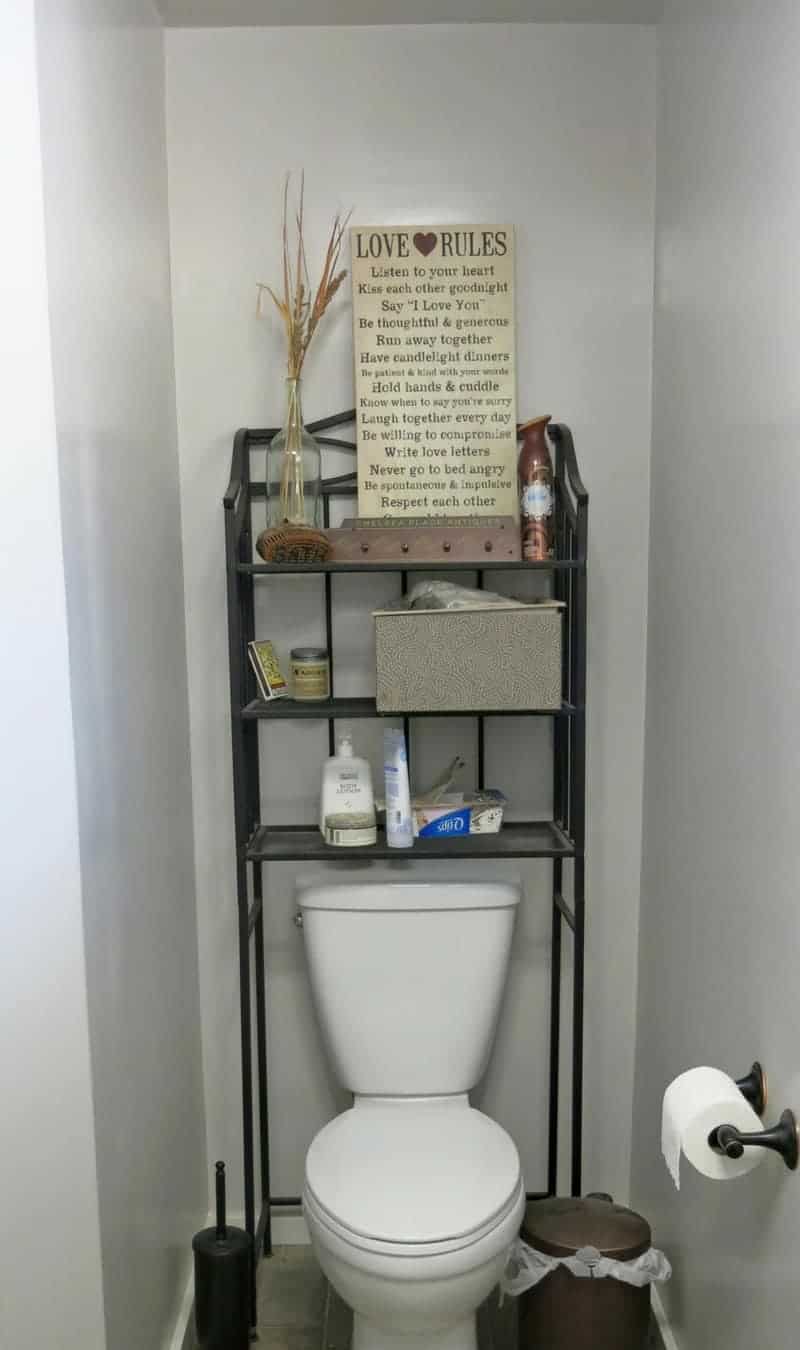
We had some (hideous) shelves about the toilet in our bathroom before we started this farmhouse master bathroom renovation that you will see below. The shelves provided some bathroom storage, but I knew I had to ditch them. So we decided on adding bathroom floating shelves. I love that they gave us that farmhouse style we desperately needed!
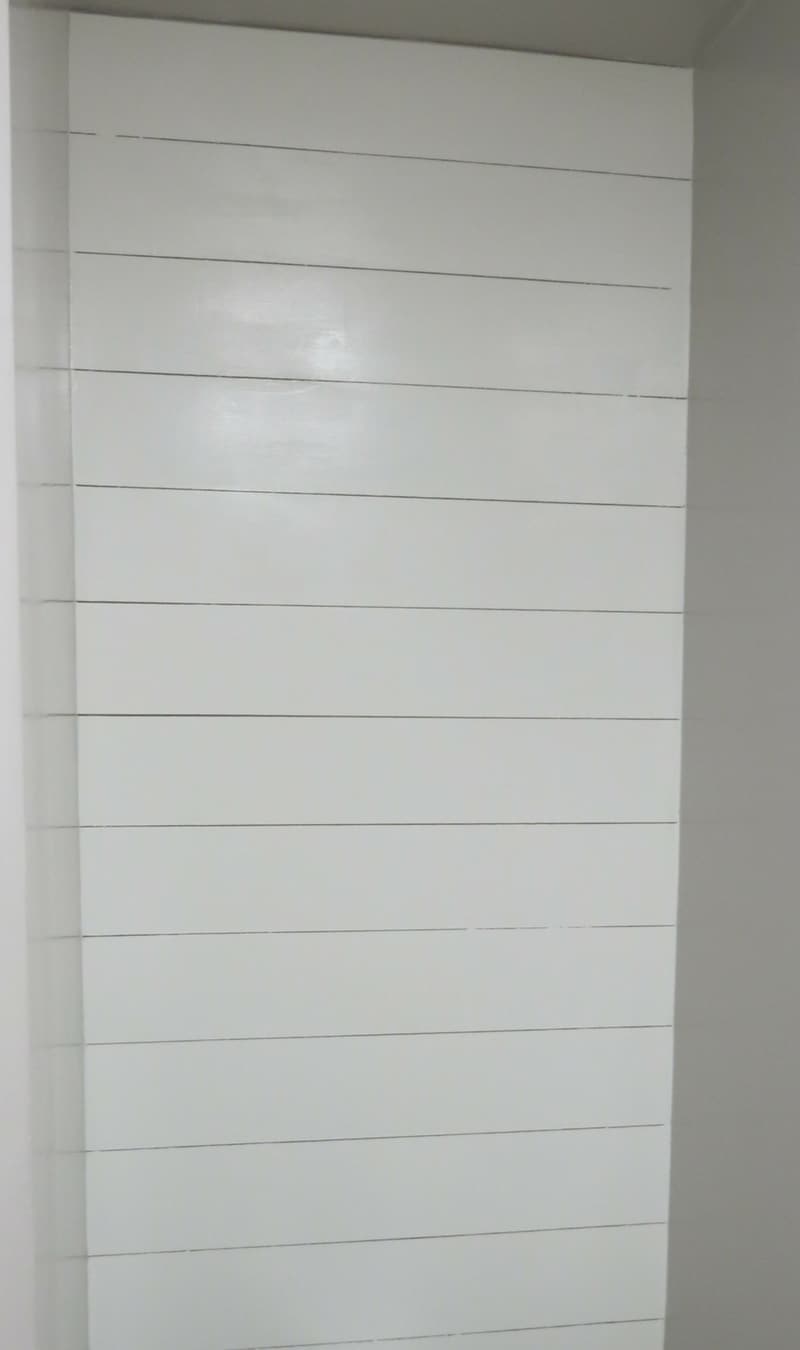
It’s been a while since I posted an update about our farmhouse master bathroom renovation! You guys loved the shiplap wall tutorial I shared and I can’t wait to show you the rest.
I have been bursting at the seams with things I’ve been wanting to share with you on the blog, so our farmhouse master bathroom room is getting revealed slowly. I promise a full reveal of our farmhouse master bathroom is coming. Hehe.
UPDATE: The wait is over!! Check out the full room reveal for our farmhouse master bathroom here!
Before Photos
You may remember from the shiplap wall post, but here’s what the bathroom looked like when we moved in. Yuck, yuck, and more yuck!
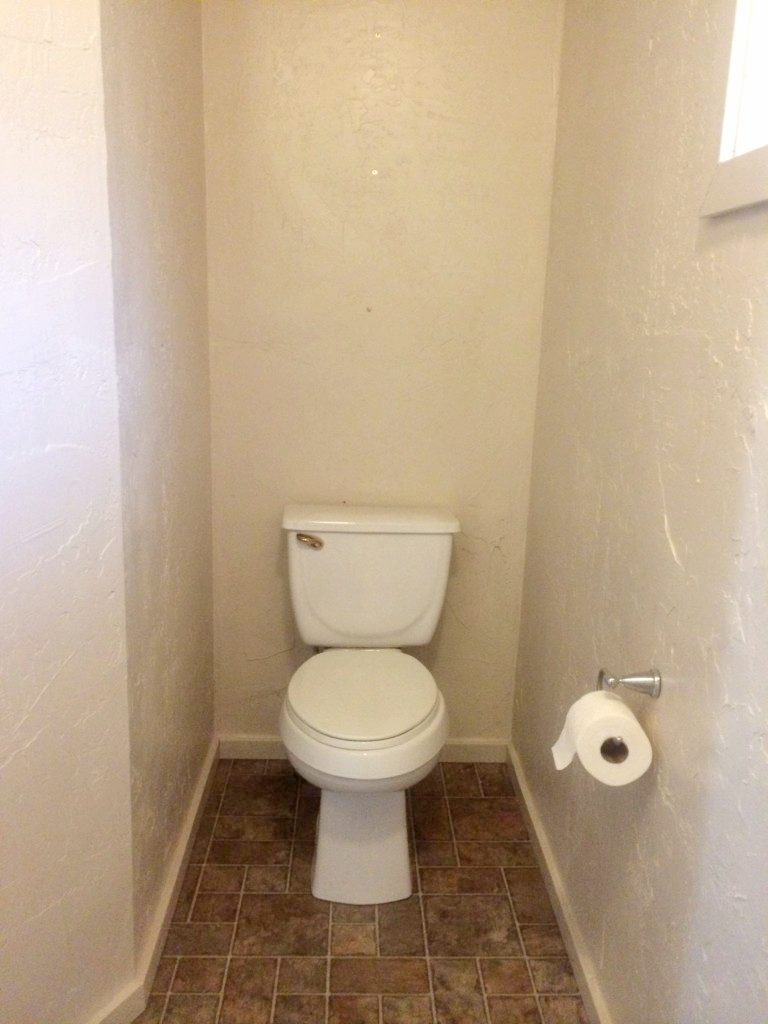
U-G-L-Y…. (ok, tell me that you didn’t start singing that cheer?… no? ok maybe I’m the only former cheerleader and Bring In On fan in the room).
The ugly bathroom did get a little (and I really mean little) better when we skim-coated (made the texture smooth), painted, and put in some wire shelving.
But, I hated those shelves. And because I hated those shelves, I also hated styling them. I just couldn’t get them to look cute. They always looked outdated and cluttered.
The master bathroom really started to transform when we added the faux shiplap wall! Don’t you think?
But, we definitely need some storage!! I’ve always dreamed about having nice open bathroom shelving above the toilet to style up really cute and provide extra storage. Who doesn’t need extra storage in their bathroom?
Oh ya, did I mention this is like the smallest master bathroom I’ve ever seen!? I was such at a loss for storage solutions when we moved in, I even shared my favorite small bathroom ideas here. These DIY bathroom floating shelves are just what we needed.
Bathroom Floating Shelves: Video Walkthrough
If you love DIY videos, be sure to subscribe to our YouTube channel!
This bathroom floating shelves post contains affiliate links, but nothing that I wouldn’t wholeheartedly recommend anyway! Read my full disclosure here.
How To Build Bathroom Floating Shelves: Step-by-Step Instructions
Materials needed:
- 2×3 Stud (for the interior base of the shelf)
- 1×12 Common Pine Board (for the top of the shelf)
- Select Pine 1×4’s (for the sides and front of the shelf)
- 1/4” Underlayment (for the bottom of the shelf)
- Dark Walnut Stain
- 2.5 inch wood screws
- Wood glue
- Wood putty
- Painter’s tape
Tools required:
- Circular Saw or Miter Saw
- Brad Nailer (and nails)
- Hammer Drill
- Rafter Square
- Hand Sander (and 220 grit sandpaper)
Step 1. Build your shelf interior base.
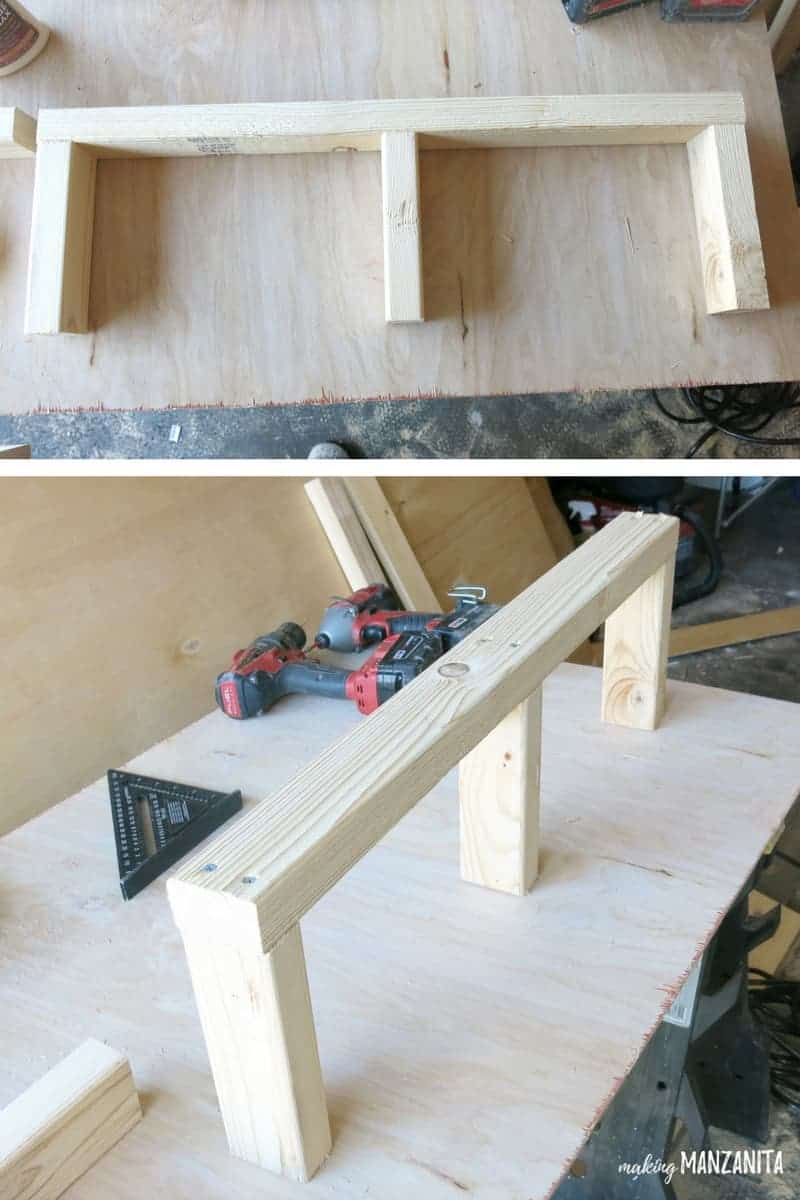
Using 2x3s, first you will build the base of your shelves. For each shelf, cut the 3 boards to the approximate desired depth of your shelf and 1 board to the width of your shelf.
Attach the three boards on each corner and one in the middle using 2.5 inch wood screws and some wood glue. Be sure to use a square to make sure everything is lined up accurately.
Step 2. Cut and attach sides and top to the base.
Cut two side pieces from 1×4’s and the top from 1×12 common pine board.
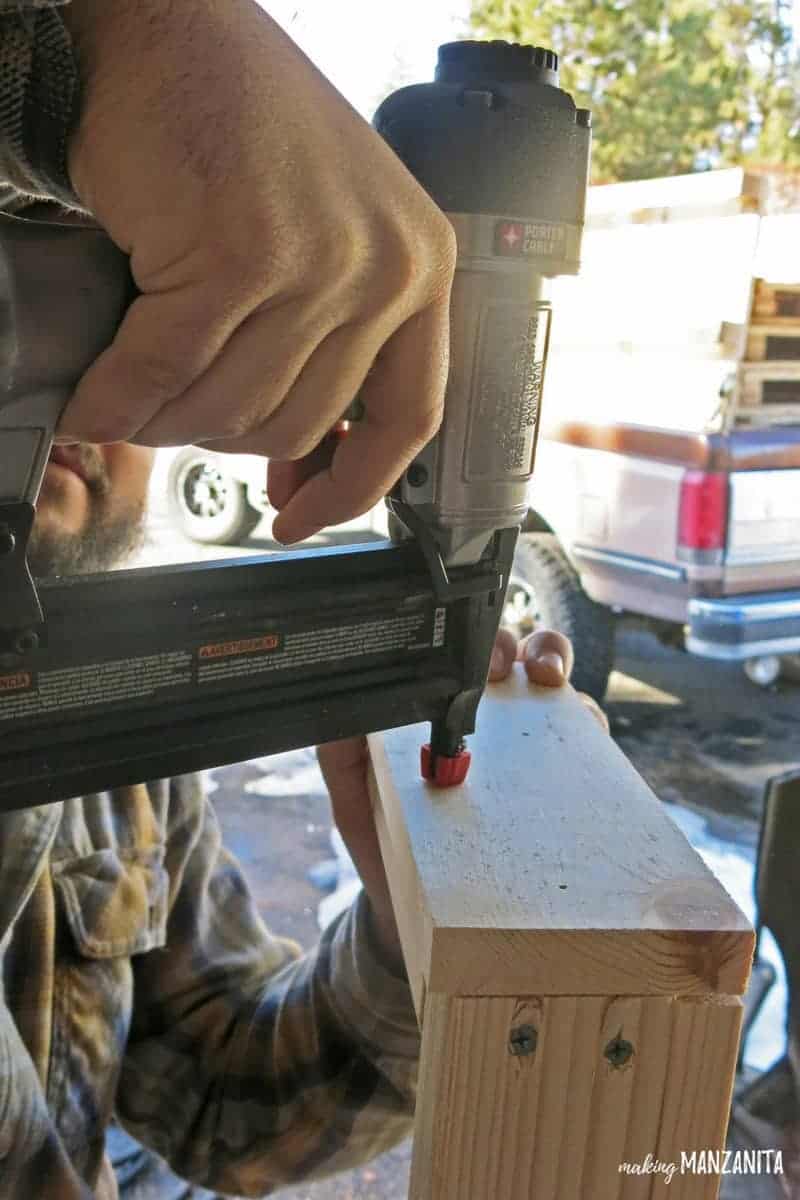
Next, you can add a little bit of wood glue to the top of the base. Next, you will attach the top of the shelf using a brad nailer with a few nails where the top of the shelf meets the base.
Then, you can attach the side boards of the shelf with the nail gun. The side boards should hang over the bottom edge of the base about 1/4”. This is because once you attach the bottom to the shelf, it will be flush.
After you’re done nailing them in, fill the holes with wood putty and scrape or rub smooth.
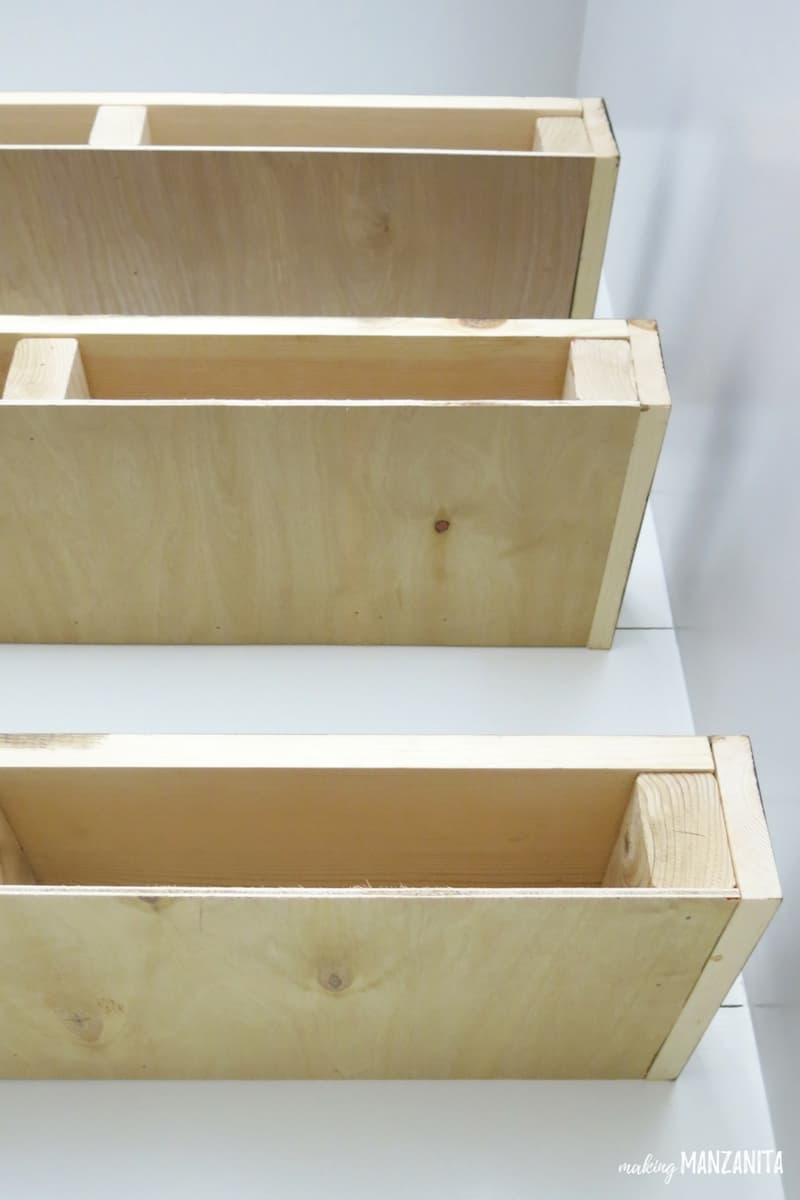
Step 3. Cut boards for the bottom and the front panel.
For each shelf, you will need to cut 1 piece of 1×4 for the front panel of the shelf. Once cut, set this piece aside. You’ll add this front panel to the shelf after it is on the wall.
For each shelf, you will then need to measure the opening on the bottom between the side boards (already attached to the base). This will be covered with 1/4″ underlayment.
Cut the bottom from 1/4” underlayment to the correct size.
Once cut, set this piece (for the bottom panel of the shelf) aside. You’ll attach this later after the shelf has been attached to the wall.
Step 4. Sand bathroom floating shelves.
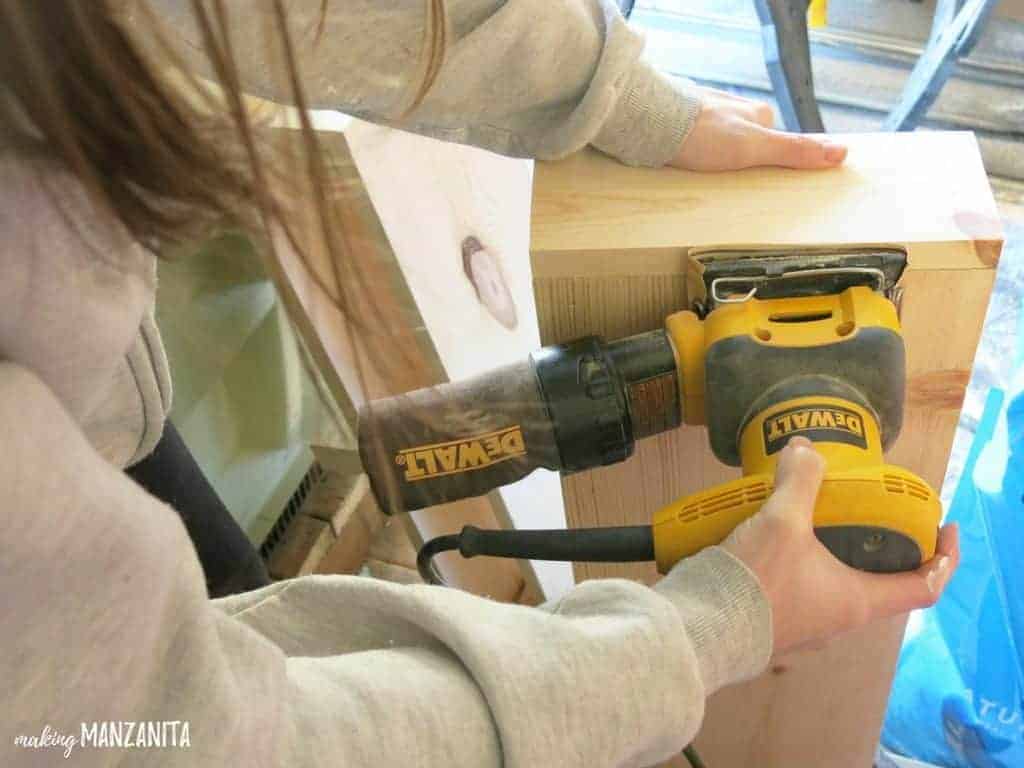
Using a hand sander and 220 grit sandpaper, give both the shelf base with the sides and top attached, as well as the boards you cut for the bottom and front panel a good sanding.
Definitely make sure you get the places where the wood putty is on the nail spots really well so the surface is smooth.
After you’re done sanding, wipe down the wood with a slightly damp rag or tack cloth to get all the sanding dust.
Step 5. Stain bathroom floating shelves.
Using a stain rag (or just a piece of cut-up old t-shirt), you will stain the shelf base with the sides and the top attached.
You only need to stain the top and sides, of course. Don’t worry about staining the interior of the shelf, which won’t be seen.
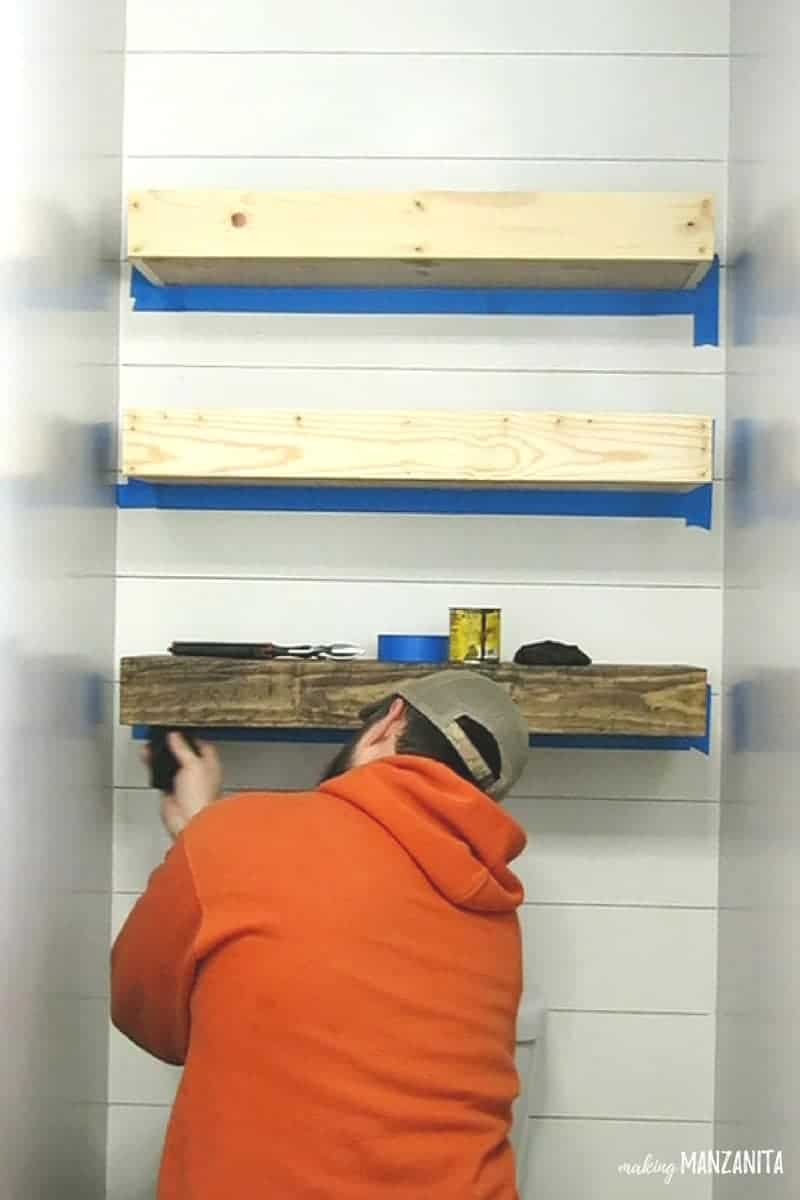
Step 6. Attach the shelf to the wall.
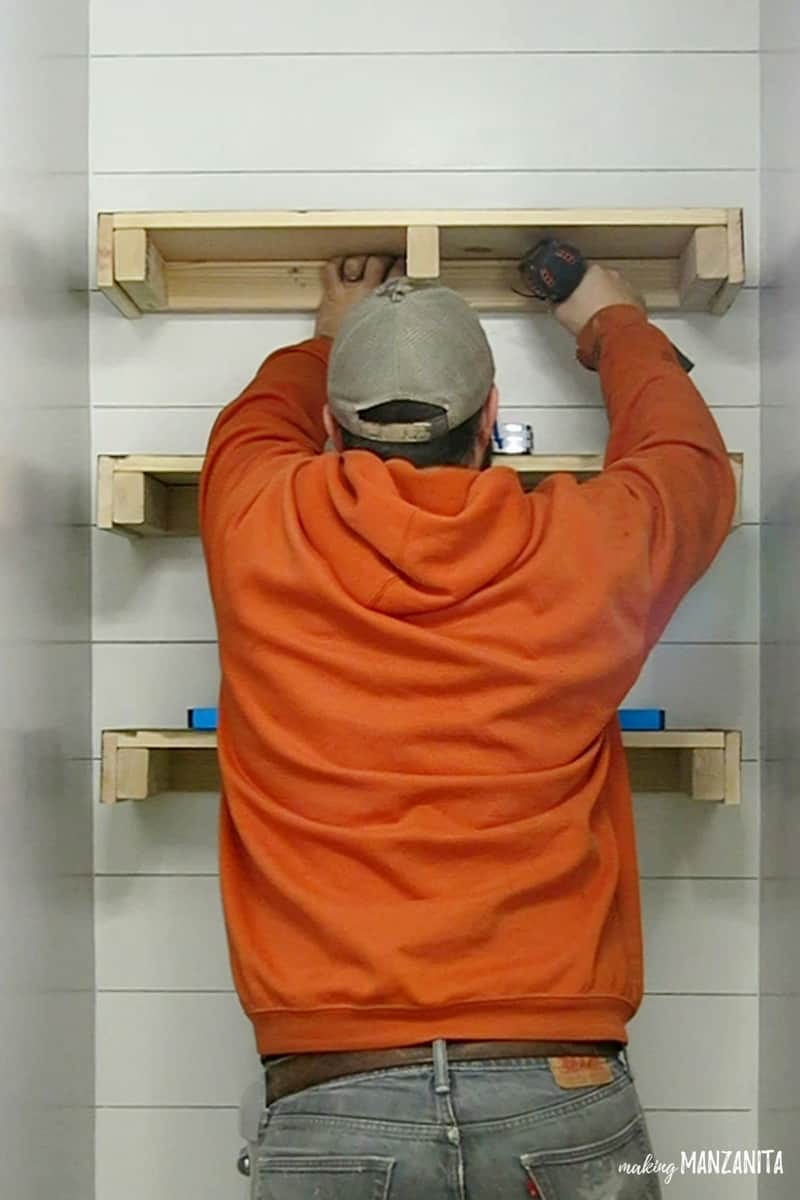
Now it all starts coming together, it’s time to get the shelf on the wall!
First, you definitely want to find the studs in your wall and then screw the base into the wall using 2.5 inch wood screws (about 2 screws on each stud).
Step 7. Attach the bottom and front panels to the shelf.
Next, you’ll move on to the unstained pieces for the bottom and front panels to the shelf. Attach the bottom first by just lining it up on the bottom of the shelf and adding some nails using a brad nailer.
The front panels will go onto the shelf in the same way, with the brad nailer.
Once everything is nailed, fill in each nail hole with wood putty and lightly sand the area until it’s smooth.
Step 8. Stain bottom and front of bathroom shelf.
First, you will tape off the wall on the sides and bottom of the shelf using painter’s tape. Then apply the stain to the front panel and bottom of the shelf using a stain rag.
You may be wondering “why in the heck didn’t we stain the bottom and front of the shelf before we attached them to the shelf?!” That’s a great question!!
You probably COULD, but once you add the nails, there will be a hole where the nail went in that needs to be filled with putty. By staining the front of the shelf last, there’s an even color to the front…so nice and pretty!
Step 9. Seal with finishing wax.
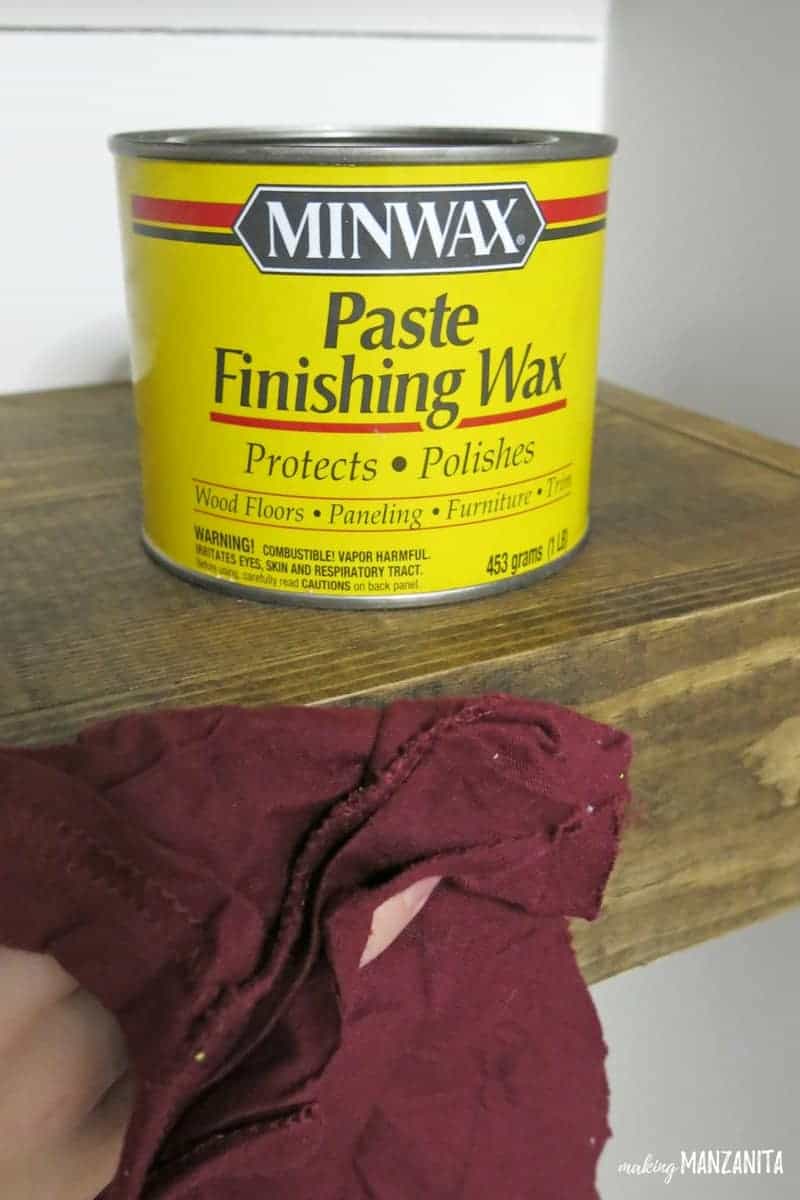
To finish things up, I added a rub-on finishing wax to the floating shelves. This is easy to apply once the shelves are in place.
Step 10. Smile!
Once you’re done with this guide on how to build bathroom floating shelves, there’s no reason not to step back and smile!
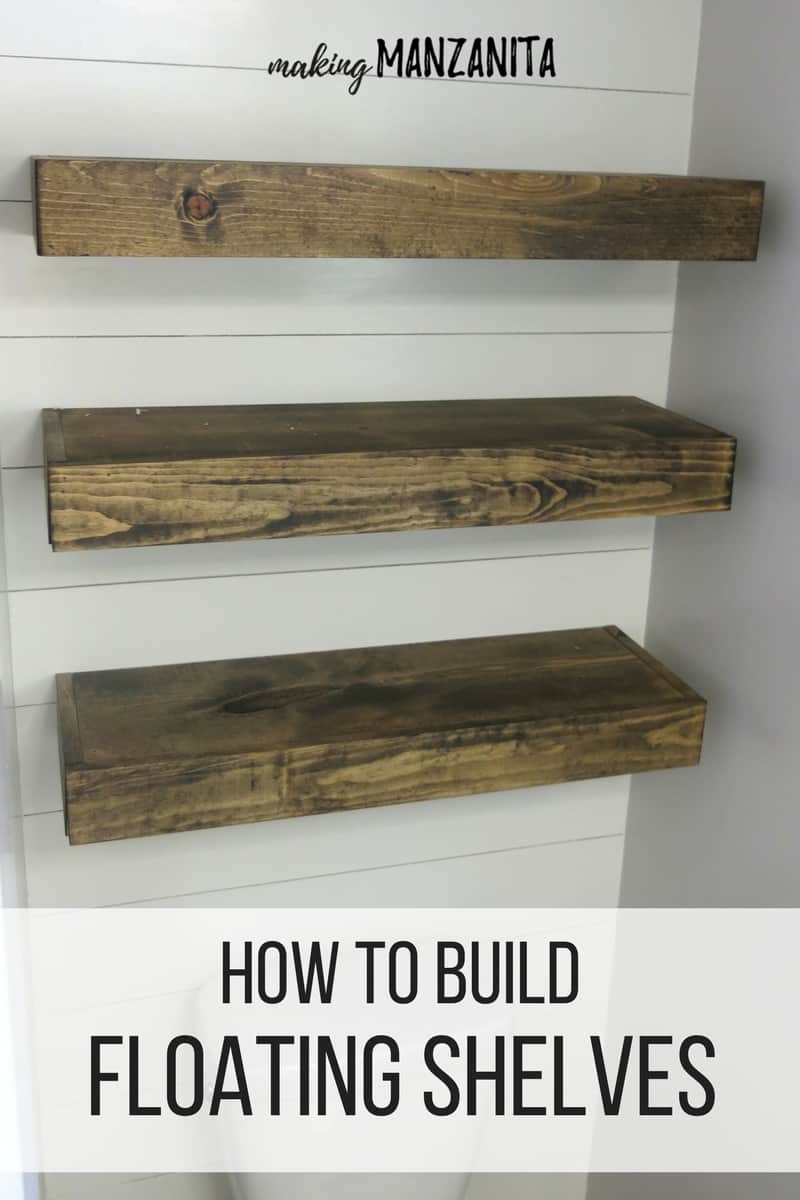
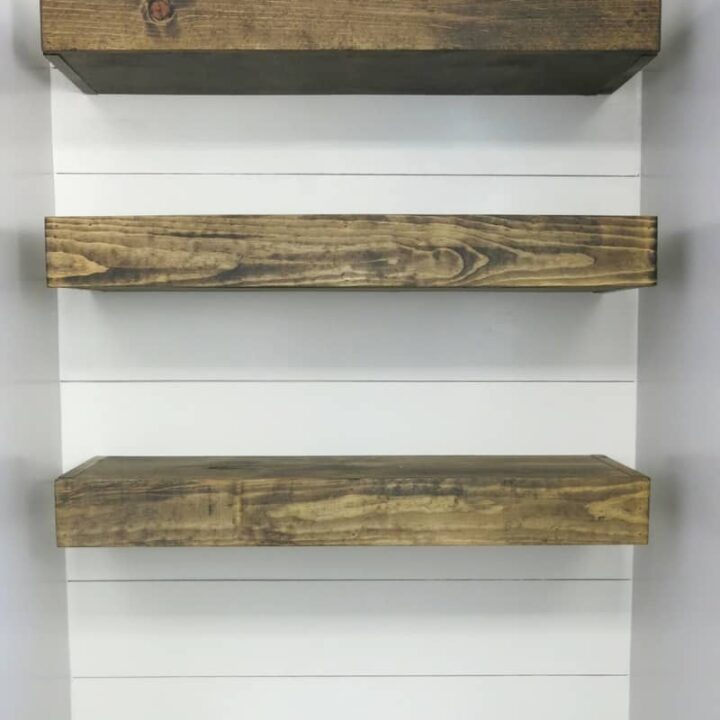
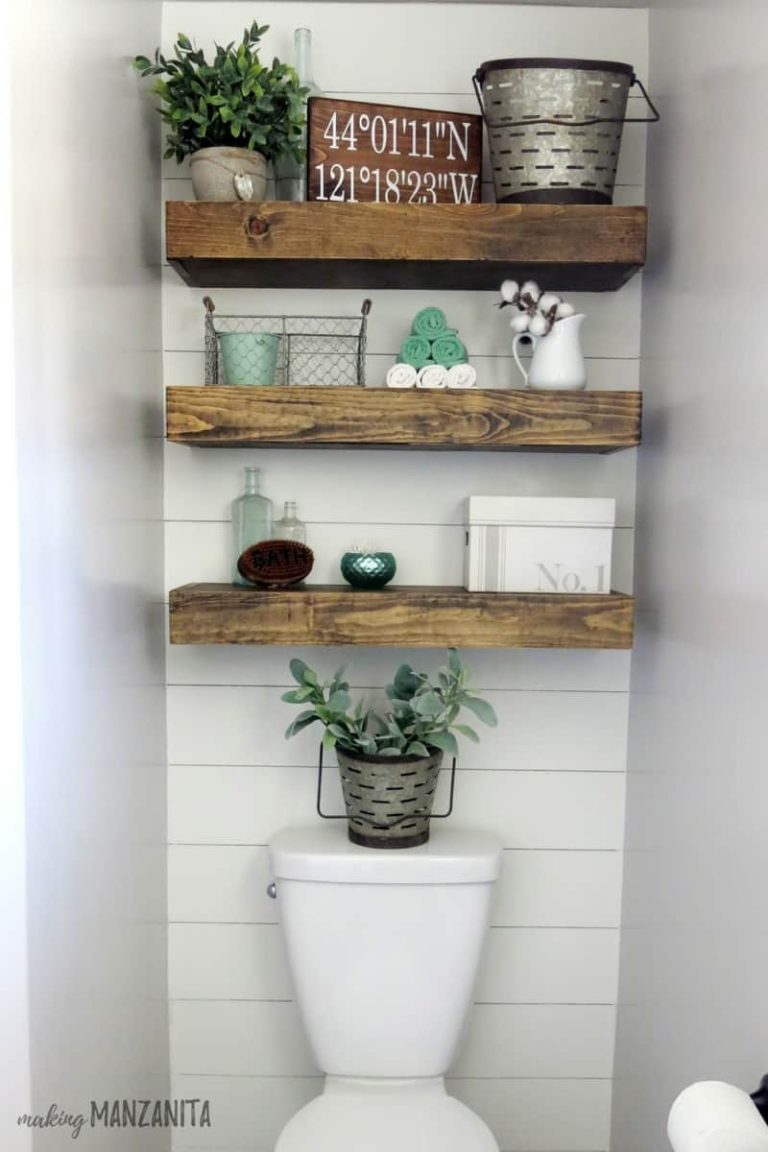
The farmhouse-style floating shelves in our master bathroom provide that extra bathroom storage and, of course, a place to decorate!
The video of our shiplap wall and bathroom floating shelves in our farmhouse master bathroom literally went VIRAL. It was so cool to see something that we did get noticed by SO many people. If you are not one of the 20,000,000 people that saw this on Hometalk’s Facebook page, here’s a little time lapse version of our transformation (and a sneak peek at the super cute farmhouse decor)!
Want to see more of our farmhouse bathroom renovation?
- How To Install A Faux Shiplap Wall
- How To Build Bathroom Floating Shelves (you are here!)
- Farmhouse Master Bathroom Room Reveal
- Ombre Painted Sign
- Chippy Paint Wood Sign
- Installing a Vintage Medicine Cabinet
- How To Give Builder Grade Vanity Light Farmhouse Style
- How To Fix A Shower Curtain That Is Too Short
How To Build Bathroom Floating Shelves
Materials
Tools
Instructions
- Build your base with 2x3s.
- Cut & attach sides and top to base.
- Cut boards for bottom and front of floating shelf (but don't attach yet).
- Sand everything.
- Stain top and sides of floating shelf.
- Attach shelf to wall.
- Attach bottom and front to shelf.
- Stain bottom and front of shelf.
- Seal.


Great tutorial and the shelves are beautiful. I have definitely pinned this one to try one day. Thanks for sharing at #HomeMattersParty
Thanks Donna!
How wide was the wall to which you attached the shelves?
Hi Marguerite. The wall is approximately 35 inches wide and the shelves were 30 inches wide. Let me know if you have any other questions!
Hi! I’m just wondering the dimensions of your shelves! The width, and height? I saw in an earlier comment they are 30 long. Thanks so much! Loved this tutorial!
Jayelyn, the shelves are 30 inches wide, 10 inches deep (out from the wall) and 3.5 inches high.
How much did this cost you? Love it!
The costs of building the shelves was about $75, but we already had most of the tools already on hand so that was for the supplies only.
How far apart are the shelves? And Lao how far from above the toilet is the bottom shelf?
Sorry I don’t have those measurements handy. We don’t live here anymore so I can’t measure for you!