What’s The Best Primer for Bathroom Walls and Ceilings?

Thank you to KILZ® for sponsoring this how to prime a wall tutorial! All opinions are entirely my own. This post also contains affiliate links, but nothing that I wouldn’t recommend wholeheartedly. Read my full disclosure here.
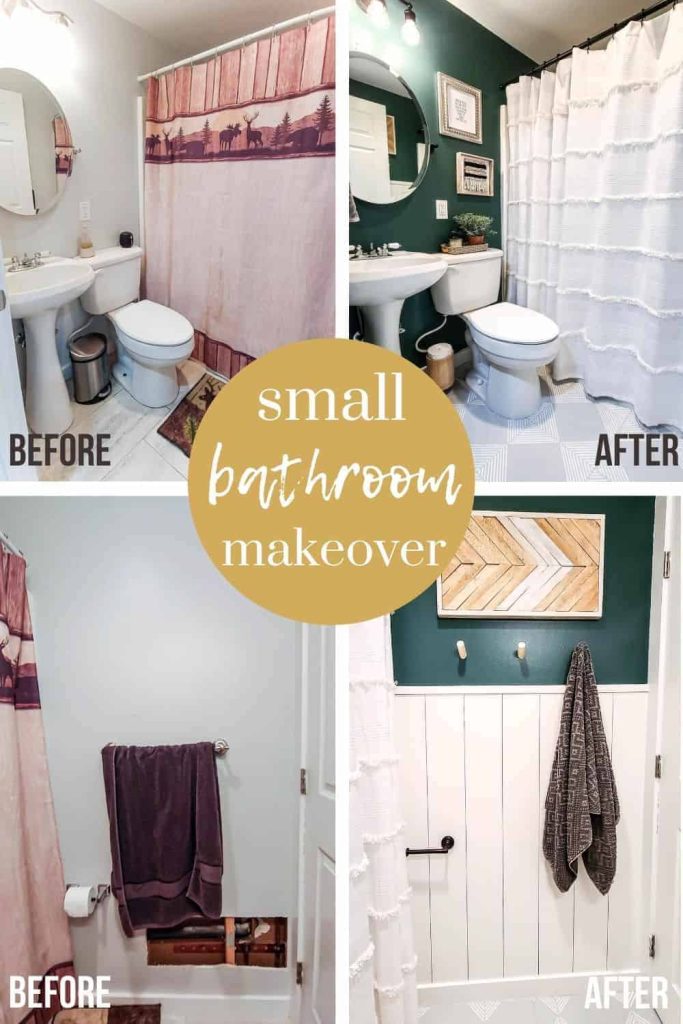
A couple of years ago we did a quick refresh to this guest bathroom with mostly just paint. We spent $250 on the makeover and did DIY vertical shiplap on one wall, painted the tile floors, painted the walls with this dark green paint color, made some DIY wall art with scrap wood and wood shims, and refreshed the decorations.
We knew it at the time, but the original bathroom makeover was definitely what I consider a “Phase 1 Makeover”. The goal was to make the room look better while we live with it and wait until we can fully renovate it.
We needed to focus on some bigger renovations elsewhere in the house first (like the living room) and come back to this bathroom when we had the time, energy, and money to focus on it.
And the makeover did its job. The bathroom looked and felt SO much better for the last two years, but now it is time to take the bathroom off the back burner and give it the renovation it deserves! Check out our bathroom mood board and renovation plan here!
We’re teaming up with KILZ® to encourage you to tackle some projects around your home this Spring and Summer!
Spring is the perfect time to tackle projects like this. This season is not just for spring cleaning, but it is time to take all of those home projects off of the backburner and get them done!!
Primer is an essential step in a lot of different types of DIY projects – whether you’re painting wood furniture or renovating a bathroom like we are. Getting started on the right foot is crucial and primer is the best way to make sure your painting project will stand the test of time.
Believe it or not, KILZ® has tons of different primer products to choose from, so there’s likely something that will work perfectly for your project. Check out all of the different KILZ® primer products here!
Do I need to prime walls in a bathroom before painting?
Before you paint the walls in the bathroom, a high-quality primer is definitely recommended. Because there are a lot of temperature changes and high moisture and humidity in bathrooms, a primer will help prevent your bathroom paint from bubbling or peeling as a result of the extra moisture.
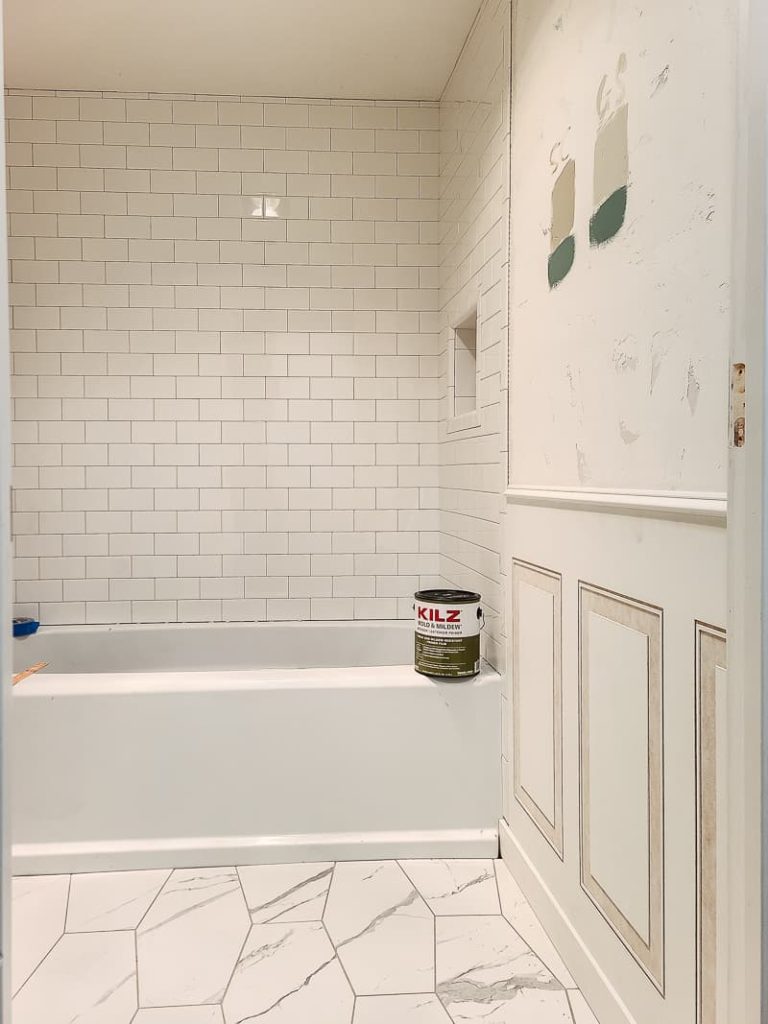
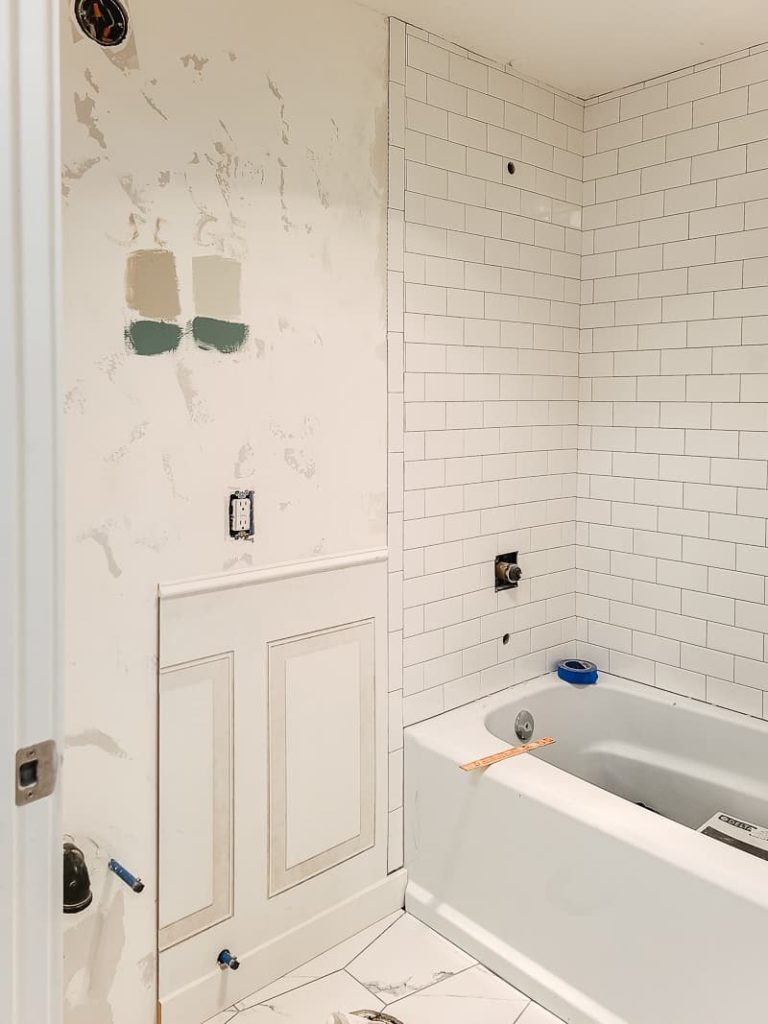
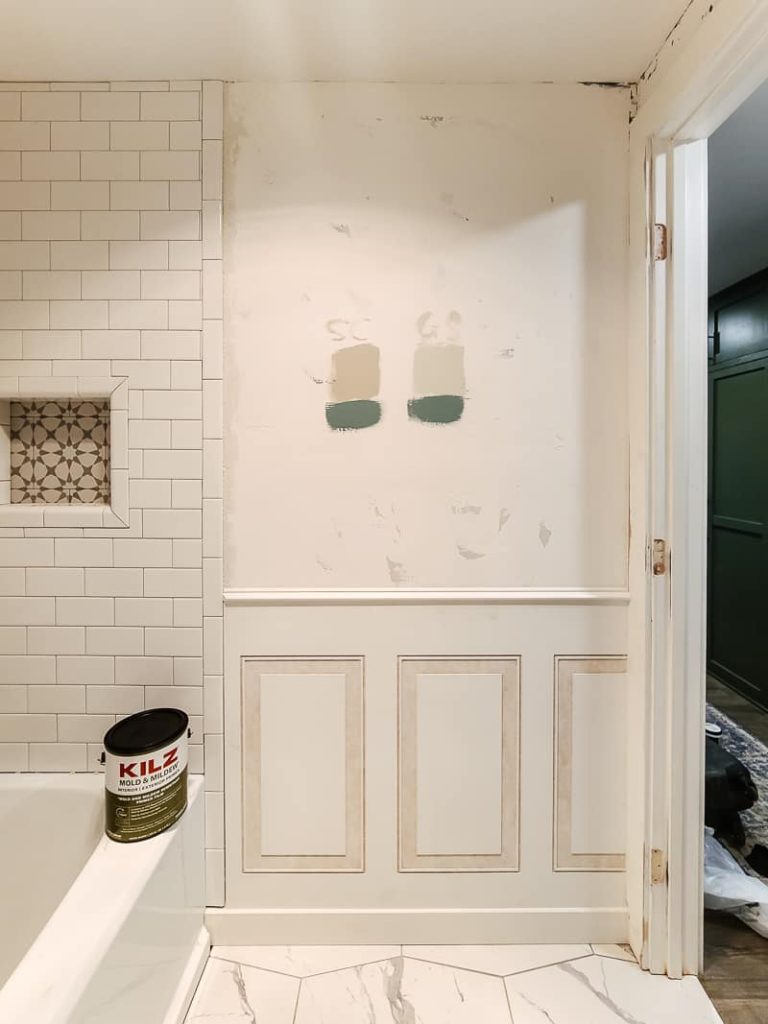
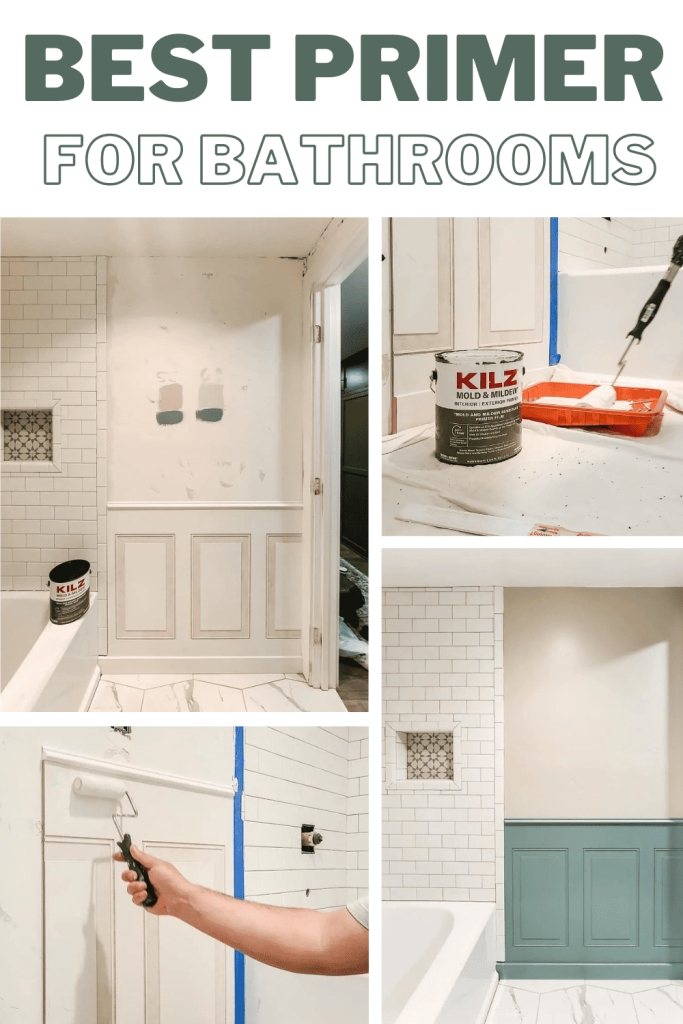
Not only did we need to prime the walls during the project because it was a bathroom (with no windows, which means extra moisture and humidity). But we also had fresh drywall texture on the walls, which is very porous and requires a primer.
What’s the best primer for bathrooms?
When you are specifically choosing a primer for bathrooms, you should be looking for something that is good for high moisture areas.
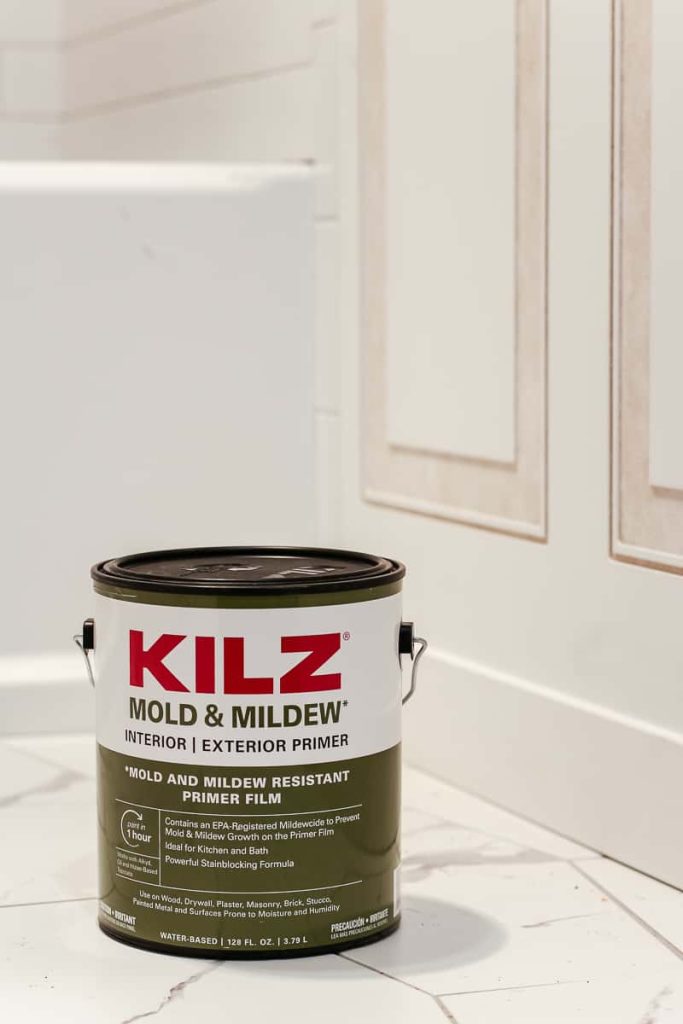
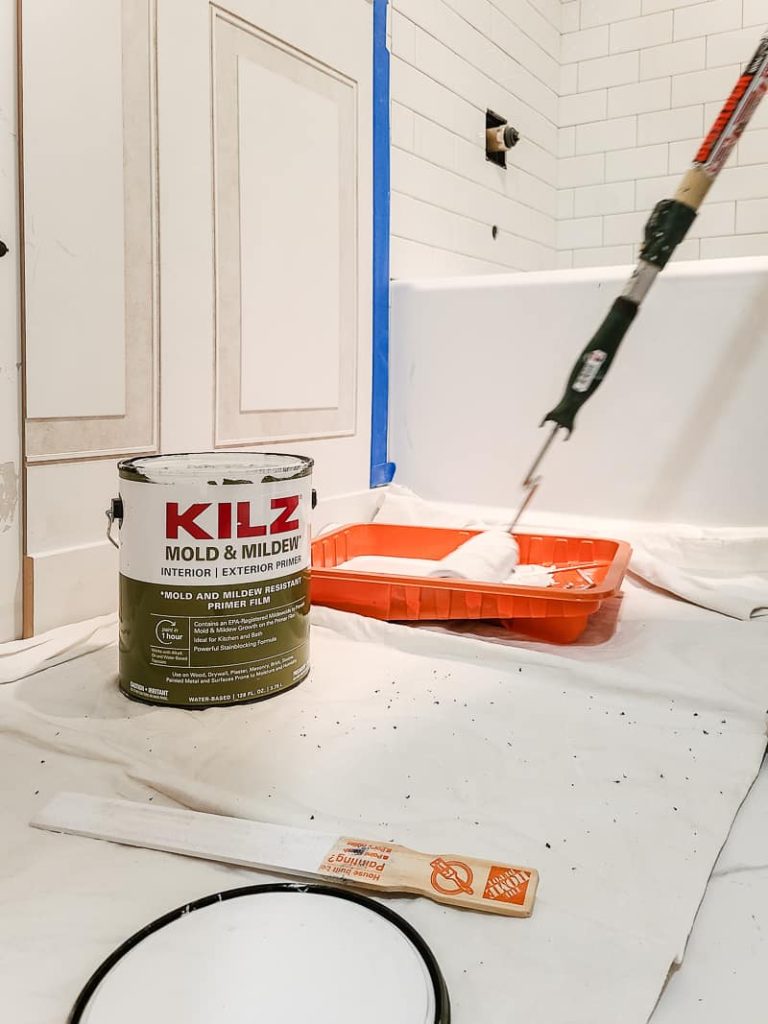
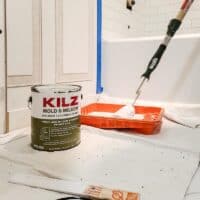
Luckily, KILZ® has just the product for small bathrooms with high moisture… KILZ® Mold & Mildew Interior | Exterior Primer.
KILZ® Mold & Mildew Interior | Exterior Primer features
- Water-based primer-sealer-stain blocker
- Can be used interior or exterior
- Seals porous surface
- Promotes adhesion
- Helps block stains, including felt marker, grease, ink, pencil, tannins from wood, and water stains
- Hides previous color
- Mildew-resistant finish that is great for high humidity, moisture, and temperature rooms like kitchens, bathrooms, powder rooms, and laundry rooms
- Has an EPA registered active ingredient that creates a mold and mildew-resistant film that protects the primer film from mold and mildew growth
- Fast drying
- Low odor
- Very low VOC formula
- Easy to clean with soap and water
- Each gallon covers 300-400 square feet
- Dries to the touch in 30 minutes at 77 degrees at 50% humidity (will need more)
- Can recoat or topcoat after 1 hour
Note when dealing with mold & mildew
Even though KILZ® Mold & Mildew Interior | Exterior Primer is designed to prevent mold and/or mildew from forming and contaminating the primer film before the paint topcoat is added, any existing mold and mildew on the surface need to be removed before priming.
To do this, you can wash the mold or mildew area with a mildew remover (or bleach) and then rinse well with water and allow it to dry FULLY before priming.
If the mold contamination exceeds 10 square, it is recommended to call a contractor that is experienced in mold remediation to deal with it.
How to prime a wall: step by step tutorial
Supplies for priming walls:
- KILZ® Mold & Mildew Interior | Exterior Primer
- Paint stir stick
- Angeled paintbrush for cutting in
- Paint roller (high-quality 3/8 – 1/2″ nap)
- Paint tray
Step 1: Prep your surface
Before you being priming your walls, it is crucial that you make sure your surface is prepped and ready to go!
Start by looking around the walls to see if there are any imperfections or nail holes that need to be patched before priming and painting.
All surfaces need to be clean, dry, and free of dust, chalk, oil, grease, wax, polish, loose or peeling paint, rust, and anything else. If you need to clean your walls before priming, follow this tutorial by using either a non-soapy detergent or TSP (or TSP substitute).
If your walls have paint peeling, scrape off any loose paint and sand to a nice and smooth surface. If you have a glossy surface, it is recommended that you scuff it up a bit with a sanding block before painting.
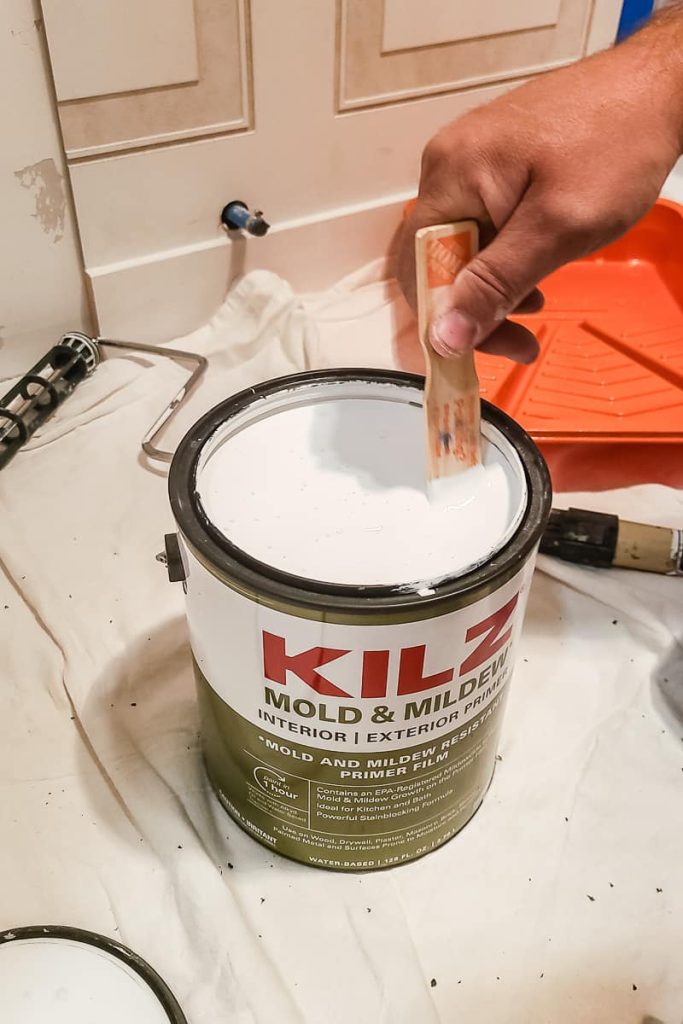
Shake your can of primer wall and then open the lid. Stir the primer well with a paint stir stick and you’re ready to start priming!!
Step 2: Cut in primer
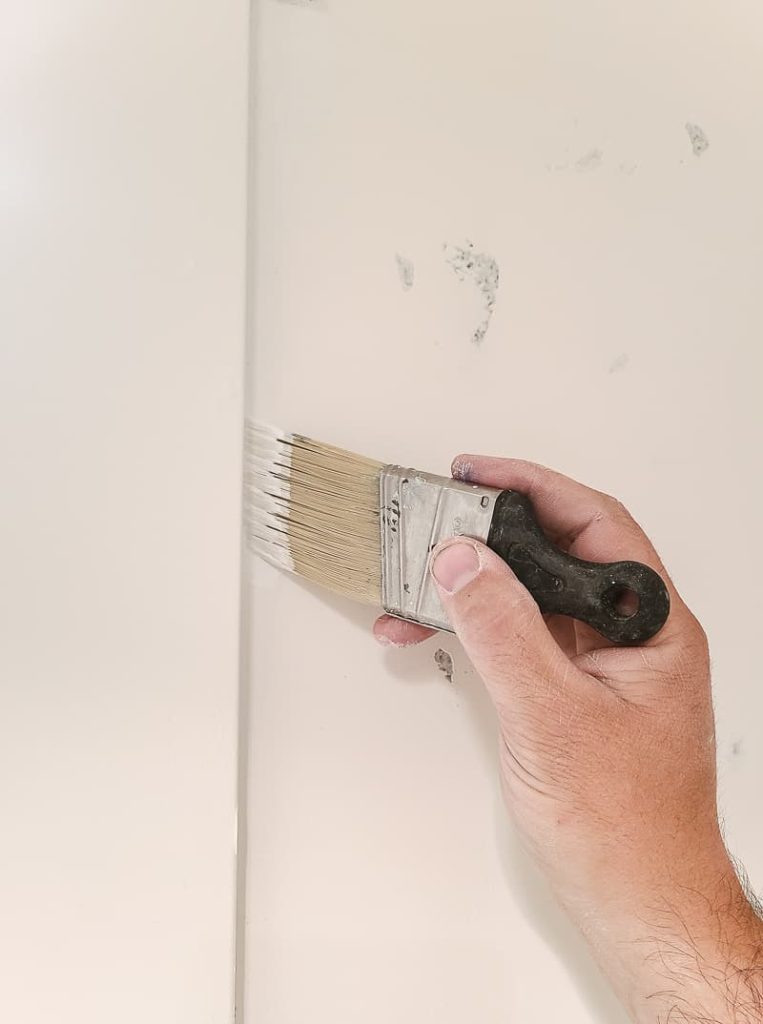
Using a high-quality nylon/polyester angeled paintbrush, dip the bottom 1/2 of the paintbrush into the can of primer and brush the backside of the brush on the edge of the paint can to get rid of the excess.
We typically start by cutting in up in the corner where the wall meets the ceiling. Since we are going to be applying the primer on the ceiling too, we don’t necessarily need to get a nice straight line up there. We just need to get the primer into the corner where the paint roller may not reach.
Next move on cutting in the primer around the areas that won’t be primed (like door and window trim, baseboards, shower, etc).
- Load the paintbrush up and brush off the backside on the paint can
- Brush off excess paint on the wall right along the edge of the trim, but not touch it
- Slowly use the angled edge of the paintbrush to press the paint into the corner where the wall meets the trim while holding the paintbrush with a steady hand
- Brush over the entire area again to make sure the paint is nice and flat on the edges and there are no brush marks so it’s easier to blend later when you paint the walls
What type of paintbrush should you use for cutting in?
In our opinion, the best paintbrush for cutting in is the Wooster short cut with a tapered edge (meaning that there is a dome shape to the edge of the bristles when you look at the brush edge-wise – which is called the filament). We typically use either the Wooster Ultra/Pro Firm Shortcut Angle Sash 2″ brush or the Wooster 2″ Shortcut Angle Sash brush with Chinex bristles. Both of those have that tapered filament that makes it perfect for getting a nice clean line.
Related Reading – Learn more here about cutting in paint in this article!
Step 3: Apply primer on bathroom walls
Shake the primer can again, open the lid with a paint can opener (or screwdriver), and stir well with a paint stick.
Pour the primer into a paint tray and load up a paint roller with primer. Roll the paint roller into the paint tray and spin until paint is covered the entire roller cover. Get excess paint off of the roller by rolling it back and forth on the ramp of the paint tray.
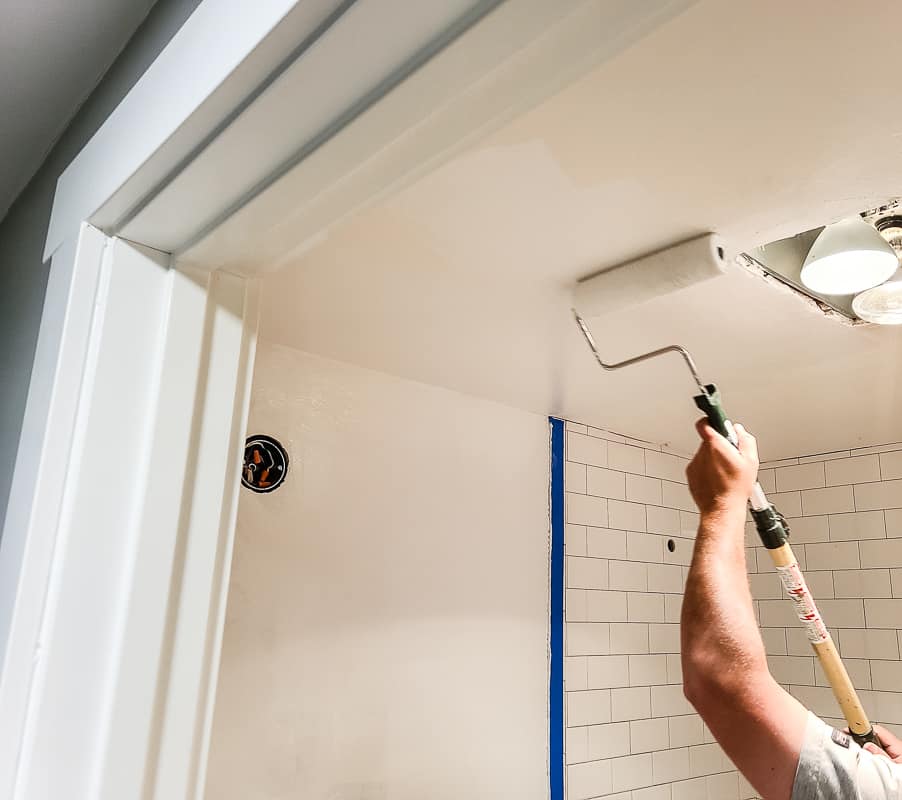
Start by rolling the primer over the bathroom ceiling. It is best to start in one corner of the room and bring the paint roller up to the ceiling. Apply the paint to the ceiling in small sections. Slightly overlap the paint strokes as you roll it on.
Use the extension pole on your paint roller to make it easier to reach up to the ceiling without getting on a ladder, which is no fun.
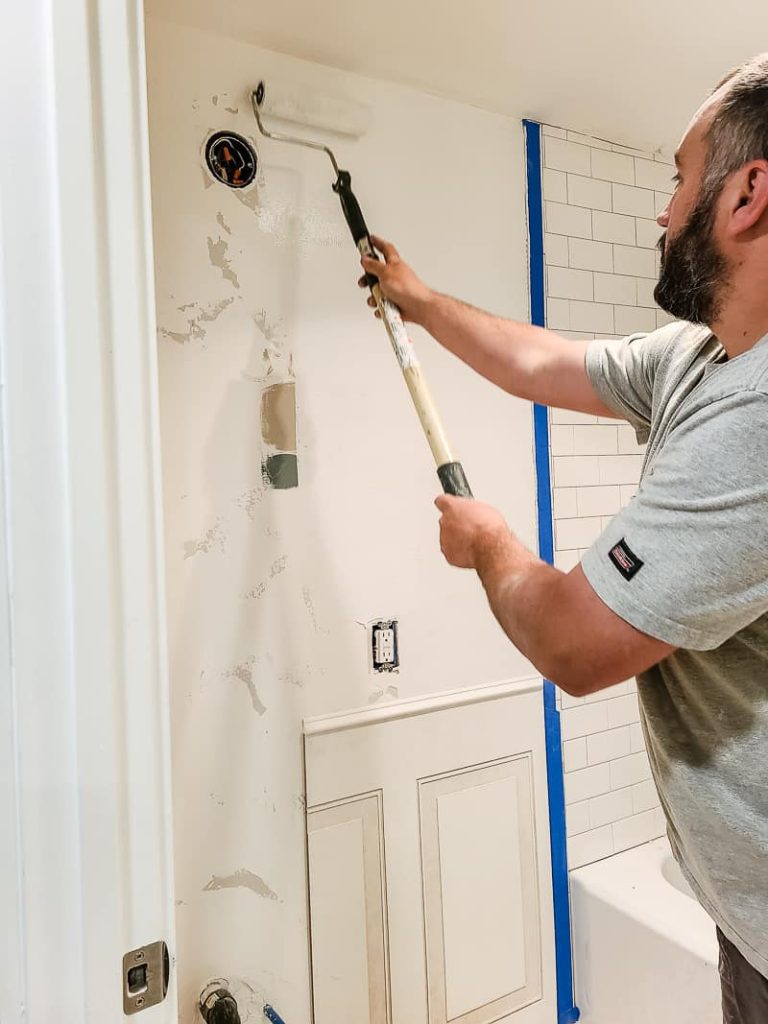
Next move on to priming the walls! Bring your paint roller up to the wall and make a large W on the wall for the initial pass. Continue to roll the paint roller over the wall working in small 4′ sections overlapping the passes.
Once you’re done priming a section of the wall from top to bottom, do one long pass of the roller from the ceiling to the floor to get rid of any roller marks. Continue with the long passes slightly overlapping each.
Once you’ve done the floor-to-ceiling pass, don’t roll over that section again.
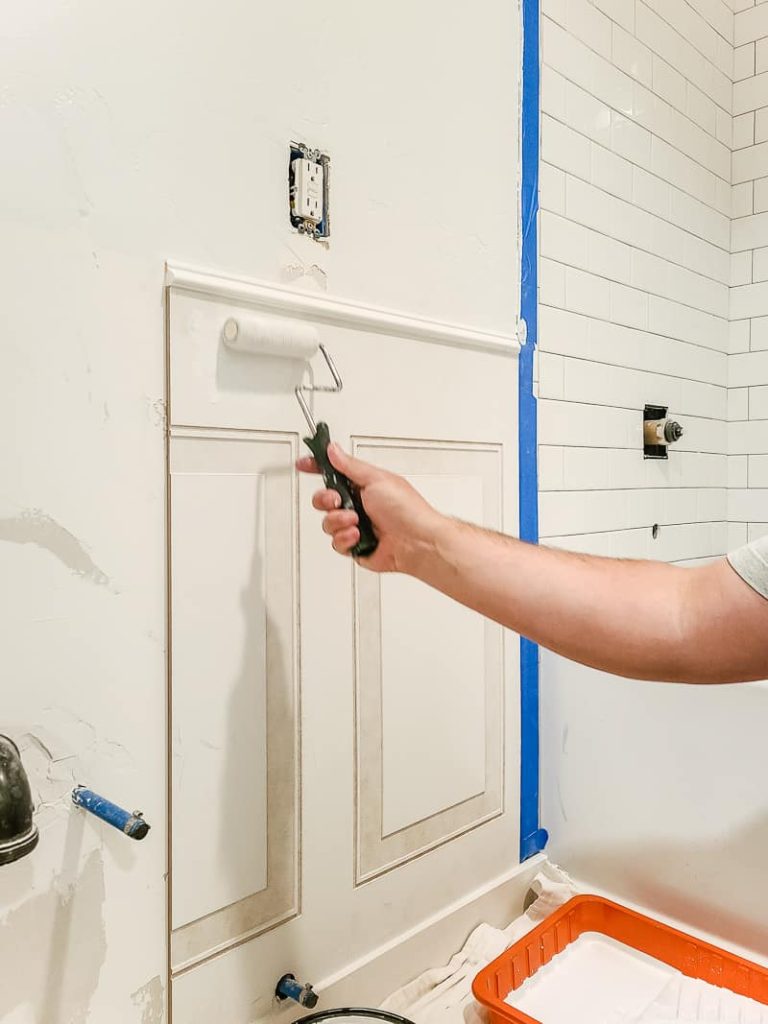
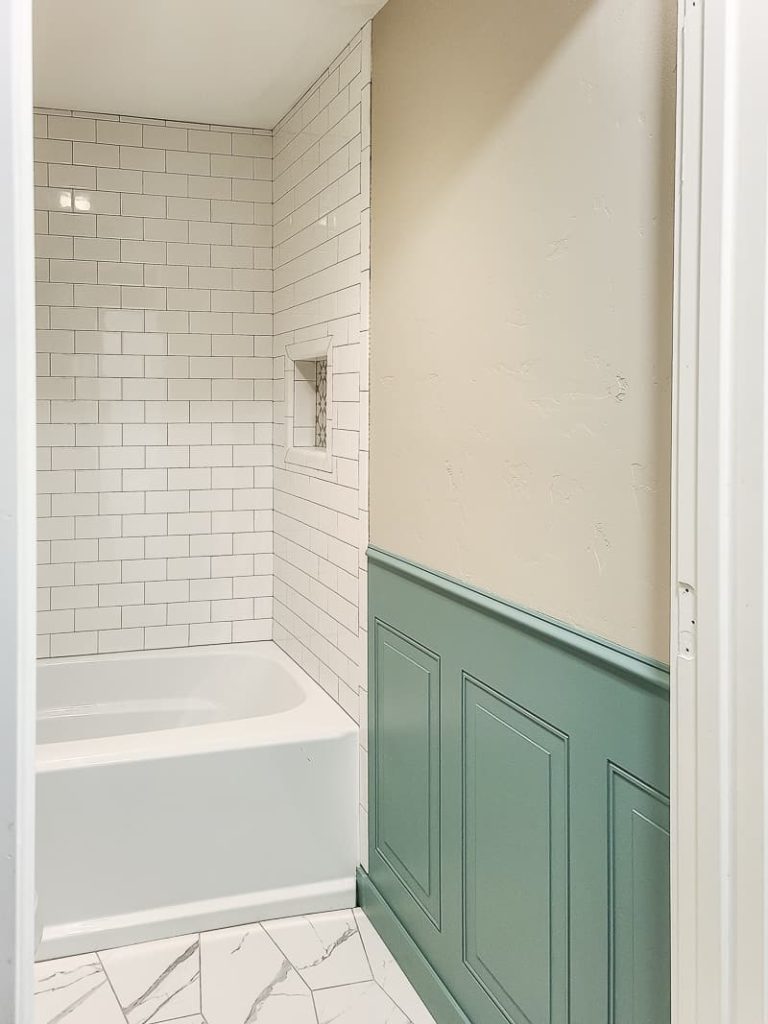
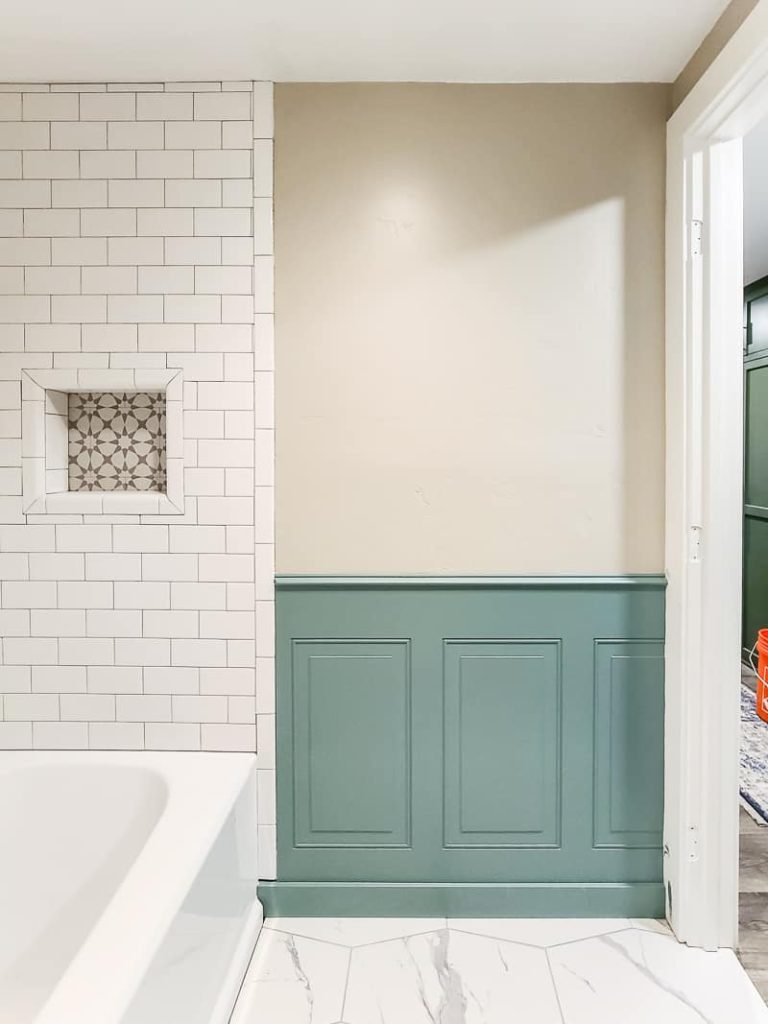
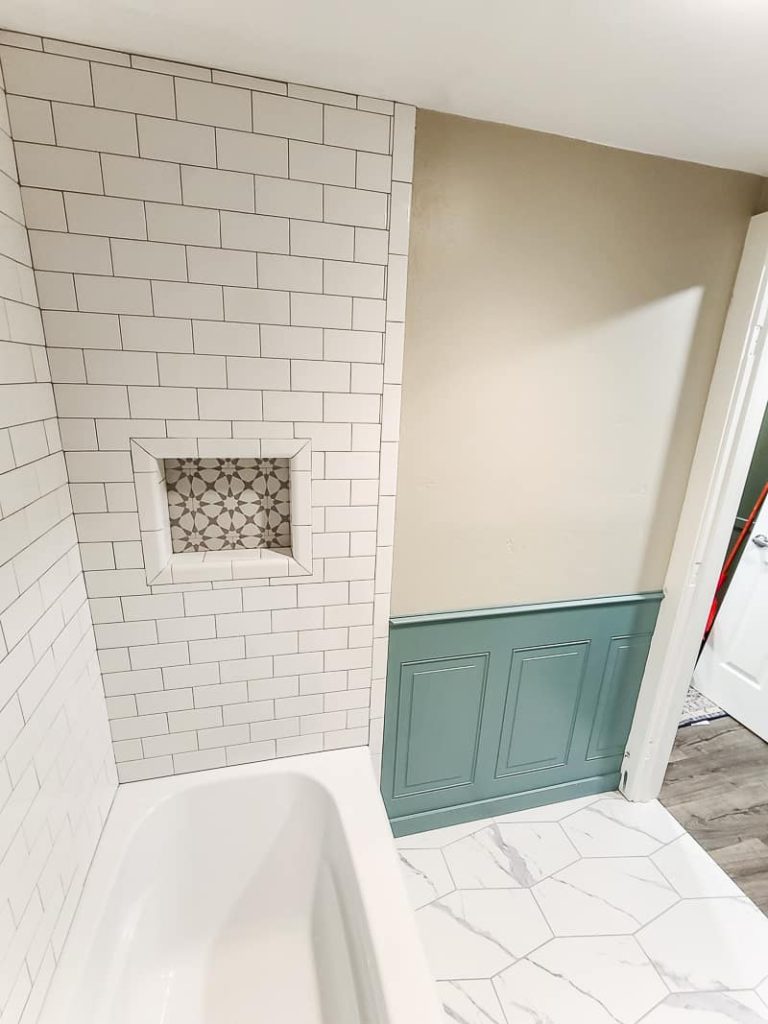
Prime over any added trim or accents as well, like we did on these wainscoting panels.
If you are spraying the primer instead of using a roller, you should add a small amount of water (no more than 1/2 pint per gallon) to thin. Keep in mind that once thinned, the stain-blocking properties of the primer won’t work as well.
Step 4: Recoat (if necessary)
If you’re going to do a second coat of primer, wait 1 hour before applying.
Follow the same steps above to do your second coat of primer.
Step 5: Clean up
Because the KILZ® Mold & Mildew Interior | Exterior Primer is a water-based product, you can clean your equipment (and any paint splatters) with warm, soapy water.
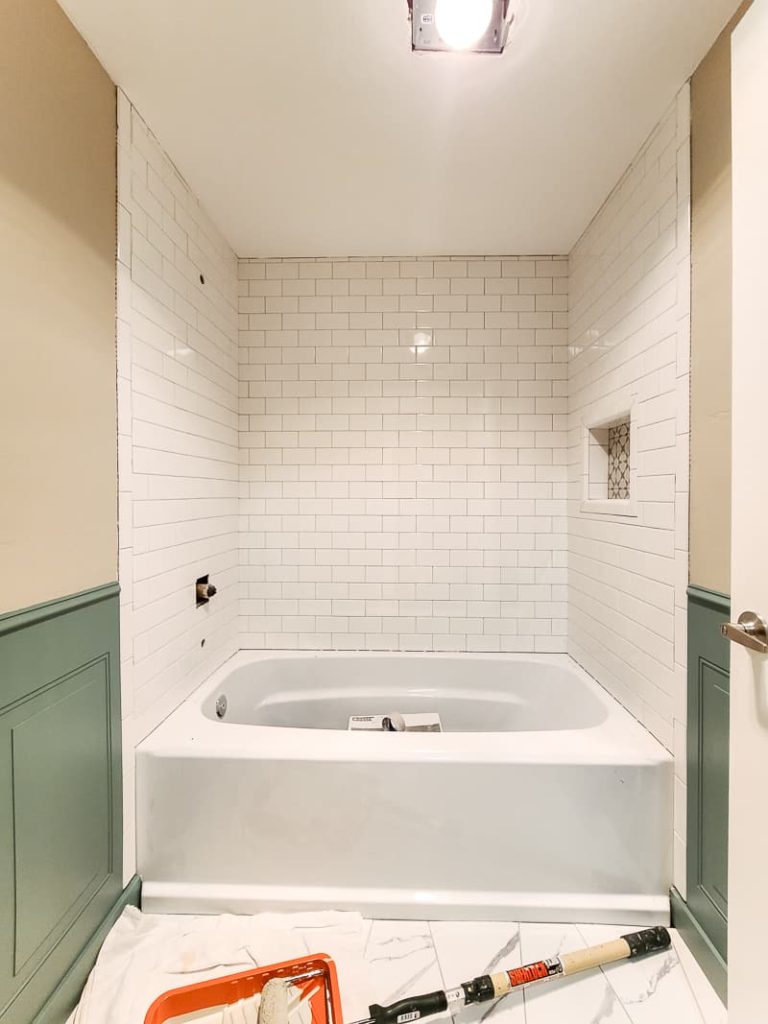
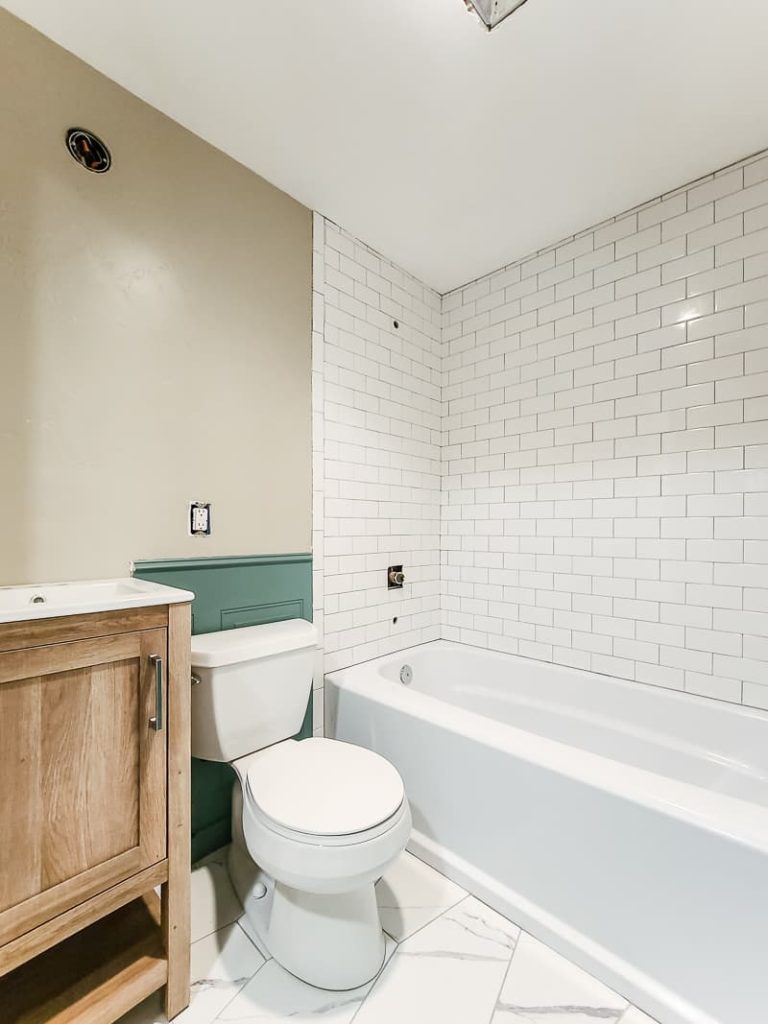
Wait at least 1 hour before moving on with painting with your topcoat. We used BEHR’s Marquee line of this color on the top part of the walls and this blue-green color on the bottom wainscoting panels.
Hopefully, by now, we’ve convinced you that using a primer for bathroom walls before painting is an important step that you shouldn’t skip. KILZ® Mold & Mildew Interior | Exterior Primer is easy to use and the perfect solution for the next time you’re going to be painting a bathroom (or another high moisture area).
We still have a few projects here and there to finish up before we call this bathroom renovation “finished”, but it looks pretty good after the walls have been primed and painted, don’t you think??

I’m so glad that we finally decided to prioritize this bathroom renovation and bring it back to its full glory with the help of KILZ®. Now I’m dying to know what area you’re going to take off of the backburner this Spring and tackle!
Do you have any other questions about using a primer in bathrooms?
Let us know in the comments below!
How to Prime a Wall
Bathrooms need a special primer to handle higher moisture and humidity. Learn how to prime a wall in the bathroom.
Materials
- KILZ® Mold & Mildew Interior | Exterior Primer
- Paint stir stick
- Angled paintbrush for cutting in
- Paint roller (high-quality 3/8 - 1/2" nap)
- Paint tray
Instructions
- Prep your surface by patching nail holes, clean walls if needed with TSP and make sure they are dry and free of dust, chalk, oil, grease, wax, polish, loose or peeling paint, rust or anything else.
- Using an angled brush, cut in areas that will be primed that touch areas that won't be primed.
- Apply primer to walls using a paint roller.
- Repeat the above steps if your need more than one coat of primer.
- Clean up using warm, soapy water.
- Wait at least an hour before painting.


I love this post! I’m currently in the process of updating my bathroom and I’m using the same primer you mentioned!
-A reader
I love this post! I’m currently in the process of updating my bathroom and I’m using the same primer you mentioned!
-A reader
Does it matter what sheen I choose to use after priming with Kilz Mold and Mildew? Will any paint stick to it well without peeling? Also can I leave this as my ceiling paint or do I still need to paint my ceiling?
For the paint sheen in bathrooms, we recommend eggshell. You could also go with semi-gloss if you want something slightly more durable and easier to clean in a bathroom – but you’ll get a little shine. You can read more about paint sheens in our guide here: https://www.makingmanzanita.com/paint-sheen-guide/
Yes, as long as you are using a water-based paint (not an oil-based paint) & you follow the instructions for drying and curing times, you shouldn’t have any troubles getting paint to stick to the this primer.
You could probably leave this as a ceiling paint if you’re really tight on budget, but we usually follow up with “Flat Ceiling Paint” over the primer in bathrooms for extra protection and durability.
Great post! I found the tips on moisture-proof primers really helpful, especially since my bathroom has been prone to mold. Can’t wait to try out the recommendations! Thanks for sharing!