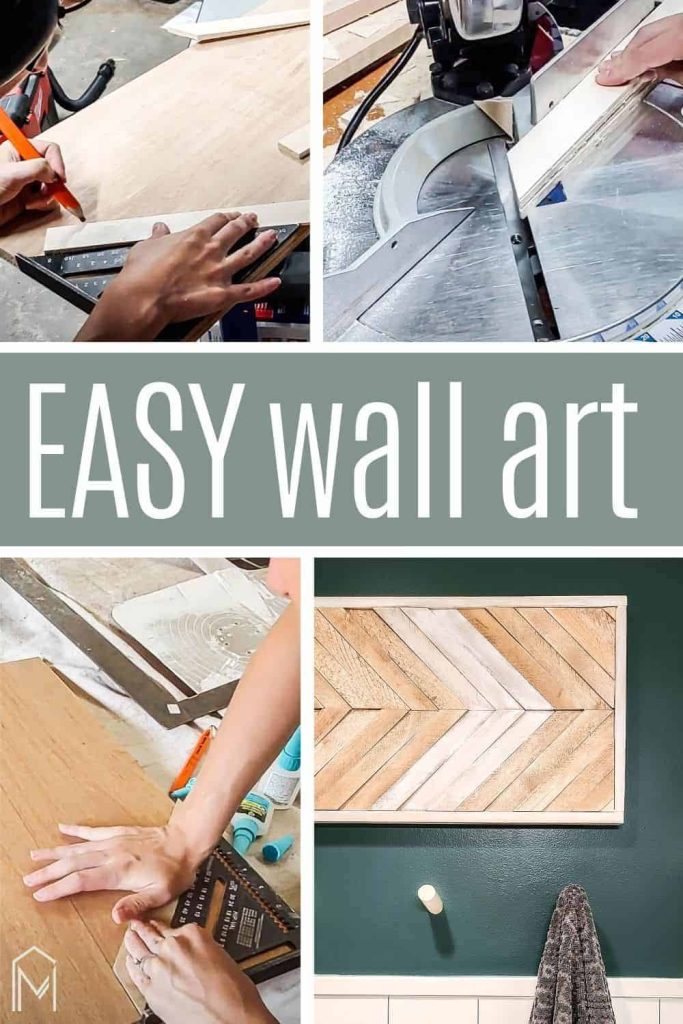
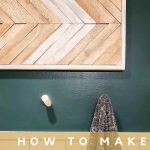
DIY Wood Wall Art with Scrap Wood and Wood Shims
Looking for scrap wood projects? This easy DIY wood wall art project is the perfect solution to fill in an empty space. With scrap wood, I created this piece of wall decor with plywood and wood shims. Learn how to do this easy project with this step-by-step tutorial.
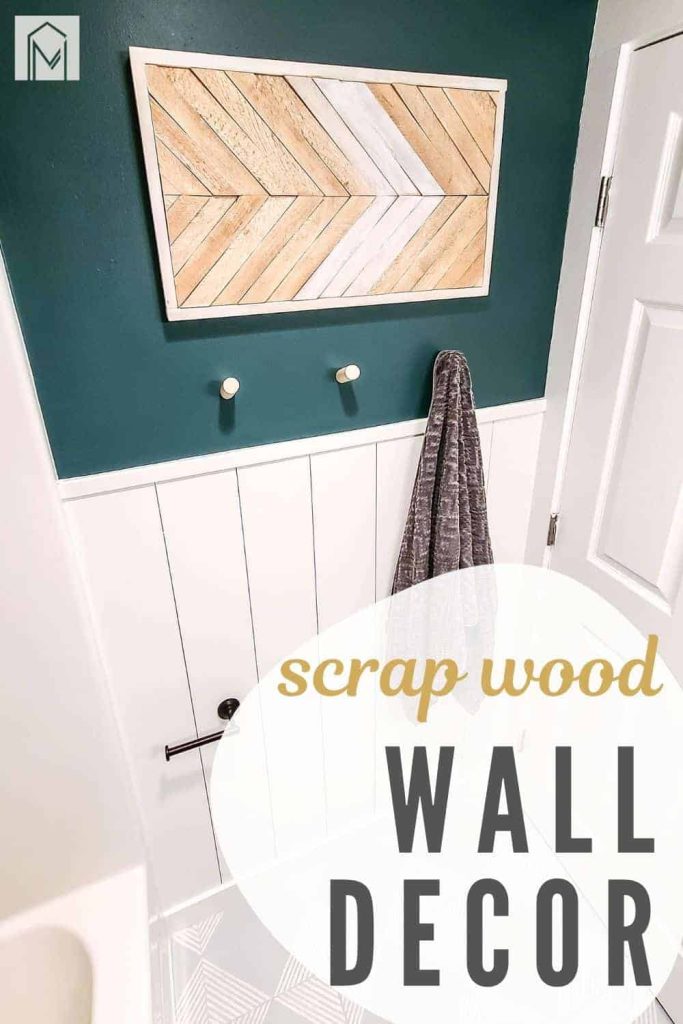
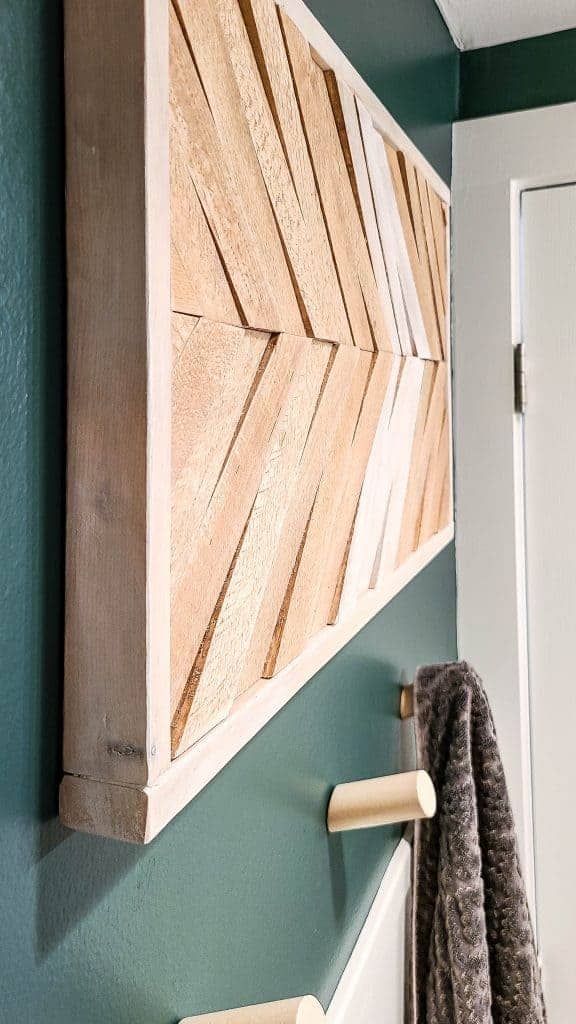
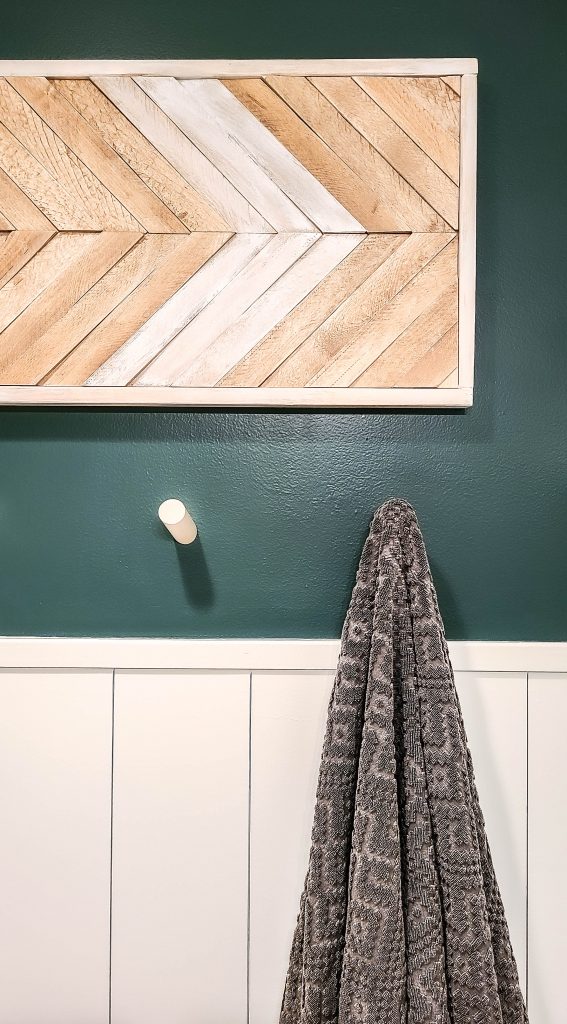
Do you have that one spot in your house that needs to be filled with…something? For us, it was our guest bathroom.
During our budget bathroom makeover, there was still this one spot that was calling out for a unique piece of wood wall art, and that’s where this piece landed – just above the vertical shiplap half wall installed during the makeover.
Table of Contents
- Video Tutorial
- Supply list
- #1: Mark center of plywood
- #2: Mark wood shims
- #3: Cut and sand wood shims
- #4: Stain wooden shims
- #5: Glue shims in place
- #6: Trim edges
- #7: Sand smooth
- #8: Make the frame
- #9: Attach wooden frame
- #10: Tape off and paint shims
- #11: Fill nail holes
- #12: Seal wooden sign
- After pictures
With as many woodworking projects as we do, we always have an excess of scrap wood, so I’m always looking for DIY scrap wood projects. I figured this was the perfect opportunity to put our pile of scrap wood to good use.
The other material that we incorporated into this fun wall decor is wood shims!
What are wood shims?
Wood shims are very thin pieces of wood that are designed as a tapered wedge and are commonly used for slight adjustments during construction and woodworking – on things like installing a prehung door or squaring up a banquette bench if your walls or floors are not level.
Wood shims are a great option because they are so cheap and easy to find at big box stores and sold in bulk packages. With the crazy cost of lumber these days, it’s always great to find ways to incorporate cheaper materials into your woodworking projects.
Looking for another way to use wood shims? This bed incorporates wood shims into the headboard, awesome right?
You will need get few other lumber pieces from the store for this unless you have a big scrap wood pile like us. You’ll specifically need a piece of plywood roughly 15″ by 24″ and a piece of 1×2 furring strip for the frame (which by the way, 1×2 lumber doesn’t actually measure 1″ by 2″ – learn more with this helpful lumber dimensions chart). Before you go to the hardware store, read these tips for buying lumber.
The DIY wood wall art pattern is already set for you, so all you need to do is follow these simple steps and the video tutorial for this super easy project!
DIY Wood Wall Art Video Tutorial
If you love DIY videos, be sure to subscribe to our YouTube channel so you don’t miss the next one!
There are so many different DIY art ideas that can turn scrap wood pieces into beautiful works of art. You can make frames, wall art pieces, floating shelves… just about anything that will add pizzazz to a boring corner.
This DIY wood wall art tutorial also contains affiliate links, but nothing that I wouldn’t recommend wholeheartedly. Read my full disclosure here.
Supplies & tools needed for DIY scrap wood wall art:
- Wood shims
- Rapid Fuse glue
- 1×2 furring strips (for frame)
- 3/4″ plywood scrap – ours was roughly
- Teak oil
- White chalk paint
- Wood putty
- Spray sealer
- Miter saw
- Orbital sander
- Multi-tool
- Paint brush
- Square
Step 1. Mark the center of the plywood board.
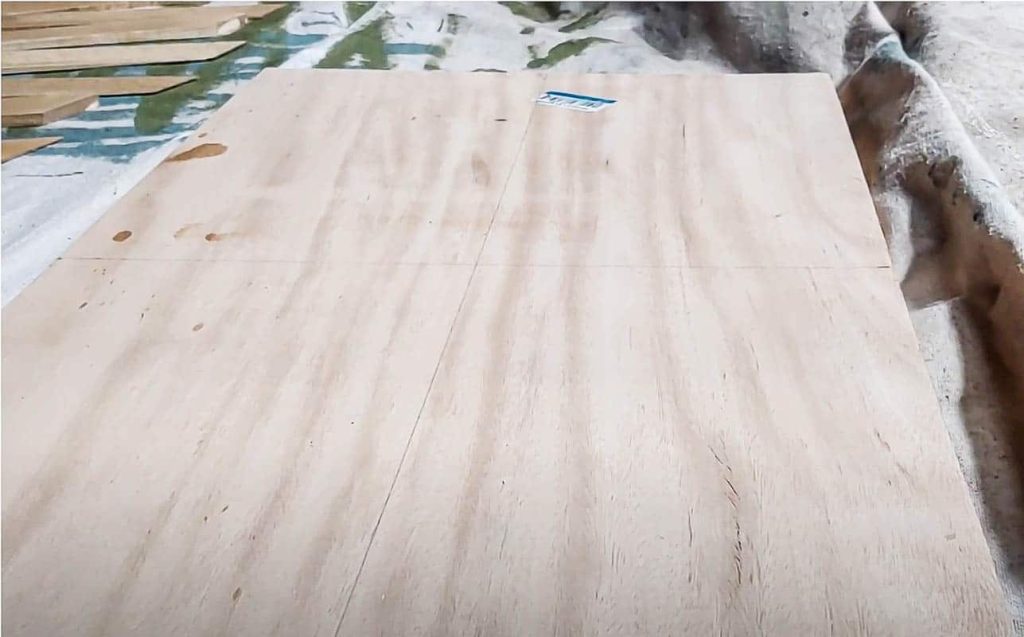
Mark the middle of the plywood by drawing a “t” across the middle to find the center point.
This marks the center of the board and will help as you lay out the shims and progress through the project.
Step 2. Measure and mark the wood shims.
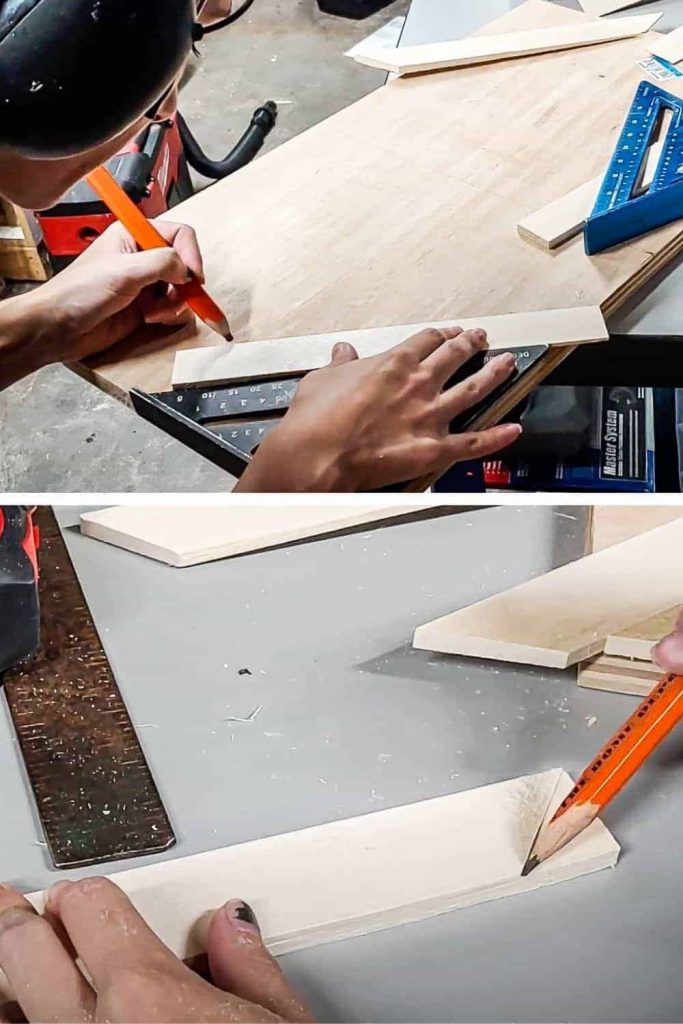
In this step, we are marking up the wood shims so you know where to cut them. You will mark where the center of the board meets the shim and where the shim overhangs from the adjacent edge of the plywood.
To do this, place a square tool in the bottom corner of the plywood board to create a 45 degree angle. Place the shim against the edge of the square, so the shim overhangs off of the edge.
Then, mark where the shim intersects the center line, and where the shim overhangs from the adjacent edge. Feel free to darken and fill in the lines to make cutting easier. These lines will serve as a cutting guide to create those clean 45 degree angles.
Using the first shim as a template, mark the rest of your shims and prepare your miter saw!
Step 3. Cut & sand the wood shims.
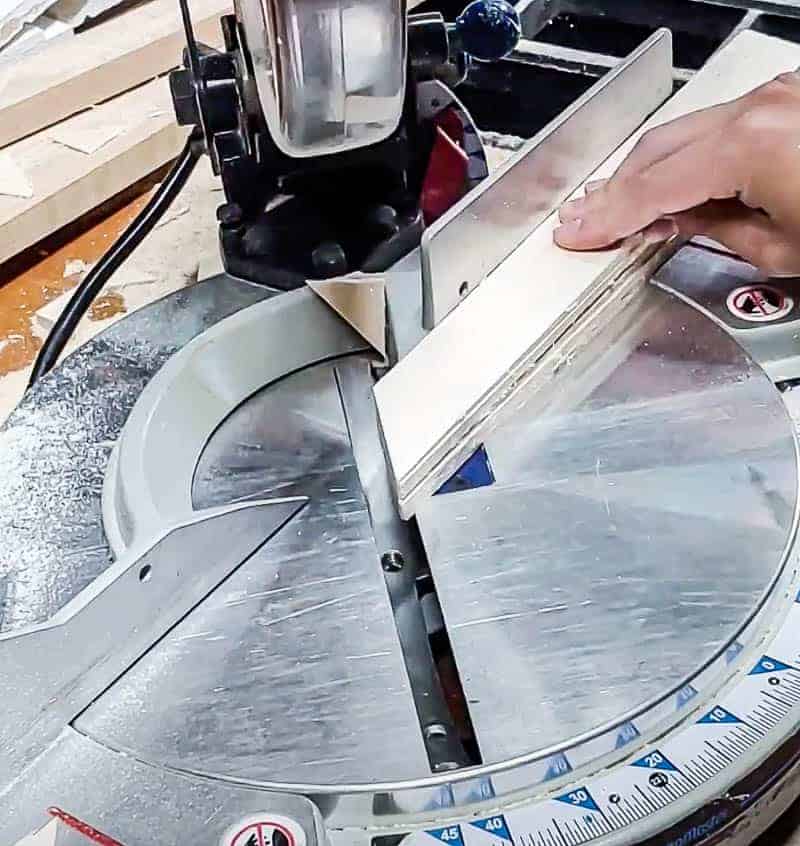
Move your miter saw to 45 degrees to cut the shims. Using a miter saw, trim the shims using the markings you made in the previous step as a guide.
Then, lightly sand each shim, focusing on the corners, sides, and edges of each piece.
Step 4. Stain the shims.
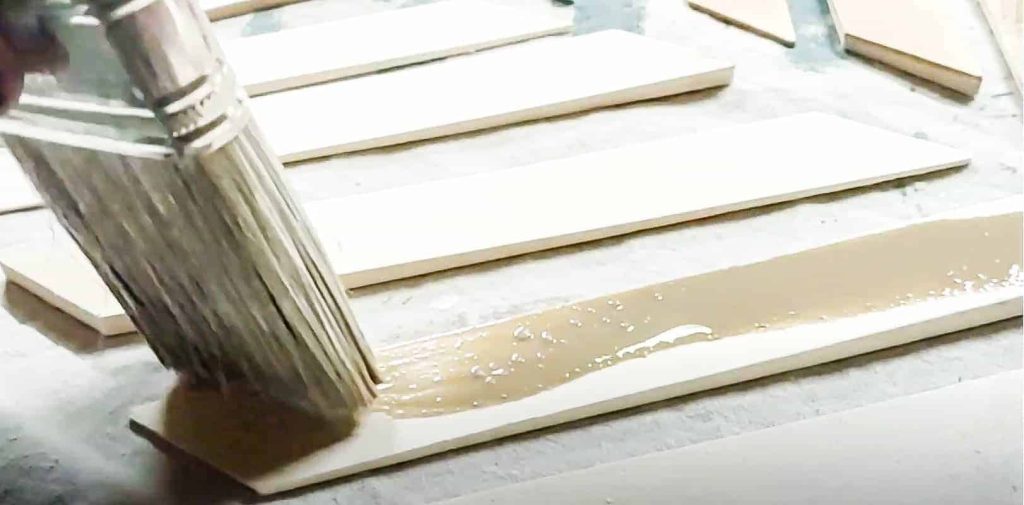
Lay out all shims on a flat work surface.
Using a paint brush, brush on the teak oil stain in smooth strokes.
Step 5. Glue the wood shims in place.
After the stain has dried, glue the wood shims to the plywood board using Rapid Fuse Glue. Also, use the square tool as a guide to keep your shims straight and even on both sides of the board.
I recommend moving from one side to the other as you work your way up the plywood board.
This part is tricky because if just one shim isn’t aligned, the entire board could look out of sorts, so take your time during this step.
With each wood shim, apply the glue and press for 30 seconds to make sure the board adheres to the board well.
If you’ve been a while, you know that we are big fans of the RapidFuse glue! It’s great for fixing things around the house and even works great for simple craft projects like this DIY footed tray, plant pot cover, DIY key holder, poster frames, marble coasters, and Christmas tassel tree.
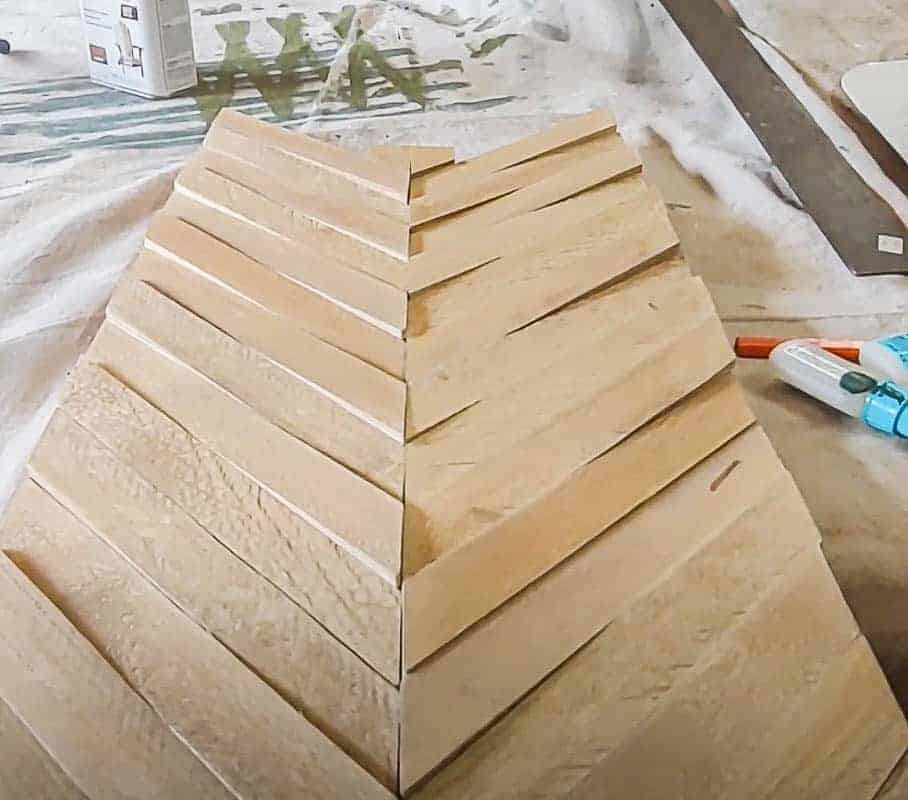
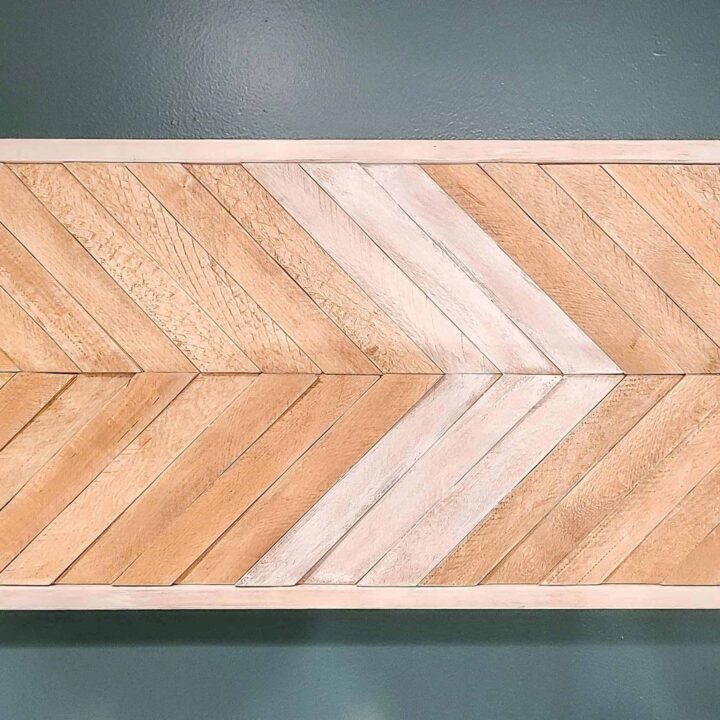
Your project should look similar to this one.
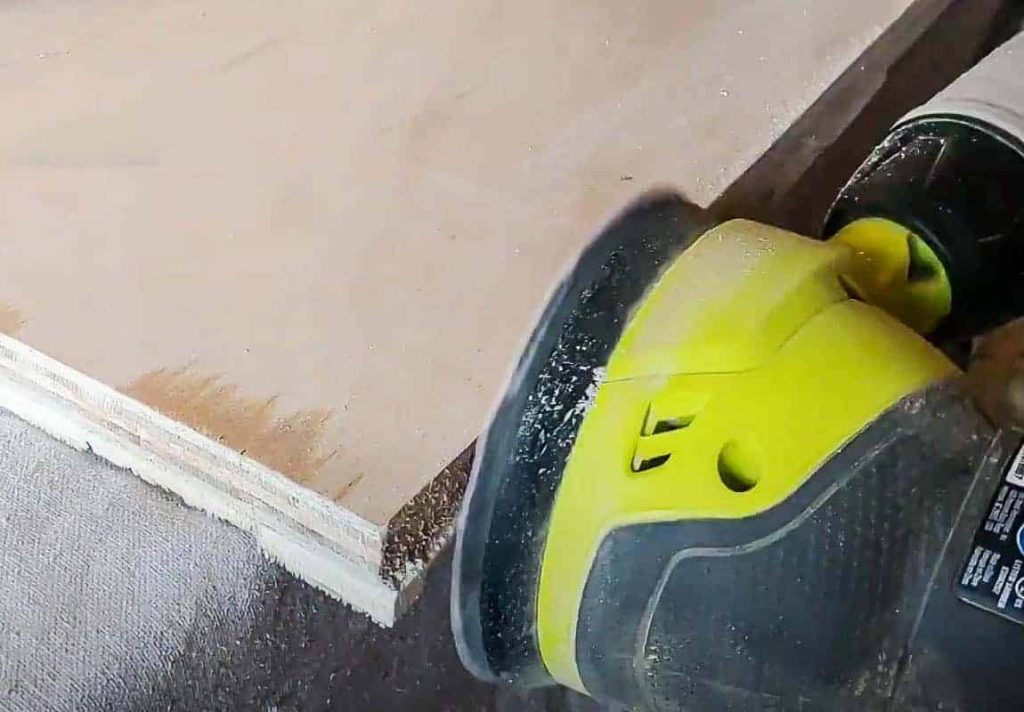
Step 6. Trim edges with a multi-tool.

Once the glue has dried and the boards are nicely adhered, trim the overhanging edges using a multi-tool.
Step 7. Sand smooth.
Using an orbital sander, smooth edges, corners, and small overhanging pieces with 80 grit sandpaper.
During this sanding process, all of our wood shim boards stayed put on the plywood, which was really impressive considering we only used Rapid Fuse Glue and did not nail anything down.
Step 8. Make the frame for DIY wood wall art.
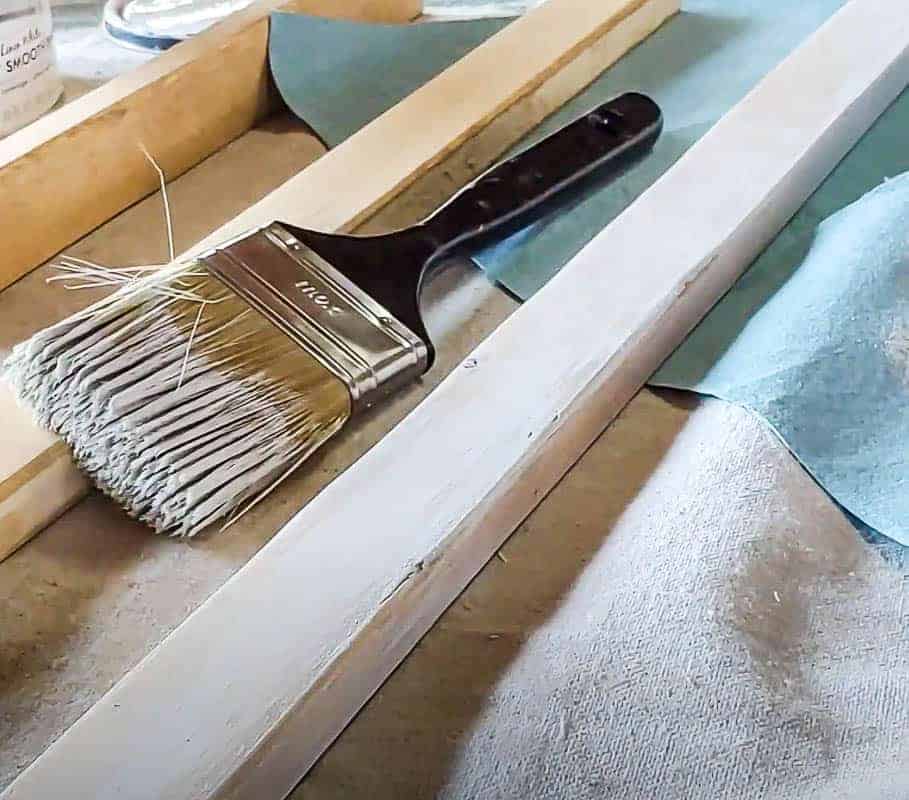
I used the same stain for the 1×2 furring strips as I did on the shim boards.
First, you will want to stain the furring strips, allow them to dry, then paint them. For this project, I didn’t want them “perfectly” painted, but to have a little of a distressed look.
In order to get the “worn” look, I used a technique called dry brushing. Dry brushing is a technique that uses minimal paint and roughly brushes color on to the surface.
Using chalk paint, lightly dip a large paint brush into the paint and then blot on a paper towel. Then, lightly brush the paint onto the boards. Be careful not to completely “paint” the boards, but rather roughly brush the surfect and allow some of the stained wood tones to show through the paint.
Then, as it is drying, take a paper towel and rub over the boards to remove any excess paint.
Removing the extra paint gives it a beachy, distressed vibe.
Step 9. Attach the frame with a brad nailer.
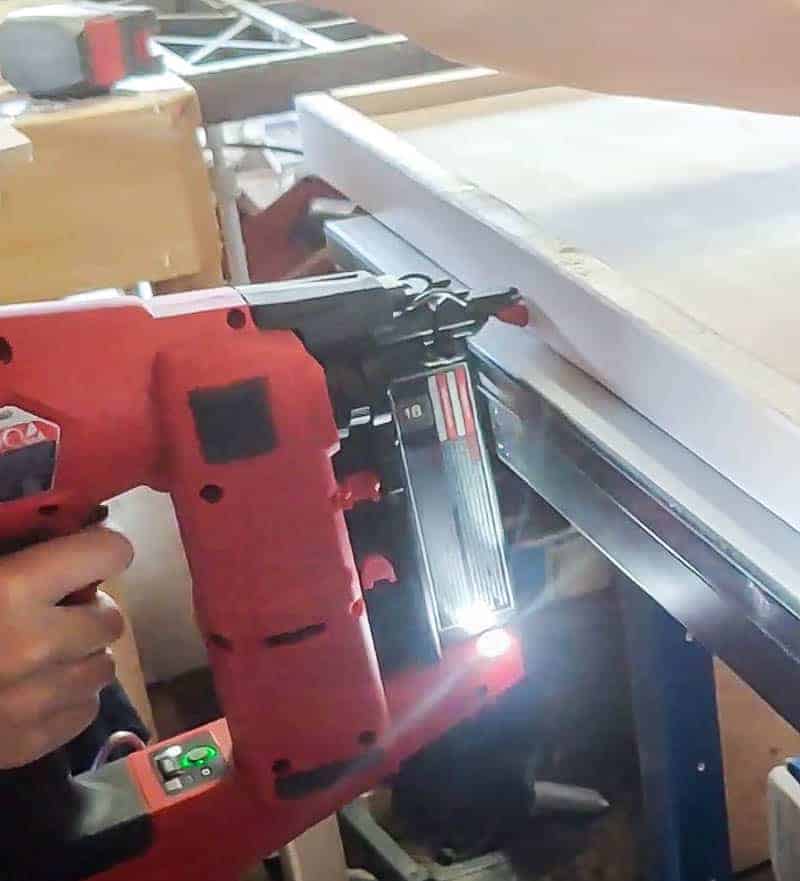
After the furring strips have dried, it’s time to attach the frame!
Using a brad nailer, attach each furring strip around the edge of the plywood with the shim boards.
A brad nailer is better for this project than a finish nailer, because we want the nail holes to be less obvious.
Plus, this is not a heavy duty project that requires heavy gauge nails. If you’re curious, here’s more information on the difference between brad nailer and finish nailer.
Then, lightly sand any rough corners if needed.
Step 10. Tape off and paint shims (optional)
To add your own unique style, you can tape off a few shims with painter’s tape and apply paint or stain to the others for a contrasted look. I also liked to use the dry brushing technique here, too.
Using a single paint color or stain would work well, too. It’s completely up to you!
Step 11: Fill nail holes
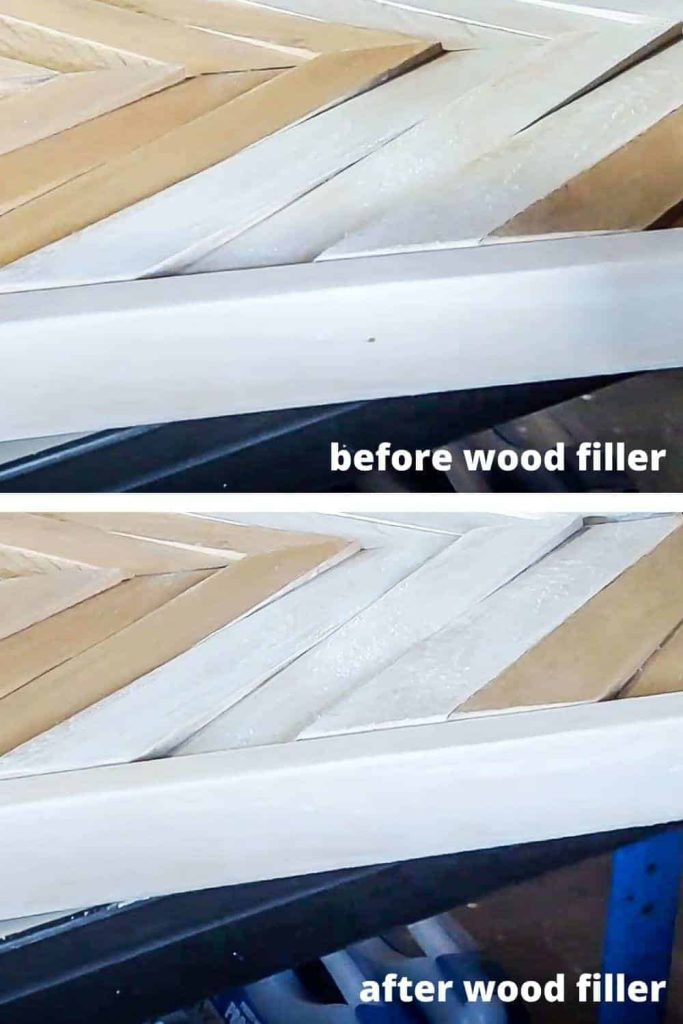
As a final step, fill in the nail holes using wood putty. This small detail gives it a more finished and refined look.
See, what a big difference that makes?
Step 12. Seal.
Before you are ready to hang, seal your piece with clear spray sealer.
This sealant is super easy to use and will protect your work from moisture, splintering, and general wear and tear.
Now, you are ready to hang and enjoy your new wall art! You can use my tried and true picture hanging hacks so you don’t make a million holes in your wall too!
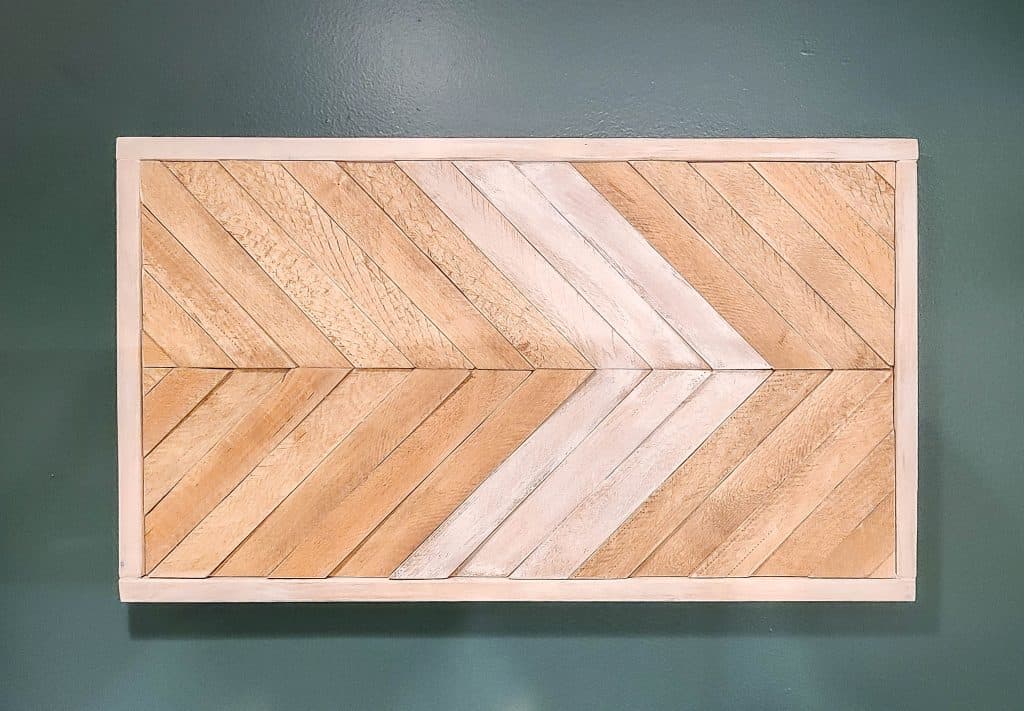
Creating DIY wall art with scrap wood pieces is an easy way to decorate your home on a budget and with your own style. It’s an instant update to your space! With these steps and the video tutorial, you can do it yourself.
Where would you hang this DIY wooden wall art in your home?
Let us know in the comments below!
DIY Wood Wall Art with Scrap Wood and Wood Shims
This easy DIY wood wall art project is the perfect solution to fill in an empty space on the wall. With scrap wood, I created this piece of wall decor with plywood and wood shims. Learn how to do this easy project with this step-by-step tutorial.
Materials
- Wood shims
- Rapid Fuse glue
- Furring Strips (for frame)
- 3/4" plywood scrap
- Teak oil
- White chalk paint
- Wood putty
- Spray sealer
Tools
- Miter saw
- Orbital sander
- Multi-tool
- Paint brush
- Square
Instructions
- Mark the center of the plywood board.
- Measure and mark the wood shims.
- Cut & sand the wood shims.
- Stain the shims.
- Glue the shims in place.
- Trim edges with a multi-tool.
- Sand smooth.
- Make the frame with furring strips.
- Attach the frame with a brad nailer.
- Tape off and paint shims (optional).
- Fill nail holes.
- Seal.
3 Comments