Pantry Open Shelves For The Kitchen
If you're low on storage space in your kitchen cabinets, maybe you should consider keeping some pantry items on open shelving in your kitchen. Check out the pantry open shelves we recently added to our kitchen.
About a year ago or so, I had enough. My pantry cabinet was overflowing every time I opened the kitchen cupboards. I had to move 20 things that were in my way when I wanted to do any sort of baking.
I looked around our kitchen – knowing that I needed to find another place to add extra storage for food items. But the key was I needed storage with easy access. No more digging around trying to get to the flour or the sugar.
This pantry open shelves article contains affiliate links, but nothing that I wouldn’t recommend wholeheartedly. Read my full disclosure here.
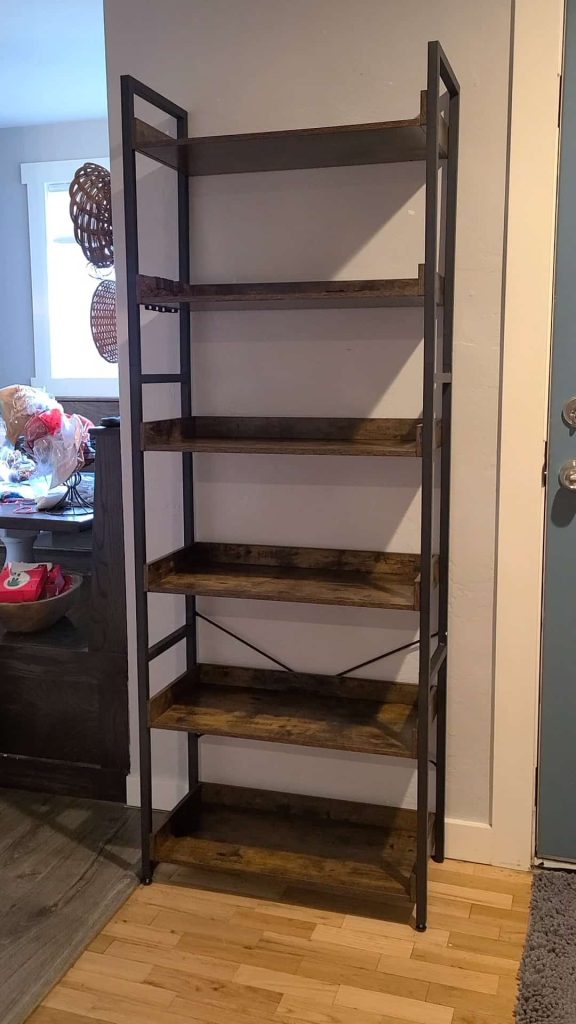
Wall For Pantry Open Shelves – Before
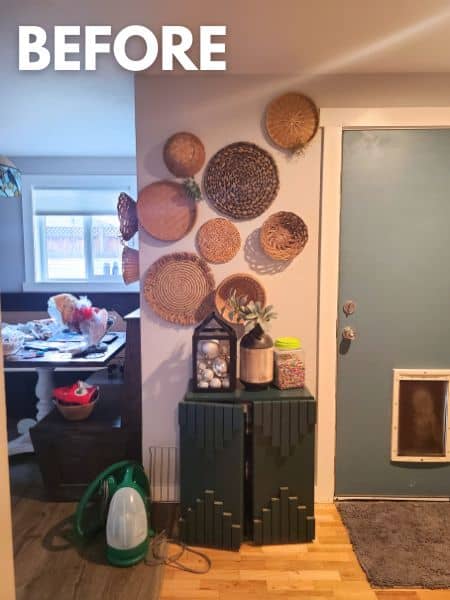
The only place that seemed to make sense was the wall near the back door where the small boho cabinet was under our basket wall.
Now I still loved both the cabinet and the basket wall, but they weren’t as functional as I needed – so they had to go. When I was desperate for more storage, I couldn’t justify using an entire wall decorated with baskets and a cabinet that was too small to really store anything useful inside.
Once we cleared away the other items, I ordered a budget-friendly shelving rack and a few different sizes of containers for food storage.
After we got the pantry shelves assembled, I started playing around with the different sizes of glass jars and the clear plastic containers that I already had. I needed to figure out exactly what I would be able to store on the shelves.
Pantry Shelving Units – Options I Considered
When I was looking for a good shelving unit to use in our kitchen, I looked long and hard. We thought about building something custom (and we may still do so someday), but in the meantime I wanted something I could install quickly on a budget.
I went back and forth between shelves with and without cabinet doors. I’m so glad that I ended up going with something that didn’t have doors. It is really handy when I’m in the middle of cooking to be able to go grab something and not mess around with a door.
One selling point for me on the shelves that I ended up choosing with the added hooks, which are perfect for these hanging baskets.
Here are some other great options for pantry shelving units:

Food Storage Containers For Your Pantry
Just like the shelving unit, I looked pretty extensively for good-sized and quality food storage containers. You will usually get the best deal if you buy them in a set, which is what I did.
Here are some great options to consider if you’re on the hunt for better pantry organization:
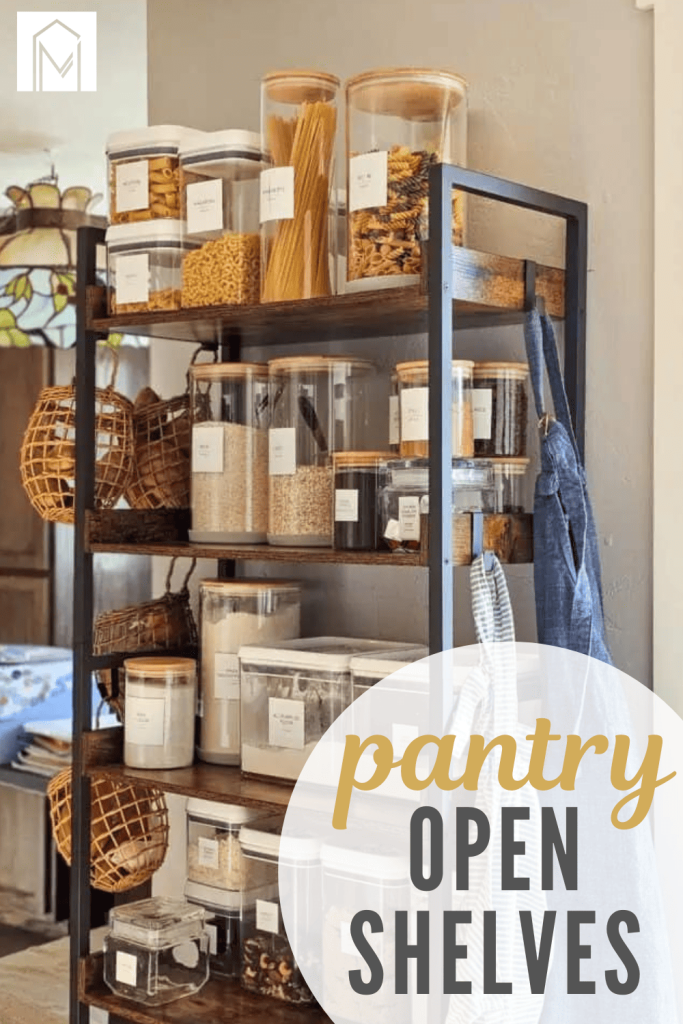
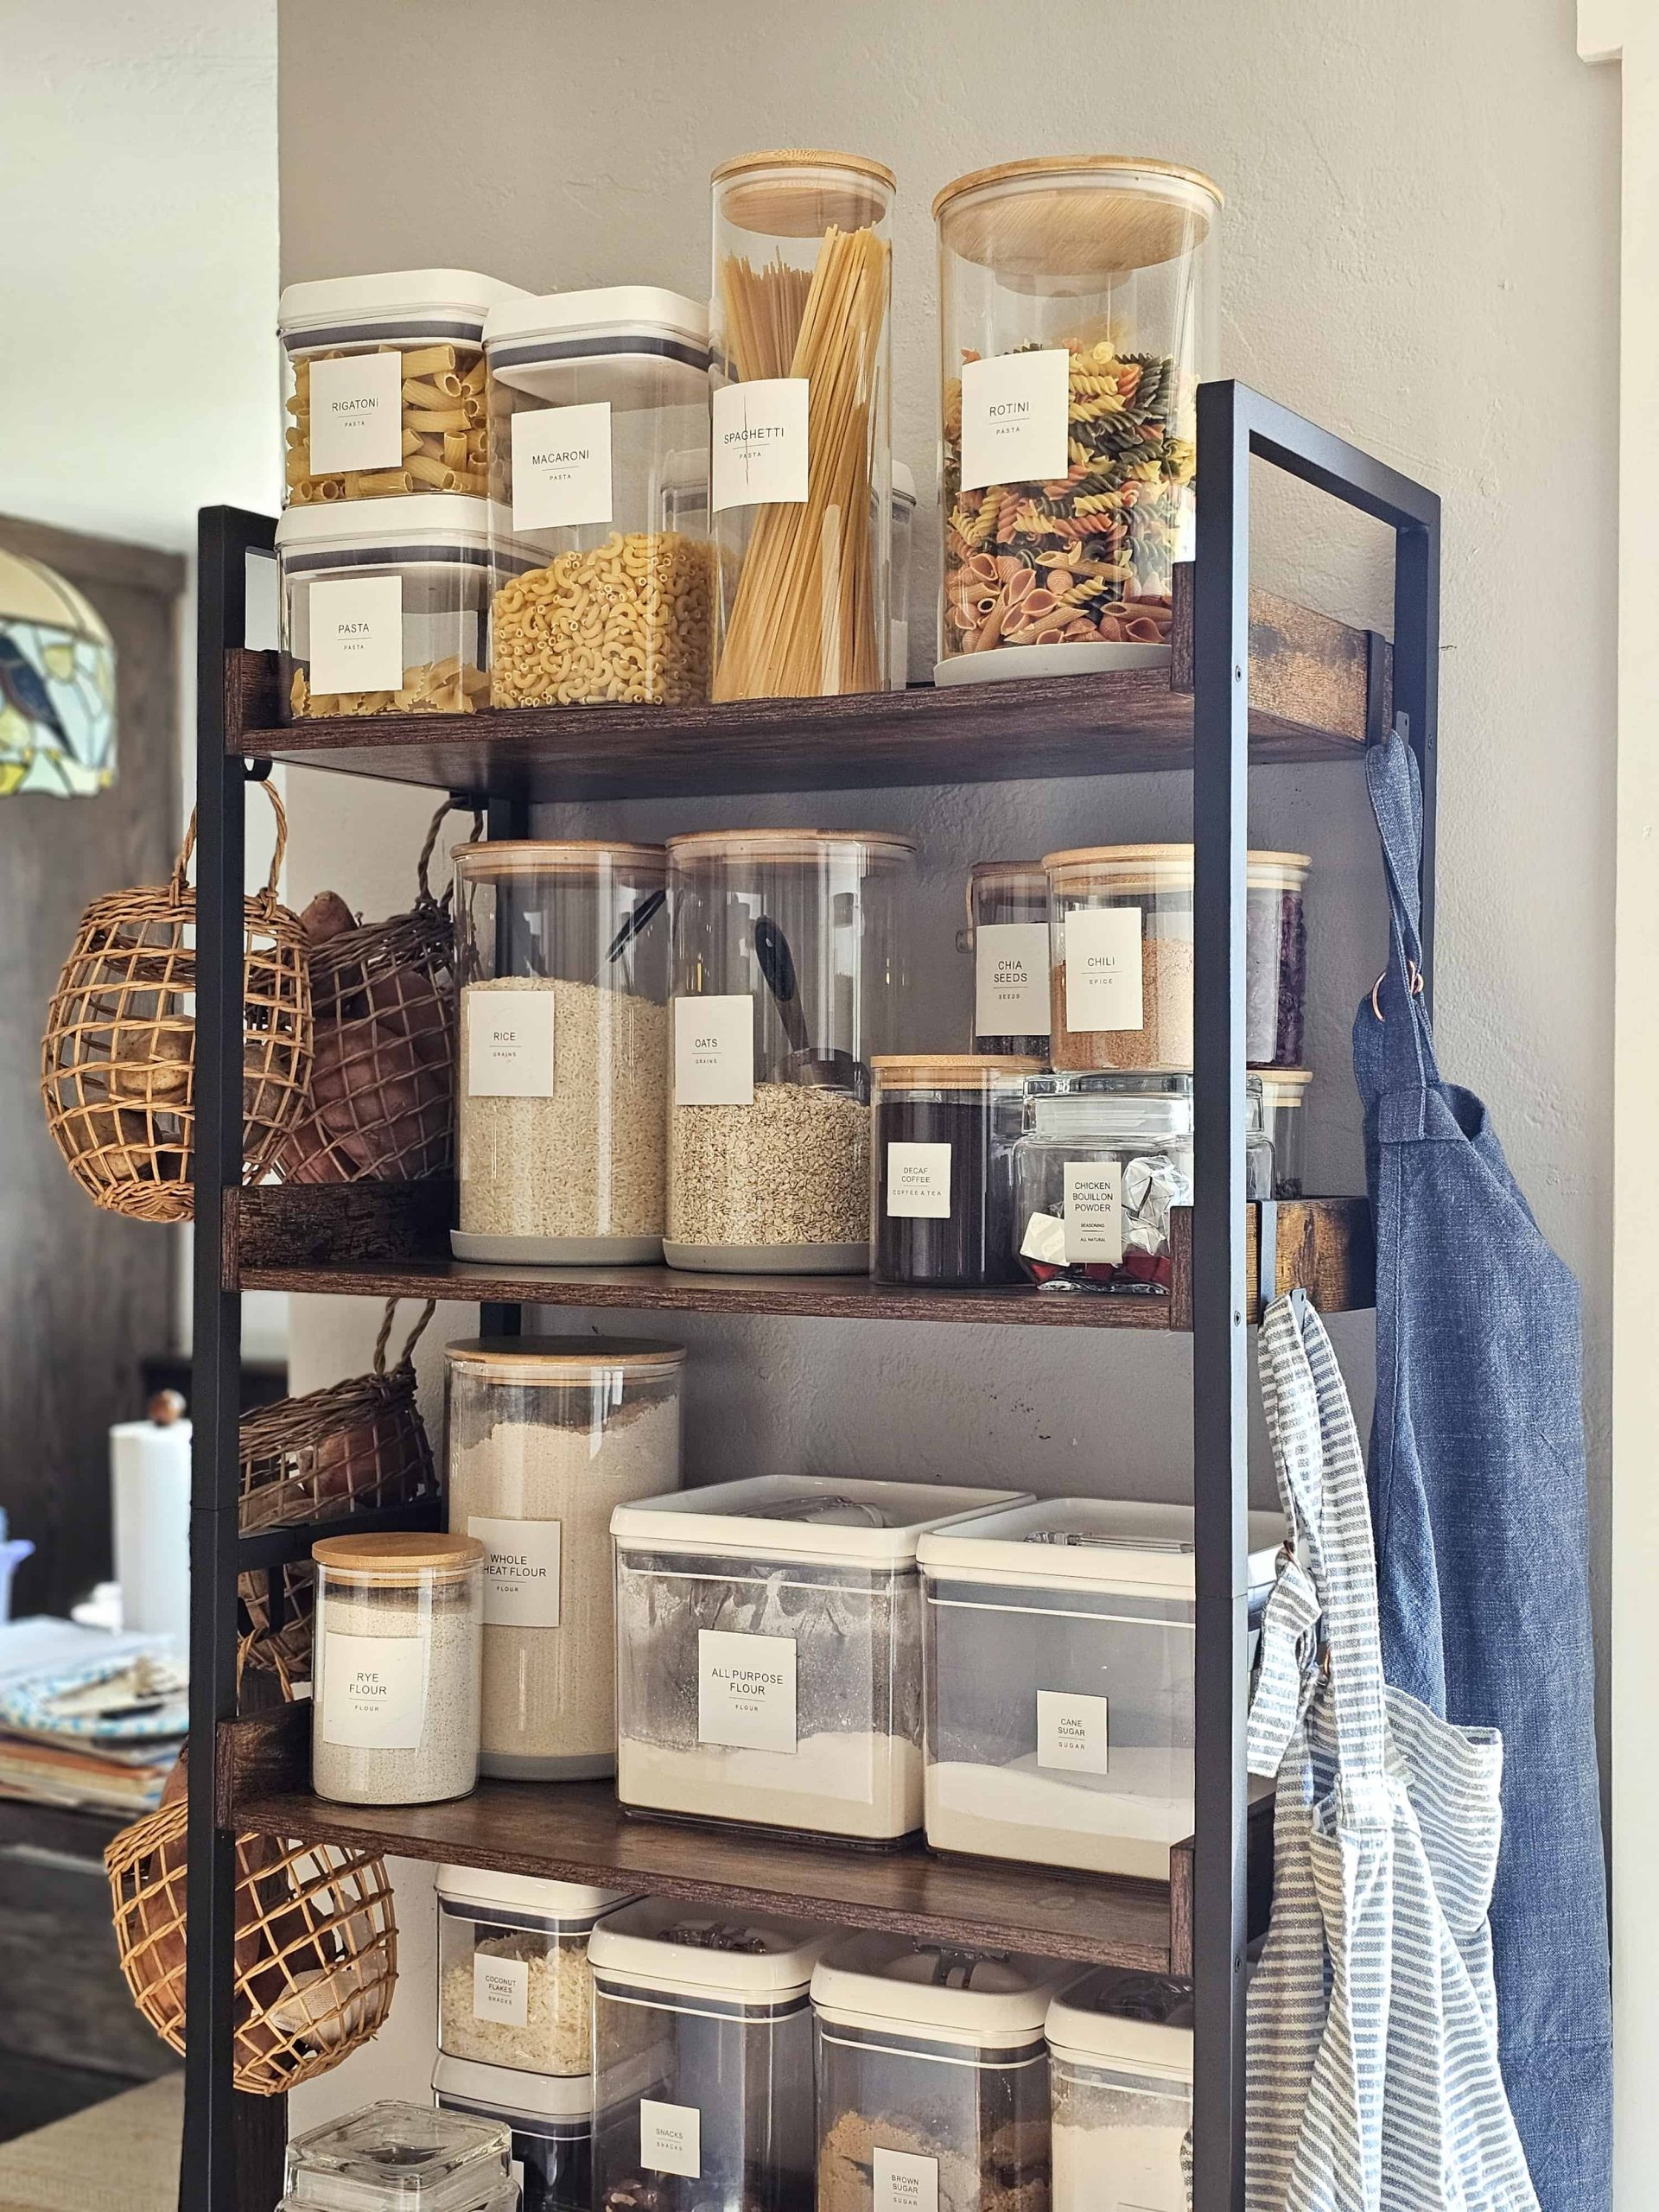
Pantry Open Shelves – Reveal
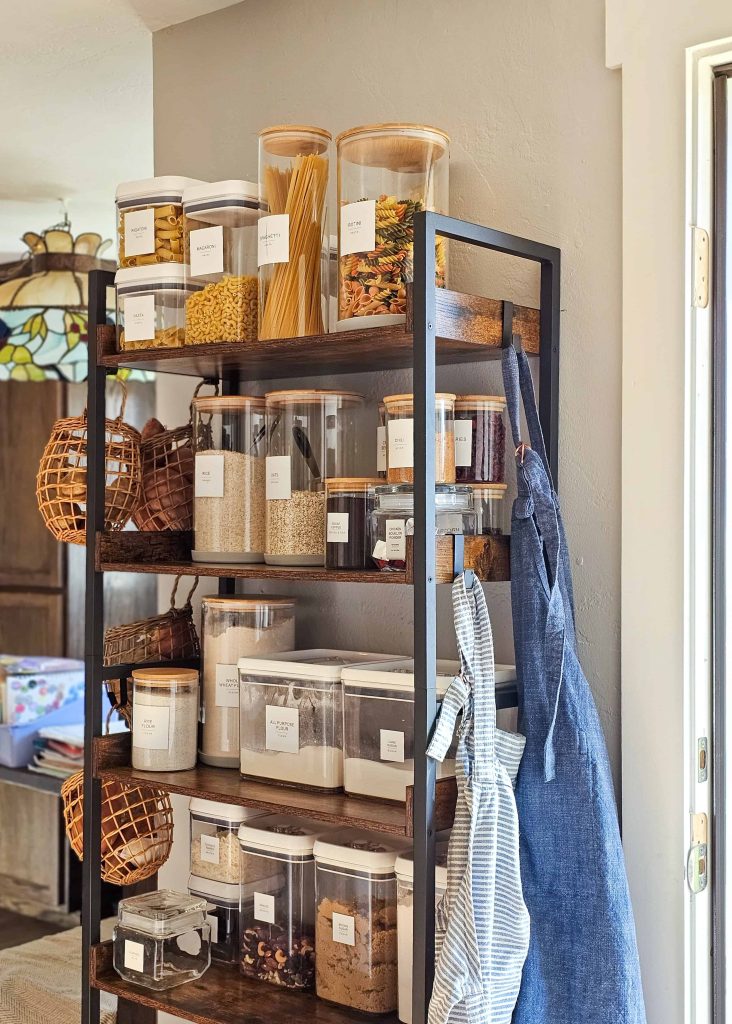
And here’s how it turned out! I love the classic look of the glass jars with bamboo lids and the modern-looking pantry labels.
I kept the sticker labels off of the containers for a while (like multiple months) so I could really get a feel of what type of items I wanted to store on the pantry open shelves. My goal was to make sure the things taking up available space on the shelves were everyday items that required easy reach.
Bottom Shelf – Small Appliance Storage
Even though there are six shelves in our little freestanding pantry, I decided to not put food on the bottom shelves. With two dogs that like to get into mischief, I figured this was a good idea. Read: why we built this DIY trash can.
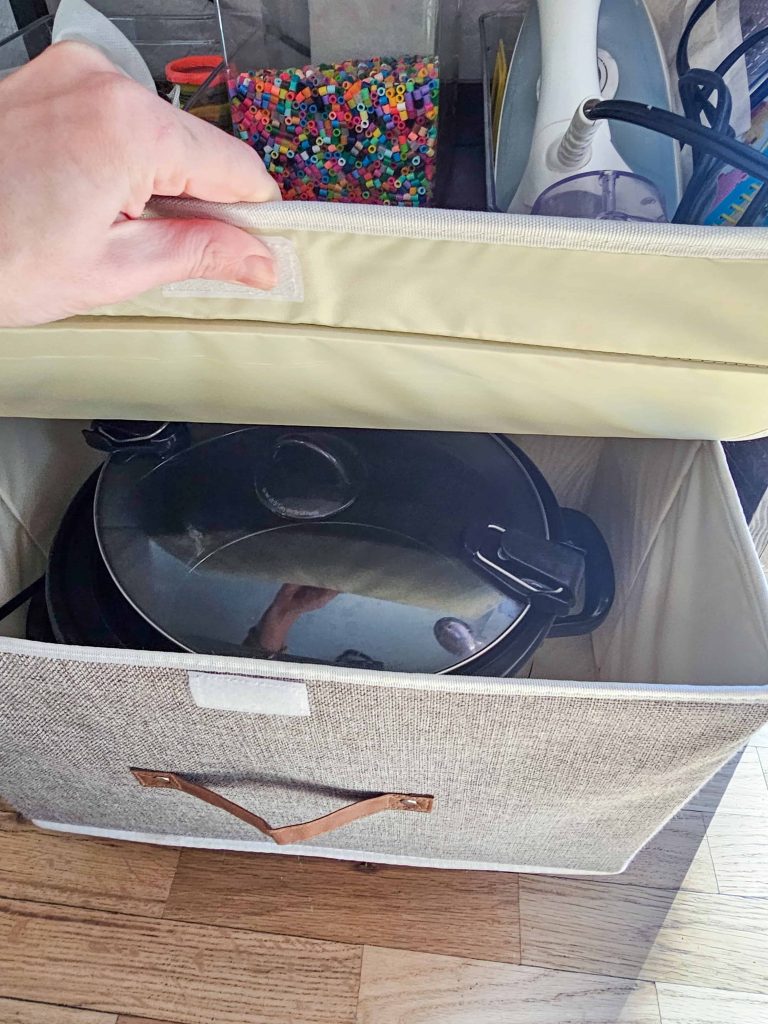
On the bottom shelf, I have a fabric bin with a lid that my Crock-Pot fits perfectly inside. I didn’t have a good spot to store the Crock-Pot in our kitchen so before I was keeping it inside of the seats in our banquette and it was sort of a pain to get out every time I needed to use it.
And I don’t know about you, but I use the Crock-Pot pretty frequently so I really like having a dedicated room for it on the shelves.
Truthfully, I could just put the Crock-Pot on the bottom shelf and call it a day. But, let’s be honest. It would be covered in dust and dog hair every time I wanted to use it. This bin seemed like a great way to keep it nice and clean.
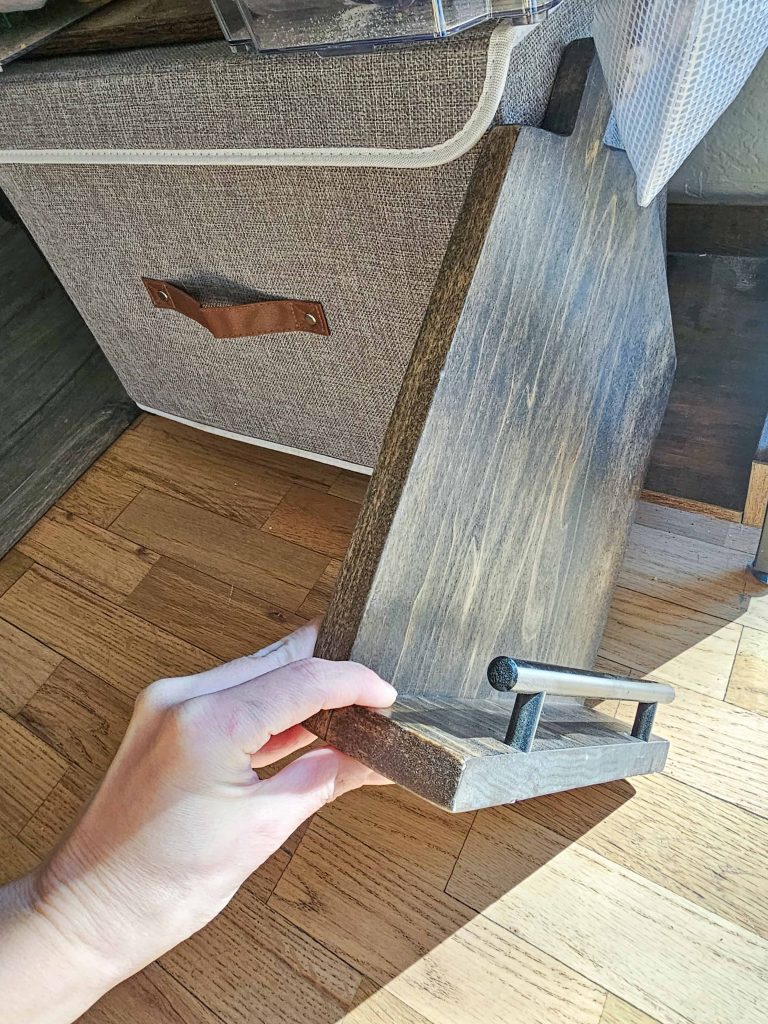
Next to the bin with the CrockPot, there was a small sliver of space that held my cookbook stand perfectly. Learn how to make this adorable little cookbook stand here.
2nd Shelf – Kids Activities
We keep one of the drawers in the kitchen island designated for some kid’s items – like coloring books and Play-Doh. But they were running out of space in their small drawer for some of their creative activities that had bigger items – like Perler Beads, which they love.
I’m all for providing tons of opportunities for the kids to be creative! So even though the kids’ items aren’t the prettiest things on the shelves and the bright colors clash a little with my neutral color scheme – I’m ok with that. Yes, I could probably find another bin that hides it all a little better, but I think if they didn’t see it they would be less likely to use them.
Your home is about your family and really living life there, so keep an open mind when it comes to storing your kid’s toys and supplies. If you need more tips for that, check out my outdoor toy storage ideas and my living room toy storage ideas.
3rd Shelf – Snacks and Dry Goods
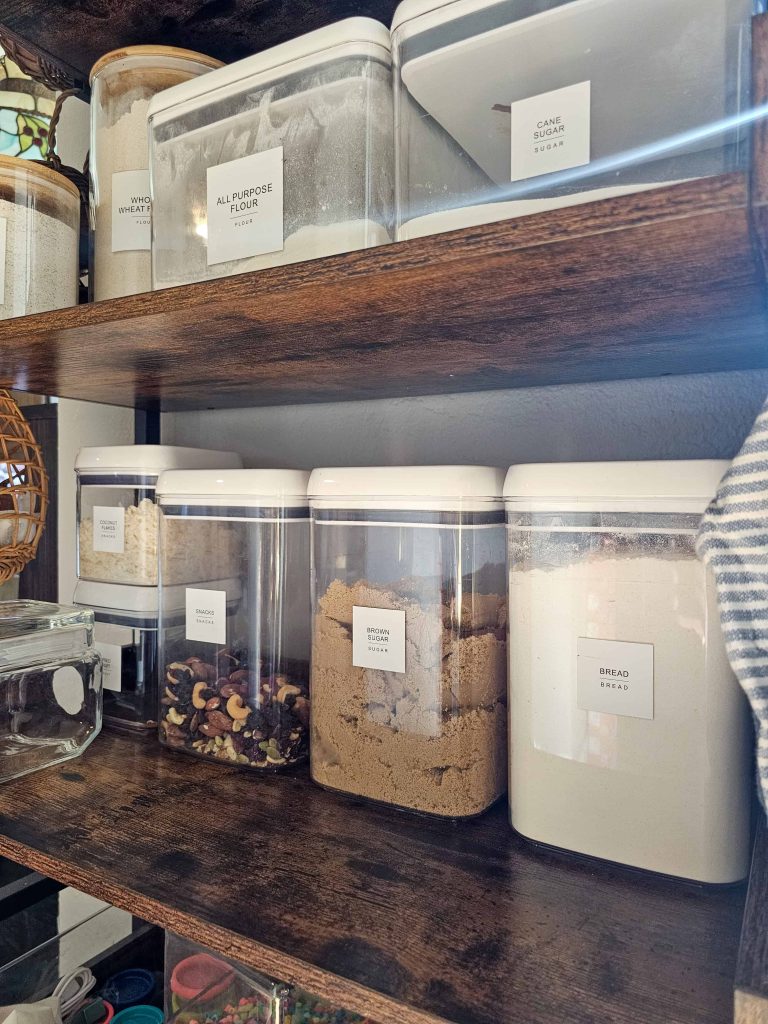
On the next shelf up, we start getting into the food items. Here we keep bread flour and brown sugar along with a bin for “snacks” (which I keep trail mix in). There are also a few smaller square jars that are perfect for smaller items we don’t need to keep a lot of out – like coconut flakes, almonds, and dried fruit (which I rotate out).
Outside of the sugar and flour, everything on this shelf is accessible to the kids for snacking (although I may or may not have caught them trying to get into the brown sugar for a taste, haha), so it is intentionally on a lower shelf that they can easily reach.
4th Shelf – Baking Supplies
On the 4th shelf, we have the big bins of all-purpose flour and cane sugar as well as wheat flour and a small container of rye flour.
For a bit, Logan was really into making sourdough bread so we kept these two types of flour on hand for that. However, we’ve gotten out of that hobby so I may choose to swap these out for something else soon.
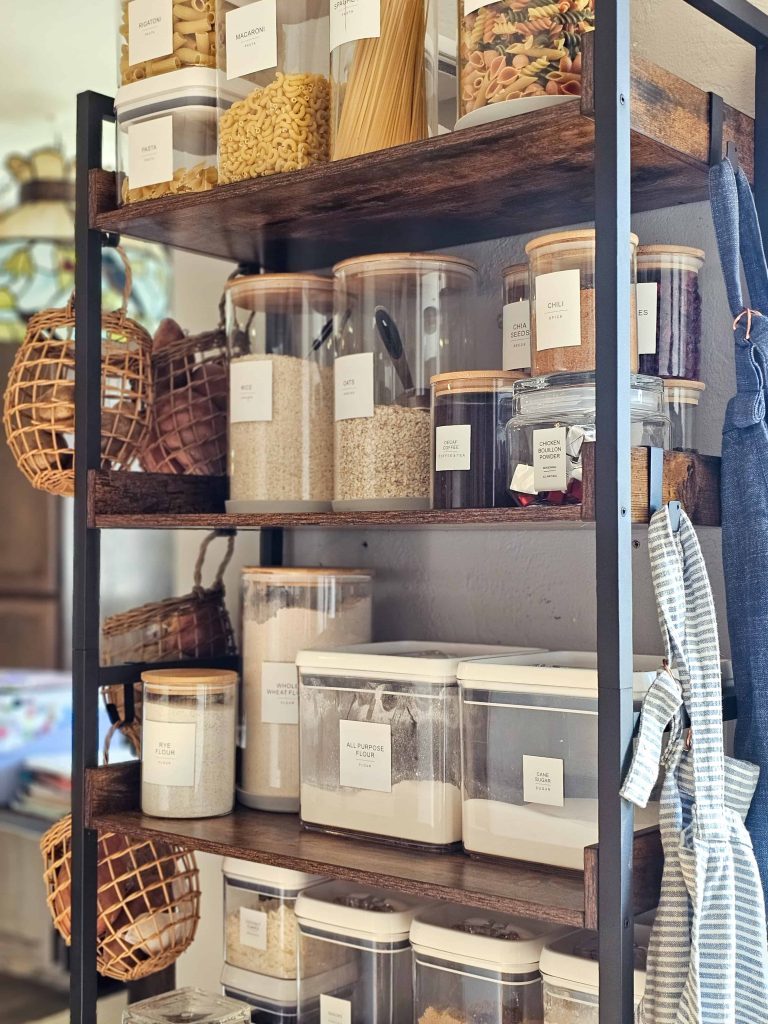
5th Shelf – Rice, Oats, and Small Containers
On the next shelf, we have two large containers with rice and oats. Both of these also have a measuring cup inside, which is so handy!
We also have several smaller containers on this shelf for decaf coffee, chia seeds, dried cranberries, walnuts, Chicken bouillon cubes, and extra whole peppercorns.
Honestly, I don’t use the Chicken cubes anymore (because I started using this or I make my own instead) and there’s no reason I need to keep peppercorn out so I may switch those two out soon.
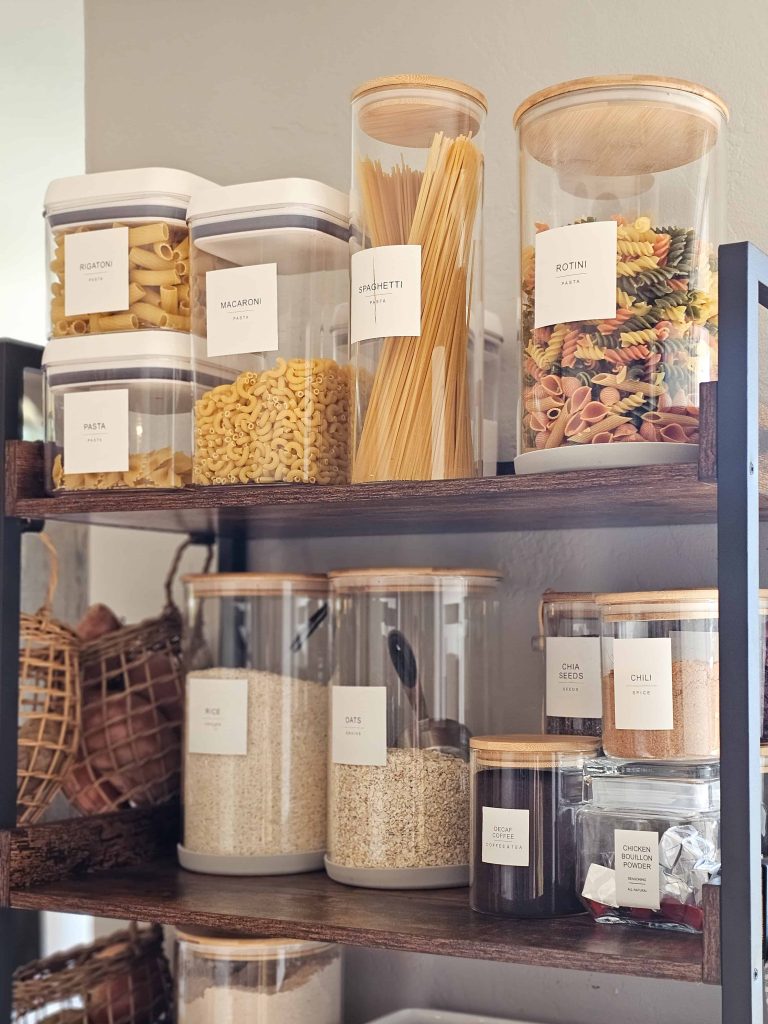
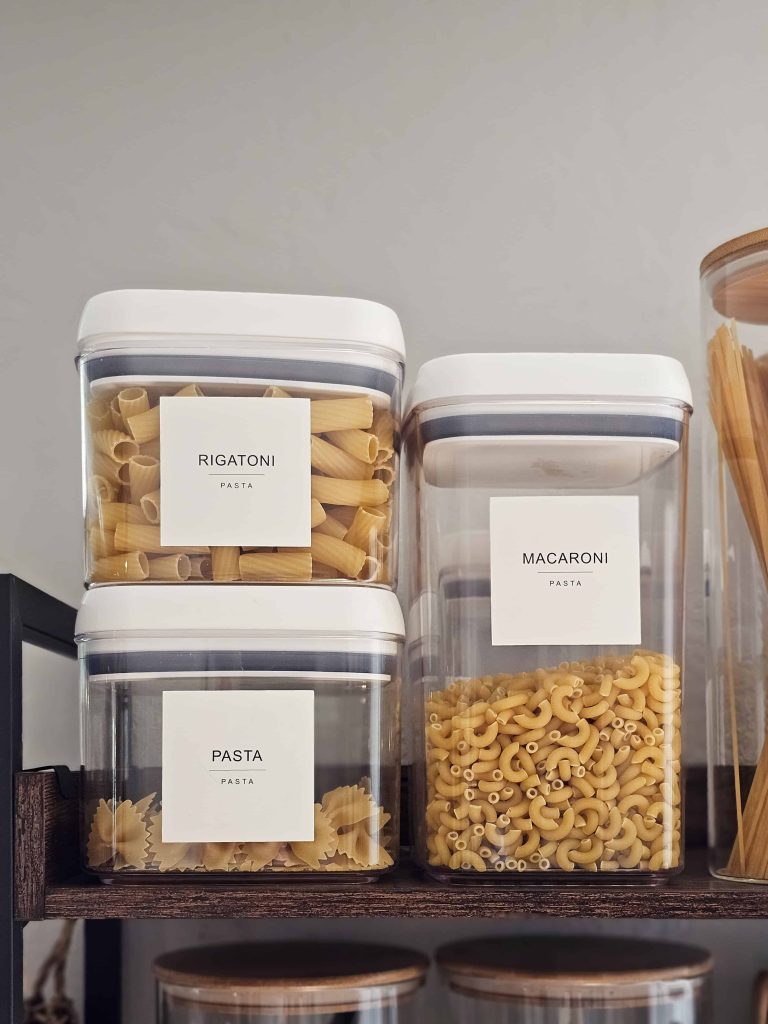
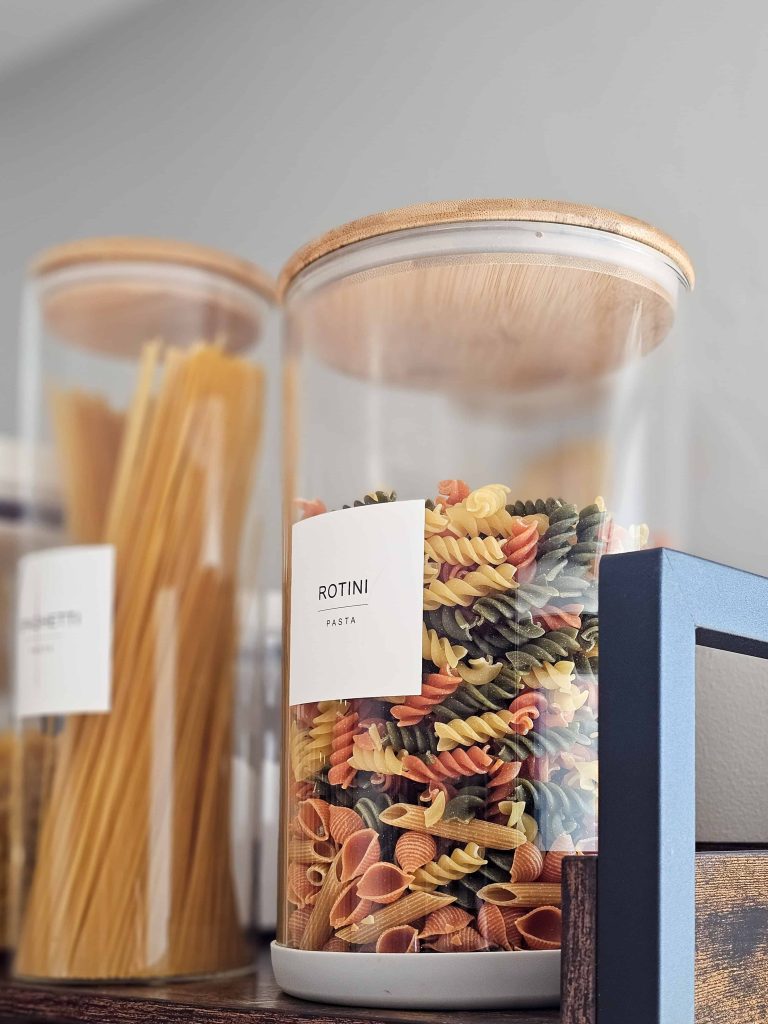
Top Shelf – Pasta
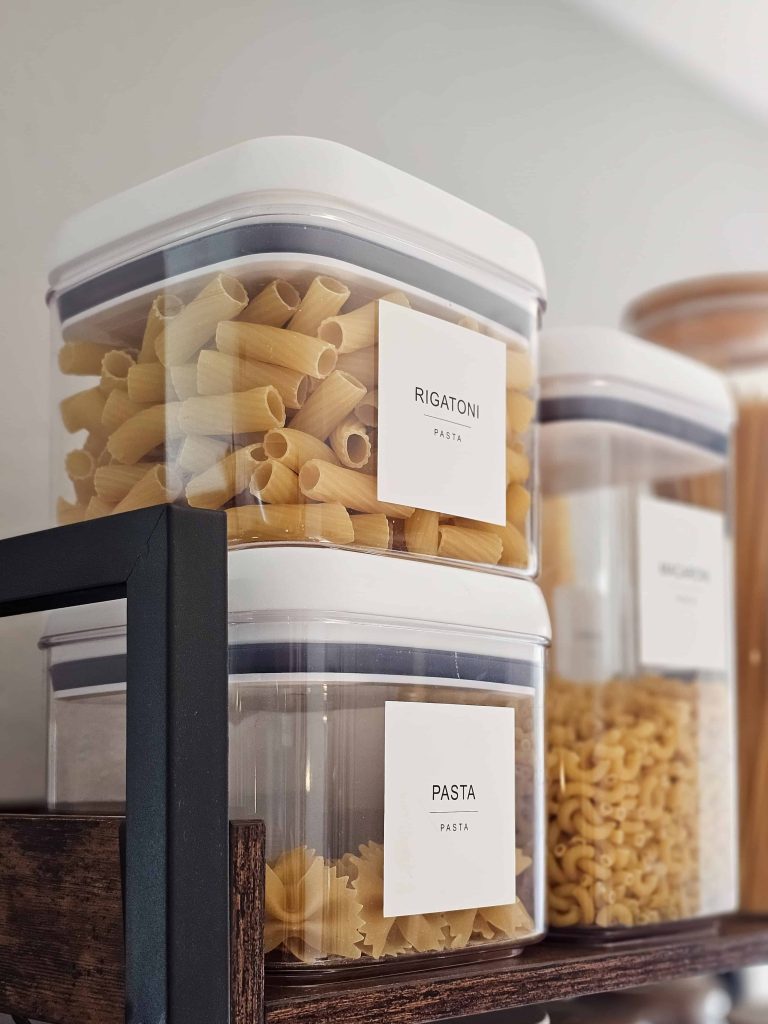
And on the very top shelf, we have several different bins for all the types of pasta we like to keep on hand. From lasagna and spaghetti noodles to rotini and bowtie – we love our pasta! 🙂
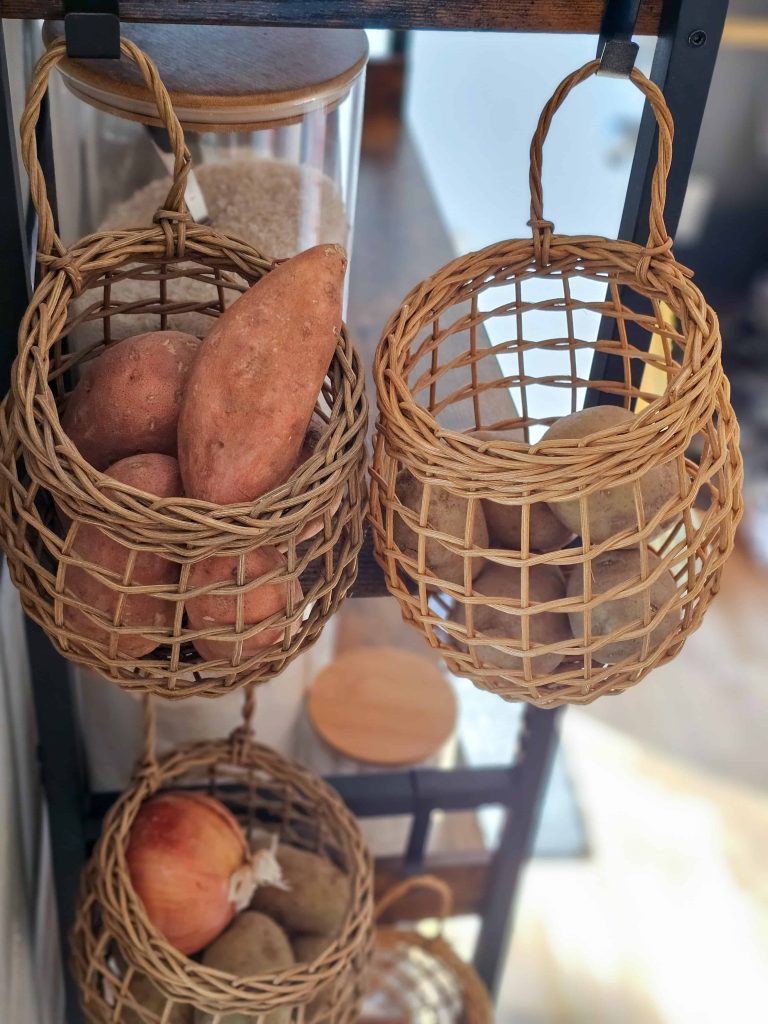
Potato and Onion Hanging Baskets on Hooks

Another thing I was having trouble finding space to store in our kitchen was potatoes, onion, and garlic. The best place to keep potatoes, onions, and garlic is somewhere with good airflow and away from other fruits and vegetables – so these hanging baskets are just perfect.
Originally I only had two, but recently added two more because I found they were always overflowing.
Aprons on Hooks
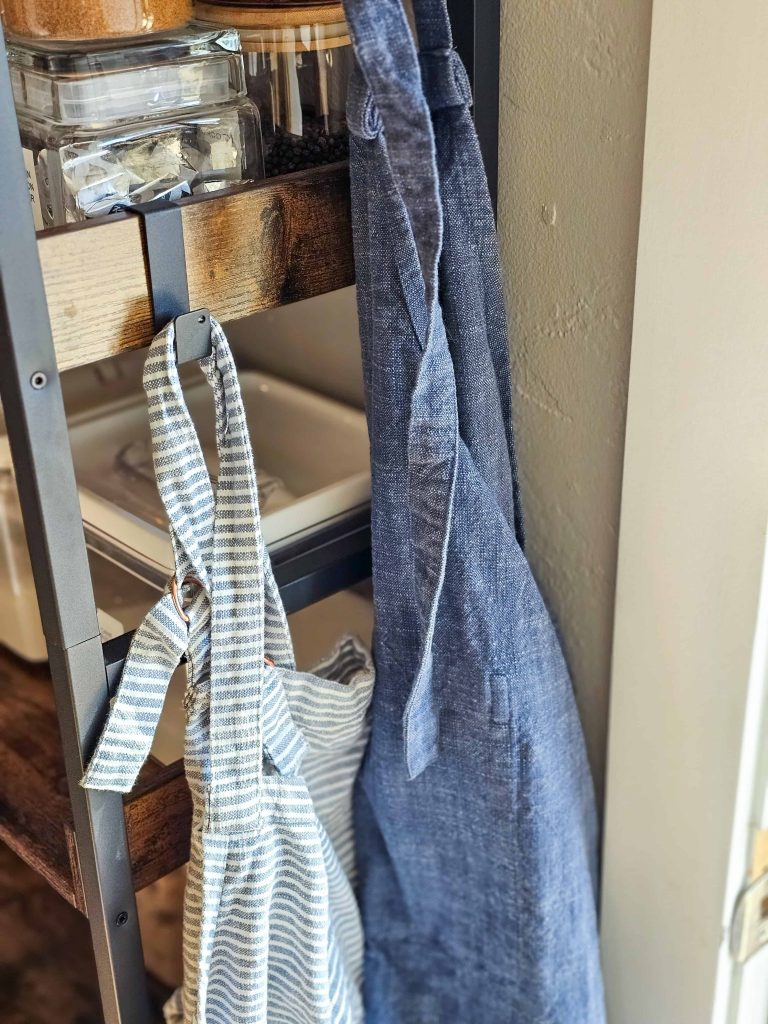
I have an apron that I use pretty regularly and two matching kid aprons for my little ones that they love putting on when they are helping in the kitchen. We used the other two hooks for the aprons.
Pantry Open Shelves – What To Consider
Are you thinking about adding pantry shelves to your kitchen? Here are the simple steps to make it happen.
- Determine where you’ll put the shelving unit or wall shelves and measure your space.
- Keep an open mind here…maybe it could be in a space adjacent to your kitchen – like your dining room.
- If you’re mounting floating wood shelves on the wall, be sure to find the wall studs so you can attach them correctly. We love this stud finder.
- Take inventory of what sort of food containers you already have on hand to see if you can reuse anything. Measure them and write down approximate sizes.
- Make a wish list of everything that you’d like to store in your open pantry. Maybe you want to stick to ingredients you use often – like I did. Or maybe you want to fill yours with breakfast foods and kids’ snacks.
- Research new storage containers that you’ll need to buy.
- The most common material here will either be glass or plastic. I have a mix of both on our shelves.
- Make sure your containers are large enough to store a whole bag of whatever you buy at the grocery stores. For example, I wanted to make sure my bins for flour and sugar were large enough to hold an entire 5 lb bag so I could just dump the whole thing in.
- Figure out if you want to add any decorative items on your shelves or if you’ll need everything purely functional.
- When it comes to your containers, you’ll definitely want to use labels. Find a set of labels that has everything you need. We used this set, which also includes spices (and we used those matching labels on our DIY spice rack on these glass jars). Check out more modern pantry labels here!
Final Thoughts
I’m so happy we decided to add the pantry open shelves to our kitchen. It helped solve a major storage problem for us and we were running out of space inside our kitchen pantry cabinets.

The additional storage has been SO helpful! I love having easy access to my pantry essentials! The orderly fashion of the storage bins with labels makes my heart happy. Please tell me I’m not the only one who gets joy from home organization.

If you’re struggling to find space inside of your pantry cabinets (or you don’t have a real pantry in your kitchen design), adding a shelving unit like this to use as pantry open shelves could be the solution to change the game in your kitchen.

Looking for more pantry organization ideas? Check out these articles next: