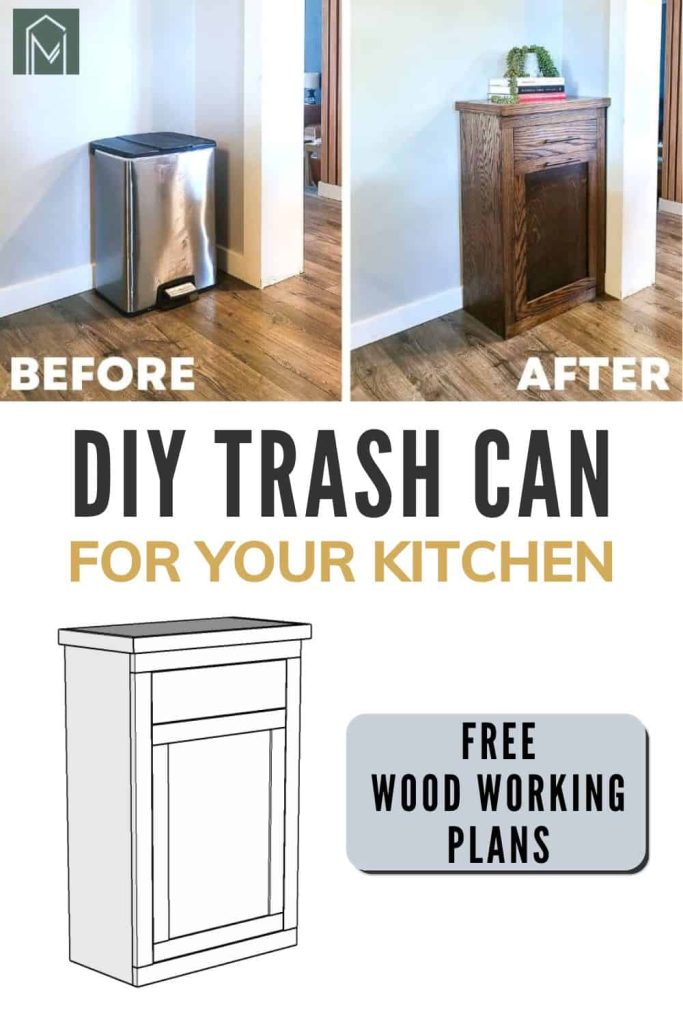
DIY Trash Can Cabinet with Free Plans

Looking for DIY tilt-out trash bin plans? Follow along with our step-by-step tutorial and download the free woodworking plans to build your own wooden DIY trash can cabinet with a drawer for your kitchen.
Thank you to Kreg for sponsoring this DIY tilt-out trash can! All opinions are entirely my own. This post also contains affiliate links, but nothing that I wouldn’t recommend wholeheartedly. Read my full disclosure here.
If you’re struggling with making your trash can look more attractive in your kitchen or your dogs are getting into your trash can, you’ll love today’s DIY trash can cabinet woodworking project.
Table of Contents
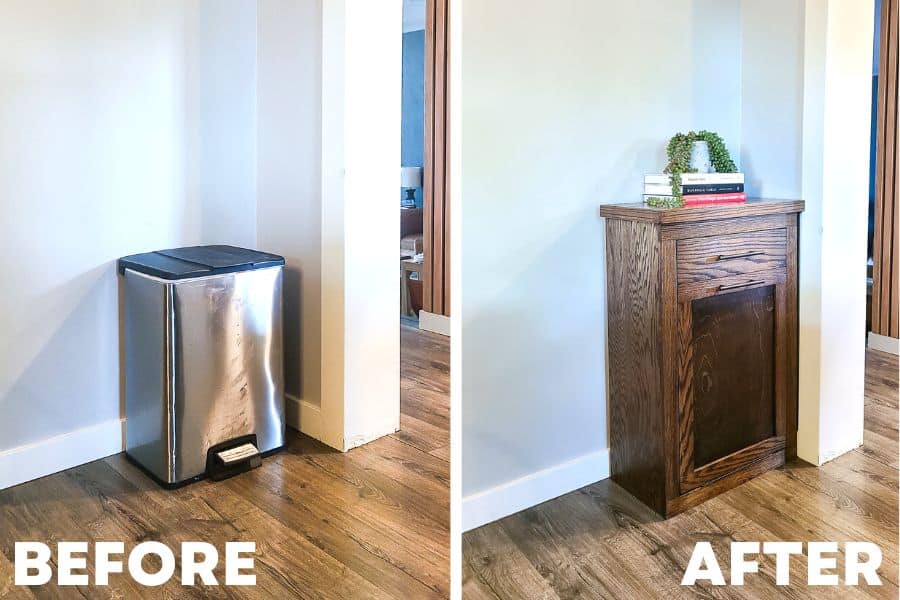
Trash Can: Before (The Problem)
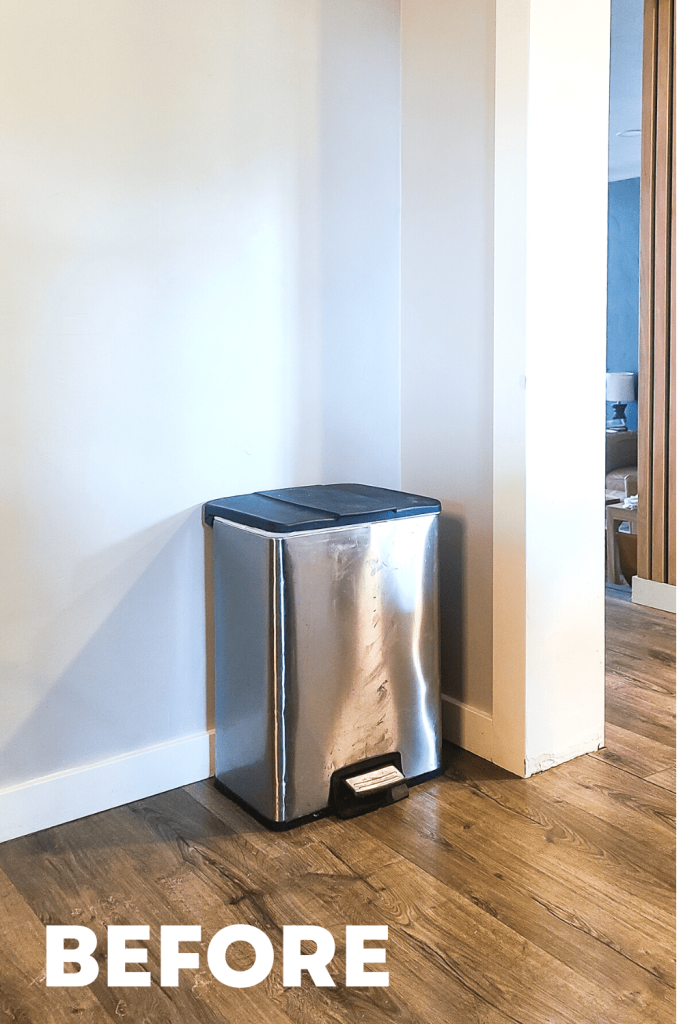
We’ve had an issue in our kitchen for a couple of years. Every time he’s left unattended, our dog gets into the trash can and makes a huge mess.
We’ve gotten pretty used to it. We always took out the kitchen trash before we left. We also started keeping a big laundry detergent container in the trash can so he couldn’t lift it. Attractive, I know.
But earlier this year, we got a puppy. And he’s started to pick up on some of the older dog’s bad habits… like getting into the trash can.
It got worse when the dogs started working together to figure out how to open the trash can to get the food scraps. Silly dogs!
Finally, it was too much, and we determined we needed to figure out a different solution.
Unfortunately, there is no good cabinet in our kitchen for a pull-out trash bin. We’ve had those in other houses and loved them, but we needed to think of something else this time.
Enter the DIY trash can cabinet!
Related Reading: Check out these other DIY trash can cabinet ideas for more inspiration!
Kreg 720PRO Pocket Hole Jig
If you’ve been following Making Manzanita for a bit, you know we are big fans of the Kreg pocket hole system.
We built tons of projects using our original K5 Pocket Hole Jig, we even have a super detailed guide and video about how to use it that you can check out here.
In 2021, Kreg released brand new pocket hole systems that replaced the K4 and K5, and the upgrades are pretty awesome.
The new 720PRO (which we were using for this DIY trash can cabinet) and the 520PRO (which replaced the smaller K4 system) were improved a ton, the most noticeable change being that they are easier to set up and use – score.
My favorite new feature of 720PRO and 520PRO is the clamp that you don’t have to adjust anymore. You just clamp it down and it automatically adjusts to match the thickness of your wood, so cool, right?
Pocket hole joinery is one of the easiest ways to join wood in woodworking projects. It’s our favorite hidden weapon for beginning woodworkers!
Want to learn more? I wrote a super detailed guide & created a video all about how to set up your Kreg 720PRO Pocket Hole and use it, so be sure to check that out too!
We teamed up with our friends Kreg again for these DIY trash can cabinet plans and are sharing them online for free, now available on KregTool.com!
Kreg’s website is chocked full of so many easy-to-follow FREE woodworking plans! I promise you will find so much inspiration while you’re there! It is a goldmine!
DIY Trash Can Cabinet: Video Tutorial
If you love DIY videos, don’t forget to subscribe to our YouTube channel!
DIY Trash Can Cabinet: Detailed instructions
Wood products needed:
- 1 Sheet of 4×8 3/4″ Oak Plywood
- 1 Sheet of 4×4 1/4″ Oak Plywood
- 1×2 Oak Board, Approximately 5’
- 1×3 Oak Board, Approximately 18’
- 1×6 Oak Board, Approximately 2’
Supplies needed:
- 1 ¼” Kreg Pocket Hole Hardwood Screws, Zinc
- 1 ¼” Kreg Pocket Hole Softwood Screws, Zinc
- Wood Glue
- 80 And 150 Grit Sandpaper
- Spray Lacquer
- 0000 Wire Wool
- Construction Adhesive
- Painters Tape
- 1 ¼” Finish Nails
- 1 ¾” Finish Nails
- 1 ½” Brad Nails
- Wood Stain
- Staining Rag
- Black Piano Hinge 2” X 12”
- 10” Euro Drawer Slides (we couldn’t find 10″ ones locally so we got 12″ and cut them down with a Dremel)
- 2 Rear Drawer Track Back Plates
- 2 Drawer Pulls
Tools needed:
- Kreg 720PRO pocket hole jig
- Kreg clamp table
- Kreg steel stand
- Kreg 90-degree corner clamp
- Table saw
- Miter saw
- Circular saw
- Tape measure
- Drill
- Impact driver
- Clamps
- Screw driver
- Dado blade for table saw
- Trim blade for table saw
- Orbital sander
- Finish nailer
- Brad nailer
- 4′ level or straight edge
- Caulking gun
Step 1: Cut Wood

- Use a table saw with a fine-toothed trim blade to cut plywood pieces and the widths of any wood pieces as needed.
- If you don’t have a table saw, no worries. It isn’t the only way! Check out the Kreg Rip-Cut circular saw guide.
- Use a miter saw to cut the board lengths.
- Cut plywood and oak boards as per woodworking plans, which can be downloaded for free here.
- Prevent plywood from chipping with a trim blade. You can also put painter’s tape over the cut line as another way to prevent chipping.
Step 2: Cut Dado for Drawer
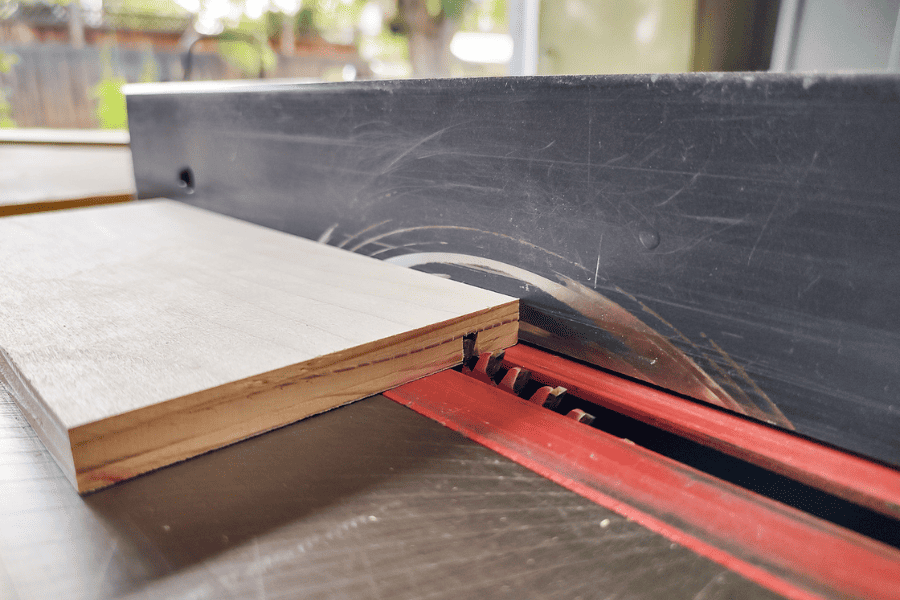
- Make ¼” dado cuts the drawer side pieces for the drawer bottom using a dado blade on a table saw.
- If no dado blade, make multiple passes with a regular table saw blade.
Step 3: Cut Groove for Door Panel Insert
- Use a table saw to cut a ⅜” deep groove into door rails and stiles.
- Make a couple of passes until the groove is ¼” wide.
Step 4: Sand
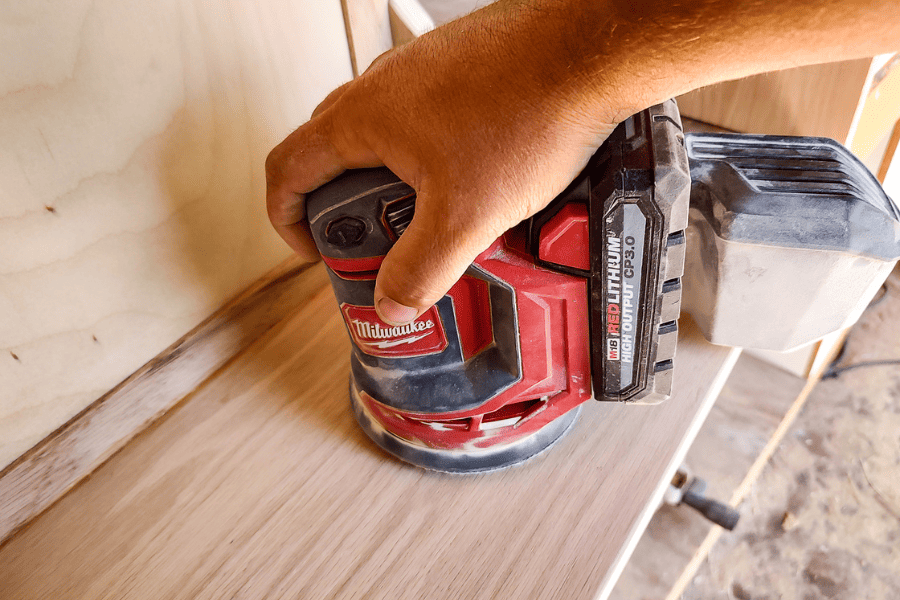
- Lightly sand all cut pieces with 80-grit sandpaper and an orbital sander.
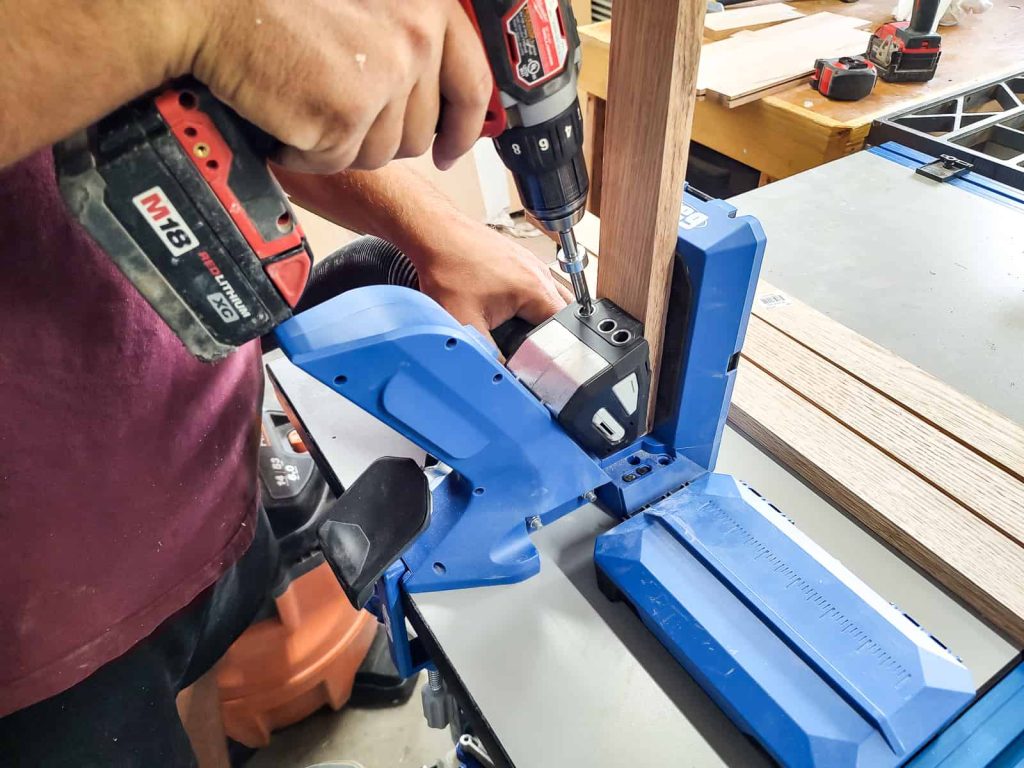
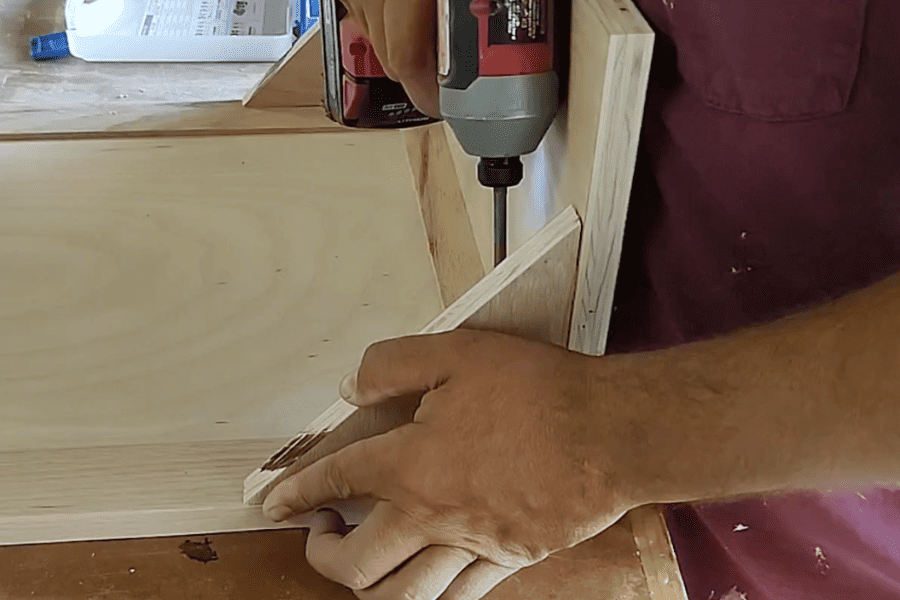
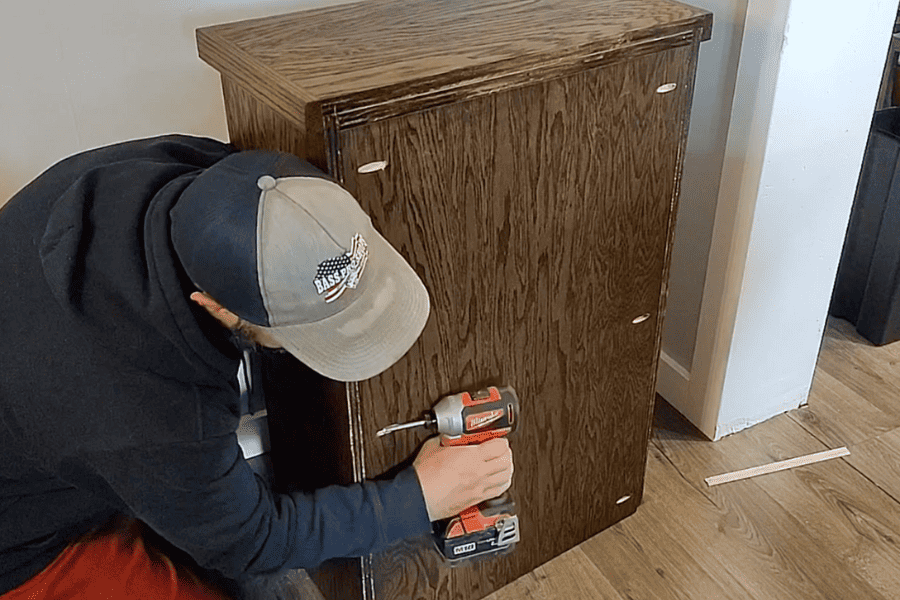
Step 5: Drill Pocket Holes
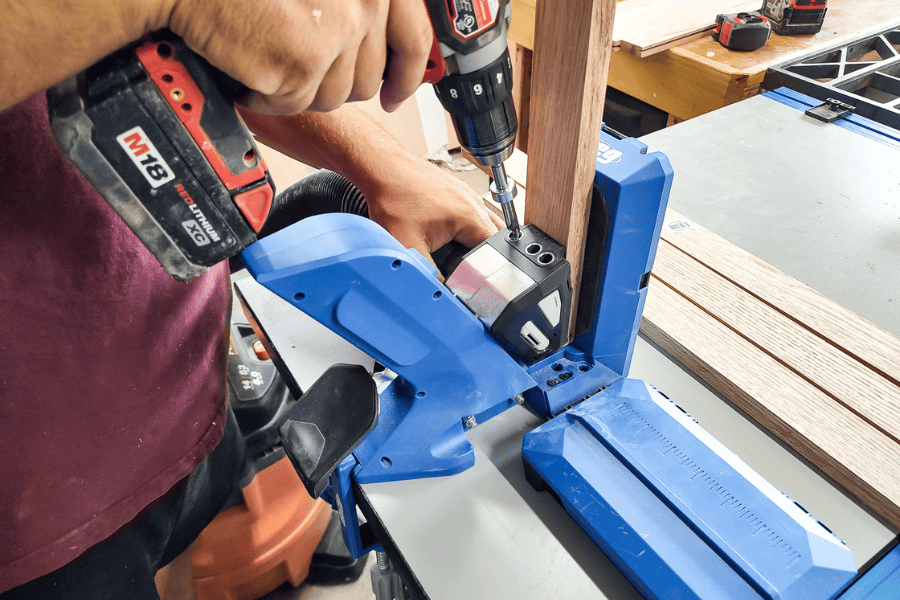
- Drill pocket holes following woodworking plans, using a pocket hole jig – like the Kreg 720 Pro or Kreg 520 Pro.
- Drill slowly to avoid damaging the thin hardwood veneer.
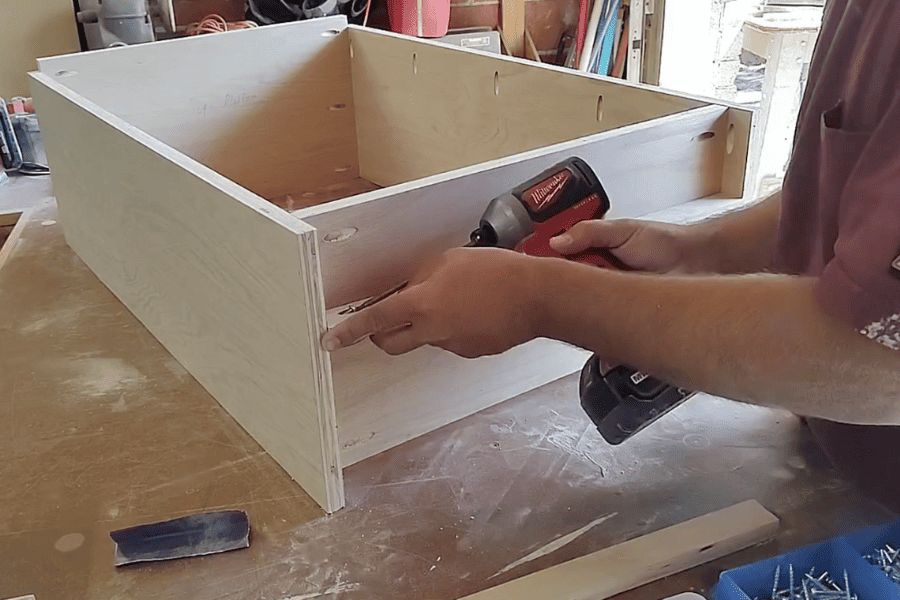
Step 6: Assemble the Drawer Box
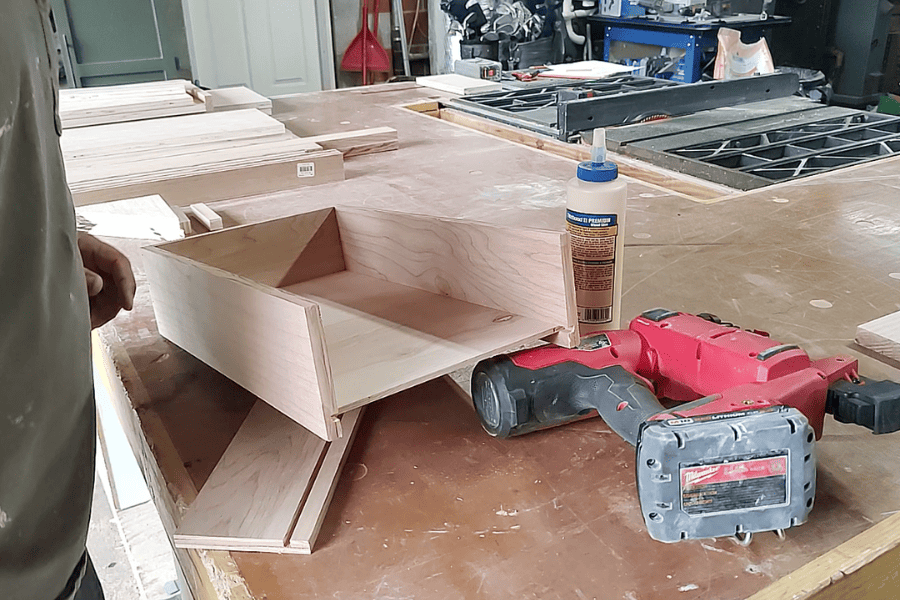
- Glue and nail back and sides together.
- Slide in drawer bottom into dado channel, add a front piece, and nail together. Allow to dry.
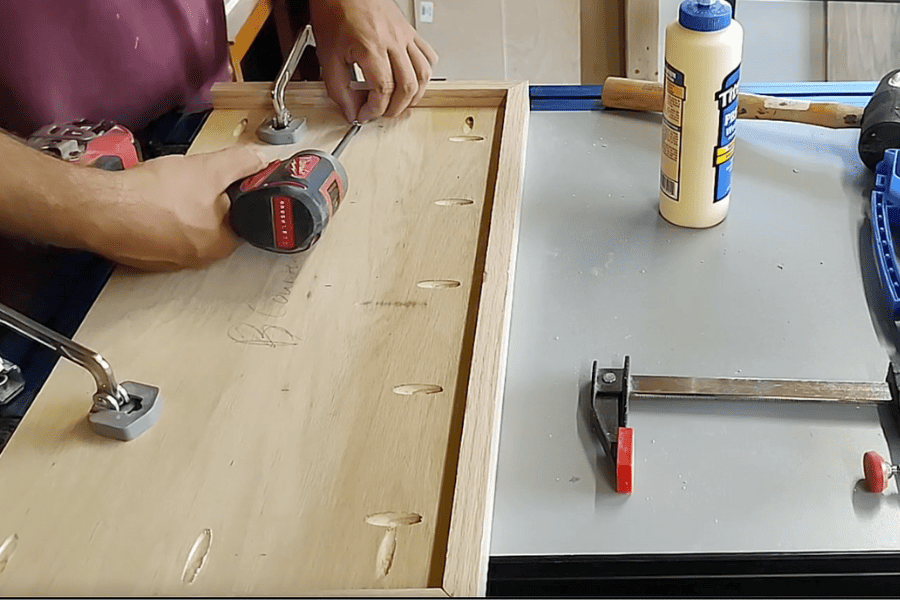
Step 7: Assemble Face Frame
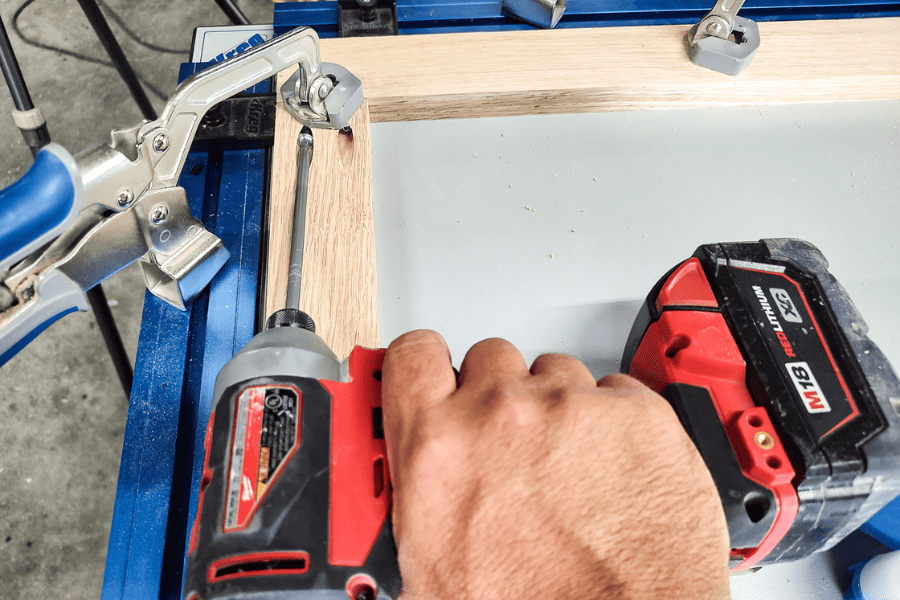
- Clamp face frame pieces together and use 1 ¼” hardwood Kreg screws to attach.
- We always recommend predrilling pilot holes to prevent splits when working with hardwood, like Oak.
Step 8: Assemble Door
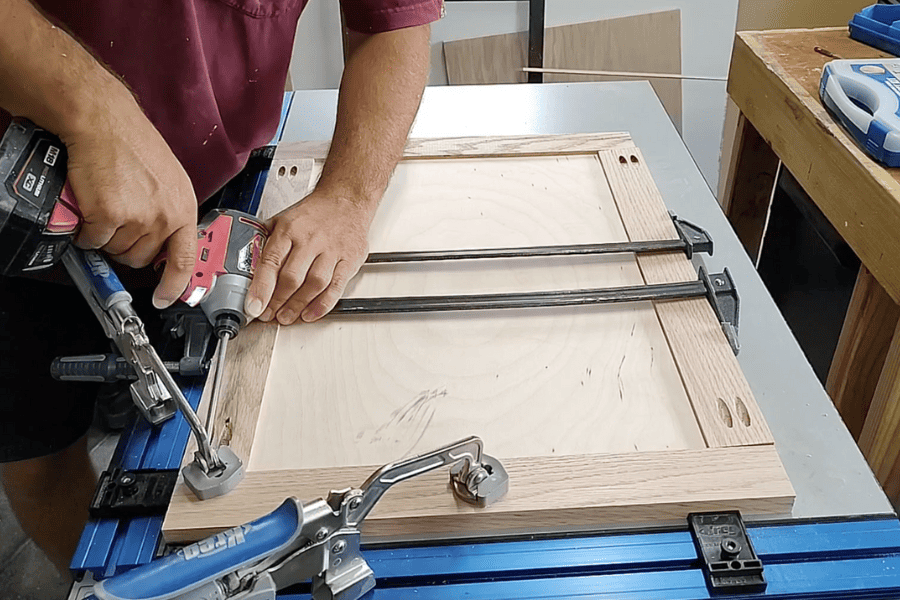
- Dry fit door pieces, clamp, mark, and pre-drill.
- Add wood glue into the groove, assemble the door, clamp, and screw in pocket hole screws.
- Allow to dry.
Step 9: Build Cabinet Frame
- Assemble cabinet side panels, bottom panel, top panel, and bottom supports using pre-drilled pocket holes.
- Use 1 ¼” Softwood/plywood Kreg screws.
Step 10: Build Top
- Dry fit top front and side trim pieces, mark through pocket holes, and assemble using 1 ¼” Kreg hardwood pocket screws.
Step 11: Attach Face Frame and Top to Cabinet
- Attach the face frame with 1 ¼” Kreg hardwood screws.
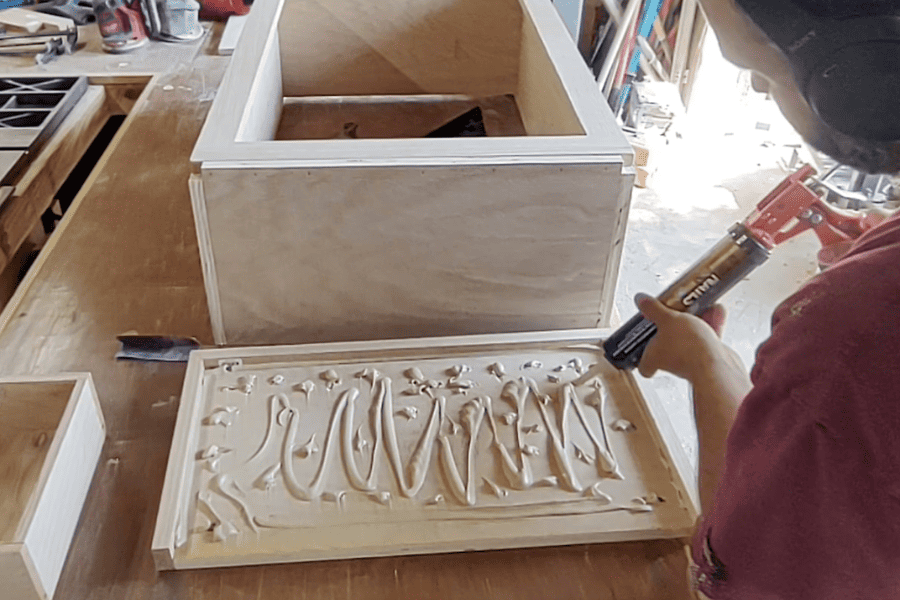
- Attach the top using construction adhesive and finish nails from the inside.
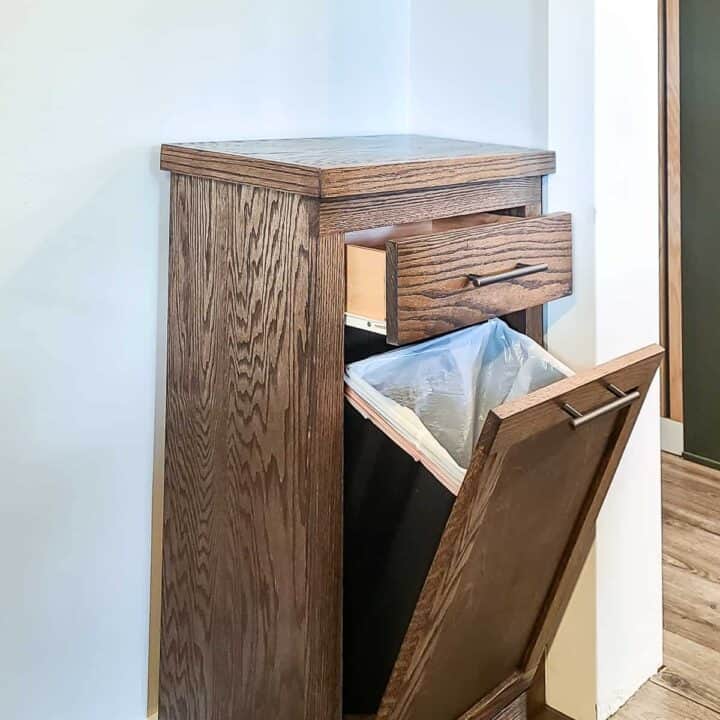
Step 12: Assemble Trash Bin Tilt Platform
- Attach tilt support triangles to the trash bin tilt platform base with wood glue and finish nails.
- Attach bin tilt platform to the door using pre-drilled pocket holes. Add wood glue for extra strength.
Step 13: Sand and Stain
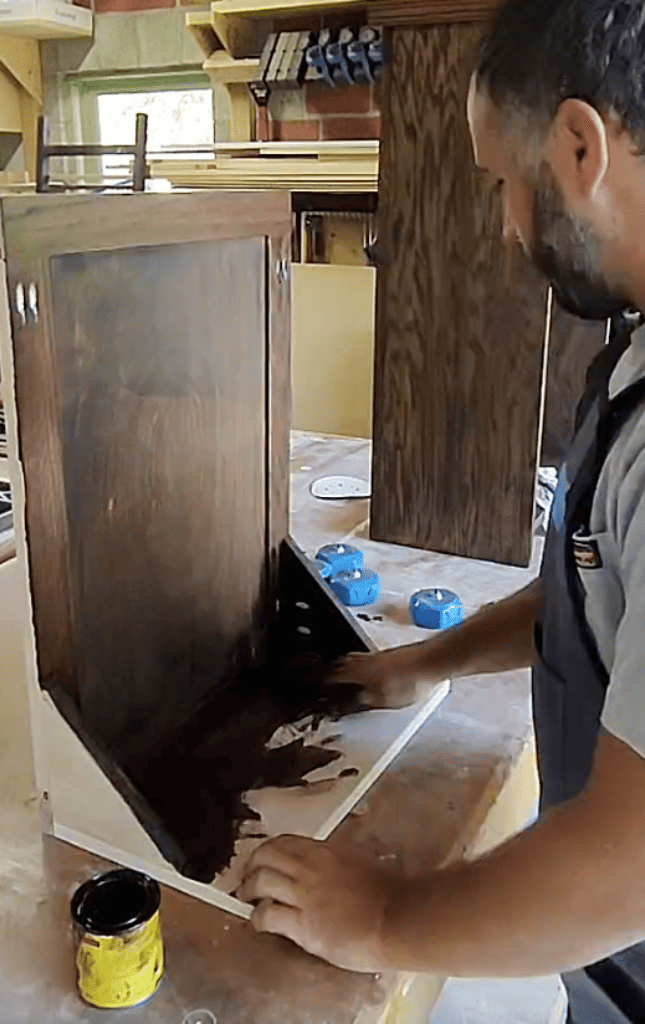
- Sand all parts with 80-grit and 150-grit sandpaper.
- Apply wood stain, like Minwax Dark Walnut.
- Allow the stain to dry for at least 8 hours before applying finish.
Step 14: Apply Finish
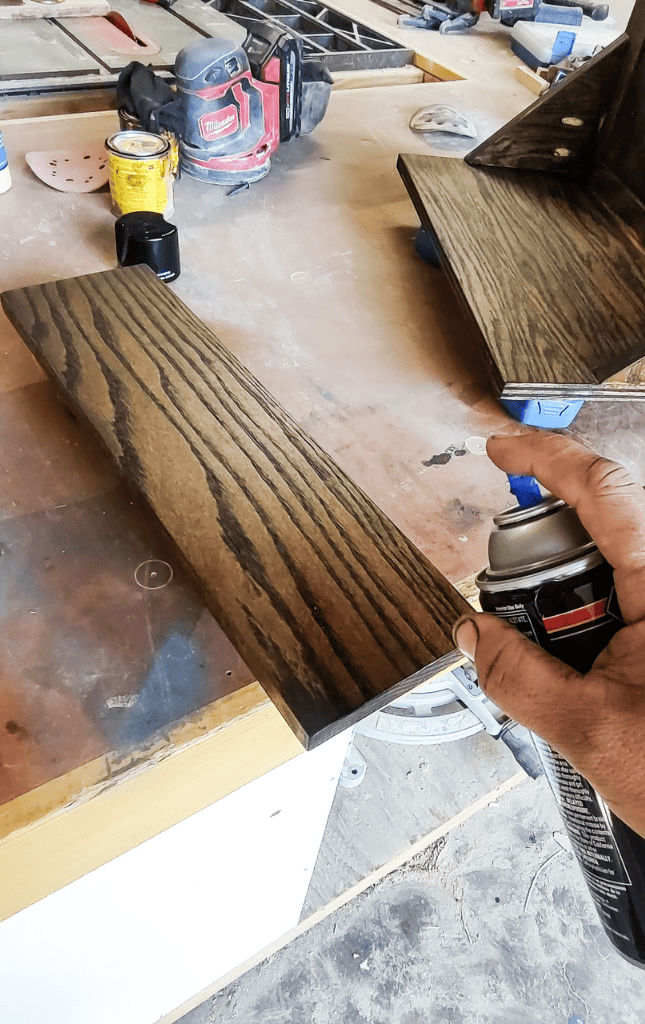
- Spray lacquer onto parts at least 3 times for protection.
- Lightly rub #0000 wire wool for a smooth finish after it’s dry to the touch.
Step 15: Add Hinges and Tilt Stops
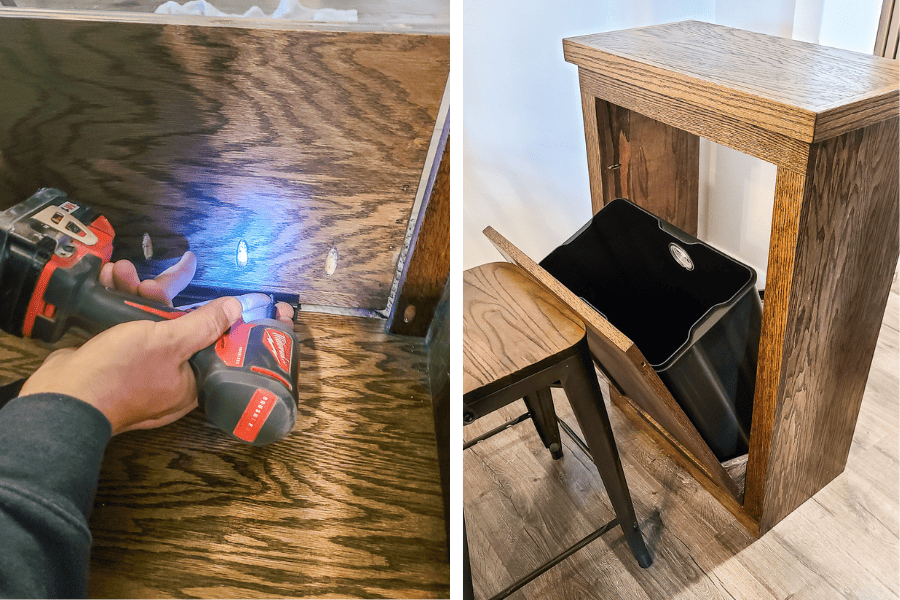
- Attach the piano hinge to the bottom edge of the cabinet and door.
- Tilt open the door to the desired angle and attach tilt stops. Test to make sure it is working properly.
Step 16: Add Back Panel
- Attach the back panel to the trash cabinet using 1 ¼” softwood/plywood Kreg screws for a finished look.
Step 17: Add Drawer Slides, Drawer Face & Hardware
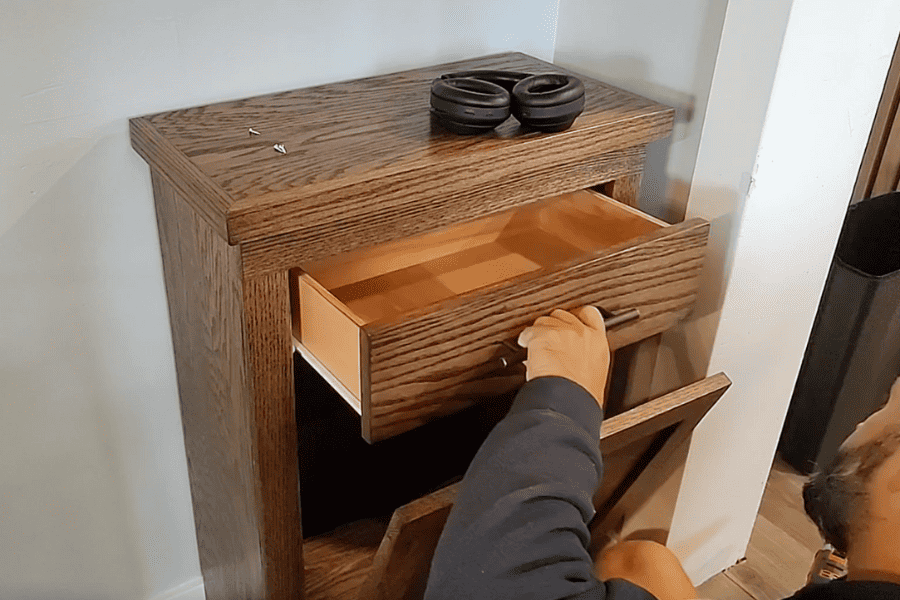
- The last thing you’ll do is add the drawer and hardware.
- Clamp together the drawer box and drawer front.
- Attach drawer pull using a hardware template.
- Follow instructions for drawer slides.
- Attach a matching door pull to the top of the door for tilting the trash bin out.
Ready to see the finished DIY trash can cabinet??
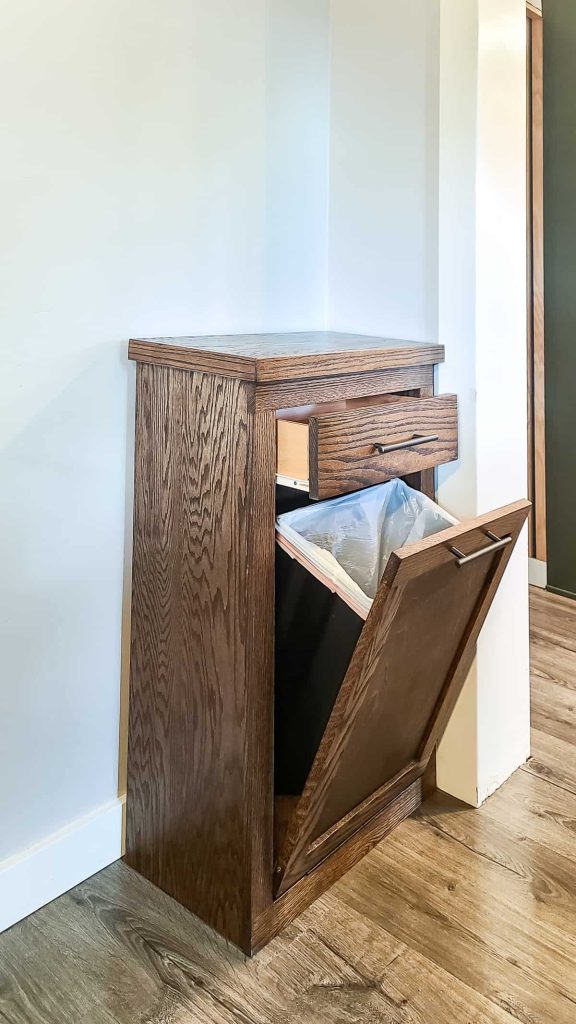
I love that the tilt out front looks like a cabinet door and the stain color matches the rest of our kitchen.

What did we make this DIY trash can cabinet out of?
We made our DIY tilt-out trash can from oak hardwood trim boards and 3/4″ oak veneer plywood. Oak is a pretty expensive type of wood, but it looks gorgeous when stained and is very durable and sturdy.
To paint or stain the DIY trash can cabinet: that is the question!
I wanted to have our trash bin stained rather than painted. My thoughts were that it would be easier to clean if it was stained and lacquer vs. painted. I also wanted it to match our dark wood kitchen cabinets and the farmhouse sink cabinet we have in our laundry room (adjacent to the kitchen).
If you’d rather have a painted trash bin, good news for you because you can make it a lot cheaper. If we had painted it instead, we would have used sanded plywood with poplar trim. That would have cut a lot of the costs down.
Even if you decide to paint yours, but building process is relatively the same, so you can still use our free woodworking plans for the DIY pull out trash can.
If you want to build this wooden DIY trash can cabinet, we’ve done all the hard work! All you need to do is visit Kreg’s website and check out the full tutorial.
At the bottom of the tutorial on Kreg’s website, you’ll also see a link to download the woodworking plans (for free) to get all of the detailed measurements and a cut list!
Would you use a tilt-out trash can DIY cabinet like this in your house?
Let us know in the comments below!
How To Build A DIY Trash Can Cabinet
Hide your trash can from view and away from pets with this easy DIY trash can in a tilt out cabinet.
Materials
- Oak plywood and oak boards per the plans
- 1 ¼” Kreg Pocket Hole Hardwood Screws
- 1 ¼” Kreg Pocket Hole Softwood/Plywood Screws
- Wood Glue
- 80 And 150 Grit Sandpaper
- Spray Lacquer
- Construction Adhesive
- Painters Tape
- Drawer Slides
- 1 ¼” Finish Nails
- 1 ¾” Finish Nails
- 1 ½” Brad Nails
- Wood Stain Of Choice
- Black Piano Hinge 2” X 12”
- 10" Euro Drawer Slides
- 2 Rear Drawer Track Back Plates
- 2 Drawer Pulls
- 0000 Wire Wool
- Extra scrap pieces for ripping (if no trim blades)
- Staining rag
- ¾” x 4’ x 8’ Oak Plywood (Qty 1)
- ¾” x 2” x 5’ Oak Board
- ¾” x 3” x 18’ Oak Board
- ¾” x 6” x 2’ Oak Board
Tools
- Kreg® Pocket-Hole Jig 720PRO
- 90° Corner Clamp
- Table Saw
- Miter saw
- Circular Saw
- Tape measure
- Drill
- Impact driver
- Clamps
- Screw driver
- Dado Blade
- Trim blade for table saw
- Finish nailer
- Brad Nailer
- 4' Level Or Straight Edge
- Kreg Clamp Table
- Orbital Sander
- Painter's tape
- Caulking gun (for construction adhesive)
Instructions
- Make all the cuts to the plywood and boards according to the cut list.
- Cut 1/4" dado cut in the bottom of the drawer using a table saw and dado blade.
- Cut the groove for door panel insert by cutting a groove into the sides of your door rails and stiles for the panel to slide into.
- Light sand all cut wood pieces with 80-grit sandpaper and an orbital sander.
- Drill pocket holes as shown in the woodworking plans.
- Assemble the drawer using wood glue and 1 1/4" brad nails.
- Assemble the face frame using 1 1/4" hardwood pocket hole screws.
- Assemble the door using wood glue and pocket hole screws.
- Build the cabinet using pocket holes and 1 1/4" soft wood pocket hole screws.
- Assemble the top using 1 1/4" hardwood pocket hole screws.
- Attach the face frame to the cabinet using 1 1/4" hardwood pocket hole screws. Next, apply construction adhesive to the underside of the top and press onto the cabinet firmly to ensure a good bond. Next, take your finish nailer and 1 ¼” finish nails and nail them up into your top from inside of the box.
- Attach the tilt support triangles to the trash bin tilt platform base using wood glue and 1 ¾” finish nails. Then attach the bin tilt platform to the assembled door using the pre-drilled pocket holes.
- Sand and stain in the color of your choice.
- Apply at least 4 coats of lacquer, allowing it to dry between coats, to ensure easy cleaning of the DIY trash can later.
- Get your door & tilt platform and put it into place inside the cabinet. Next, attach the piano hinge to the bottom edge of the cabinet and door.
- Add the back panel to the cabinet with 1 ¼” softwood/ plywood Kreg screws.
- Install drawer slides, the drawer front, and the hardware and you're done!
Related – Projects that use a pocket hole jig
- Kid’s Cabin Bed
- Table Top
- Planter Box for Front Porch
- Outdoor Plant Wall
- Farmhouse Sink Cabinet
- Mudroom Lockers
- DIY Desk Calendar & Wooden Pencil Holder
- DIY Dress Up Storage for Kids
- Picture Ledge DIY
- DIY Firewood Rack with Roof
- DIY Cane Headboard
- Boho Nightstand with Cane
- DIY Behind the Couch Table with Outlet
- DIY Headphone Stand
- DIY Cookbook Stand
- Easy DIY Grill Utensil Holder
- DIY Deck Box for Outdoor Toys
- DIY Towel Rack Made With One Board
- DIY Tool Organizer for Kreg Tool Stand
- DIY Mail and Key Holder
- DIY Step Stool for Toddler
- DIY Trash Can
- DIY Spice Rack
- DIY Book Holder
- Easy DIY Magazine Shelf
- DIY Clamp Rack
- DIY Chicknic Table
- DIY Bike Rack
- Small Bookshelf
- DIY Laptop Tray


I love your site and projects. I am also a huge fan of Kreg products. I was wondering if there are detailed plans for the trash can project available? I like the tutorial but I was hoping for step-by-step guide.
Thanks!
Dave
Yes, you can find a detailed step-by-step guide and woodworking plans with all of the measurements here: https://learn.kregtool.com/plans/tilt-out-trash-bin/
I love and need one of these. Great idea. Thanks for sharing
Glad you enjoyed it!
What are the maximum dimensions for the trash bin that goes inside this? I’d prefer to get the biggest one that will fit (or can be made to fit) instead of trying to adjust all the wood dimensions.
Thanks.
We built this for a trash can 16.6″ wide, 19″ tall and 10″ deep.
We built this for a trash can 16.6″ wide, 19″ tall and 10″ deep.