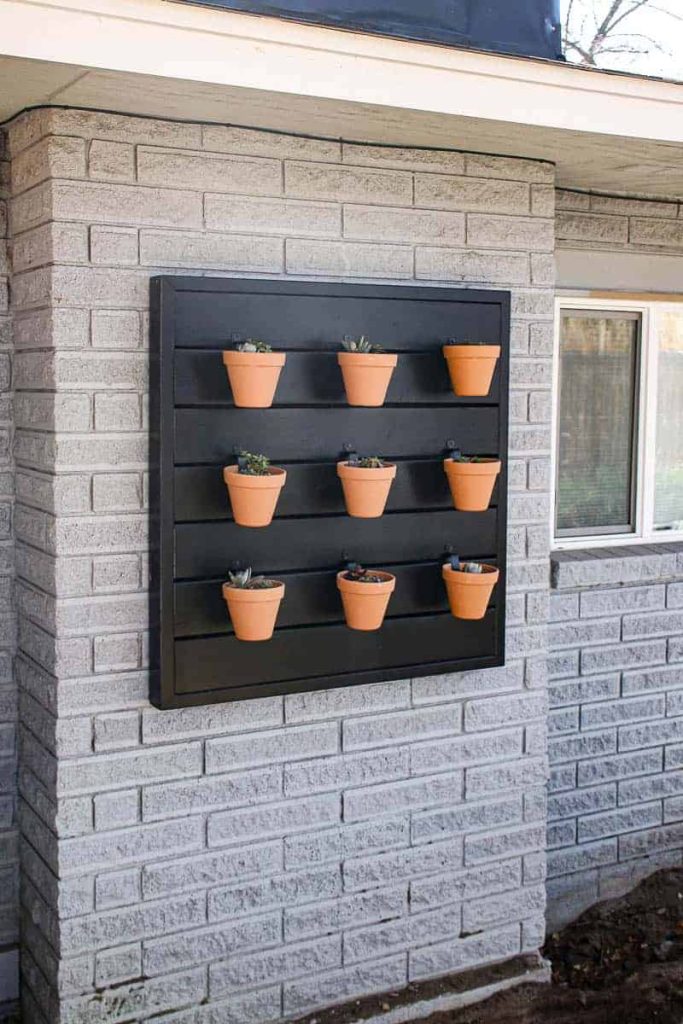
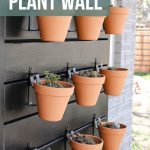
DIY Outdoor Wall Planter with Vertical Garden Pots (With Free Plans)

Looking to add more character to your backyard or curb appeal to your front yard? Build an outdoor wall planter for vertical garden pots! This easy woodworking project turns out SO good!
Thank you to Kreg for sponsoring this DIY outdoor wall planter! All opinions are entirely my own. This post also contains affiliate links, but nothing that I wouldn’t recommend wholeheartedly. Read my full disclosure here.
We’ve got BIG plans for this backyard and we’re hoping to be able to completely redo the whole outdoor space this Summer & Fall. (UPDATE: See how the backyard makeover turned out here!)
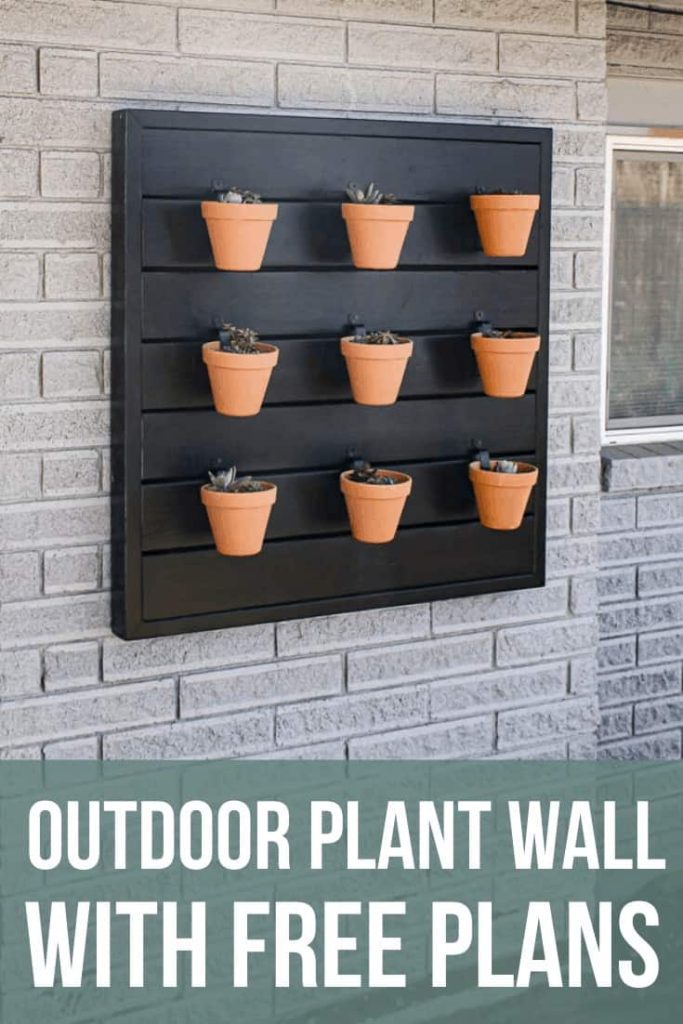
To really get our minds right and ready for a backyard makeover, we’re starting with a super simple woodworking project to add more character to the backyard. We built an outdoor plant wall with vertical garden pots! And it turned out SOOOOOO good, guys!
Once the whole backyard is done, this will fit in perfectly with what we have planned…but for now, with a yard full of dirt and weeds…which is a great way to keep up the motivation to keep working!
Related – Looking for more easy woodworking projects?
Kreg Pocket Hole System
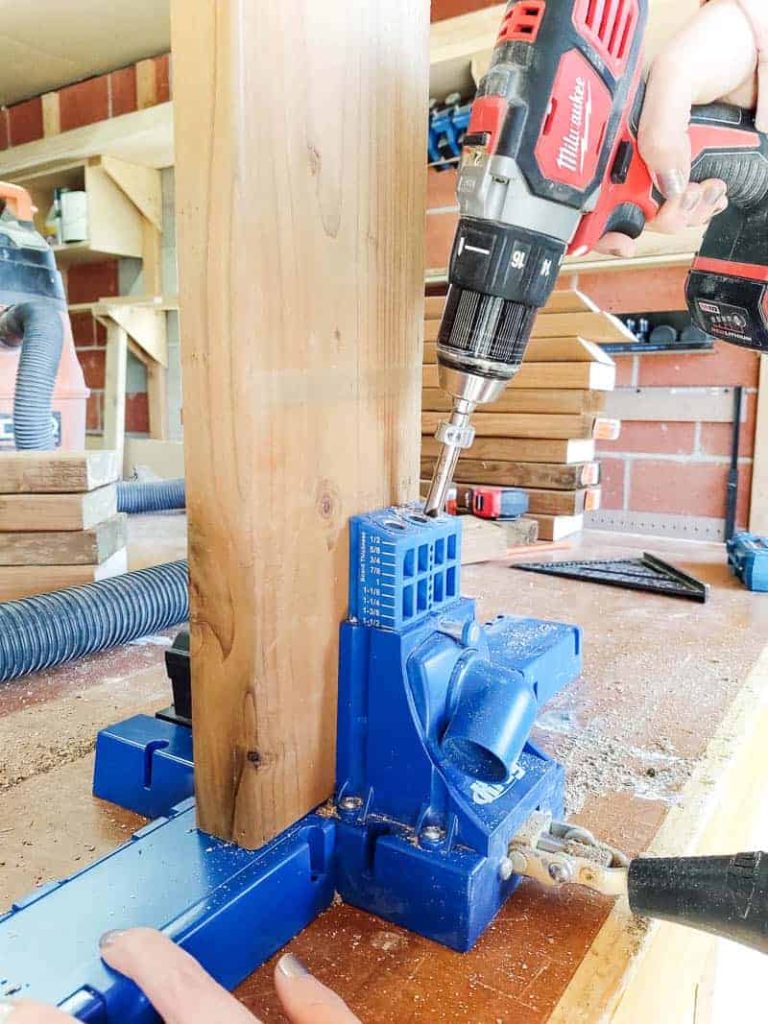
We incorporated pocket hole joinery into this easy project, which is one of the easiest ways to join wooden boards in woodworking projects. We have Kreg’s K5 Master System and LOVE it. It’s a hidden weapon for beginning woodworkers!
UPDATE: In 2021 Kreg replaced the K5 Pocket Hole system with the Kreg 720 Pro. Check out our guide all about the new Kreg 720Pro to learn more.
For this fun DIY (and SUPER EASY) woodworking project, we teamed up with our friends Kreg again to create the vertical planter plans and share them online for free, which are now available on KregTool.com!
If you’re wondering, Kreg Tools’ website is full of easy-to-follow woodworking plans that are all available for free! I promise that you are going to find so much inspiration while you are there!
Vertical wall planter – video tutorial
If you love DIY videos, don’t forget to subscribe to our YouTube channel!
DIY Outdoor Wall Planter – step-by-step tutorial
Wood materials needed:
Supplies needed:
- Primer
- Quart Of Exterior Paint
- 4-inch Paint Roller & Tray
- 9 Terra Cotta Pots (6 Inch)
- Perlite
- Cactus Soil
- Succulent Rock Mixture
- 9 Mini Succulents
- 9 Planter Pot Hooks
- 2 1/2″ Blue Coated Outdoor Kreg Screws (Qty 24)
- 2 1/2″ Exterior Construction Screws (For Corners) (Qty 16)
Tools needed:
- Kreg® Pocket-Hole Jig 720
- Wagner FLEXio Paint Sprayer
- Miter Saw
- Square
- Tape Measure
- Impact Driver
- Sander
- Shop Vacuum
- Tape Measure
Step 1. Cut wood to size

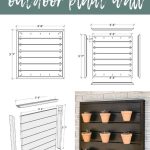
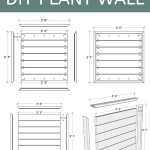
- Use a miter saw to cut wood to the sizes listed in the cut list found in the woodworking plans, which can be downloaded for free here.
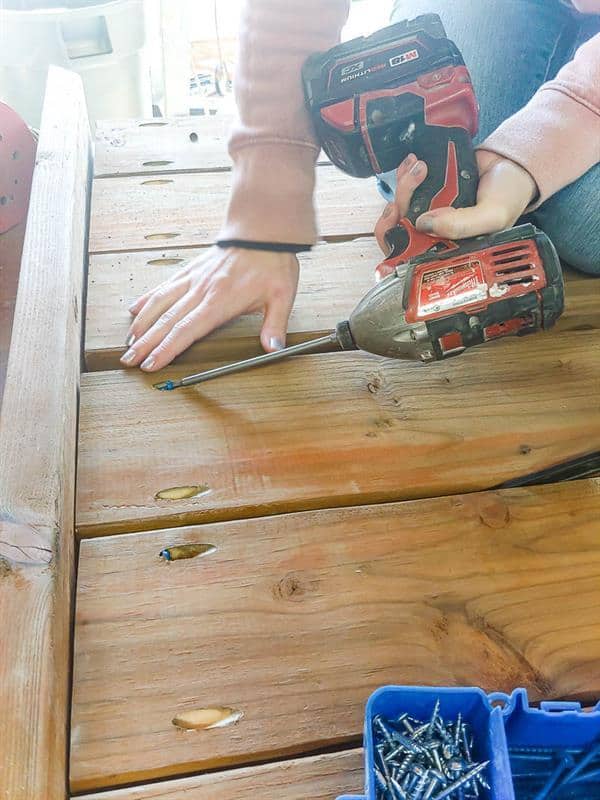
Step 2. Drill pocket holes

- Drill two pocket holes on each end of every slat.
- On one top and one bottom slat, drill five pocket holes across the wood board horizontally for attaching to the frame.
Step 3. Assemble
- Attach slats evenly to one side of the frame with a roughly 1/4″ gap between each.
- Add the top and bottom frame pieces, then attach the other side.
- Secure mitered corners of the frame with two screws in each outside corner.
Step 4. Sand
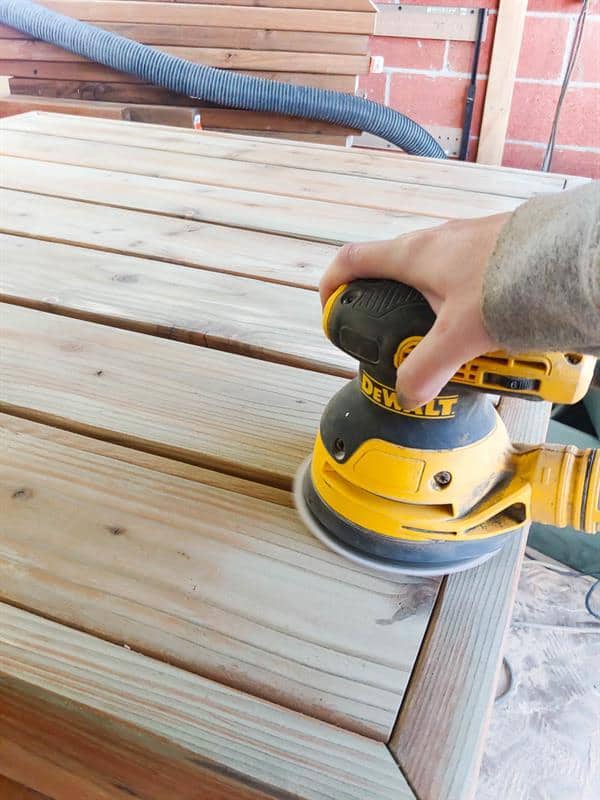
- Lightly sand the entire structure with an orbital sander.
- Start with 80 grit for uneven areas, progressing to 150 grit.
Step 5. Prime
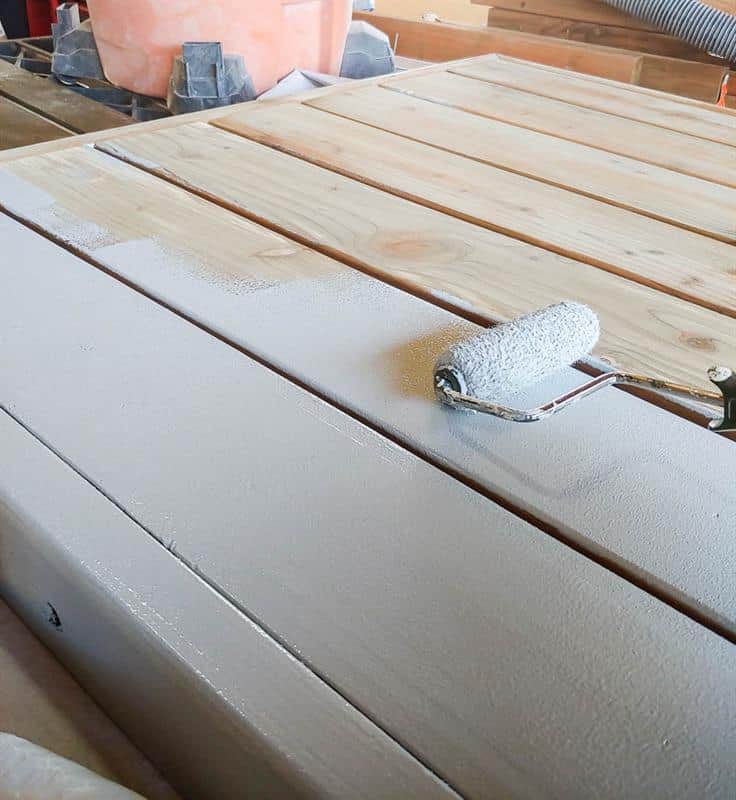
- Roll primer onto the entire structure.
- We used a tinted gray primer since we were painting it dark.
Step 6. Paint with sprayer
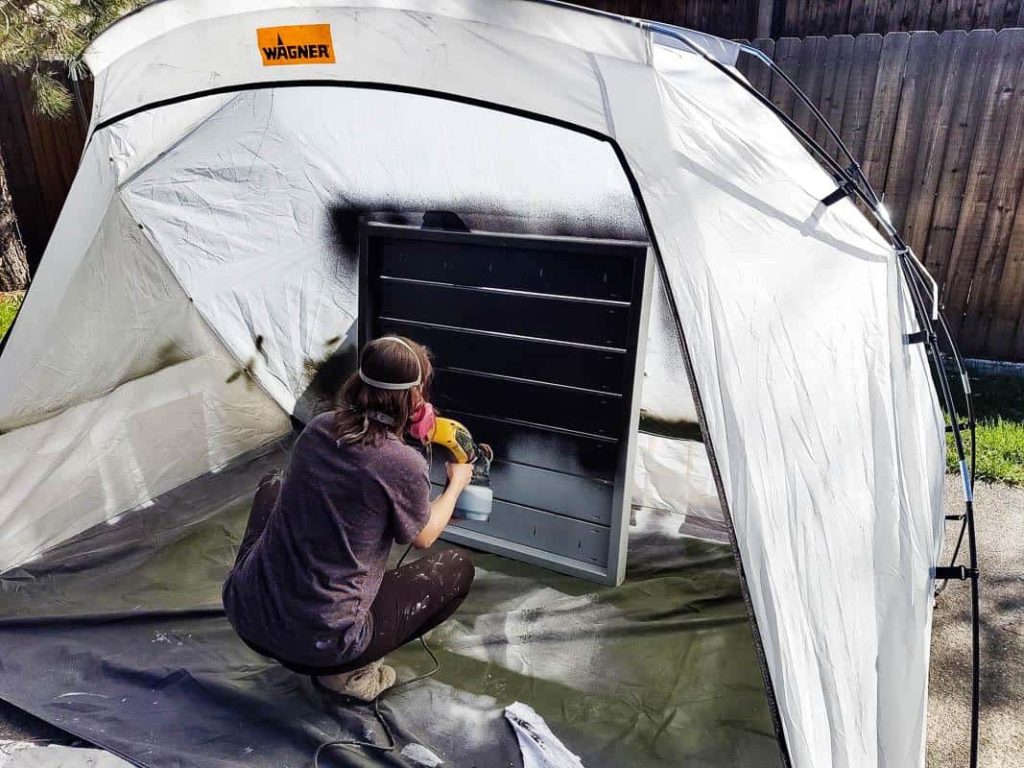
- Paint the structure with exterior paint, using a paint sprayer for easy coverage.
- Be sure you check the filter on your paint sprayer before starting, replacing it if needed.
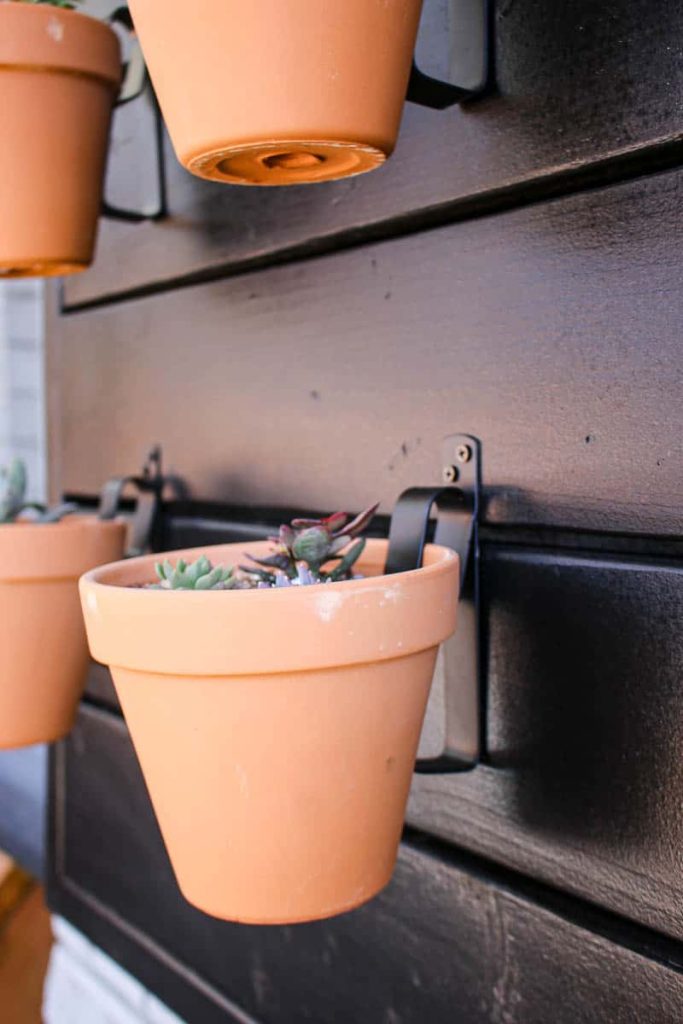
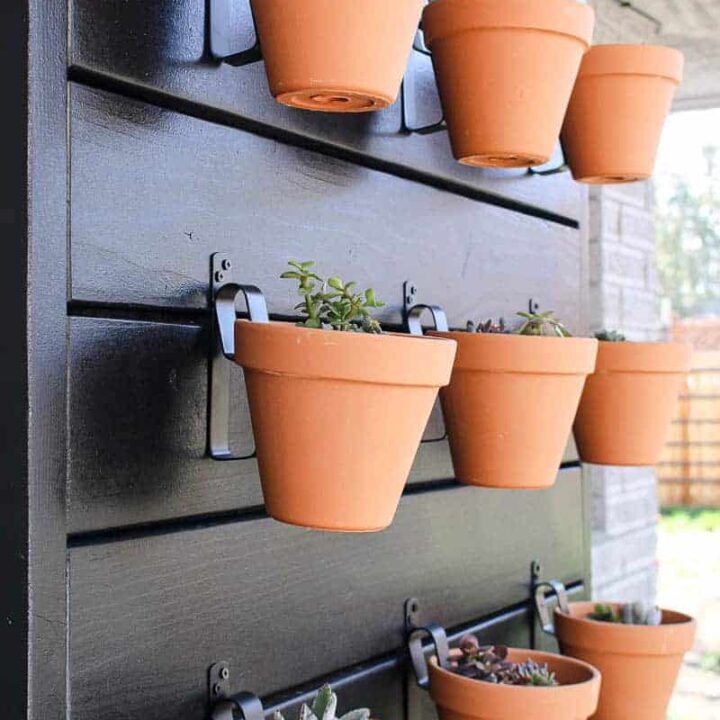
Step 7. Add hooks for planters
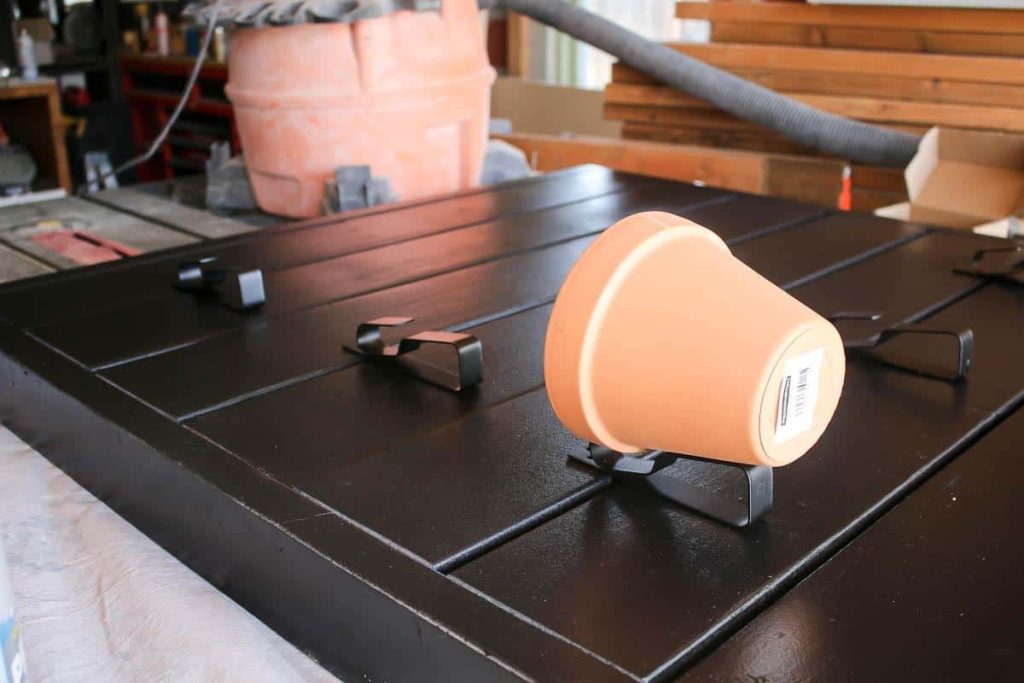
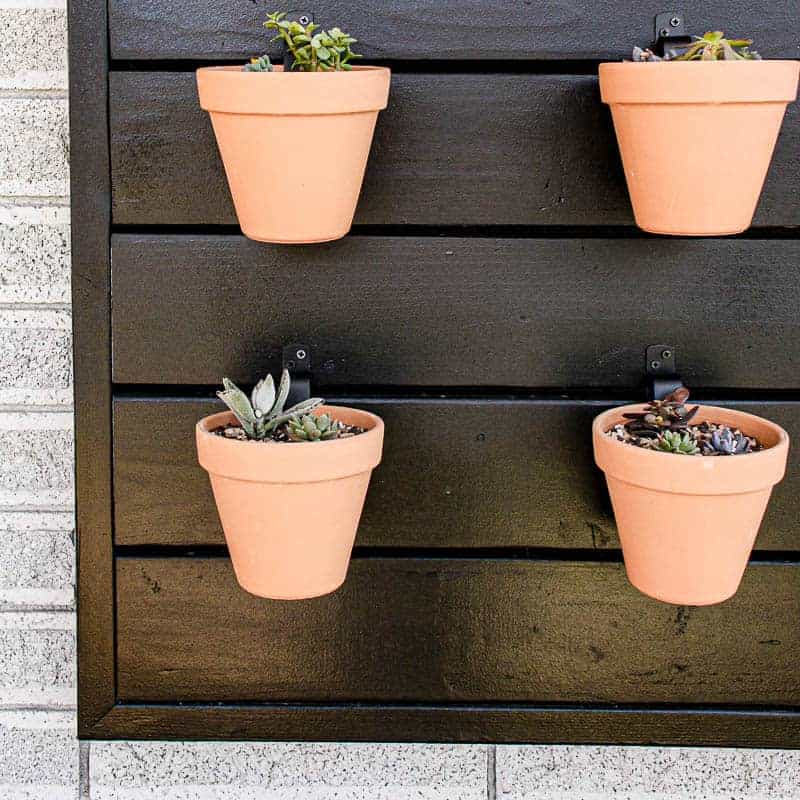
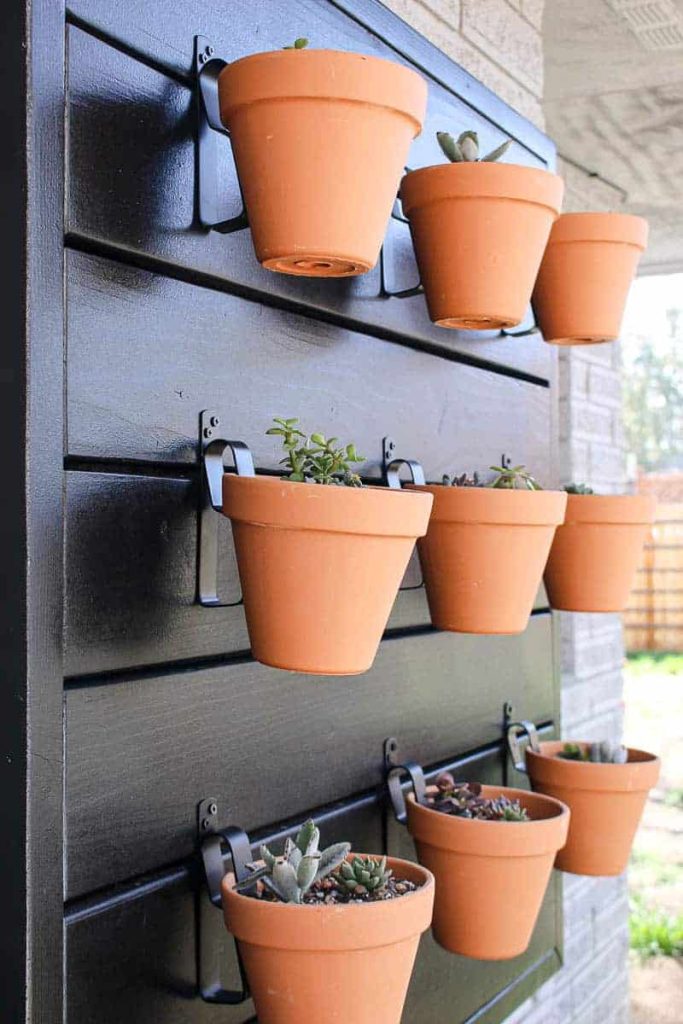
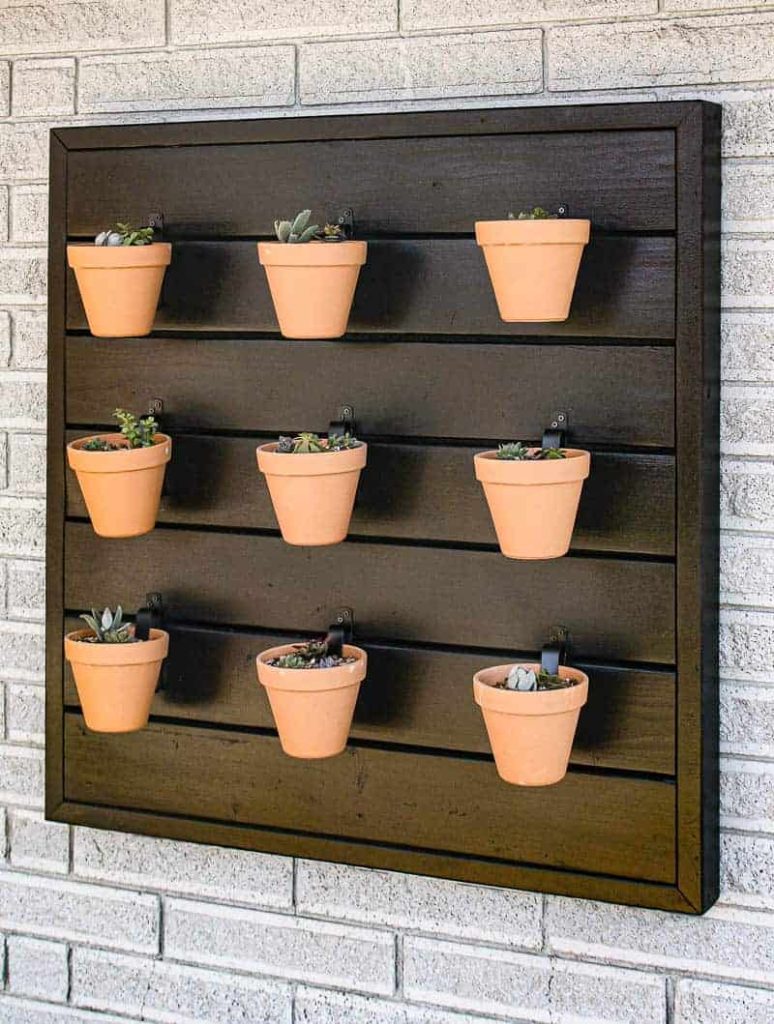
- Mark spaces for nine planters evenly on the plant wall.
- Attach planter pot hooks in the marked spaces.
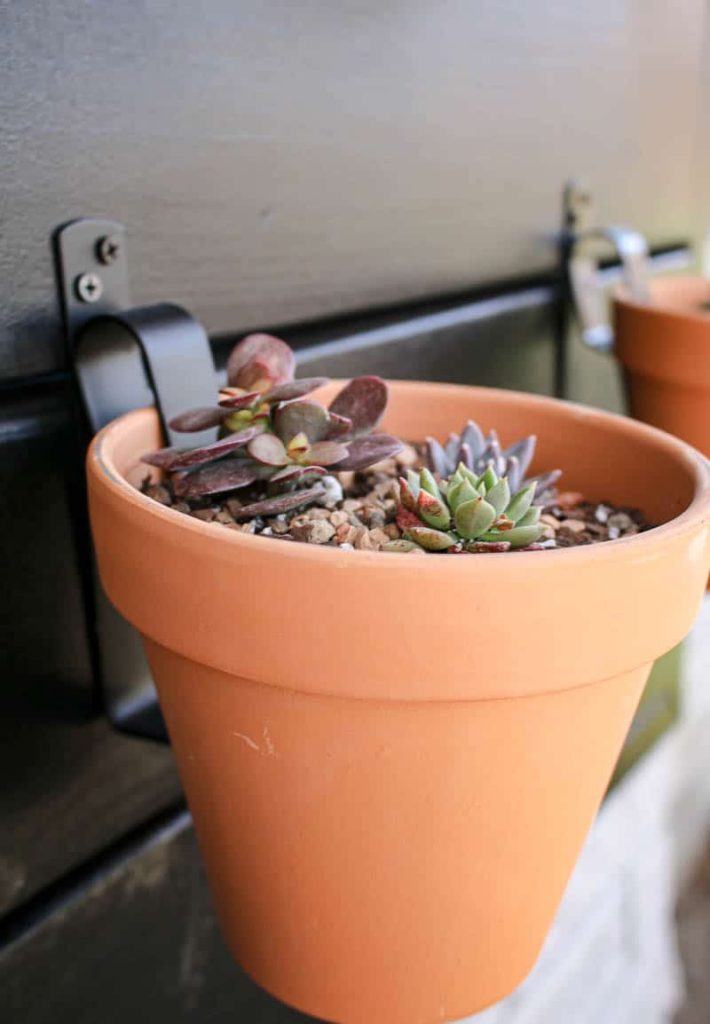
Step 8. Add succulents in planters
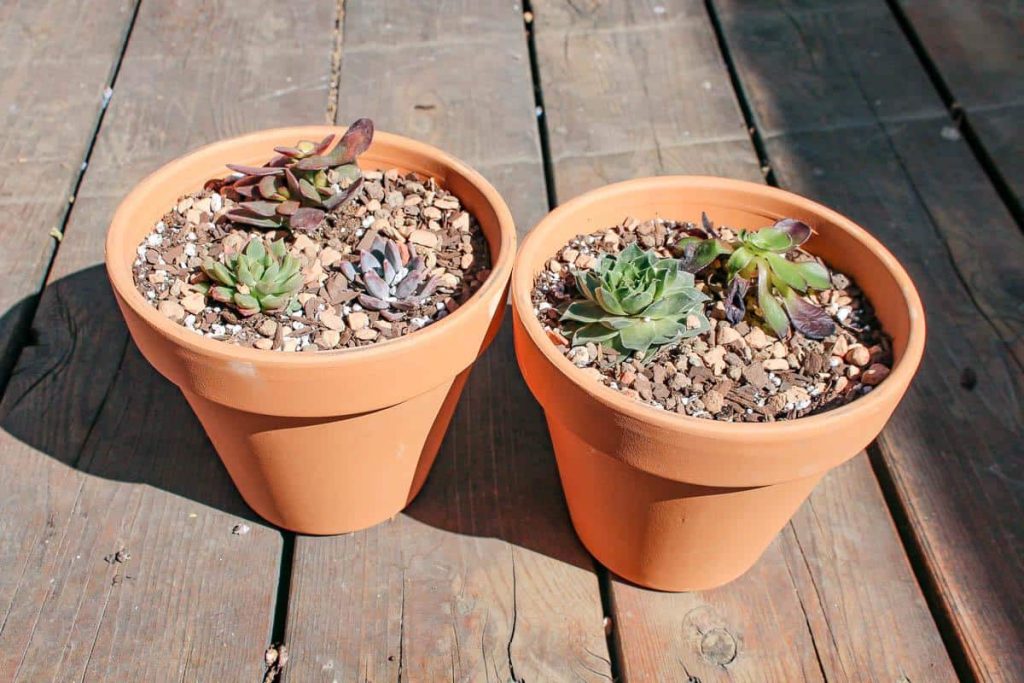
- Use terra cotta planters with cactus soil, Perlite, and succulent rock mix for proper drainage.
Step 9. Hang plant wall up
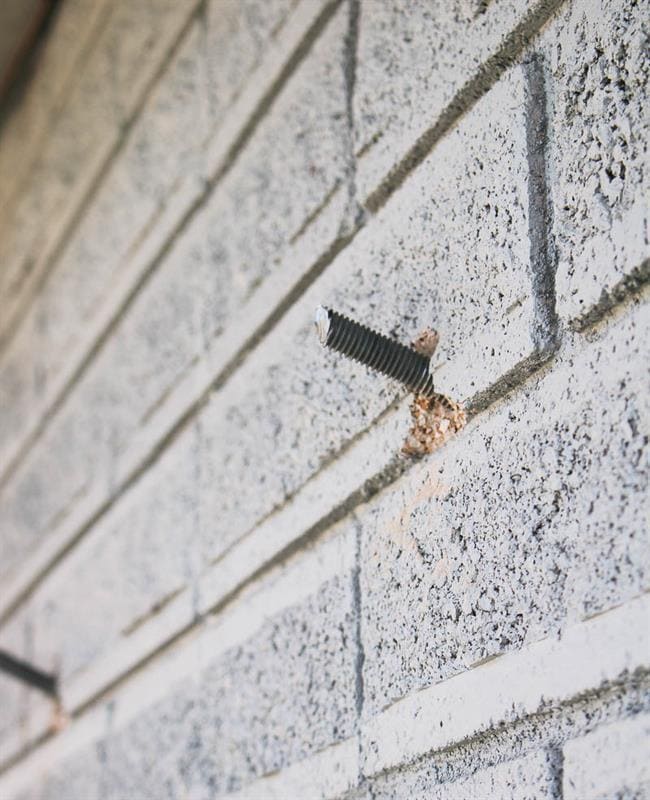
- If your exterior is brick, drill two angled holes at the correct height.
- Insert steel rods and secure with 100% silicone.
- Hang the plant wall directly onto the steel rods.
What type of wood should you use for this DIY outdoor wall planter?
For this outdoor plant wall, we used mostly pressure-treated cedar wood, which is perfect for outdoor DIYs. Cedar has a natural resistance to decay and insects, which makes it able to withstand harsh outdoor elements and stay strong over time.
By using pressure-treated lumber, we’re adding even more protection to the wood against decay and bugs. Learn more about types of wood for woodworking in this article.
If you don’t want to mess around with building something new wood, you could also probably do something similar using a wooden pallet! Just hang the old pallet on the outdoor wall and attach pots to the wooden planks.
SOOOO good, right? I told you!
How should you finish the DIY outdoor plant wall?
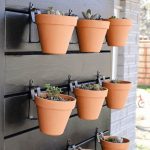
To finish the plant wall, we used black exterior paint. I love the contrast the terracotta plant pots have against that black paint.
But if you were craving a pop of color, feel free to use something more colorful! To put the paint on the wood wall planter, we turned to our paint sprayer.
The best thing about using the paint sprayer is that you’ll be able to get the paint in between the slats easily and in all of the nooks and crannies. It is really the easiest way to get the best look when painting something like this. Check out the full tutorial and learn all of our outdoor painting tips.
I’m in LOVE with our little DIY outdoor wall planter!
How should you fill your outdoor wall planter?
For now, we decided to fill it with mini succulents, which are the perfect easy-maintenance plants that don’t need much attention.
Succulents are perfect even if you don’t have a green thumb! To care for them, I give them a little water about 1x per week (maybe a little more often when it is really hot outside).
If you didn’t want to use succulents in your pots and you’re craving fresh herbs all Summer long, you could also use this as a vertical herb garden!
Just be sure you get some herbs that do well in pots and keep in mind that you’ll need to manually water the herbs often (probably 1x day during the summer months) if you don’t want to install an irrigation system. Each terra cotta pot has drainage holes in the bottom so the water just runs out the bottom.
If you use different plants (like herbs or really any of your other favorite plants), you’ll also want to make sure that your DIY outdoor wall planter also is installed in a place where the terracotta pots will get plenty of sunshine!
Are you working with limited space? No worries! If you’ve always wanted to have a garden, but you’re stuck with small spaces – this easy DIY project is a pretty simple way to get into vertical gardening! This would be perfect if you lived in a small apartment with a balcony that didn’t have much floor space!
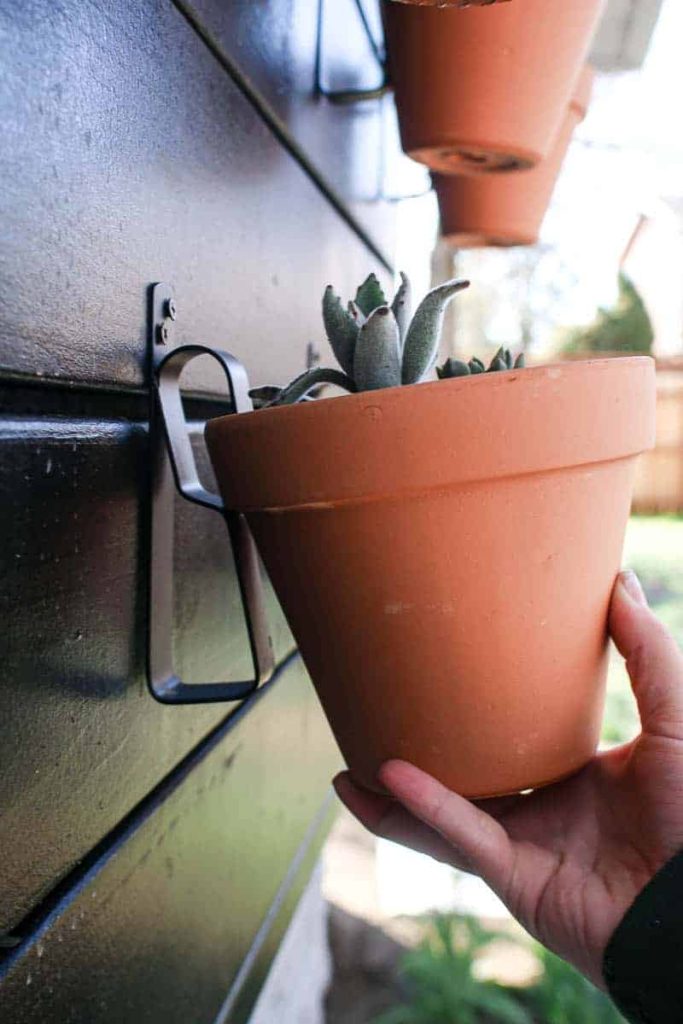
How do you hang terracotta pots up on the wall planter?
One of the coolest things that I found to use in this little wall garden is the clips to hold each clay pot. The pot holders simply screw into place on the wood and the pots simply slide in and rest on the clip.
They are super strong and can hold up to 50 lbs! The clay pot clips come in a pack of 4, so for our DIY outdoor wall planter with 9 spots, I had to buy 3 packs, which meant you would have extra plant hooks if you built yours the same way!
You can use the extra clips elsewhere in your backyard to hang more pots up on cedar fence pickets or cedar posts, trees, porch posts, and more!
This DIY outdoor wall planter has a simple design and it was seriously SO so easy to build! The best part is that we’ve made it even easier for you because we’re giving away the free plan that you can follow along with the step-by-step instructions.
I was able to build this DIY outdoor wall planter entirely by myself without Logan’s help, so I’m feeling pretty proud. But that also means that you can do this too!
Even if you’re a beginner when it comes to woodworking with not much experience with power tools – you can do this!
Other Outdoor Garden Ideas
This outdoor plant wall is not the only way you can incorporate a garden or plants in your backyard! Check out these other DIY projects for your outdoor garden and planters!
- Renter Friendly Garden: How to Make a Vertical Garden with a Pallet
- DIY Cedar Raised Garden Beds | Cheap and Easy Waist High Garden Plans
- DIY Planter Box For Front Porch
- How To Make A Succulent Garden Bed In Your Front Yard
- DIY Wooden Planters: 23+ Creative Ideas
- How To Make Stamped Garden Stepping Stones
How To Build A DIY Outdoor Wall Planter
Materials
- 2x4, 72", Pressure Treated Wood (4)
- 2x6, 72", Pressure Treated Wood (6)
- Mini succulents
- Planter pot hooks
- 2 1/2" Blue Coated Outdoor Kreg Screws (24)
- 2 1/2" Exterior Construction Screws (16)
- Primer
- Exterior Paint
- Terra Cotta Pots 6 in (9)
- Perlite
- Cactus Soil
- Succulent Rock Mixture
- 100% Silicone
- Steel rods (for hanging)
Tools
- Wagner Flexio Paint Sprayer
- Paint Brush
- Kreg Pocket Hole Jig
- Impact Driver
- Miter Saw
- Orbital Sander
- Tape Measure
Instructions
- Cut wood.
- Drill pocket holes.
- Assemble plant wall.
- Sand lightly.
- Prime.
- Paint.
- Add planter hooks.
- Plant succulents.
- Hang plant wall.
Do you want to see more of our big backyard makeover??
- Family Friendly Backyard Plan: Our Next Big Project (BEFORE Pictures)
- Large Chalkboard For Backyard With Live Roof
- Easy Garden Tool Storage In Backyard Shed
- DIY Build for Outdoor Vertical Garden Pots (With Free Plans)
- Mulch for Playground: Why We Chose Rubber Play Bark
- How to Plant Grass Seed
- How To Create A Cozy Patio
- How To Build A Paver Patio with Fire Pit
- How To Build A Fire Pit With Pavers
- Our Backyard Makeover Before and After Pictures
- How to Build a Wood Fence In Your Backyard
- How To Make a Wooden Gate for Your Fence
- How To Lay Deck Boards (and hide the screws!)
Related – Projects that use a pocket hole jig
- Kid’s Cabin Bed
- Table Top
- Planter Box for Front Porch
- Outdoor Plant Wall
- Farmhouse Sink Cabinet
- Mudroom Lockers
- DIY Desk Calendar & Wooden Pencil Holder
- DIY Dress Up Storage for Kids
- Picture Ledge DIY
- DIY Firewood Rack with Roof
- DIY Cane Headboard
- Boho Nightstand with Cane
- DIY Behind the Couch Table with Outlet
- DIY Headphone Stand
- DIY Cookbook Stand
- Easy DIY Grill Utensil Holder
- DIY Deck Box for Outdoor Toys
- DIY Towel Rack Made With One Board
- DIY Tool Organizer for Kreg Tool Stand
- DIY Mail and Key Holder
- DIY Step Stool for Toddler
- DIY Trash Can
- DIY Spice Rack
- DIY Book Holder
- Easy DIY Magazine Shelf
- DIY Clamp Rack
- DIY Chicknic Table
- DIY Bike Rack
- Small Bookshelf
- DIY Laptop Tray

Looking for where to get the pot hooks. May use a substitute style.
Hi there, here’s the link for the pot hooks that we ordered: https://amzn.to/2XBRZqr