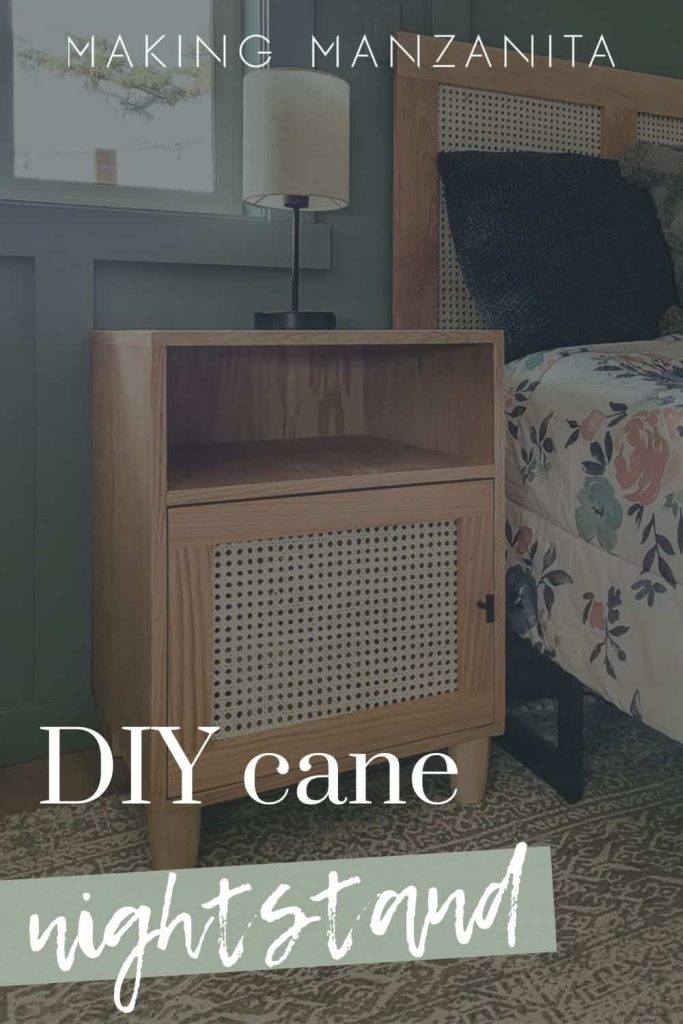
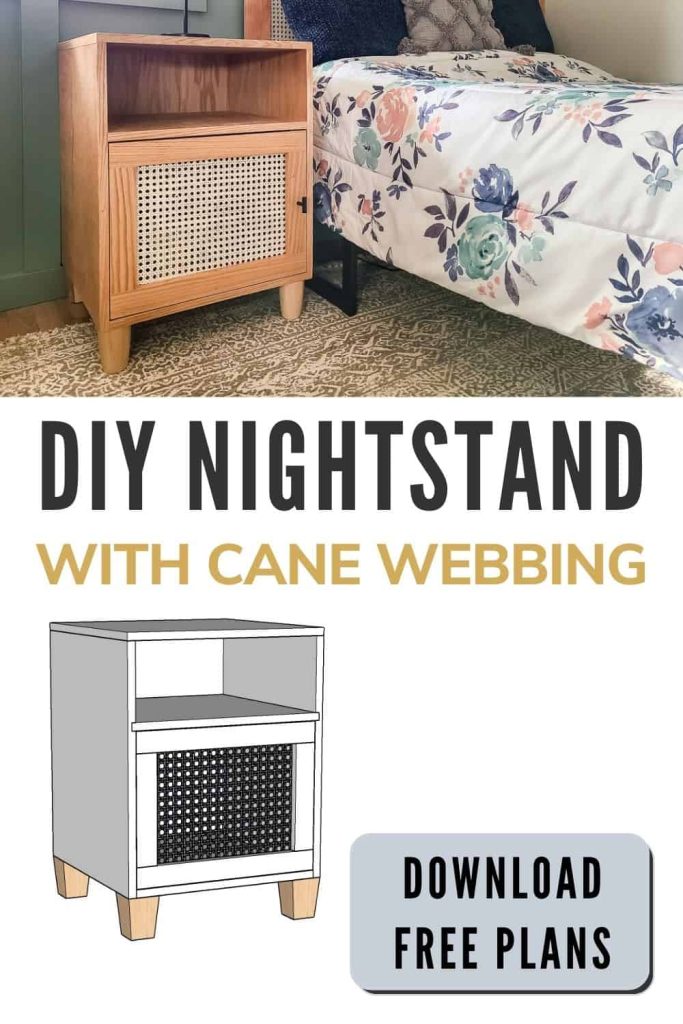
Easy DIY Bedside Table Plans | Cane Boho Nightstand

Want a trendy cane boho nightstand, but don't want to pay the big prices? Build it yourself with these free easy DIY bedside table plans.
Thank you to Kreg for this DIY bedside table plans project! All opinions are entirely my own. This post also contains affiliate links, but nothing that I wouldn’t recommend wholeheartedly. Read my full disclosure here.
A few weeks ago, we shared this DIY cane headboard that we built for Quinn’s room as we get our house ready for the short-term rental conversion that we have planned. We added a queen-sized bed along with the new headboard, and it looks so great.
Today, we’re sharing the tutorial for the matching bedside table we made to go with the cane headboard. If you’re looking for a modern nightstand that fits in with the boho style, you’re going to love this DIY project. Keep reading to get the free plans!
Related – Do you love cane furniture too? Check out this rattan furniture round up!
Table of Contents
Before: Bedside Table Pictures
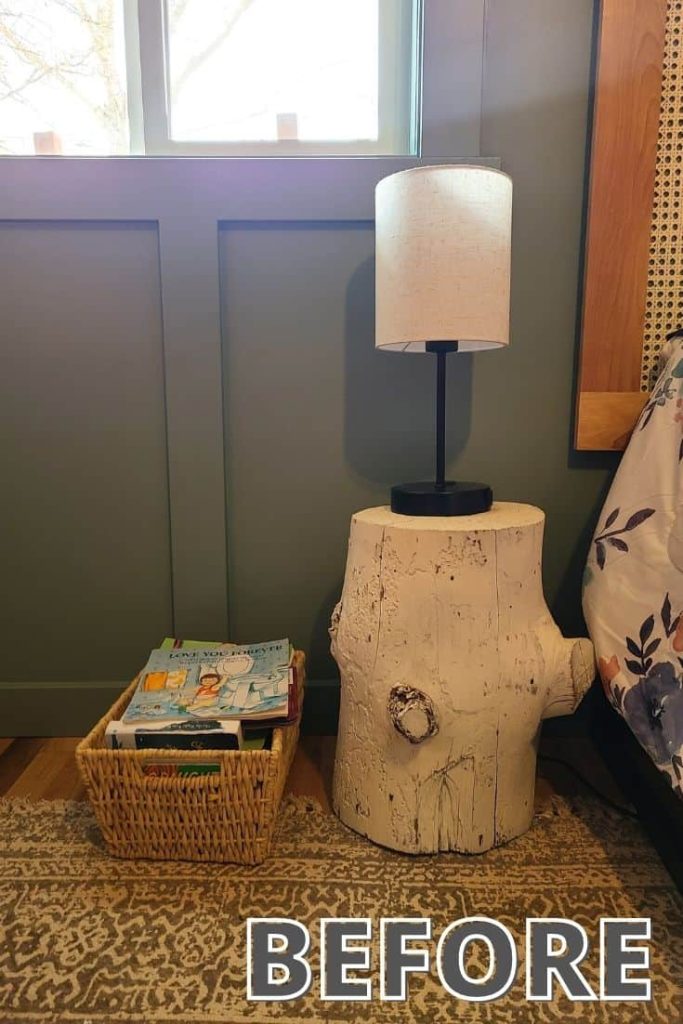
The small stump table that I moved into the room from our modern boho office, just wasn’t working. What we really need in the space is a bedside table with extra storage for her books that we keep beside her bed for storytime at night.
So what better excuse to build a matching cane boho nightstand? (As if we need an excuse to build more furniture).
Kreg’s 720PRO Pocket Hole Jig
If you’ve been reading our blog for a while, you know that we are big fans of the Kreg pocket hole system. We’ve built so many projects using our K5 Pocket Hole Jig, we even have a super detailed guide and video about how to use it that you can check out here.
But in 2021 Kreg released brand new pocket hole systems that are replacing the K4 and K5, and the upgrades are pretty freakin’ awesome.
The new 720PRO (which we were using for these DIY bedside table plans) and the 520PRO (which replaced the smaller K4 system) were improved a ton, the most noticeable change being that they are easier to set up and use – score.
My favorite new feature of 720PRO and 520PRO is the clamp that you don’t have to adjust anymore. You should clamp it down and it automatically adjusts to match the thickness of your wood, so cool, right?
Pocket hole joinery is definitely one of the easiest ways to join wood in woodworking projects. It’s our favorite hidden weapon for beginning woodworkers!
Want to learn more? I wrote a super detailed guide & created a video all about how to set up your Kreg 720PRO Pocket Hole and use it, so be sure to check that out too!
We teamed up with our friends Kreg again for these DIY bedside table plans and share them online for free, which are now available on KregTool.com!
Kreg Tool is chocked full of so many easy-to-follow FREE woodworking plans! I promise that you are going to find so much inspiration while you’re there!
DIY Boho Nightstand – Video Tutorial
If you love DIY videos, be sure to subscribe to our YouTube channel!
Bedside Table with Cane – Step-by-Step Tutorial
Wood products needed:
Supplies needed:
- 1 1/4″ Kreg Pocket-Hole Screws, Zinc with Fine Thread
- 80 & 150 Grit Sandpaper
- Edge Banding For Plywood
- Spray Lacquer
- 24″ Wide Cane Webbing (approximate 1-foot)
- Wood Glue
- Inset Hinges
- Magnetic Catch/Strike
- Cabinet Door Hardware
- 3/8” Staples
Tools needed:
- Kreg 720PRO Pocket Hole Jig
- Custom Plug Cutter Drill Guide Kit
- Clamp Table
- Steel Stand
- Miter Saw
- Table Saw
- Tape Measure
- Drill
- Driver
- Orbital Sander
- Rubber Mallet
- Utility Knife
- Household Iron
- Pneumatic Staple Gun
Step 1. Cut wood down to size
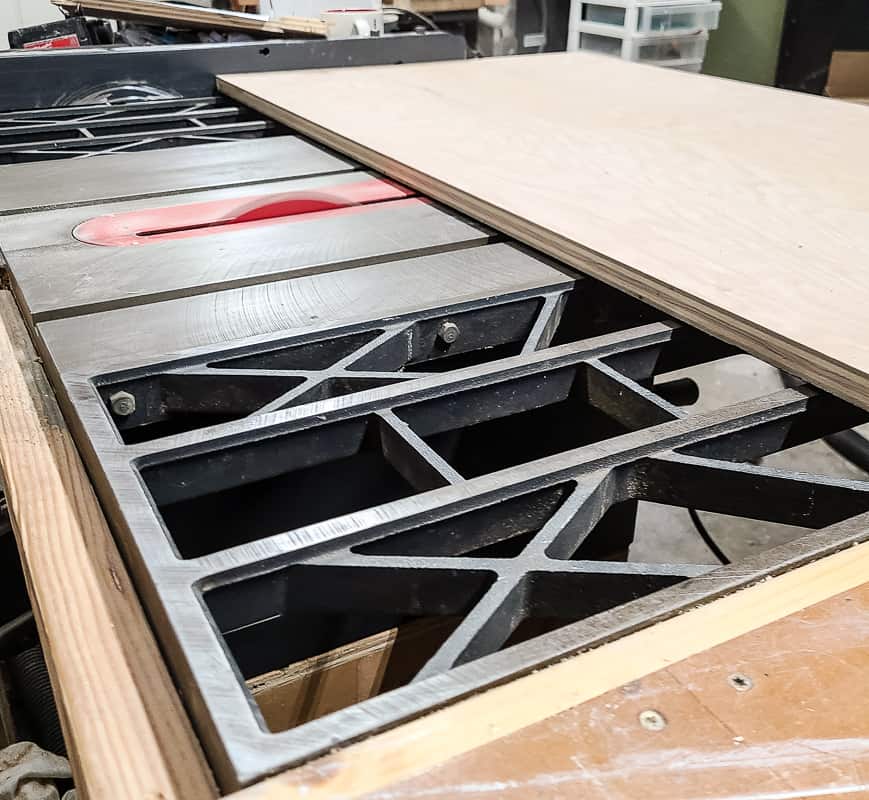
- Follow the cut list in the woodworking plans, which you can download here
- Use a miter saw for oak & table saw for plywood (or a Kreg Rip-Cut with a circular saw to cut plywood)
- Make a dado for the shelf using a table saw.
- Lightly sand everything with an orbital sander and 80-grit sandpaper.
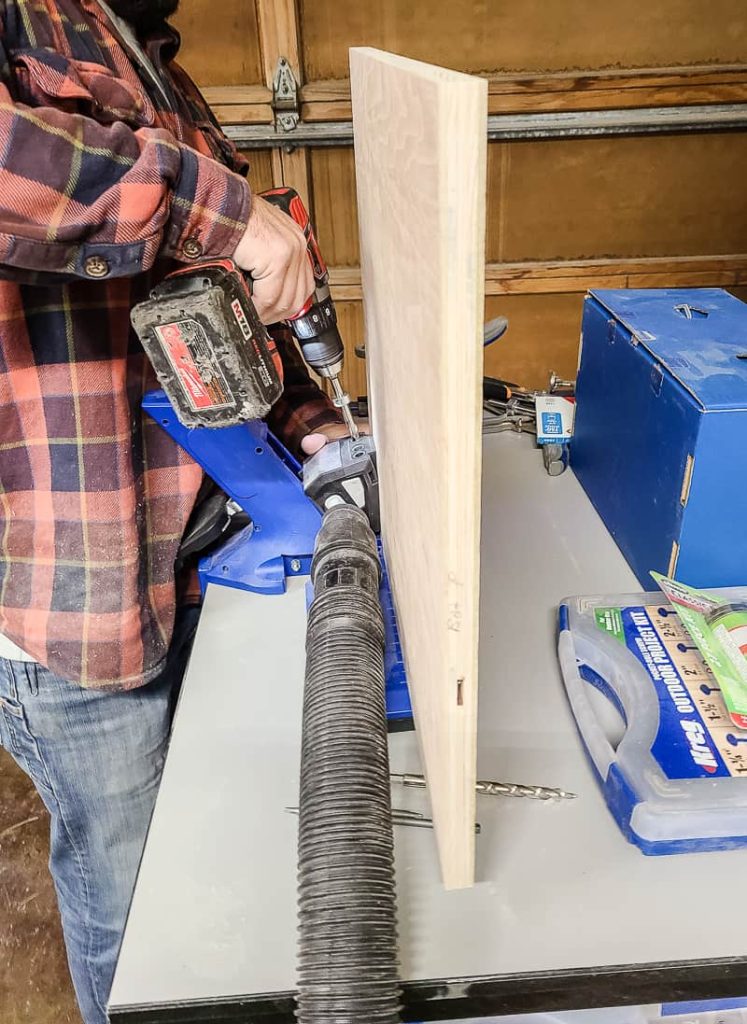
Step 2. Drill the pocket holes

- Use a Kreg Jig 720 Pro to drill pocket holes as per the plans.
- You don’t have your choice of screws when it comes to pocket holes – you need to use pocket hole screws.
Step 3. Assemble outside box of nightstand
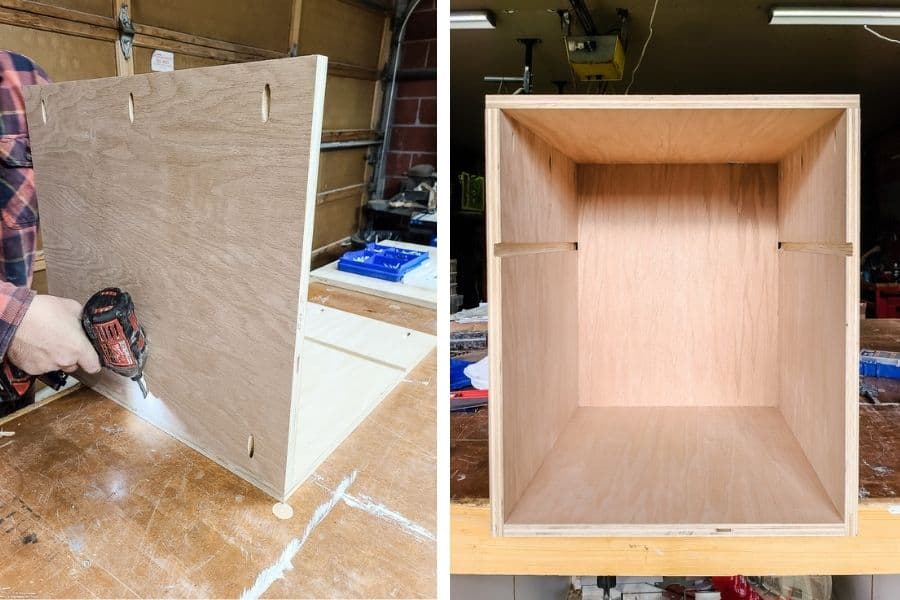
- Use 1 ¼” pocket hole screws to assemble the cabinet perimeter.
- The back panel is also attached with pocket holes.
Step 4. Add the shelf
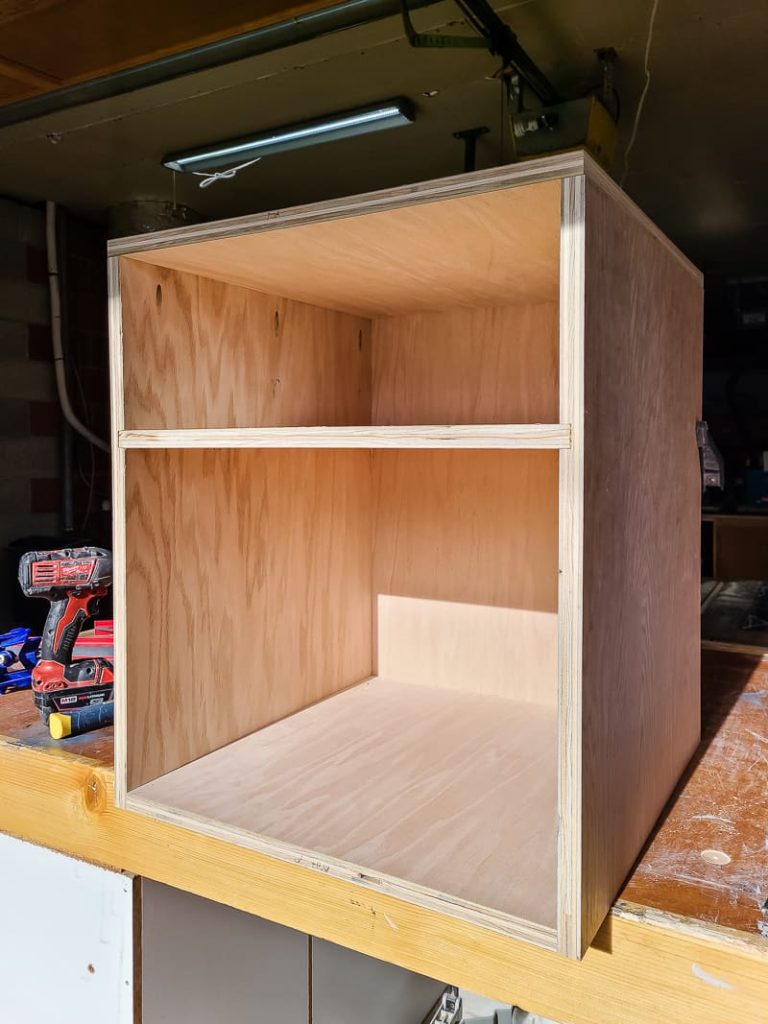
- Apply wood glue in dado, insert shelf, use rubber mallet to push into place if needed.
Step 5. Fill pocket holes with plugs
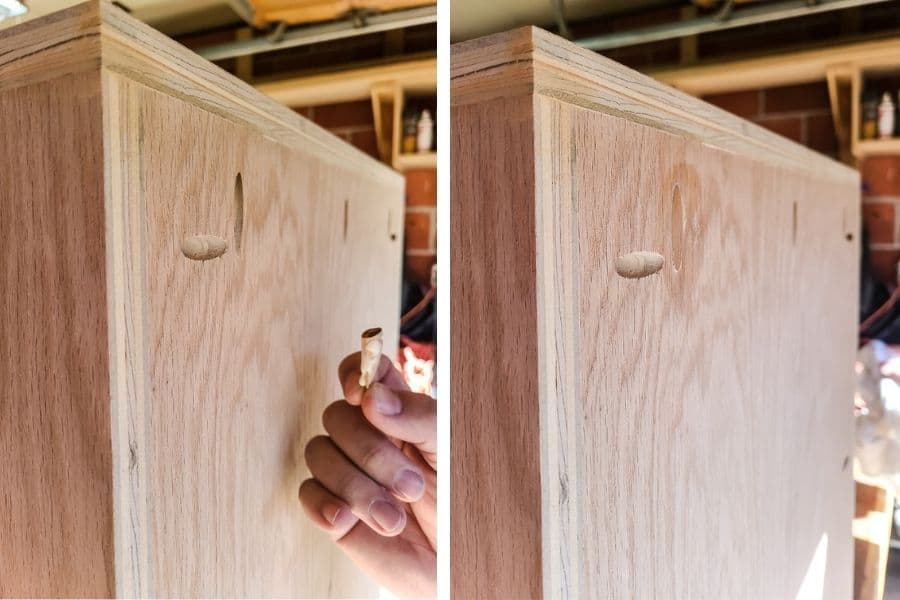
- Drill custom plugs with the plug cutter kit.
- Add with wood glue and push plugs into pocket holes.
- Let dry, then sand smooth
Step 6. Add furniture legs
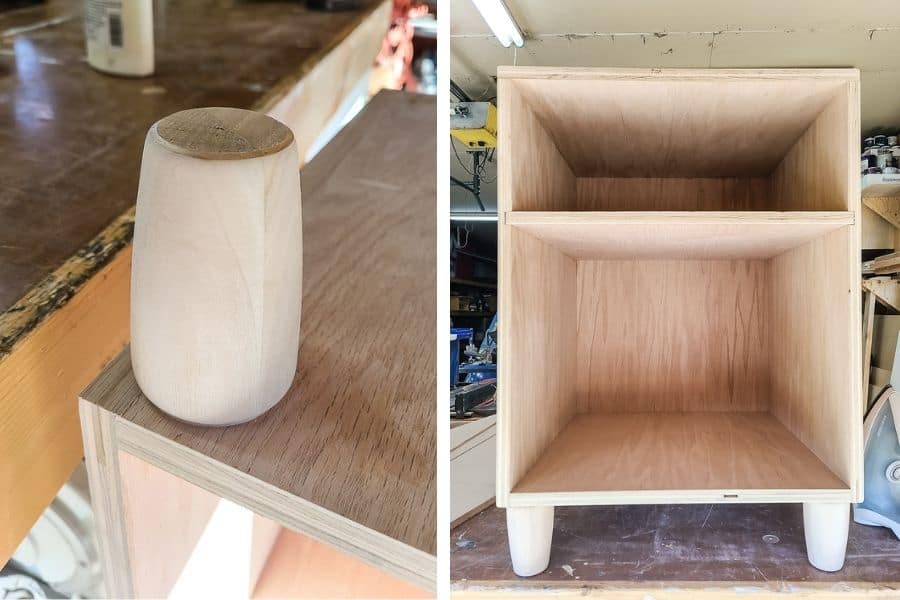
- The next step is to predrill holes, glue, and screw in furniture legs into the bottom of the night stand.
Step 7. Cover plywood edges with edge tape
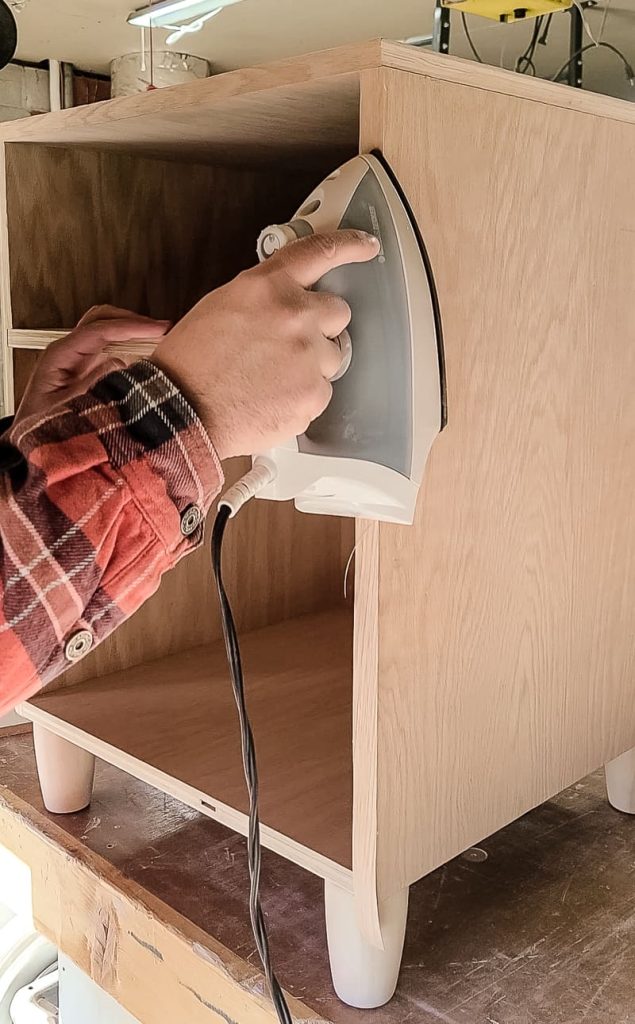
- Feel free to leave the exposed plywood edges on your own nightstand if you like the modern look. But for the most professional results, cover them with edge banding.
- Follow edge banding instructions, and trim with a utility knife.
- Learn more about covering plywood edges!
Step 8. Build nightstand door

- Assemble with pocket hole joinery.
- Ignore the channel on the back in the photos; we stapled the cane instead.
Step 9. Sand
- Smooth everything with 150-grit sandpaper and an orbital sander.
- Wipe off dust.
Step 10. Seal or paint bedside table
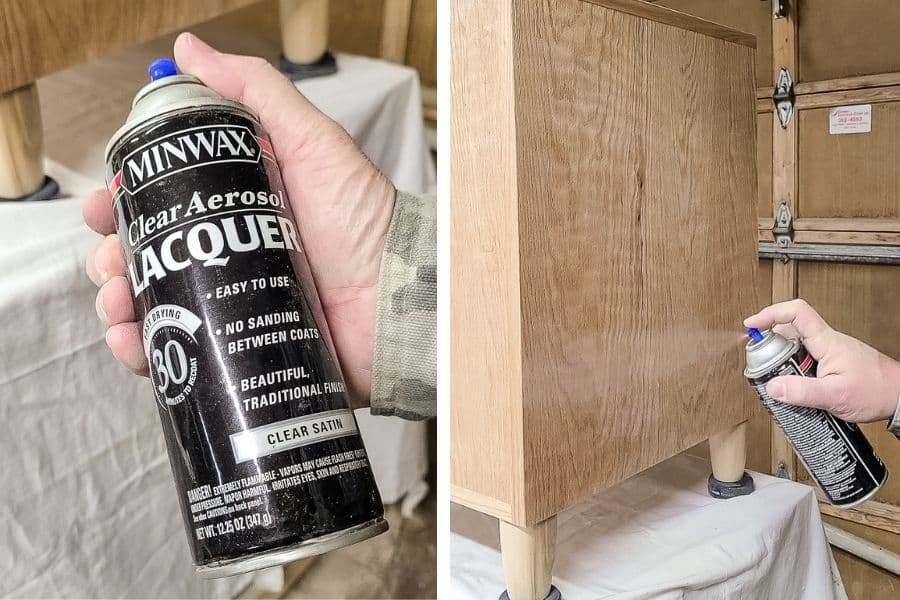
- Use stain/oil or paint. We opted for spray lacquer to keep the natural wood tone.
Step 11. Soak cane webbing in water
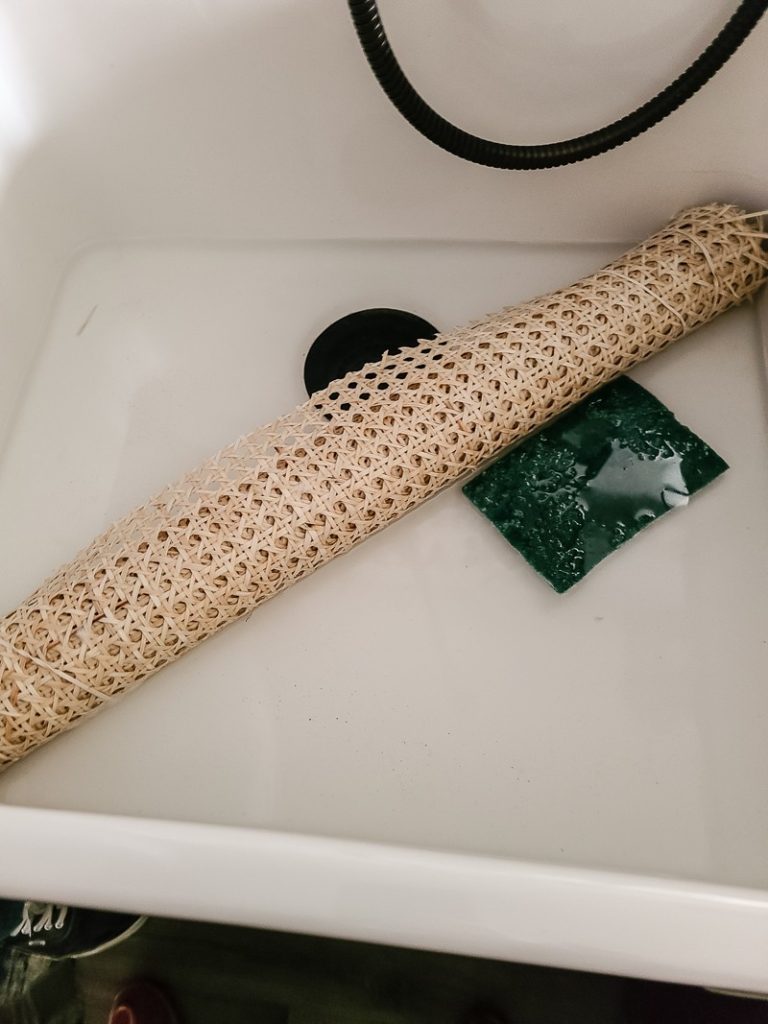
- You should attach the cane to the cabinet door while damp so that when it dries, it will contract and the webbing will be nice and taut.
- Soak for 30 mins to 4 hours for expansion.
Step 12. Add cane to door
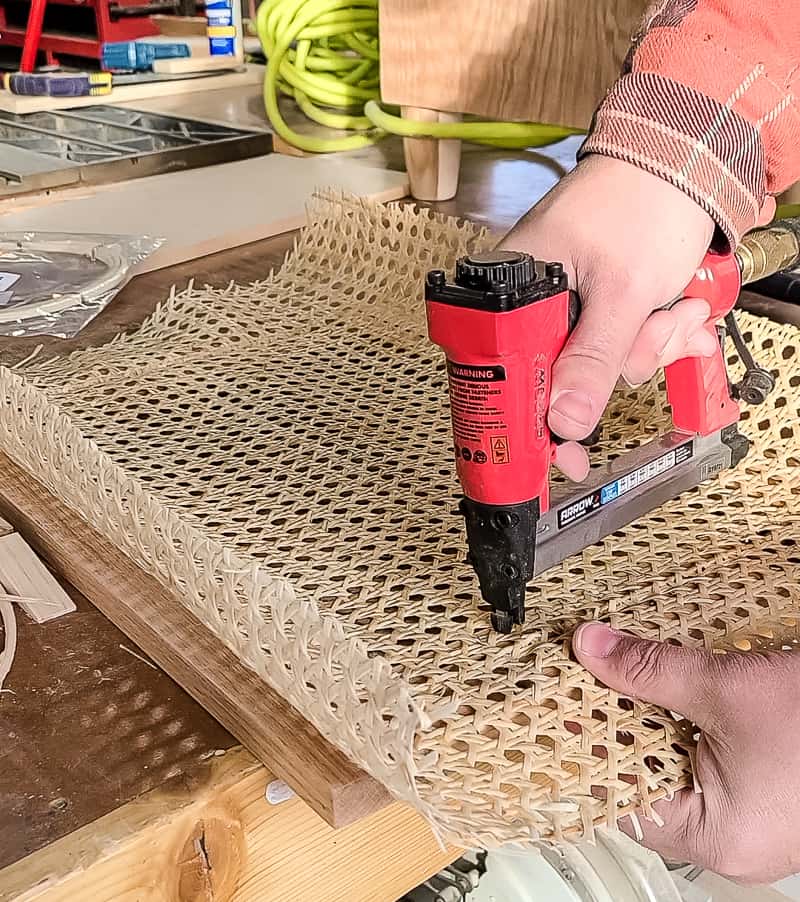
- Pat damp webbing dry, cut to slightly larger than the size you need, and staple in place on the back of the door.
- Cut excess with utility knife.
Step 13. Hang the nightstand door
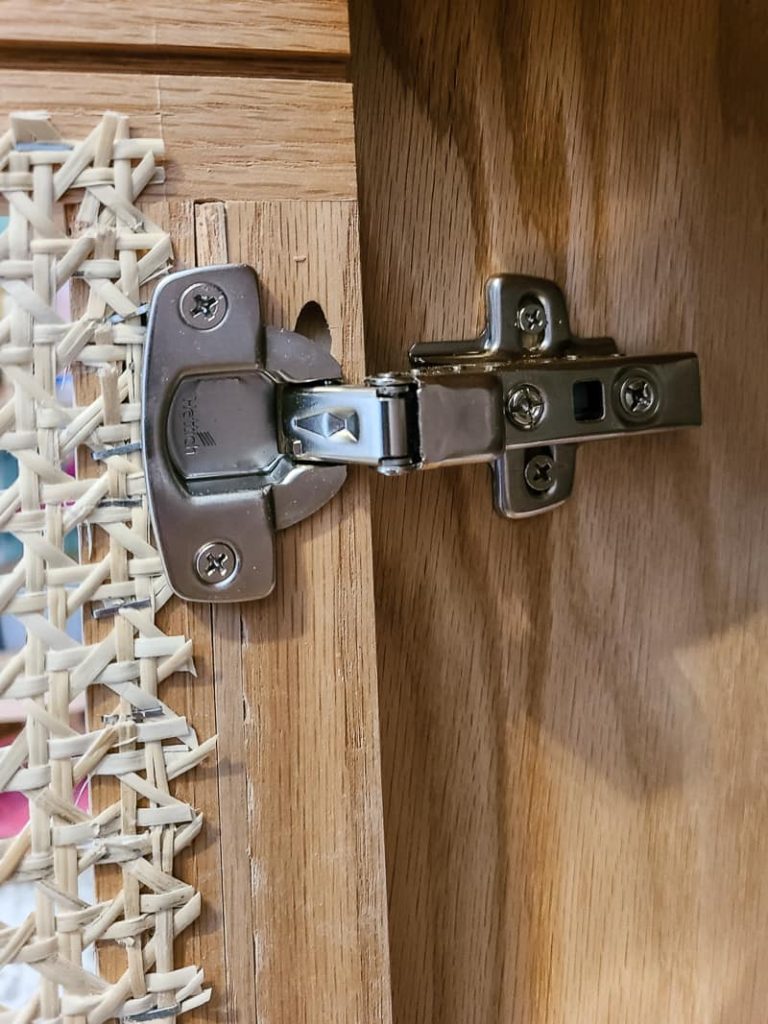
- Follow the hinge template instructions to drill holes, and attach the door.
Step 14. Add hardware
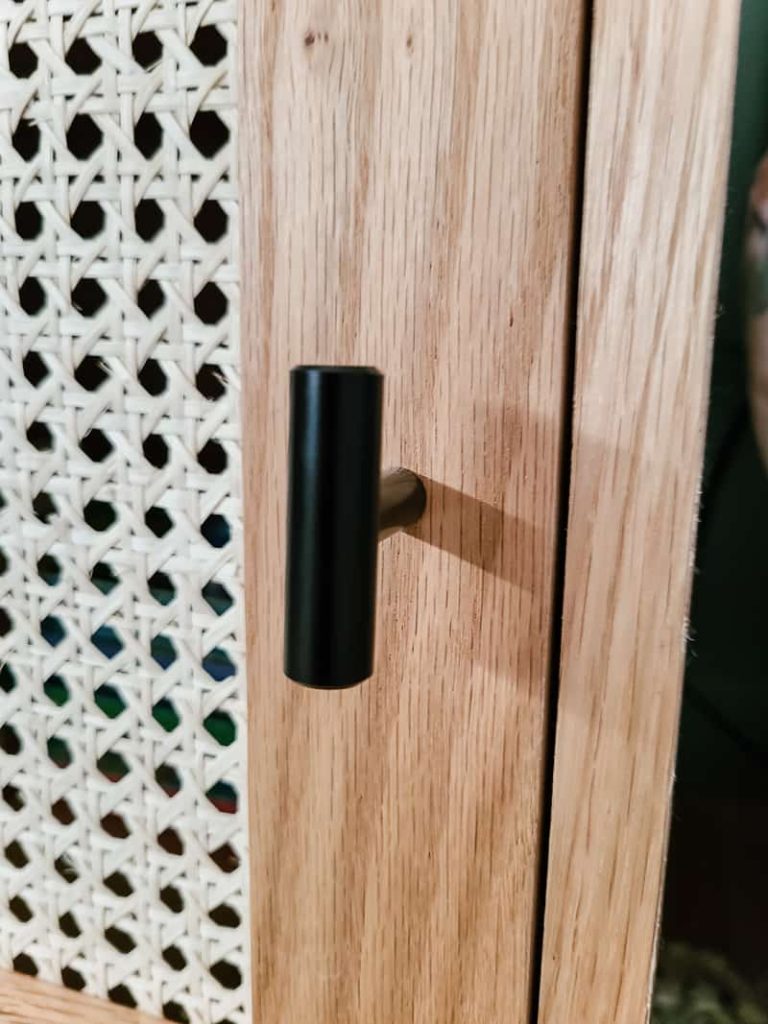
- Drill hole, screw in hardware.
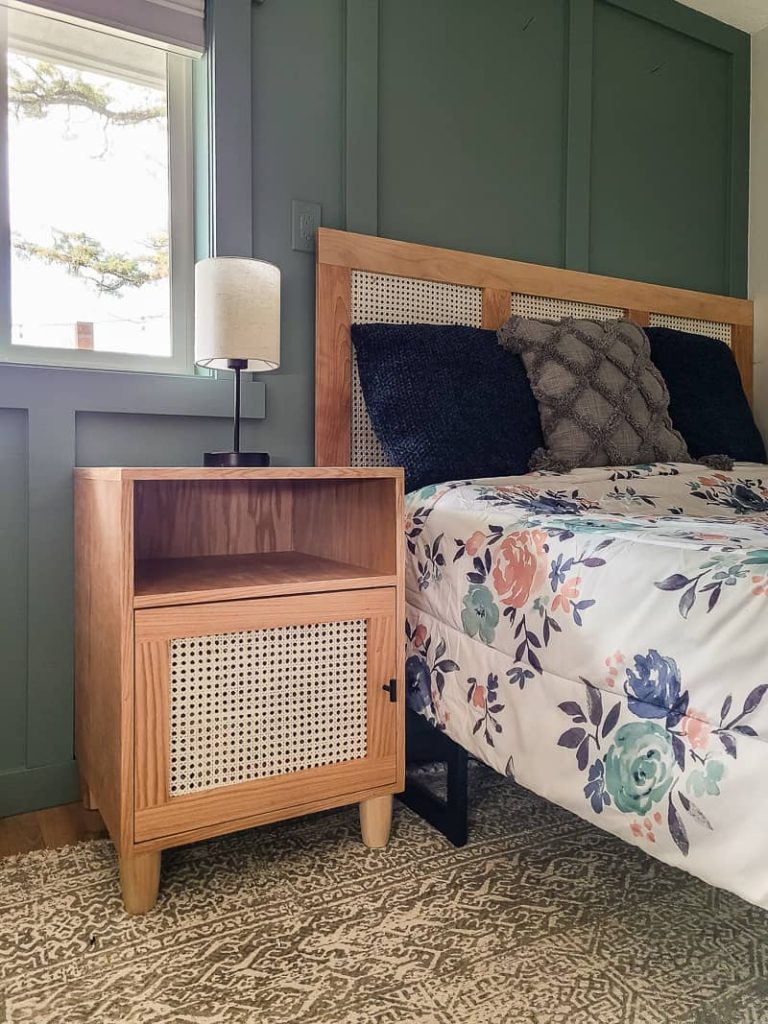
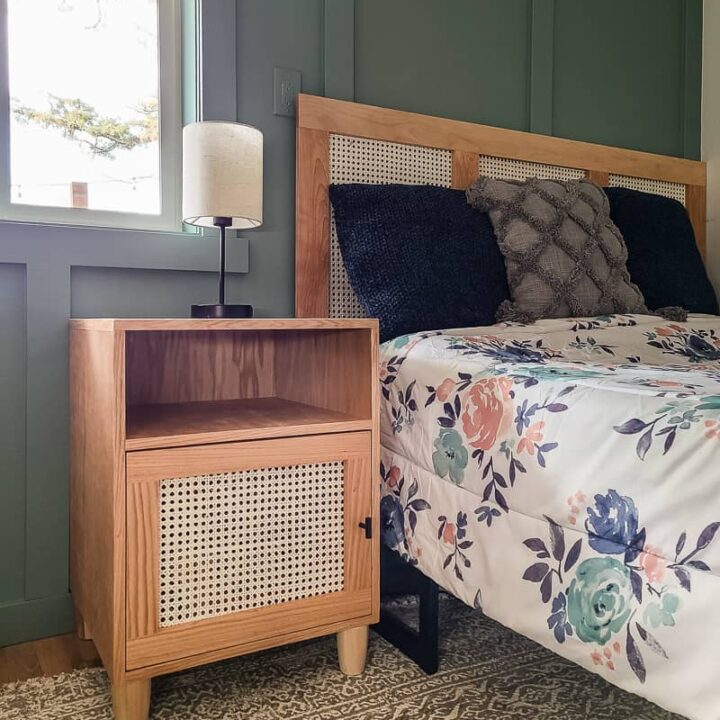
It’s the perfect complement to the headboard! It fits in this room perfectly, don’t you think?
A lot of bedside tables and nightstand plans call for drawers, which means building a drawer box, drawer face, and drawer bottom, and then getting it to fit perfectly in drawer slides. If you’ve never built drawers before, they can be kind of complicated. There are a number of woodworking challenges with drawers.
And we really wanted to make this an easy build that beginners could tackle with a few power tools and a sheet of plywood, so we opted for a door and shelf.
So if this is your first time making a cabinet or nightstand, the simple design of these bedside table plans is perfect for beginners.
The shelf is a great place to keep things that you need to keep at easy reach, while the bottom shelf is covered with a door to hide the clutter and personal items. There’s plenty of room on the top of the nightstand for a lamp and decor if you’d like.

If you’ve done any research on cane furniture, you’ll know that they are SOOOO expensive to buy from trendy retailers (like this one that is nearly $600 or this one that is almost $400). And most of the time, you’re not even getting solid wood nightstands when you buy them! The good news is that we were able to build this DIY bedside table on a budget.
DIY Bedside Table Plans Cost Breakdown
Note: these costs are, of course, subject to change and may be different in your region. We built this in 2021 for reference.
Wood Products Needed
- ¾” x 4’ x 8’ Sanded Oak Plywood (Qty 1) = $64.88
- ¾” x 2 ½” Red Oak – Approximately 4 linear feet @ $3.36 per foot = $13.44
Materials Needed
- Edge banding = $16.99 (learn how to finish plywood edges here)
- Clear spray lacquer = $9.68
- Inset hinges = $11.48
- Magnetic catch / strike = $0.87
- Cabinet door hardware = $5.48
- 24″ wide cane webbing, Approximately 1 foot = $14.99
**Already on hand: 80 & 150 grit sandpaper, staples, wood glue, 1 1/4″ pocket hole screws, and all tools required, like the Kreg Pocket-Hole Jig 720Pro and Kreg Custom Pocket-Hole Plug Cutter**
Total Cost of DIY Cane Nightstand – $137.81
I just love how the final product turned out! So much so that I would probably put it in our master bedroom if I had more room at the side of our bed. Even though it is a nightstand here in Quinn’s room, I think it could pass for a side table or end table in a living room.
This easy-to-build DIY cane nightstand was SO fun to make! And the best part is that we’re giving away the great plans so you can make it too! Woohoo!
Are you going to snag the free bedside table plans?
Let us know in the comments below!
Easy DIY Bedside Table
Want a trendy cane boho nightstand, but don't want to pay the big price? Build it yourself with these easy to follow plans and video tutorial.
Materials
- ¾” x 4’ x 8’ Sanded Oak Plywood (Qty 1)
- ¾” x 2 ½” Red Oak – Approximately 4 linear feet
- Edge banding
- Clear spray lacquer
- Inset hinges
- Magnetic catch / strike
- Cabinet door hardware
- 24″ wide cane webbing
- 80 & 150 grit sandpaper
- 3/4″ staples
- finish nails
- wood glue
- wood filler
- 1 1/4″ pocket hole screws
Tools
- Kreg Pocket-Hole Jig 720Pro
- Kreg Custom Pocket-Hole Plug Cutter
- Miter Saw
- Table Saw
- Tape Measure
- Drill
- Orbital Sander
- Rubber Mallet
- Utility Knife
- Sanding Block
- Finish Nailer
- Hammer
- Iron
- Pneumatic Staple Gun
Instructions
- Cut your wood according to the plans.
- Drill your pocket holes using a pocket hole jig
- Assemble the outside perimeter of the cabinet.
- Using wood glue add the shelf to the inside of the cabinet.
- Use the custom pocket hole plug cutter to droll out plugs and add to the pocket holes with wood glue.
- Apply wood glue and screw legs into place.
- Apply edge banding to exposed plywood edges.
- Assemble the door then sand everything smooth and seal or paint.
- Soak cane webbing in water for up to 4 hours, then cut to size for your door frame. Attach using a staple gun.
- Attach hinges and hang the cabinet door. Add door hardware and you're done!
Related – Projects that use a pocket hole jig
- Kid’s Cabin Bed
- Table Top
- Planter Box for Front Porch
- Outdoor Plant Wall
- Farmhouse Sink Cabinet
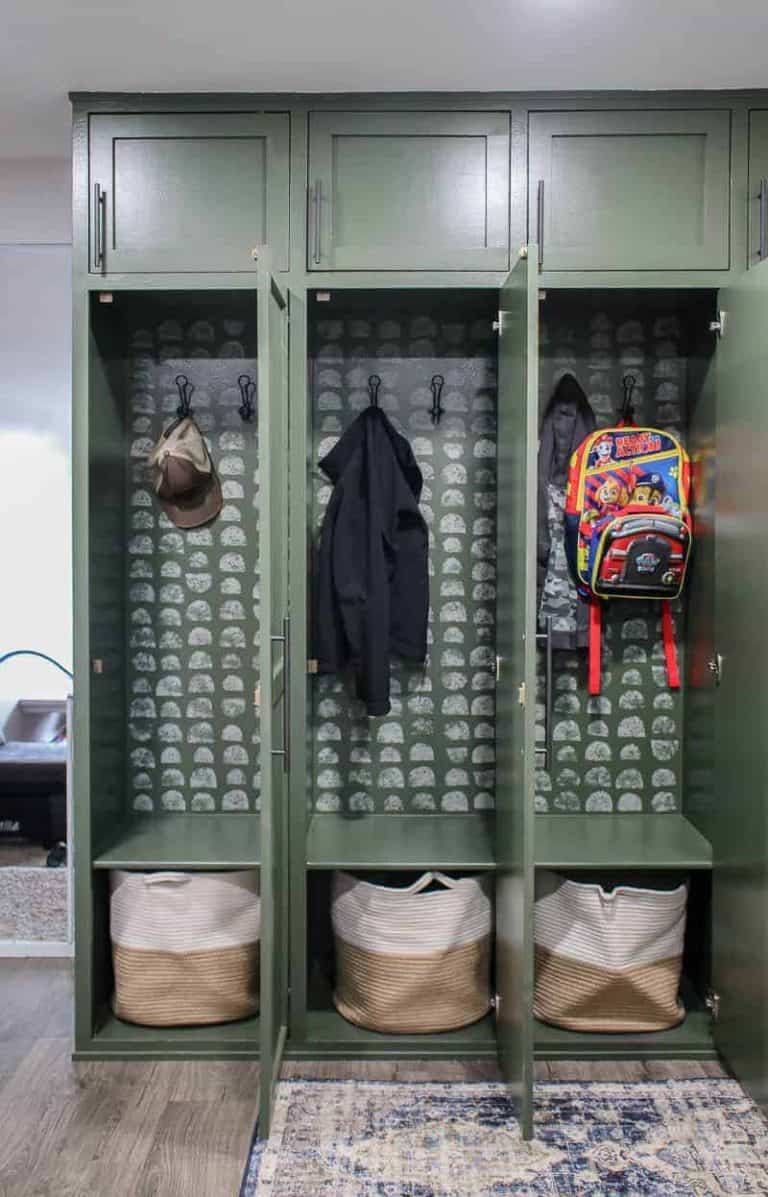
- Mudroom Lockers
- DIY Desk Calendar & Wooden Pencil Holder
- DIY Dress Up Storage for Kids
- Picture Ledge DIY
- DIY Firewood Rack with Roof
- DIY Cane Headboard
- Boho Nightstand with Cane
- DIY Behind the Couch Table with Outlet
- DIY Headphone Stand
- DIY Cookbook Stand
- Easy DIY Grill Utensil Holder
- DIY Deck Box for Outdoor Toys
- DIY Towel Rack Made With One Board
- DIY Tool Organizer for Kreg Tool Stand
- DIY Mail and Key Holder
- DIY Step Stool for Toddler
- DIY Trash Can
- DIY Spice Rack
- DIY Book Holder
- Easy DIY Magazine Shelf
- DIY Clamp Rack
- DIY Chicknic Table
- DIY Bike Rack
- Small Bookshelf
- DIY Laptop Tray