Wondering how to use a Kreg K5 pocket hole jig? This is a must-read for beginners who are interested in pocket hole joinery. In this article, we walk you through several pocket hole jig FAQs and provide an easy step-by-step picture & video tutorial for using a pocket hole jig with the Kreg Jig K5 System.
A pocket hole jig is a great tool that every woodworker (beginner or advanced) should have on hand! Pocket hole joinery is perfect for beginners because it is one of the simplest ways to join two pieces of wood.
Whether you just took your brand new Kreg k5 pocket hole jig out of the box or you’re thinking about investing in a Kreg Jig, you’re going to love this pocket hole guide.

Related – Projects that use a pocket hole jig
- Kid’s Cabin Bed
- Table Top
- Planter Box for Front Porch
- Outdoor Plant Wall
- Farmhouse Sink Cabinet
- Mudroom Lockers
- DIY Desk Calendar & Wooden Pencil Holder
- DIY Dress Up Storage for Kids
- Picture Ledge DIY
- DIY Firewood Rack with Roof
- DIY Cane Headboard
- Boho Nightstand with Cane
- DIY Behind the Couch Table with Outlet
- DIY Headphone Stand
- DIY Cookbook Stand
- Easy DIY Grill Utensil Holder
- DIY Deck Box for Outdoor Toys
- DIY Towel Rack Made With One Board
- DIY Tool Organizer Plans for Kreg Tool Stand
- DIY Mail and Key Holder
- DIY Step Stool for Toddler
- DIY Trash Can
- DIY Spice Rack
- DIY Book Holder
- Easy DIY Magazine Shelf
This Kreg K5 pocket hole guide also contains affiliate links, but nothing that I wouldn’t recommend wholeheartedly. Read my full disclosure here.

Pocket Hole Jig FAQs
What is a pocket hole?
A pocket hole is an angled hole for a screw to join together two pieces of wood.
How do pocket holes work?
Pocket holes are created by drilling an angled hole into one piece of wood and then screwing a self-tapping screw into the angled hole to join with the 2nd piece of wood.
Pocket holes are great for beginners because it is one of the simplest ways to join wood, and they save time because you don’t need to use glue and wait.
What screws do you use with pocket holes? Can you use regular screws with pocket holes?
One of the most common questions I get when I show our Kreg K5 pocket hole jig is, “What type of screws do you use with pocket holes?” It’s important to note that you should NOT use regular screws with pocket holes.
One big difference between regular screws and pocket hole screws is that the threads only go halfway up the screw. This ensures that the threads are primarily in the 2nd piece of wood and prevents the threads from pushing the joint of the pocket hole apart as the screw is driven in. We always use Kreg’s pocket hole screws that come in lots of different size options!
For more information about choosing the right screw for the job, check out Step 1 below.
How far should you space pocket holes? How many pocket holes do I need?
You should always have at least 2 pocket holes on every board. You can fit 2 pocket holes even on 1×2 pieces of wood.
For wider pieces of wood, space out the pocket holes approximately 6-8 inches, with the first one roughly 2 inches away from the edge.
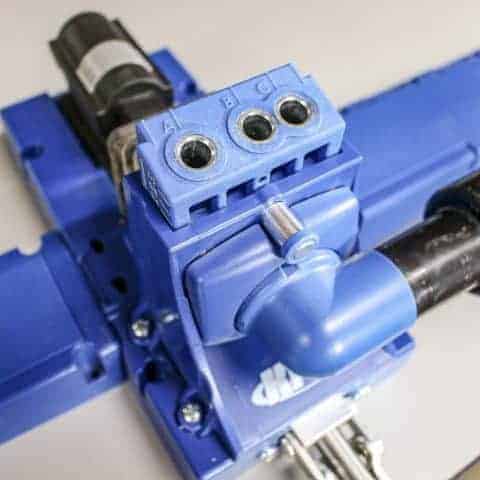
There are three holes (called drill guides) on the pocket hole jig labeled A, B, and C. For more information on which drill guides to use, see below.
What angle are pocket holes? What angle does a Kreg k5 jig drill at?
15 degrees.
Can pocket holes be covered or hidden?
When you’re planning your woodworking projects, you can plan to put pocket holes on the inside or back of your projects to hide them.
If you want to cover the pocket holes, they do make plugs that fit right in to fill the hole.
Do you need to drill a pilot hole in the 2nd piece of wood when using a pocket hole?
No, a pilot hole is not necessary for pocket holes. The self-tapping point of the pocket hole screws eliminates the need for pilot holes.
Which Kreg K5 pocket hole jig is right for you?
If you are thinking about buying a pocket hole jig and you’re wondering, “What Kreg Jig should I get?”, here’s a great chart with a side-by-side comparison of all of the pocket hole jigs available.
I can really only speak for the two that we own, which are….
Kreg Jig K5 System – all the bells and whistles

Now if you’ve been around awhile, you know that we have the Kreg Jig K5 System, and it’s no secret that we love it. Kreg is a brand we know & love, and we partner with them here on the blog from time to time!
Here’s a great video that Kreg put together that shows off some of the Kreg Jig K5 features a little closer!
UPDATE – In 2020, Kreg released new models of their pocket hole jigs, and at that time, they discontinued the K5 System. The Kreg 720Pro replaced the K5, adding many new bells and whistles. Learn how to use and set up the Kreg 720 here. Spoiler alert – we love the new version even more!
Kreg 320 Jig – a budget-friendly option

We also have the Kreg 320, which we love too! It’s a more budget-friendly option if you’re not ready for an investment, like the K5 (or the new Kreg 720Pro model). I also love how portable and lightweight the 320 is.
We also use the 320 when we’re working with really long pieces of wood that we’d have trouble standing up on the K5 (like the large face frame we built for these mudroom lockers).
However, this issue has been fixed with the new model Kreg 720 Pro because it can be used either with the wood laying flat or upright!
Learn how to use the Kreg pocket hole jig 320 here!
Step-by-step guide for the Kreg K5 pocket hole jig


In this step-by-step tutorial for using a Kreg K5 pocket hole jig, I will demonstrate the Kreg Jig K5 System.
Video Tutorial – How To Set Up Your Kreg K5 Pocket Hole Jig
We also created a YouTube video demonstrating how to use the pocket hole jig, which may be a little easier to see some of the steps in video format.
If you love DIY videos, be sure to subscribe to our YouTube Channel!

Step 1. Select the right screw.
Selecting the right screw for your project with the pocket hole jig is essential to ensure you have a strong joint.
I already mentioned earlier in the FAQs section above that you want to use a specially designed pocket hole screw rather than a regular wood screw when working with the pocket hole.
However, beyond that, there are many different options (thread, length, and composition) that you’ll need to choose from to choose the right screw for your job.

Coarse vs. fine thread
- Use COARSE thread for softwoods (cedar, pine, fir, etc.), plywood, and MDF.
- Use FINE thread for hardwoods (cherry, maple, oak)
Screw composition (zinc, stainless steel or Blue-Kote)
- Use ZINC COATED for indoor projects where moisture is not a concern
- Use STAINLESS STEEL for “extreme applications” where there will be excessive exposure to salt water or other corrosive environments
- Use BLUE-KOTE FINISH for damp or wet applications, like outdoor DIY projects or something that will go in a high moisture environment
Screw length
One thing I LOVE about the Kreg Jig K5 system is the handy screw chart inside the lid on the small storage compartment on the side of the jig. The Kreg screw length chart breaks it down and shows you the correct screw length based on your material thickness.

Kreg jig screw chart
Your screw length should always be based on your material thickness. Here’s the screw length chart to refer to. Note: this is to be used when joining materials of the same thickness.
| Thickness | 1/2″* | 5/8″ | 3/4″ | 7/8″ | 1″ | 1 1/8″ | 1 1/4″ | 1 3/8″ | 1 1/2″ |
| Screw | 3/4″-1″ | 1″ | 1 1/4″ | 1 1/2″ | 1 1/2″ | 1 1/2″ | 2″ | 2″ | 2 1/2″ |
When joining two pieces with different thicknesses, a general rule of thumb is to use the thinner one.
*For materials 1/2″ thick, it’s recommended to use the pan-head screws. For all other projects, you’ll use the normal Maxi-Loc head screws.

Step 2. Set up pocket hole jig height on the drill guide.
Adjusting the drill guide on the pocket hole jig couldn’t be easier! There’s a simple spring-loaded pin and markings on the side of the drill guide to adjust it to your material thickness by raising or lowering the drill guide.
Step 3. Set up stop collar on drill bit.
The stop collar attaches to the drill bit and stops the drill bit at a specific spot based on your screw length (not be confused with your material thickness).

Option 1. Use the Easy-Set drill bit to adjust your stop collar
Adjusting the stop collar impacts how deep you drill the pocket hole; this step shouldn’t be overlooked.
Now I will say that if you buy ANY extra accessory to go with your pocket hole jig, it should be this easy-set drill bit! It is freakin’ AWESOME because it has guide marks that you line the stop collar up with, which makes this part a breeze.

Option 2. Use the stepped block to adjust your stop collar
If you don’t have the easy set drill bit, here’s the process to manually adjust your stop collar on the drill bit. There is a block with steps and markings that comes with your pocket hole system.
Simply place the block at the base (in front of the drill guide) and drop the drill bit into a drill guide hole that lines up with the step that corresponds to the length of your screw.
Next, slide the stop collar on your drill bit and tighten it with the hex wrench.
Note: Always do a test on some scrap wood of the same thickness after you make adjustments to your pocket hole jig.

Step 4. Adjust clamp.
One great feature of the Kreg jig K5 system is the awesome clamping mechanism, which you can quickly adjust to match your wood thickness every time.
- Simply push the clamp assembly back (push the gray button on top to move it)
- Put the wood in
- Push the clamp handle (in front) down
- Now you can adjust the clamp assembly forward until it makes contact with the wood (you’ll hear it clicking as you move it).
- Next, while holding the clamp assembly in place with your spare hand, you can raise the clamp handle back up until you hear the adjustment mechanism click two times.
Once this is set, you can move the clamp handle up and down to replace the wood and have the clamp push right back into the right position for the wood thickness when you clamp down.

Step 5. Drill pocket holes.
Now that your Kreg jig K5 system is ready for your project, it’s time to drill your pocket holes!
Kreg K5 jig pocket hole placement
Before you start drilling, remember that spacing your pocket holes is also important!
- There are three holes (aka drill guides) on the pocket hole jig labeled A, B, and C.
- B and C holes are 9/16” apart, A and B are 7/8” apart, and A and C are 1 7/16” apart.
| 1″ – 2″ wide material | Holes B & C |
| 2″ – 3″ wide material | Holes A & B |
| 3″ – 4″ wide material | Holes A & C |
| Panel joints | Space out 6-8 inches |

Drilling pocket holes
Now, this is seriously the easiest part, I promise! Slide the drill bit into the drill guide hole, turn on the drill to full speed, and slightly push the drill into the wood.
You can stop drilling when the stop collar reaches the drill guide. Wait until the drill stops, and then remove. Simple as that, friends!

Step 6. Joining wood pieces with pocket holes.
Once your pocket holes are drilled, you can assemble them! Grab the screws and align them with your wood pieces and clamp.
- For flat pieces, you can use a Kreg clamp on the edge of a workbench or invest in the clamping table & stand that we have (and LOVE!)
- For corner assemblies, you can use 90 degree clamps or bar clamps to hold the pieces in place.

Then using the driver bit included with the Kreg K5 jig, drive the screws into the holes.

Remove clamps, and that’s it, folks!


It is SERIOUSLY that easy, guys!!!
The Kreg K5 Pocket Hole Jigs are super helpful tools for woodworking projects! We hope you enjoyed this detailed guide filled with FAQs and a tutorial on using a K5 Kreg pocket hole jig!
How To Use A Kreg Pocket Hole Jig
Materials
Instructions
- Select the right screw.
- Set up pocket hole jig height on drill guide.
- Set up stop collar on drill bit.
- Adjust clamp.
- Drill pocket holes.
- Join wood pieces with pocket holes.
Do you have any other questions about using a Kreg K5 pocket hole jig or anything else about pocket holes?
Just let us know in the comments below!


