DIY Tool Organizer Plans for Kreg Tool Stand

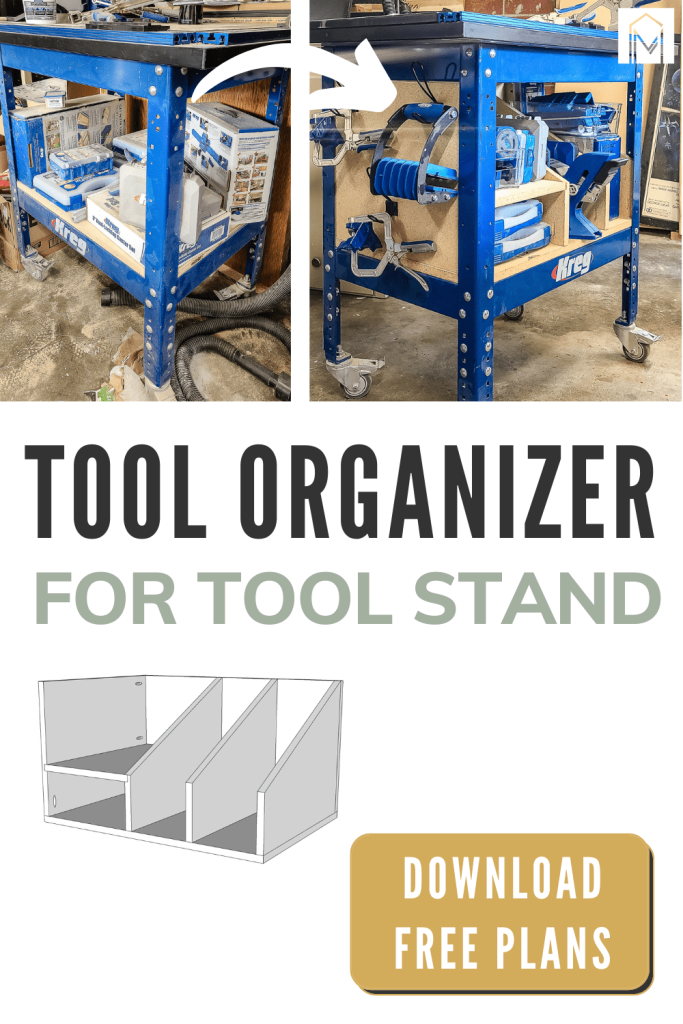
Need to get your tools more organized? We built this DIY tool organizer for our Kreg tool stand to store our Kreg tools and accessories.
Thank you to Kreg for sponsoring this DIY tool organizer! All opinions are entirely my own. This post also contains affiliate links, but nothing that I wouldn’t recommend wholeheartedly. Read my full disclosure here.
It’s no secret that we love our Kreg tools and accessories. But things have gotten a little messy in our workshop. We needed a place to organize and store our Kreg tools, and what better place than at the bottom of our Kreg tool stand?
So we got creative and created a customized tool organizer that fits all of our tools perfectly! Today we’re sharing the free woodworking plans to build your own tool organizer!
Table of Contents
Before Pictures: Kreg Tool Stand Before Installing a DIY Tool Organizer
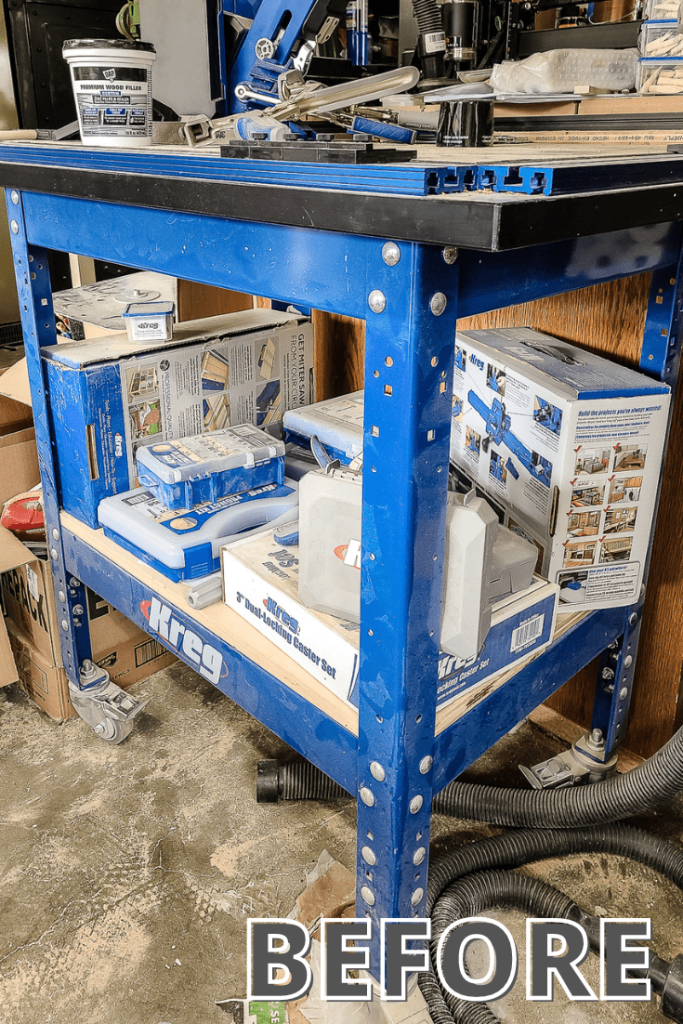
We love our Kreg tool stand (also known as the router table stand) that we have our clamp table mounted to. As the name suggests, you can also use the tool stand to mount a router.
But we already have another spot for our router in our workshop, so we use the tool stand for our clamp table. The clamp table is so handy. It not only provides a nice level and durable surface, but it also allows you to clamp together and square up face frames when you are attaching.
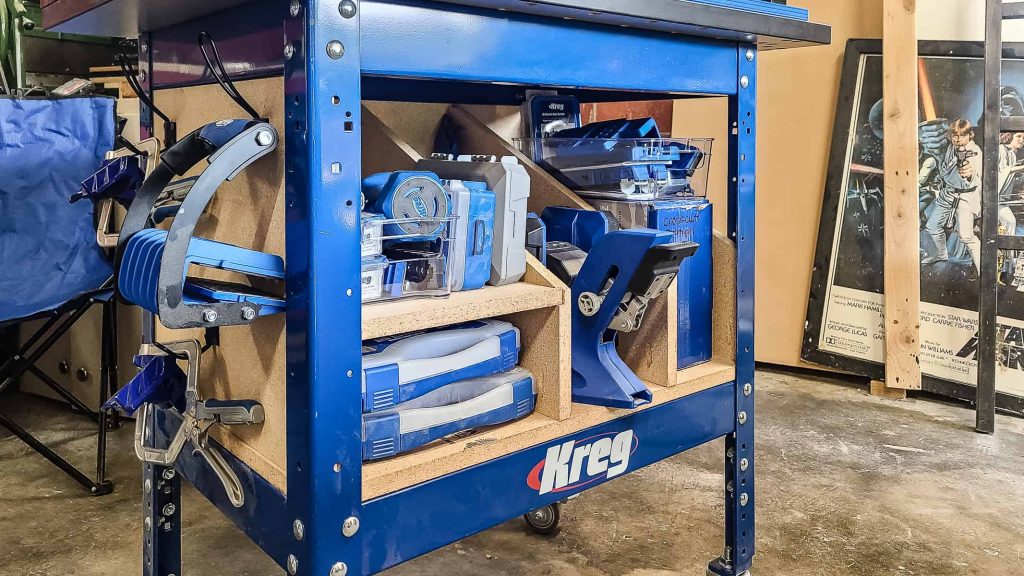
Kreg Tools We Fit Into Our DIY Tool Organizer
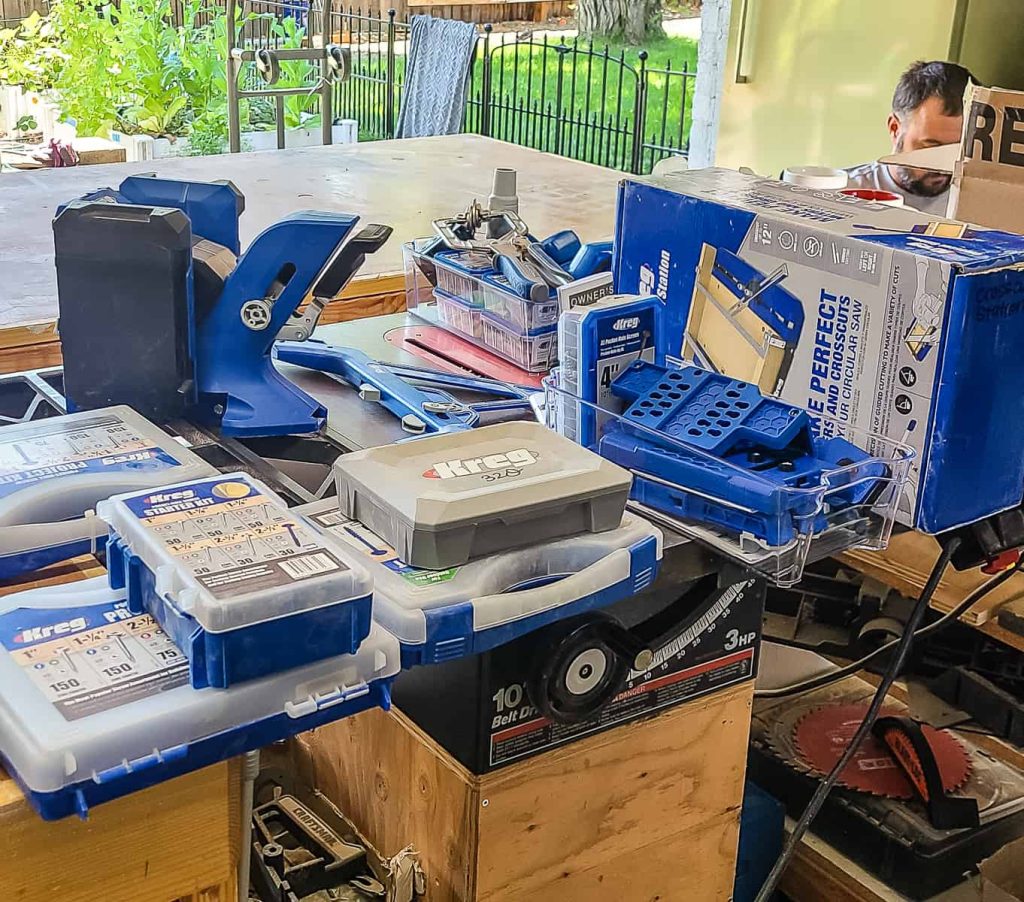
We were able to fit so many Kreg tools on our shelves. Here’s a full list:
- Kreg 720Pro pocket hole jig – learn how to use it here
- Crosscut Cutting Station
- Portable Cross Cut
- 320 Jig
- 3 large boxes of pocket hole screws
- 1 small box of screws
- 4 boxes of pocket hole plugs
- Two 90-degree corner clamps (hanging on hooks)
- Panel carrier (hanging on hook)
- XL pocket hole jig
- Cabinet door mounting jig
- 4 project blocks
Kreg 720PRO Pocket Hole Jig
If you’ve been following Making Manzanita for a bit, you know that we are big fans of the Kreg pocket hole system.
We built tons of projects using our original K5 Pocket Hole Jig, we even have a super detailed guide and video about how to use it that you can check out here.
In 2021, Kreg released brand new pocket hole systems that replaced the K4 and K5, and the upgrades are pretty awesome.
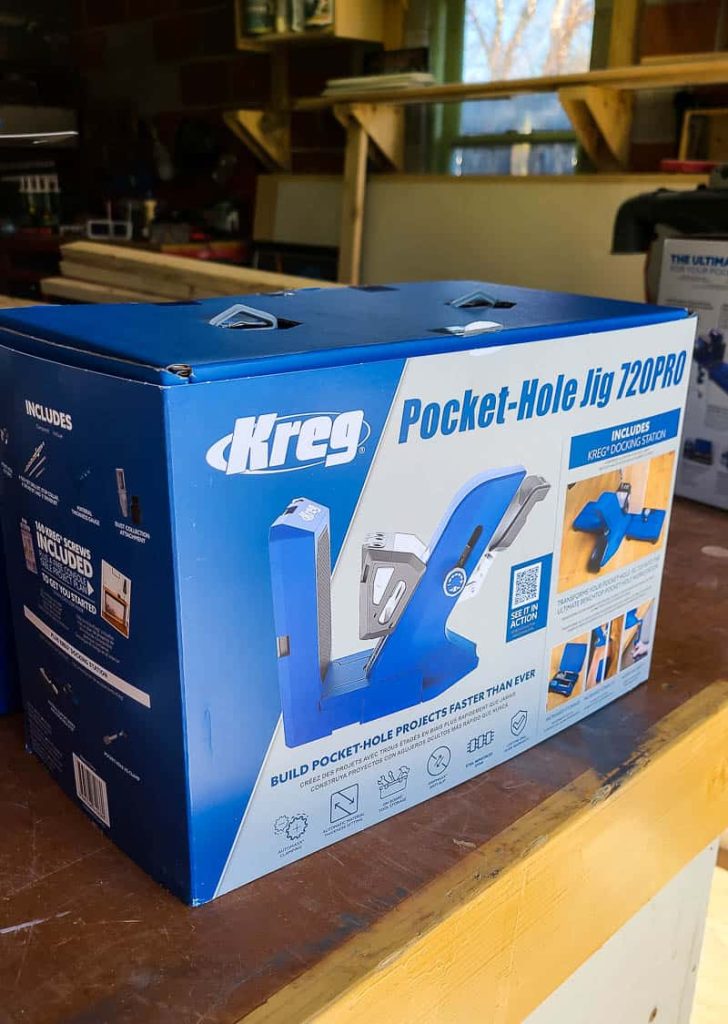
The new 720PRO (which we were using for this DIY tool organizer) and the 520PRO (which replaced the smaller K4 system) were improved a ton, the most noticeable change being that they are easier to set up and use – score.
My favorite new feature of 720PRO and 520PRO is the clamp that you don’t have to adjust anymore. You should clamp it down, and it automatically adjusts to match the thickness of your wood; so cool, right?
Pocket hole joinery is definitely one of the easiest ways to join wood in woodworking projects. It’s our favorite hidden weapon for beginning woodworkers!
Want to learn more? I wrote a super detailed guide & created a video all about how to set up your Kreg 720PRO Pocket Hole and use it, so be sure to check that out too!
We teamed up with our friends Kreg again for these DIY tool organizer plans and are sharing them online for free, now available on KregTool.com!
Kreg’s website is chocked full of so many easy-to-follow FREE woodworking plans! I promise that you are going to find so much inspiration while you’re there! It is a goldmine!
Related – Projects that use a pocket hole jig
- Kid’s Cabin Bed
- Table Top
- Planter Box for Front Porch
- Outdoor Plant Wall
- Farmhouse Sink Cabinet
- Mudroom Lockers
- DIY Desk Calendar & Wooden Pencil Holder
- DIY Dress Up Storage for Kids
- Picture Ledge DIY
- DIY Firewood Rack with Roof
- DIY Cane Headboard
- Boho Nightstand with Cane
- DIY Behind the Couch Table with Outlet
- DIY Headphone Stand
- DIY Cookbook Stand
- Easy DIY Grill Utensil Holder
- DIY Deck Box for Outdoor Toys
- DIY Towel Rack Made With One Board
- DIY Tool Organizer for Kreg Tool Stand
- DIY Mail and Key Holder
- DIY Step Stool for Toddler
- DIY Trash Can
- DIY Spice Rack
- DIY Book Holder
- Easy DIY Magazine Shelf
- DIY Clamp Rack
- DIY Chicknic Table
- DIY Bike Rack
- Small Bookshelf
- DIY Laptop Tray
DIY Tool Organizer: Video Tutorial
If you love DIY videos, don’t forget to subscribe to our YouTube channel!
Tool Organizer: Step-by-Step Instructions
Wood products needed
Tools needed
- Kreg 720Pro pocket hole jig
- Circular saw
- Table saw
- Drill
- Impact driver
- Clamps
- Crescent wrench
- Dado blade
- Trim blades (for circular saw and table saw)
Supplies needed
- 1 1/4″ pocket hole screws
- Painters tape
- 4′ level or straight edge
- Hooks (optional)
- Clear storage bins (optional)
Step 1: Cut wood

- Follow the visual cut list in the woodworking plans, which you can download here.
- Use a table saw and circular saw with a fine tooth trim blade to prevent chipping on particle board.
- No trim blade? No problem! Use clamps, a straight edge, scrap particle board, and painter’s tape. Apply two layers of painter’s tape where you’ll cut and place a scrap board over it to catch chips and rips.
Step 2: Cut dado
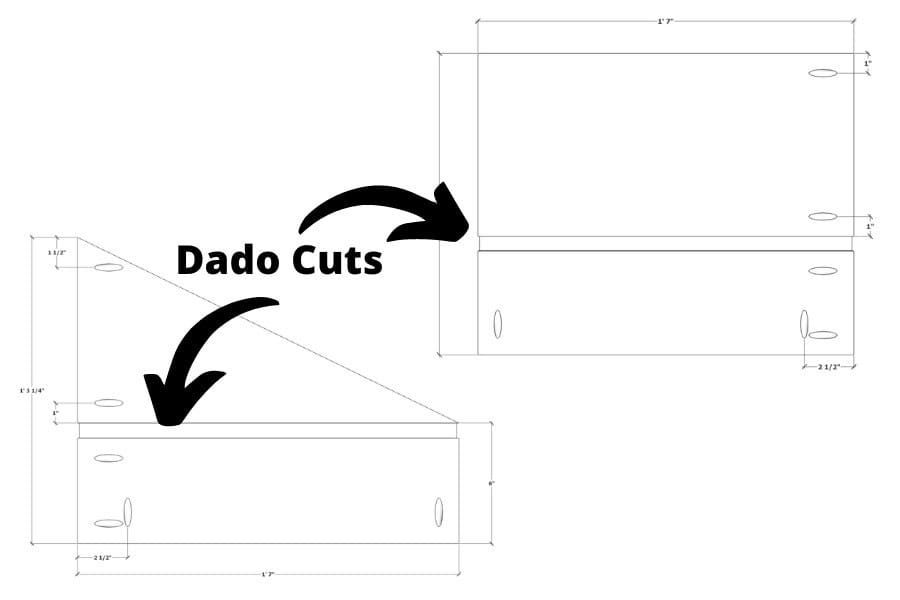
- Use a table saw and dado blade to make dado cuts for the shelf.
- No dado blade? Use a regular table saw blade and make multiple passes.
- Keep the dado cut under ¾” to ensure a snug fit for the shelf.
Step 3: Dry fit and adjust
- Dry fit pieces to ensure they fit in the Kreg cart.
- Make any necessary adjustments with the table saw or circular saw.
Step 4: Drill pocket holes
- Follow woodworking plans to drill pocket holes.
- Drill at an even pace to avoid tearing particle board.
Step 5: Assemble on cart
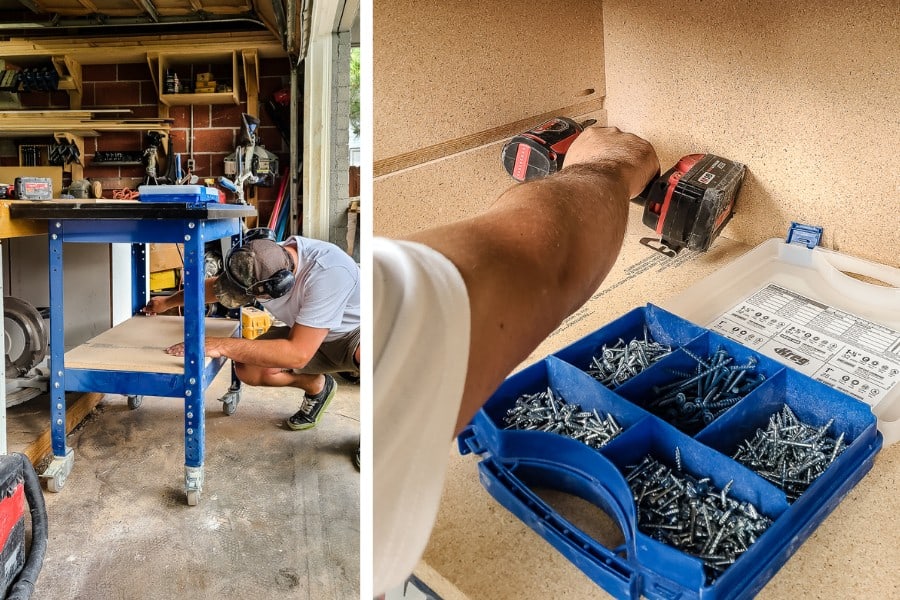
- Place bottom panel inside the Kreg table stand.
- Attach back panel with pre-drilled pocket holes.
- Attach side panels and middle divider panels.
- Use a crescent wrench to detach blocking leg and slide in shelf.
- Reattach leg to secure shelf.
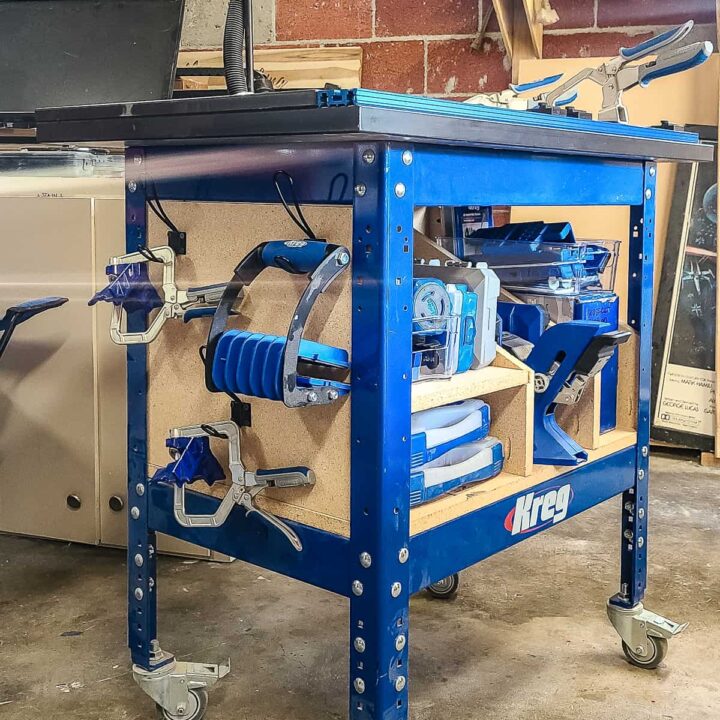
Step 6: Stock storage rack with tools
- Store tools like Kreg 720 Pro, screws, plugs, and other jigs.
- Add hooks for clamps and use clear bins for smaller tools.
- The rack accommodates various tools and has room to spare.
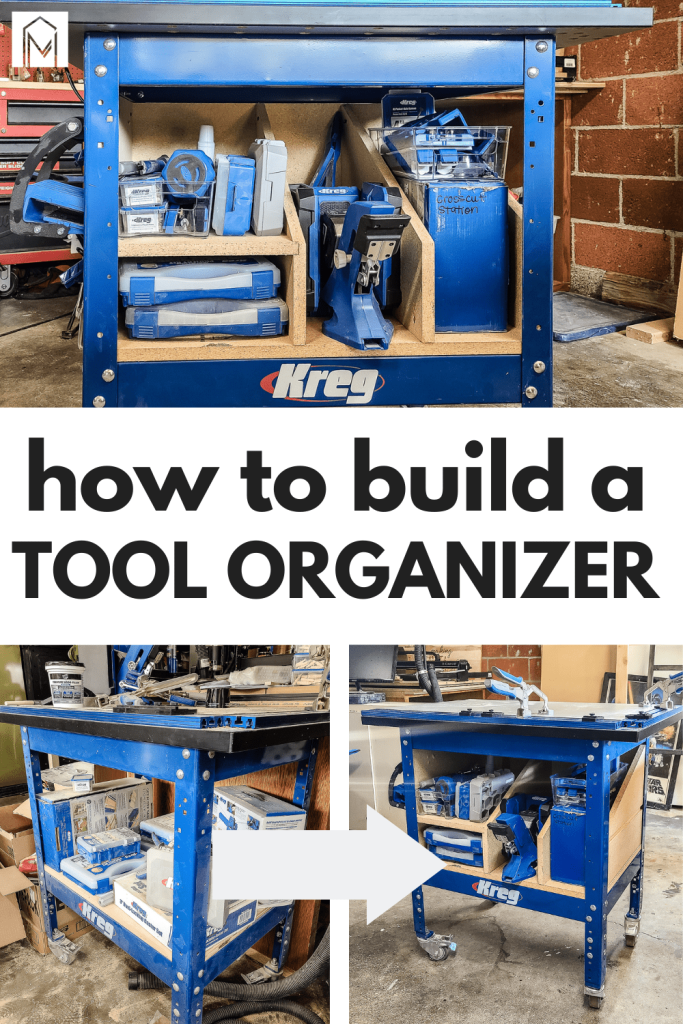
After Pictures: Kreg Stand Tool Organizer Reveal!
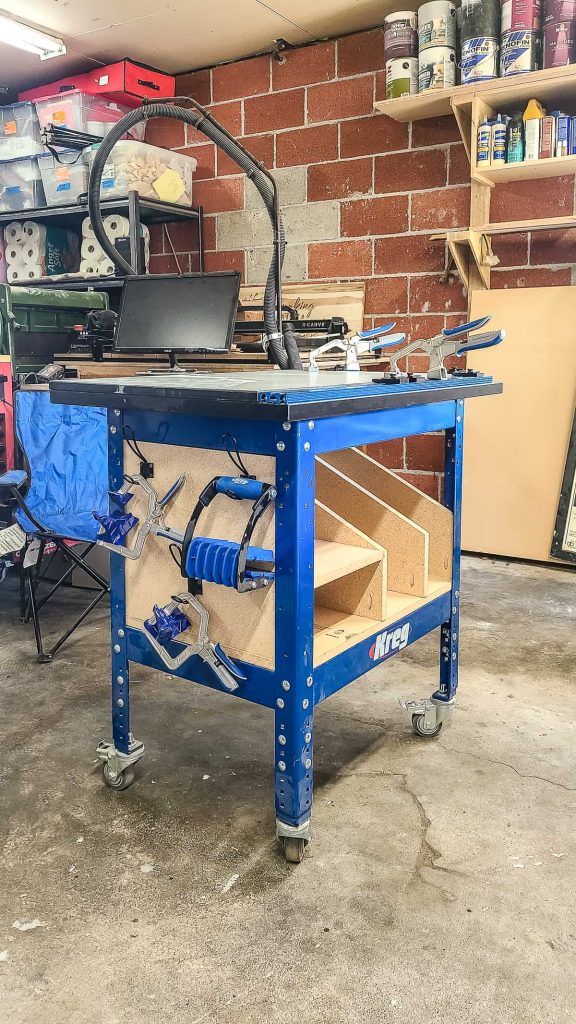
Here’s what the tool storage shelves look like without any tools added. I love that you can totally customize the plans to fit whatever tools you have that you need to store.
The hooks on the end were a last-minute decision because I found the hooks when we were cleaning out our garage! They are perfect for hanging the 90-degree clamps and panel carrier, right?
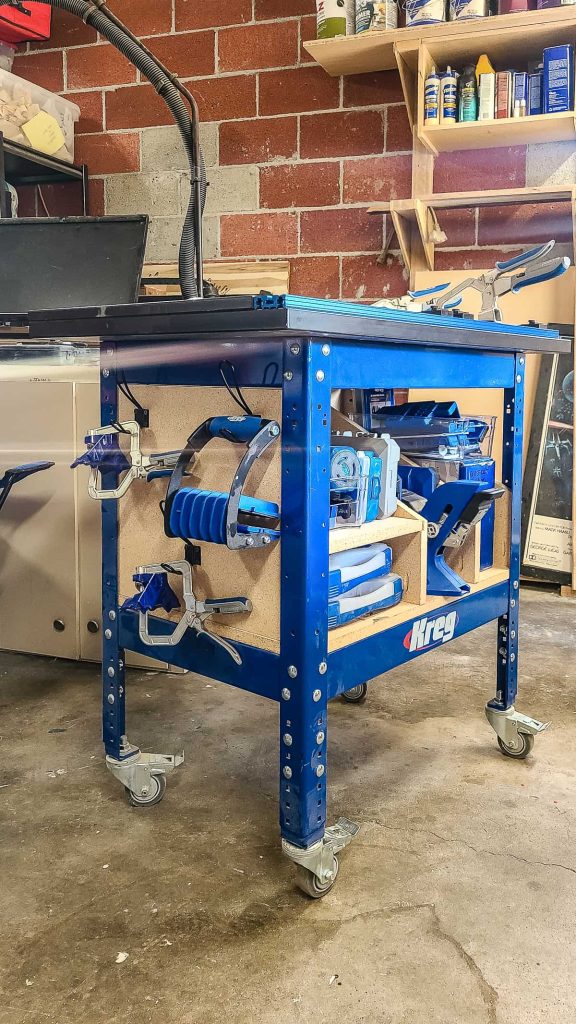
We also just happened to have a few extra clear storage bins lying around the house that are perfect for rounding up some of the smaller pieces of the tools and accessories for the shelves.
If you want to build these easy particle board tool storage shelves, we’ve done all the hard work for you! All you need to do is hop over to Kreg’s website and check out the full tutorial.
At the bottom of the tutorial on Kreg’s website, you’ll also see a link to download the woodworking plans (for free) to get all of the detailed measurements and a cut list!
Before we go, let’s take one more look at the transformation of the tool stand with a before and after picture!
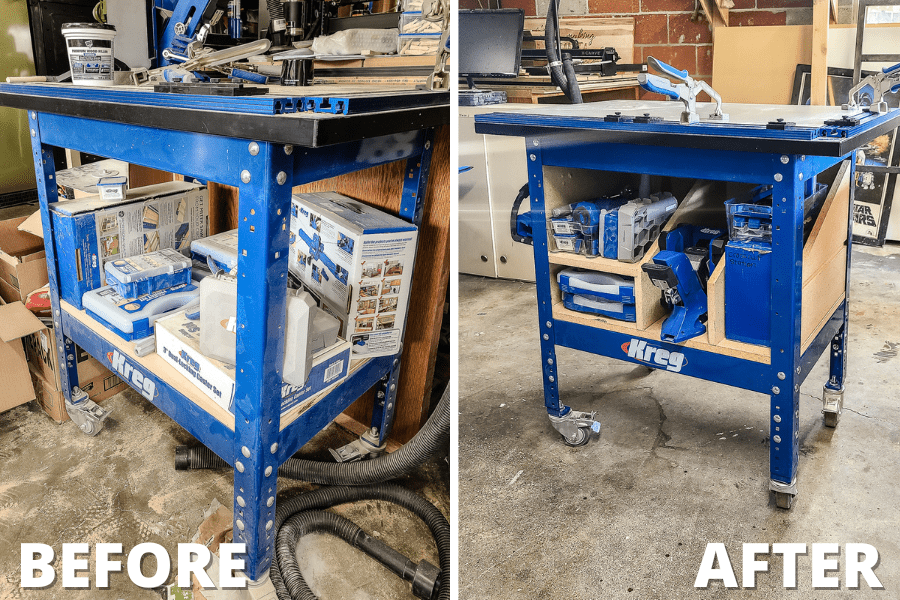
SO much better, right?!
What would you store in your tool organizer?
Let us know in the comments below!
DIY Tool Organizer Plans for Kreg Tool Stand
Want to organize your mass of woodworking tools? This DIY tool organizer is conveniently built right into the bottom shelf of a Kreg tool stand! Download the FREE plans here, along with a complete supply list, directions, and video tutorial.
Materials
- Particle Board , ¾” X 4’ X 8’
- 1 ¼” Kreg Pocket Hole Screws
- Painter's Tape
- 4' Level Or Straight Edge
- 3 Hooks (Optional)
- Clear Storage Bins (Optional)
Tools
- Kreg Pocket-Hole Jig® 720PRO
- Circular Saw
- Table saw
- Tape Measure
- Drill
- Impact Driver
- Clamps
- Crescent Wrench
- Dado blade
- Trim Blades (For Circular Saw And Table Saw)
Instructions
- Cut wood according to the cut list.
- Make dado cut for the shelf using a dado blade or table saw.
- Dry fit your pieces to make sure the all fit together, if they don't make adjustments as needed.
- Drill pocket holes using a Kreg jig as shown in the plans.
- Assemble the cart. Once everything is assembled, reattach the leg on the table stand to lock in the shelf.
- Stock the storage rack with tools!