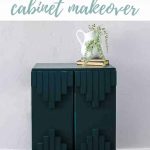
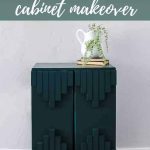
Laminate Cabinet Makeover: A Boho Style DIY Transformation

Over the past few years, I’ve been trying to take advantage of all the opportunities I can to add more modern boho-style decor to our home.
Whether it be big room makeovers like our modern boho office or modern boho bedroom or small DIYs like making your own DIY boho wall decor, painting thrift store vases with joint compound and dirt, or even mixing together baking soda and paint for vases.
There are SO many creative ways to add more of whatever style you’re after to your home!
And this DIY cabinet makeover is no exception! Even if you’re completely overwhelmed with thinking, “I don’t know how to decorate my home!” or you’re looking for ways to decorate a house with no money – this is for you!
This is an easy project to follow along and cheap to recreate using a laminate cabinet makeover you can find at a thrift store.
Table of Contents
- The story behind the $3 laminate cabinet find
- Can you paint cheap laminate furniture?
- Before pictures
- Supply list for boho cabinet
- Step 1. Sand.
- Step 2. Clean cabinet.
- Step 3. Prime.
- Step 4. Cut trim pieces.
- Step 5. Paint one coat.
- Step 6. Attach trim pieces.
- Step 7. Fill nail holes.
- Step 8. Paint boho cabinet.
- Step 9. Add legs and contact paper inside (optional).
- After pictures
- Update: 2 years later!
The Story Behind The $3 Laminate Cabinet Makeover Find
So, here’s what happened.
We had just finished our kids’ combined birthday party for 1 and 3 years old (their birthdays are only a week apart). We had been outside all day. We were all tired (no naps all day). Our house was a straight-up disaster.
So, like anyone would do. We avoided it.
We took a nice air-conditioned drive out to one of our favorite little towns about 30 minutes away for an early dinner….crossing our fingers that the kids would fall asleep in the car.
Well, they didn’t. There was screaming, chaos, and phones flying when YouTube played the “wrong” video…the whoooollllle way there.
But right when we pulled into the town, they both zonked out. So naturally, we wanted to keep the asleep just a little while longer. We snuck over to my favorite ReStore thrift shop, and I, oh so quietly, opened the door and left Logan inside with the sleeping kids.
5 minutes later… I text him this picture.
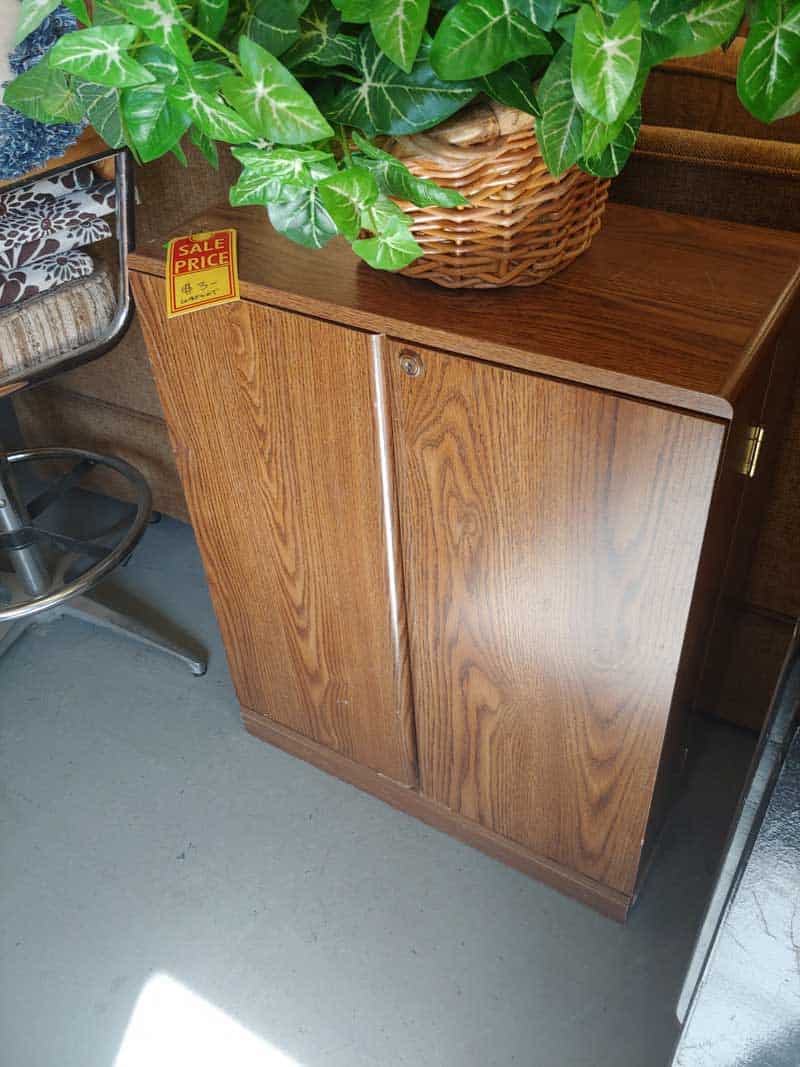
And said, “do you you think we can fit this in the car?” ….
No response.
I follow up with this picture.
“This is what I would do with it” – I said.
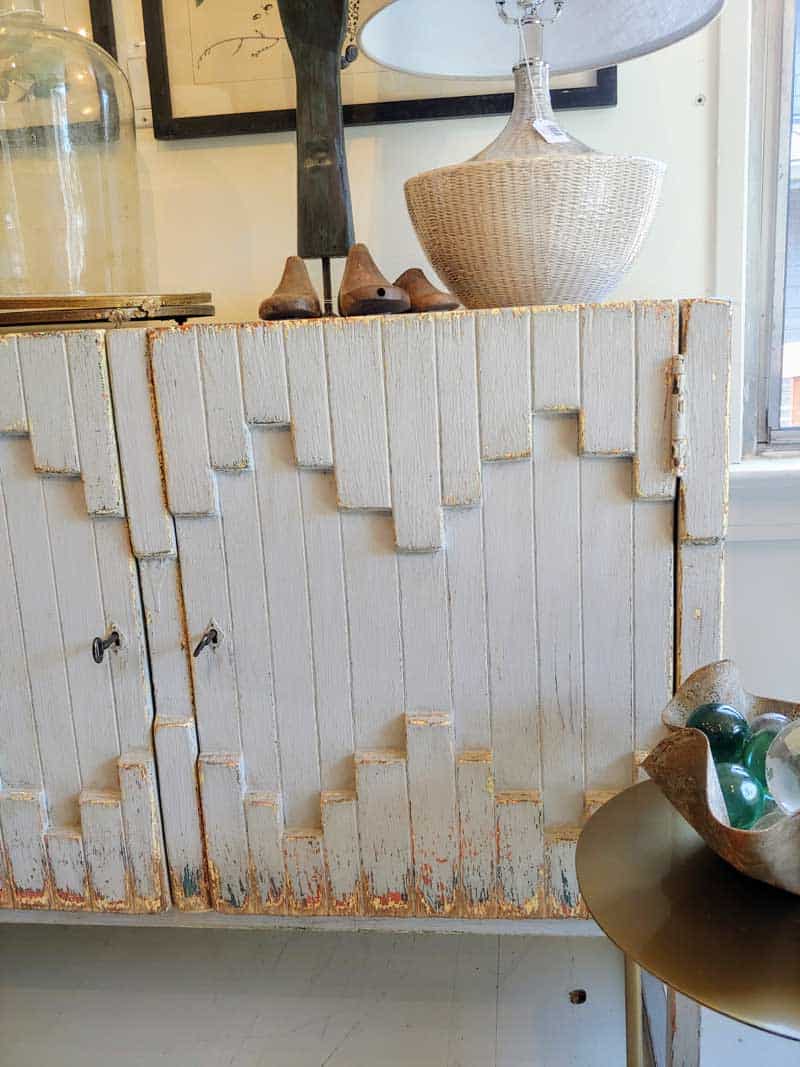
I took this picture last year and one of my favorite decor stores that is super expensive.
You know, the kind of store you go into for inspiration but know you can’t really afford anything so you never really bother looking at the price tags…..well, I do remember glancing at this price tag. It was somewhere in the range of $3,000.
But I snagged a picture of it because I thought to myself….ya know, I could probably do something like that. What can I say, I’m a true DIYer at heart.
So that’s what happened.
That’s where it all started.
I guess we should thank the kids for falling asleep the Saturday afternoon.
So I had a $3 cabinet. A $3,000 inspiration piece. And a husband that was thankfully willing to repack the back of the car that day so we could fit this bad boy (thank you, Honey).
I knew this fun thrift store challenge was coming up, so it was really meant to be…right?
Can you paint cheap laminate furniture?
You may be wondering if you can paint cheap laminate furniture like this…. the answer is YES! But it’s all about getting the prep right (which we’re totally going to get into in this tutorial, hold your horses). Specifically, sanding the finish, cleaning really well, and using a good primer.
The hardest part about painting cheap laminate furniture is getting the paint the adhere, so that’s why sanding first will help give the paint something to grab onto.
Keep in mind that painting laminate furniture is a lot different than painting wood furniture – like this chalk paint desk or these painted bar stools
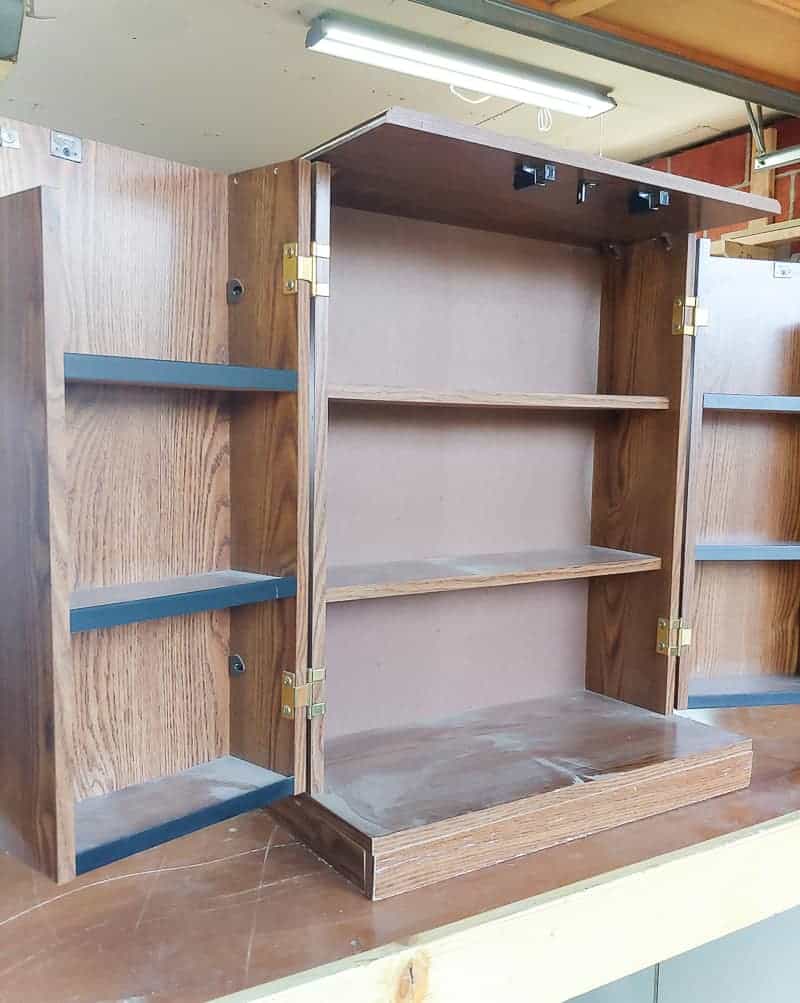
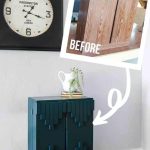
Alright, before we jump into the how-to here, let’s take a look at what we were starting with.
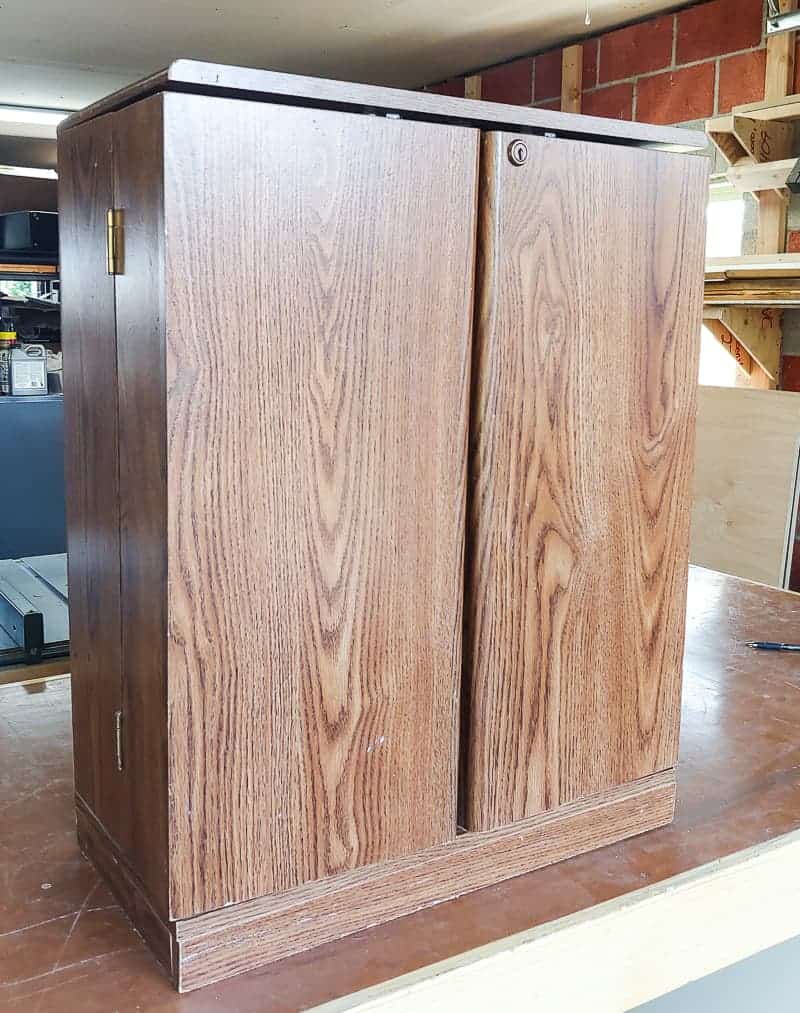
I’m not entirely sure what this is….maybe a bookcase or “media cabinet” for DVDs or VHS videos. The shelves are not very deep. Especially the ones on the inside of the doors.
(Update: Readers have commented and messaged me several times since I originally published this DIY laminate cabinet makeover to tell me this is an old VHS cabinet, so mystery solved – case closed)
This boho cabinet tutorial post contains affiliate links, but nothing that I wouldn’t wholeheartedly recommend anyway! Read my full disclosure here.
Supplies for boho cabinet makeover:
- Screwdriver (to remove doors and hinges)
- Sandpaper (150 and 220 grit)
- TSP cleaner
- Cleaning rag
- Primer
- Paint – I got this color matched with Behr’s Premium Plus Ultra semi-gloss sheen (learn more about paint sheen in this guide to understand why I went with semi-gloss)
- Paint brush
- Paint tray
- Small paint roller cover
- Small paint roller
- Pre-primed 1×2 trim
- Miter saw
- Nails
- Nail gun
- Rapid Fuse adhesive
- Wood filler (for nail holes)
- Furniture legs
- Contact paper
- Xacto knife
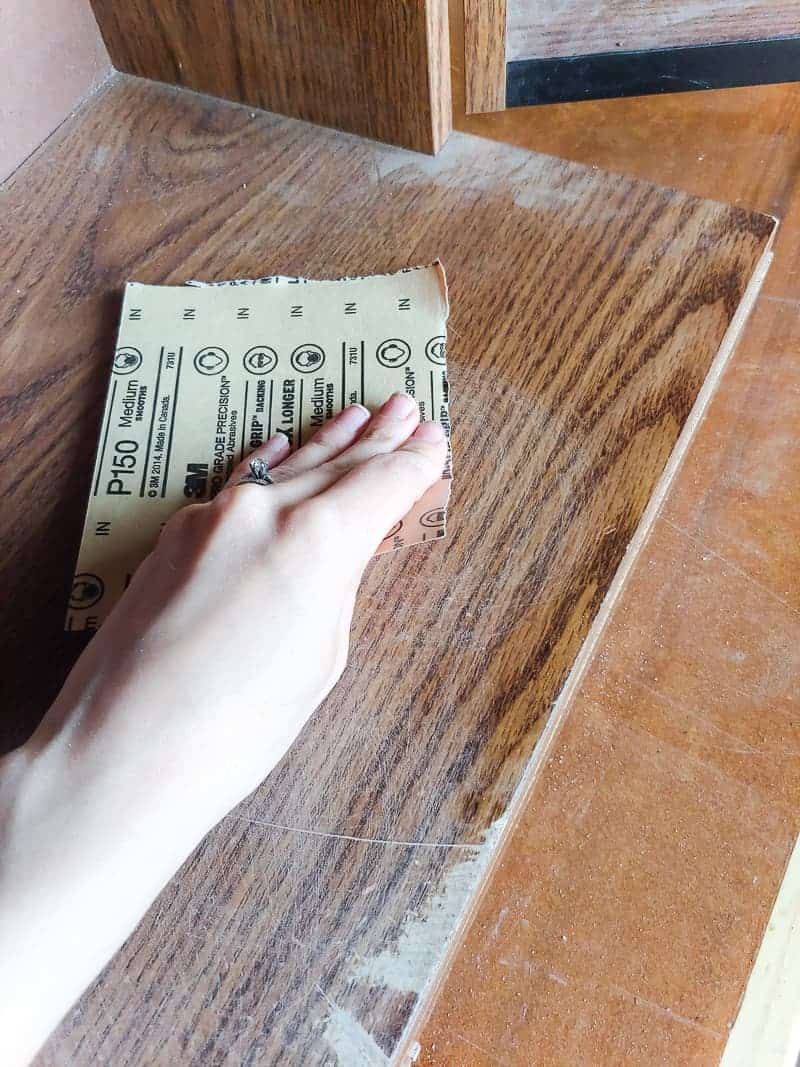
Step 1. Sand cabinet.
Removing the doors and hinges/hardware before you start sanding is much easier. When working with laminate furniture, you’ll definitely want to do all of your sanding by hand so you don’t take too much off. All you want to do is get rid of the shiny texture on the laminate furniture.
Start with medium (150 grit) grit sandpaper. You want to just lightly rub it over all cabinet surfaces in a circular motion. The goal here is to rough up the slick surface of the finish on the laminate furniture. You aren’t necessarily sanding to remove anything.
Remember that laminate furniture is not made of pure wood, so a veneer on the top is basically a screen-printed picture of wood – not real wood. So if you sand too much, you’ll go right through that veneer!

After you do the 150 grit, do another pass over everything with fine (220 grit) sandpaper. This will help smooth everything out.
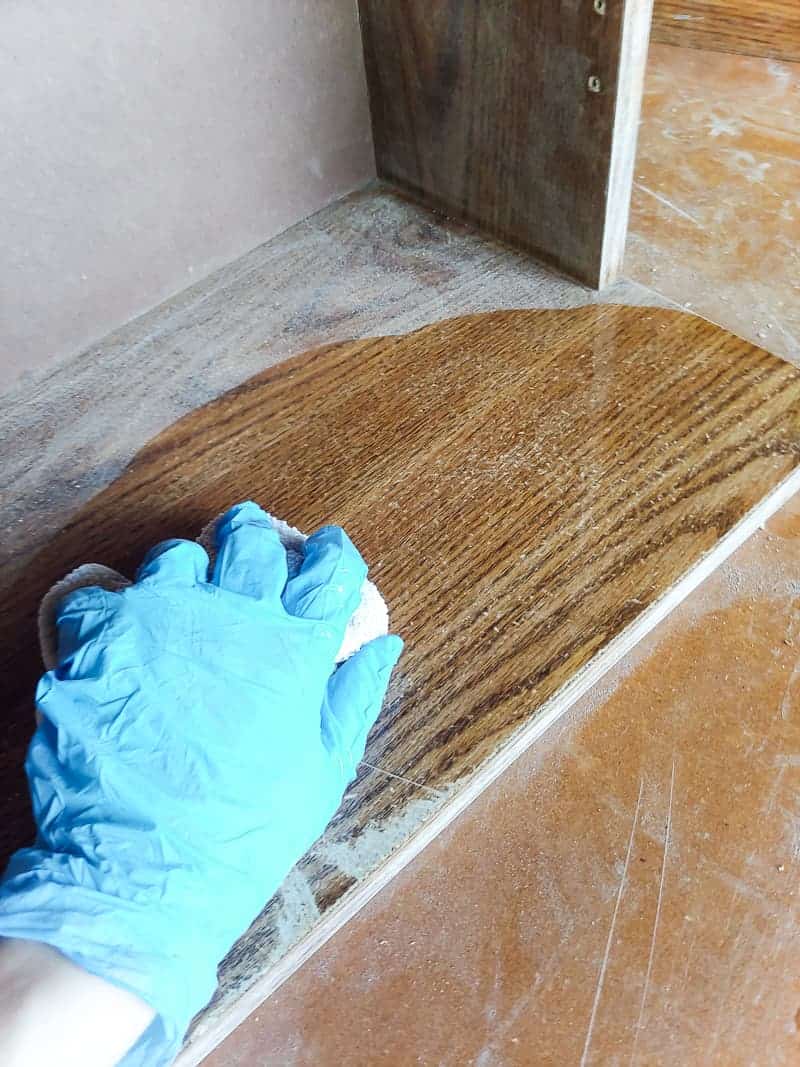
Step 2. Clean cabinet.
We used TSP to clean before starting to paint because that’s what we had on hand. It helps remove dirt, grease, grime, and all that sanding dust. Another thing you could use to clean the surface of the cabinet is rubbing alcohol – which I always use before spray painting things.
For TSP, you dissolve a small amount in warm water and apply it with a cleaning rag.
Be sure to wear cleaning or kitchen gloves because the TSP will irritate your skin. Also, be sure to rinse with water as well.
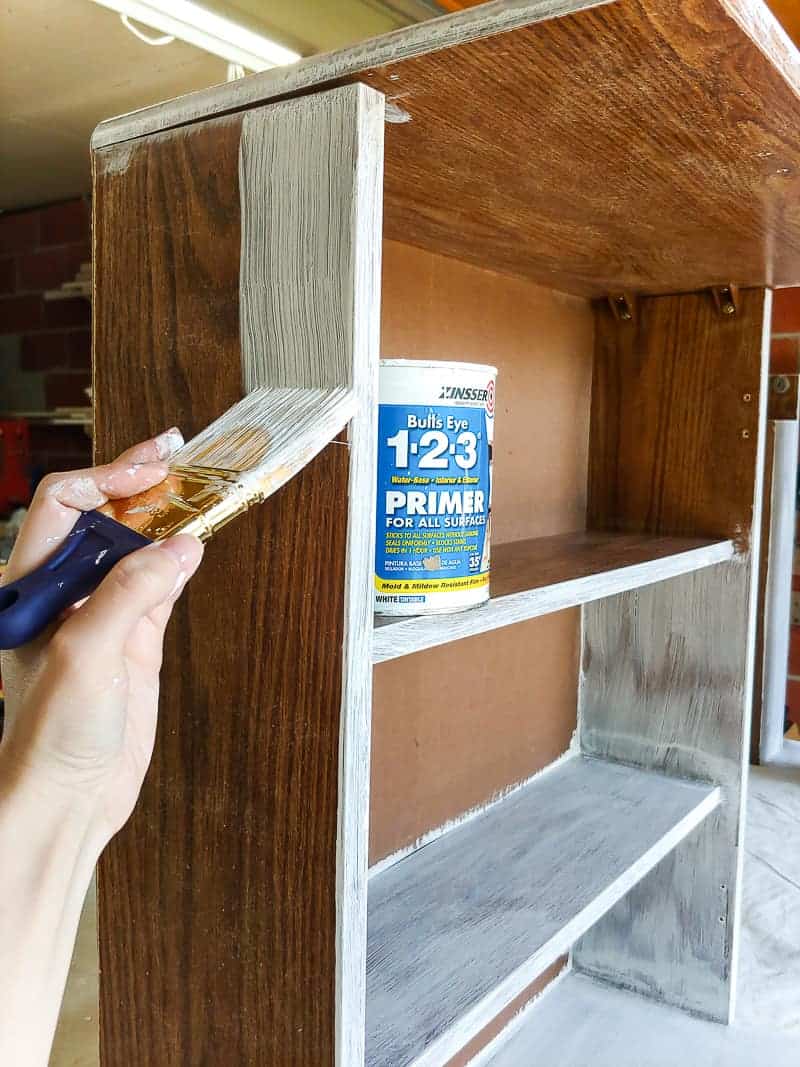
Step 3. Apply primer to the cabinet.
I warned you that there was a lot of prep when it comes to painting laminate furniture. Now it’s time to grab that paintbrush, finally!
Apply 2 thin coats of this primer to all surfaces of the cabinet. Let the primer dry for 1 hour in between coats.
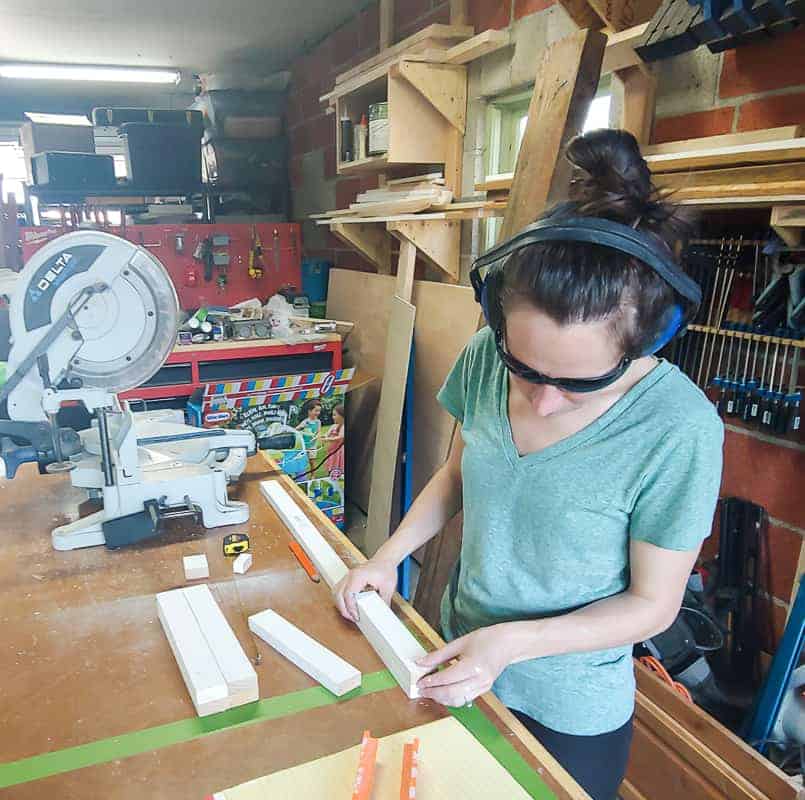
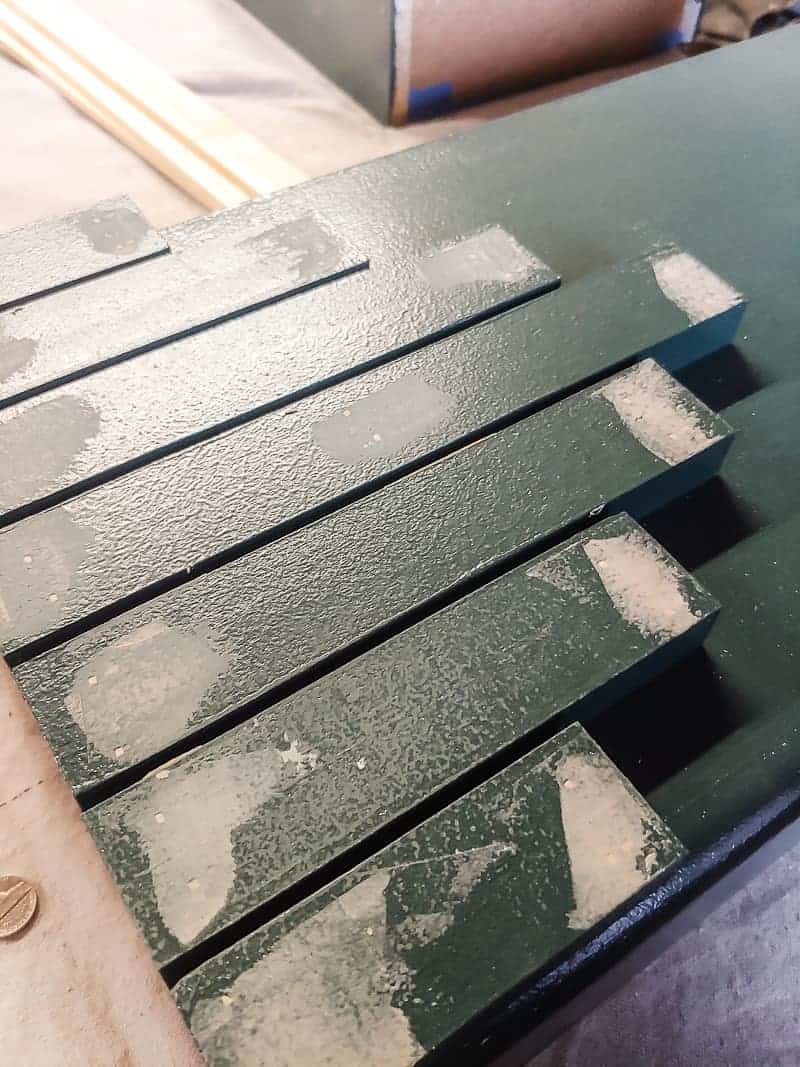
Step 4. Cut trim pieces for doors of boho cabinet.
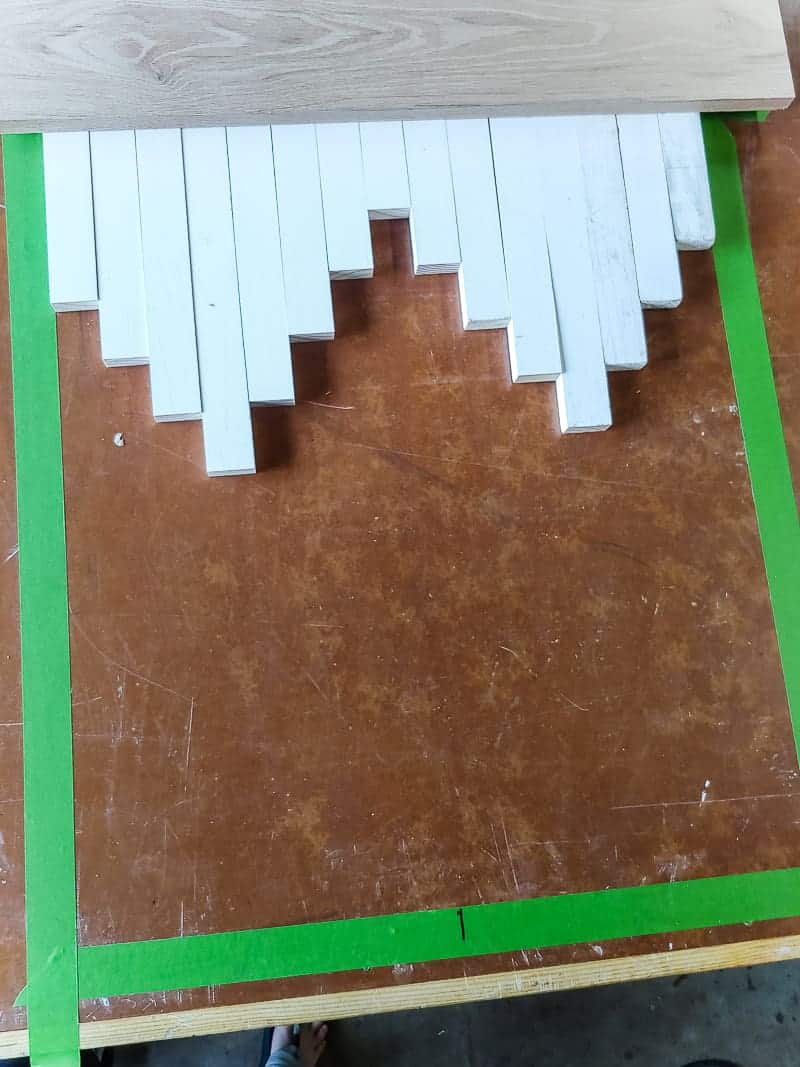
While the 2nd coat of primer is drying, you can start working on the fun part….that boho-style front for the doors! I measured the front of the doors and marked the area on our workbench with painter’s tape to have a flat surface to plan the design on.
Pro Tip – Remember that although I purchased 1×2 trim, it’s not ACTUALLY 2 inches wide. There’s a difference between actual and nominal lumber dimensions – learn more here!
I looked back and forth to my inspiration picture a few times and just started laying pieces of trim out until I got the look I was going for.
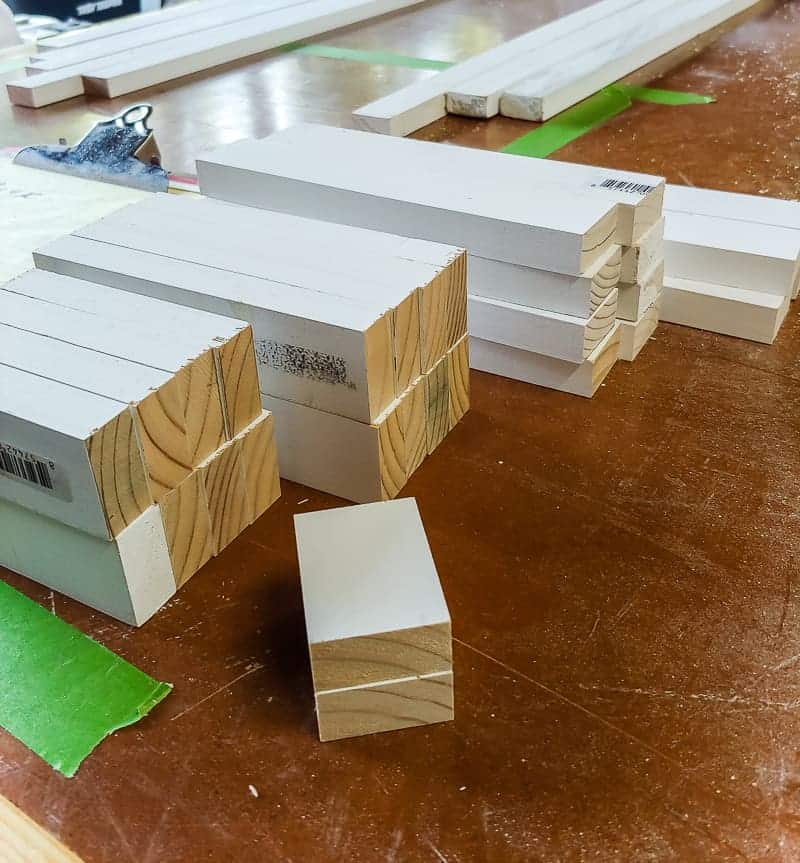
I decided to space the length trim pieces out 2 inches, which made the measuring easy! Here’s my cut list for the miter saw:
- 4 pieces @ 10 inches
- 8 pieces @ 8 inches
- 8 pieces @ 6 inches
- 4 pieces @ 4 inches
Learn the difference between all of the different types of saws to understand why the miter saw is the best saw for this job.
I originally also cut 2 pieces at 2 inches, thinking that I was going to add it to the middle in between the two doors. After everything was laid out on the door fronts, I decided not to use that small middle piece. It was going to have to be cut in half and was going to be pretty hard to attach because the edges of the doors are rounded. I also liked having the trim pieces a little more spread out.
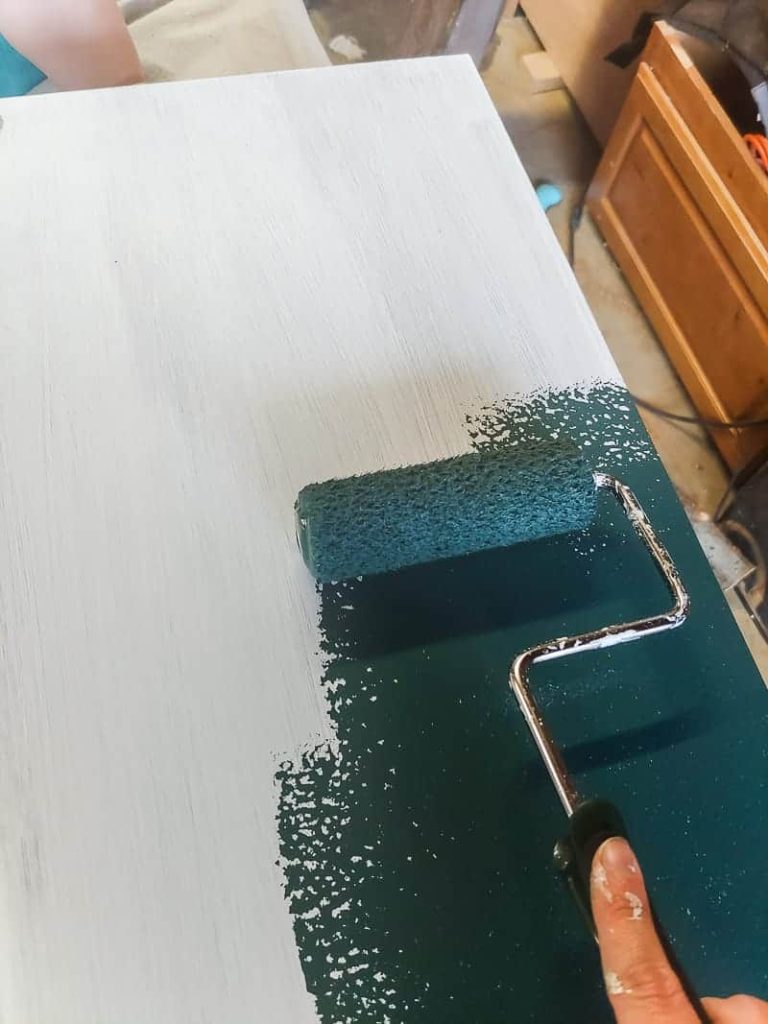
Step 5. Paint one coat of paint on the cabinet & trim pieces.
Before you attach the trim, it’s important to get a coat of paint on both edges of the trim, the front, and the entire cabinet. It would be really hard to get the paintbrush down in between the trim pieces if you didn’t do it before installing.
To paint the laminate cabinet, I used this paint brush to get into hard-to-reach places, like corners of the shelves, and then finished everything off with a small paint roller, which has a nice clean finish.
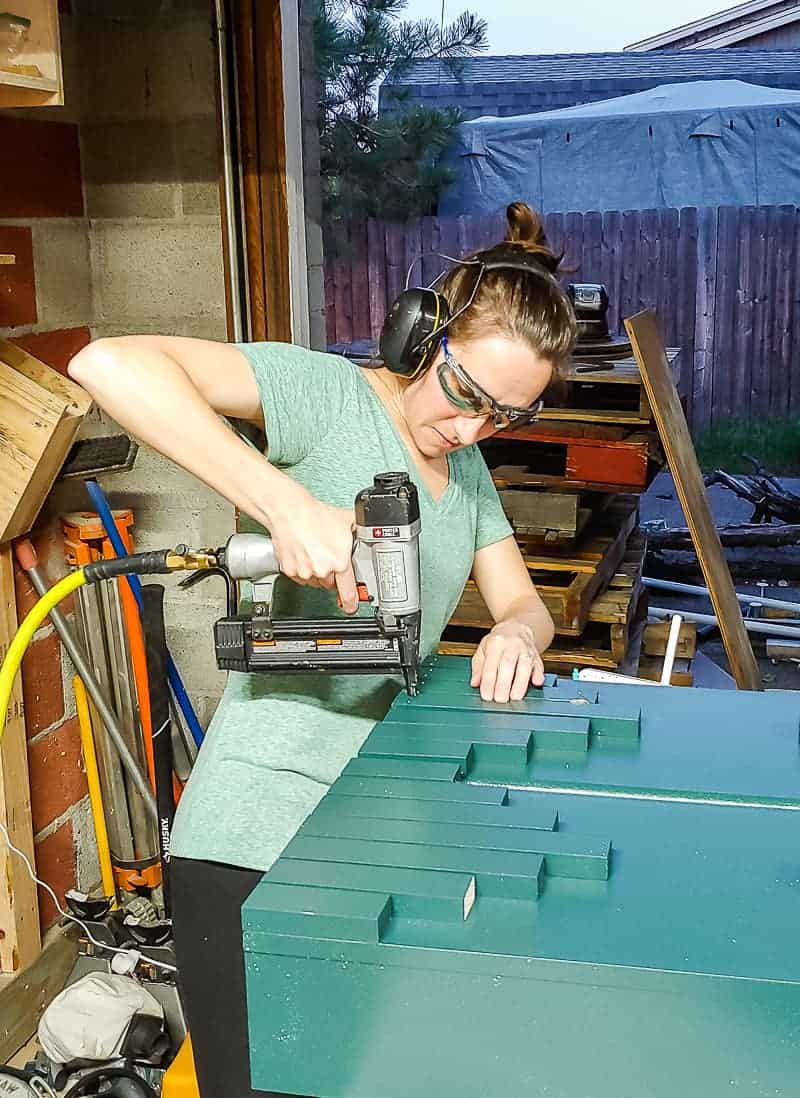
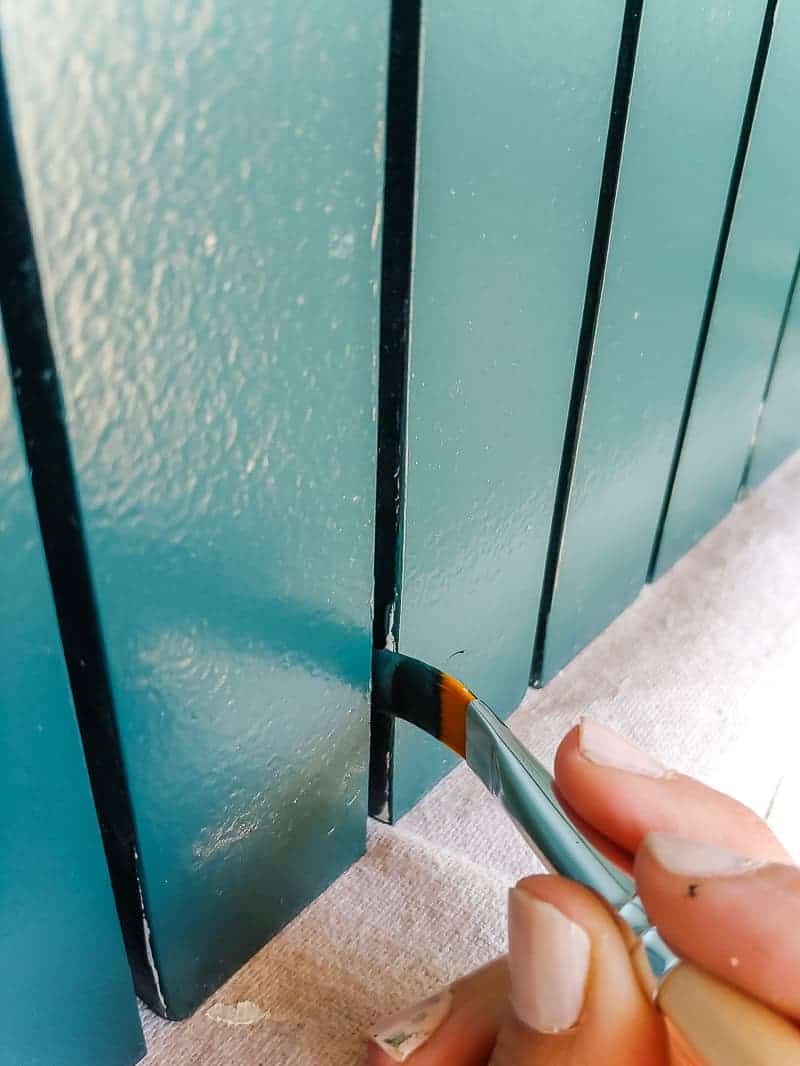
Step 6. Attach trim pieces to the front of the doors.
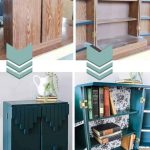
After everything has been painted once and is nice and dry, you can add fun trim to the front. This is where it started something together and looked like the boho cabinet that I had imagined.
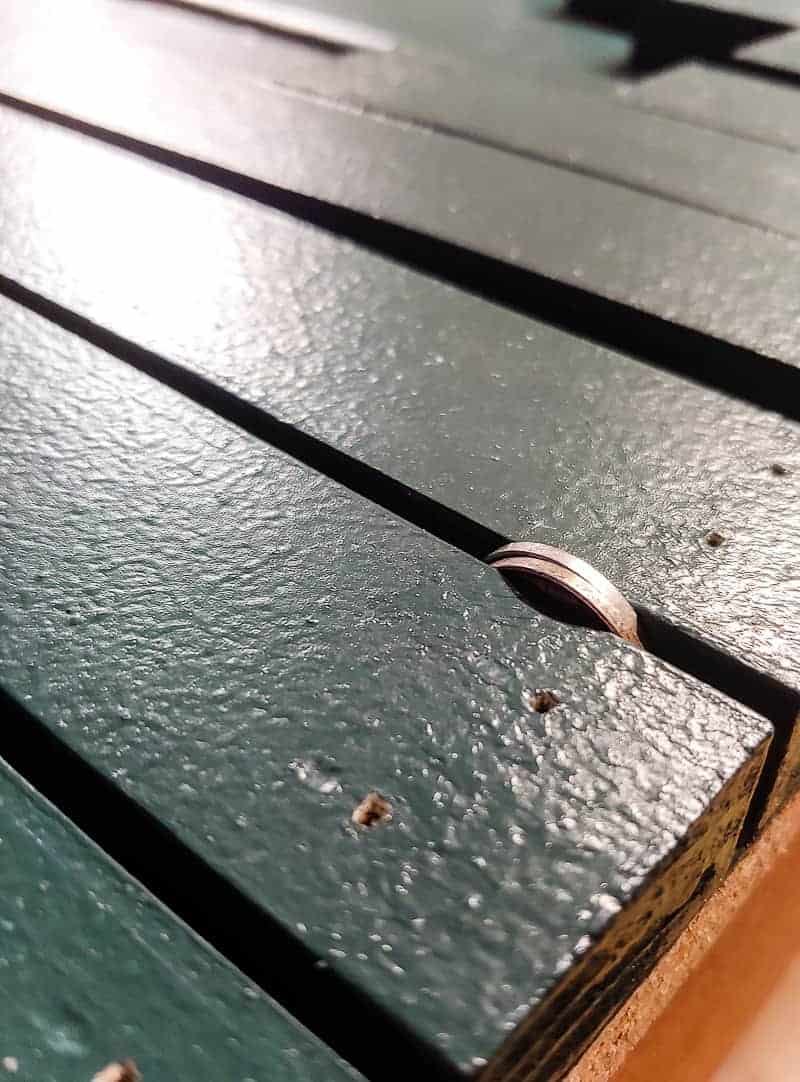
To space the trim pieces out, I used two nickles held at the top and the bottom to make sure the pieces go on straight and everything is spaced evenly. The ‘ol nickle trick as spacers is something we’ve learned from all of the shiplap walls we’ve installed!
Use a Brad nailer and add two nails to each end of the trim piece. (Learn the difference between a brad nailer and finish nailer here to understand why I picked the brad nailer for this project!)
The nails we had on hand worked, but it would be nice to have them be just a hair longer. So just to be safe, we used some Rapid Fuse glue on the back of the trim pieces before nailing them in place.
We can’t use wood glue because it has already been painted. This glue is seriously DA BEST. I talk all about why it’s the best super glue for fixing things around your house in the this post.
Step 7. Fill nail holes.
Next, use wood filler to patch all nail holes, and then, once dry, sand them with fine-grit sandpaper so they are nice and smooth.
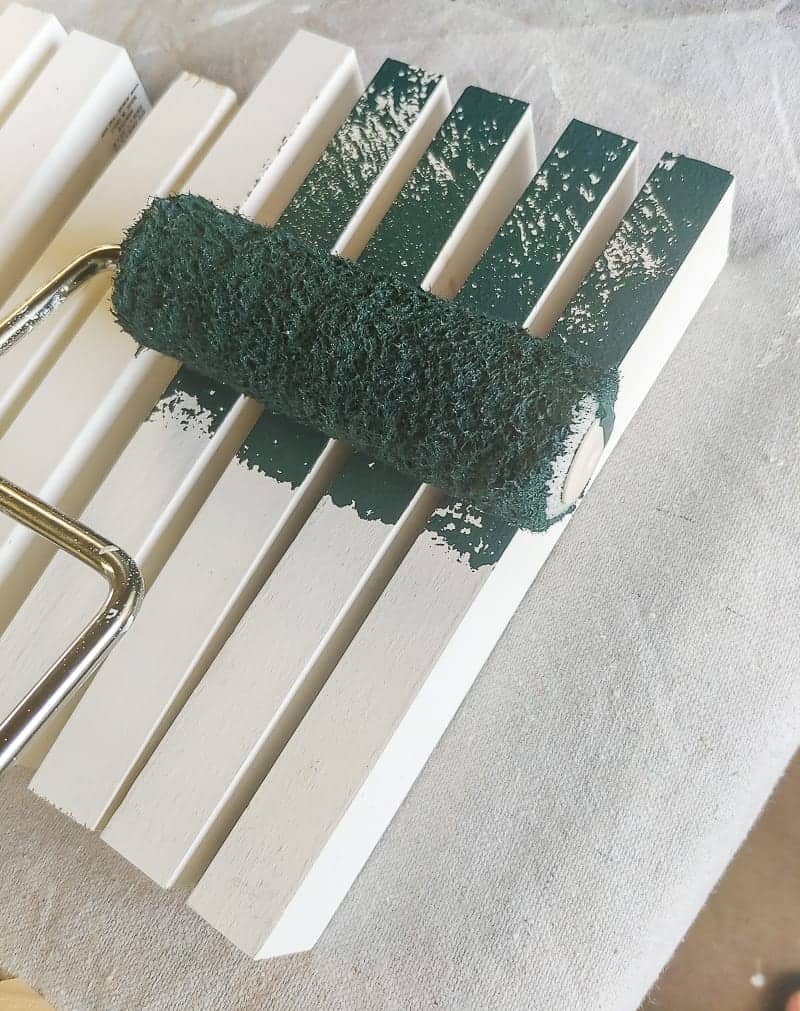
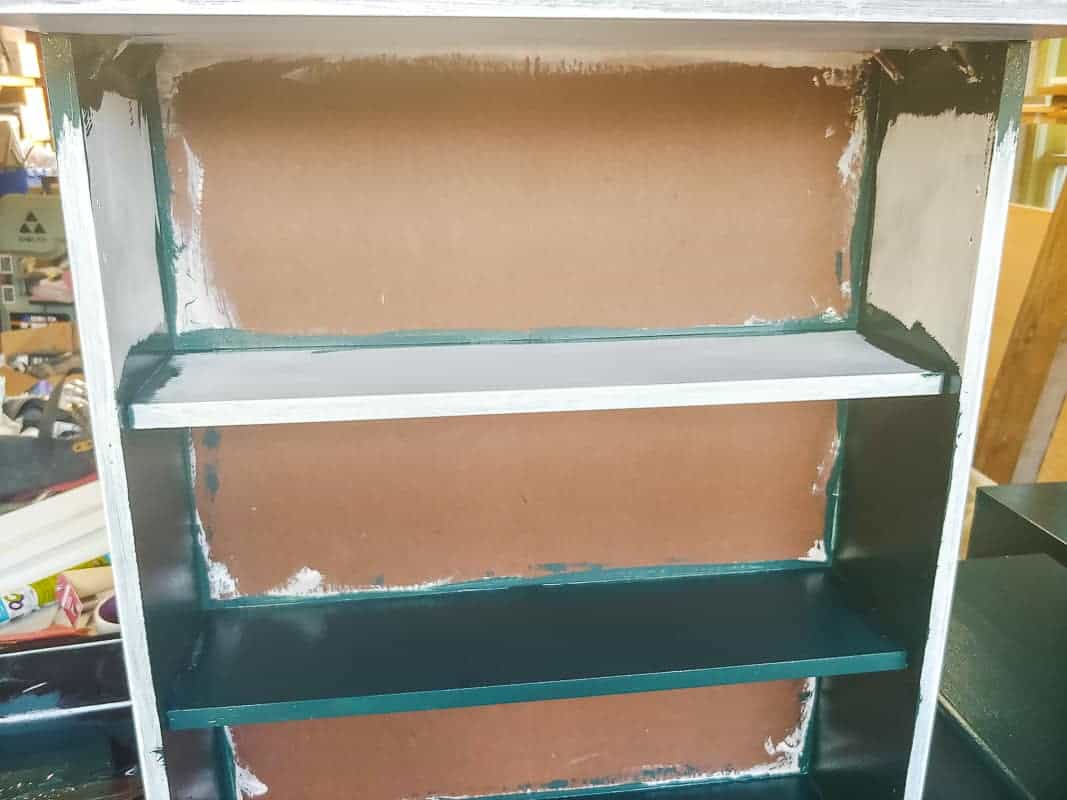
Step 8. Paint the entire cabinet.
Then you can keep painting the cabinet with the paint roller! I needed 2 more coats at this point, so 3 coats total.
I used this small craft paint brush for touch up and to get any pieces of trim that got messed up from sanding/wood filler.
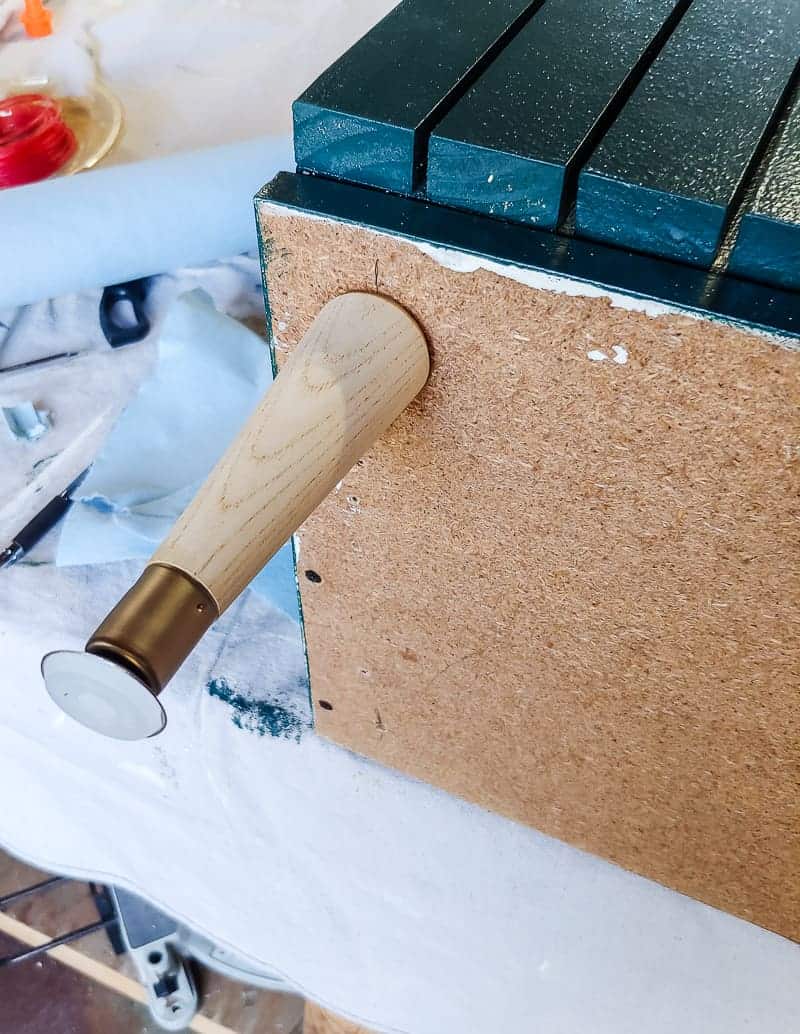
Step 9. Add furniture legs to the bottom and contact paper inside (optional).
The last step is to add the furniture legs to the bottom. I love these ones, which are super inexpensive!
We measured 2 1/2 inches from the corners and drilled pilot holes for the legs. Since we are working with particle board on the bottom surface of the cabinet, we were really careful to slowly work our way up to a larger pilot hole for the legs. Then we added wood glue to the end of the screw before installing (for some extra support).
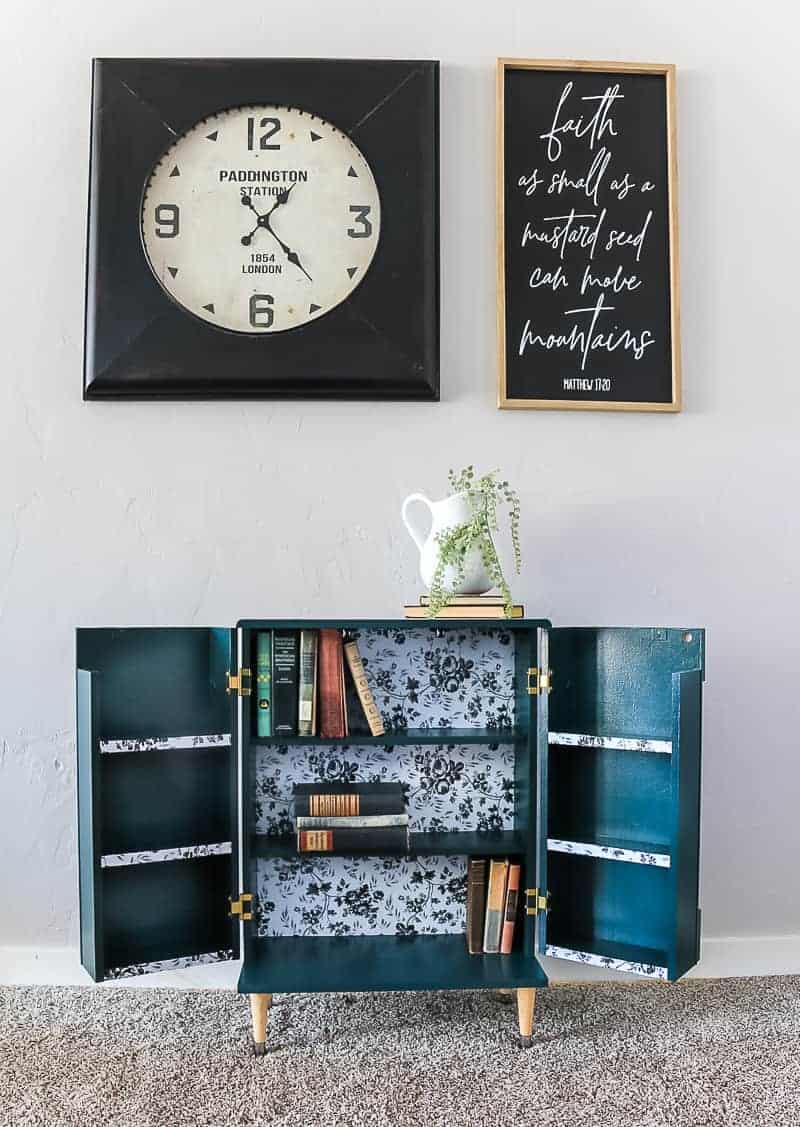
The other thing I did to add a little something extra to this boho cabinet is put peel and stick contact paper from the dollar store to the back of the cabinet. I just pressed it into place and cut it out in the corners with an Xacto knife.
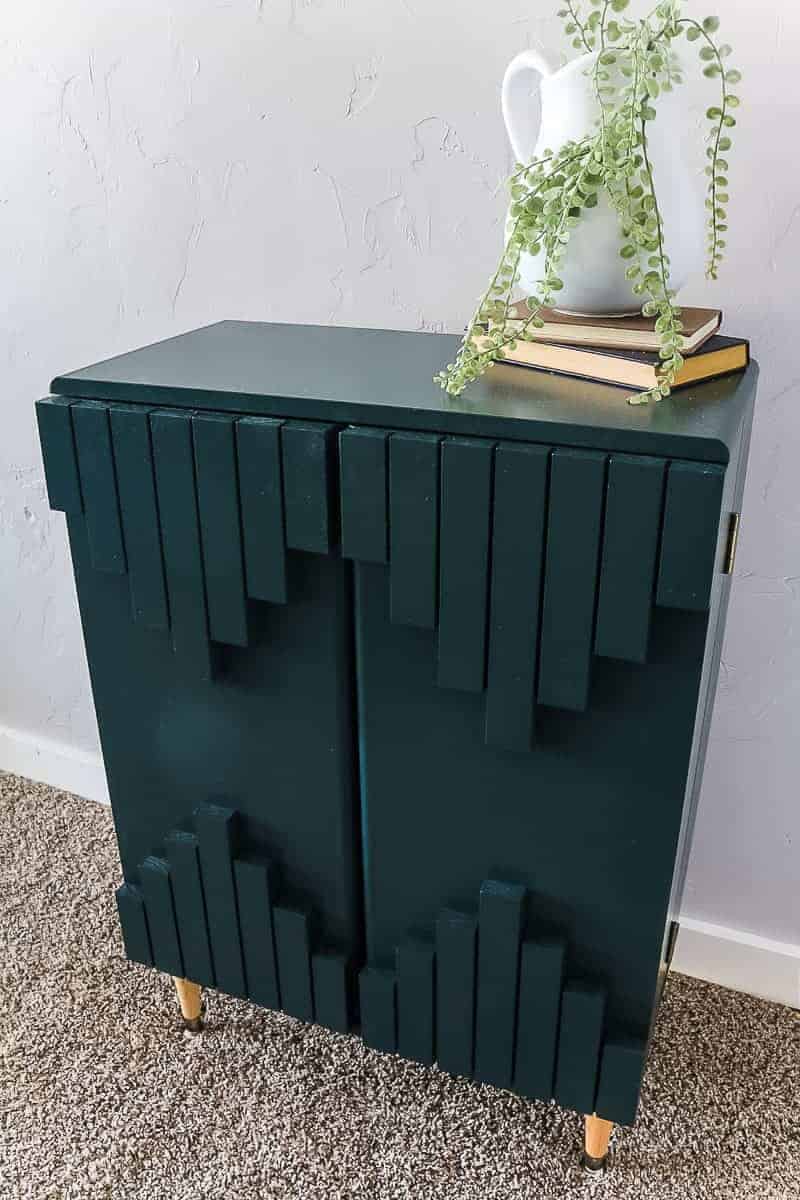
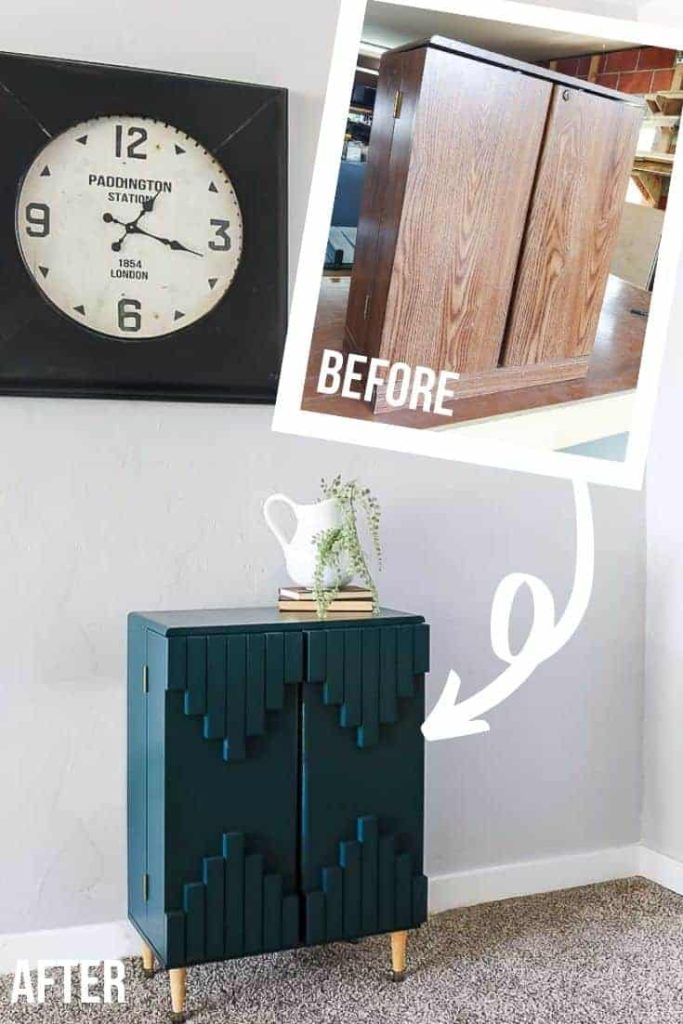
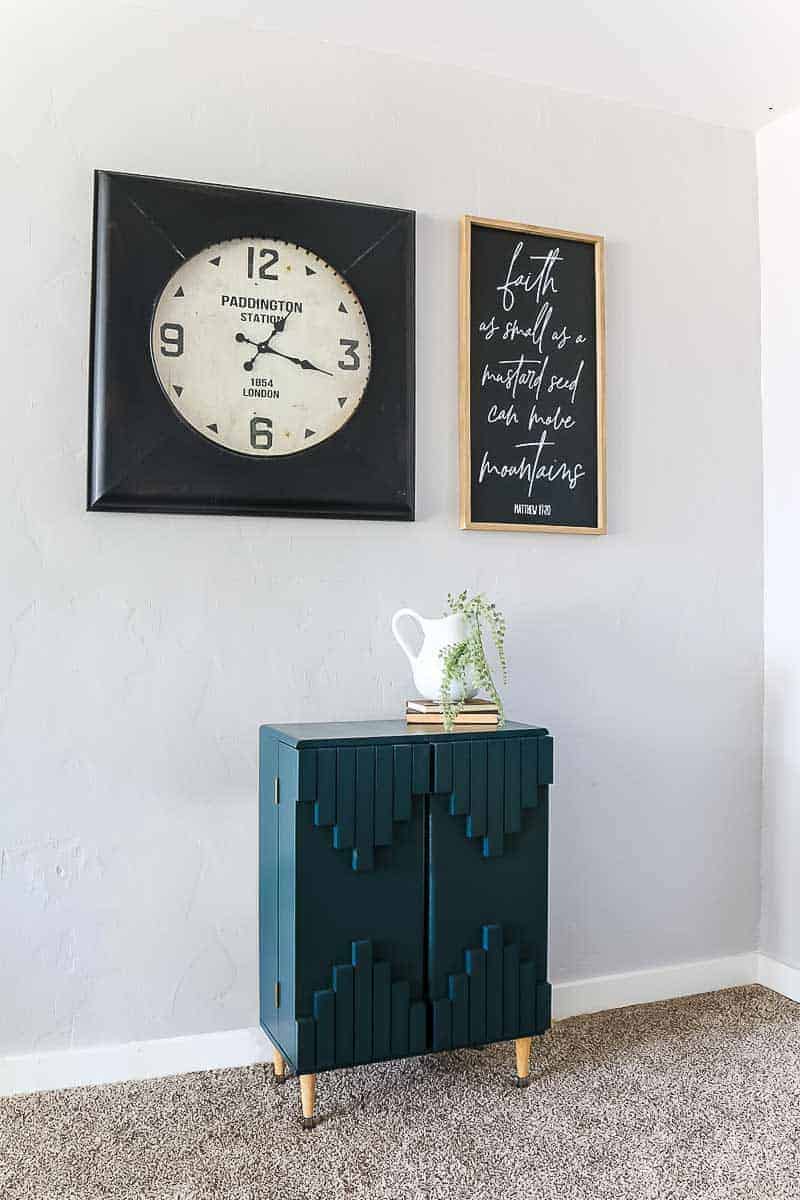
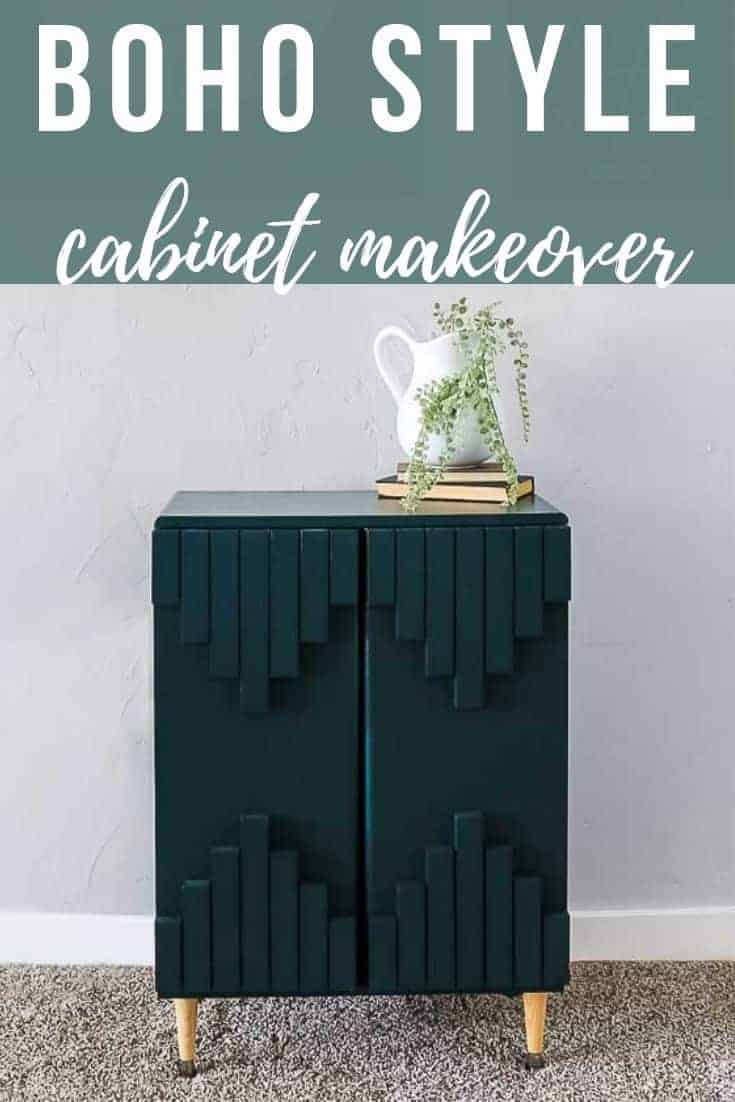
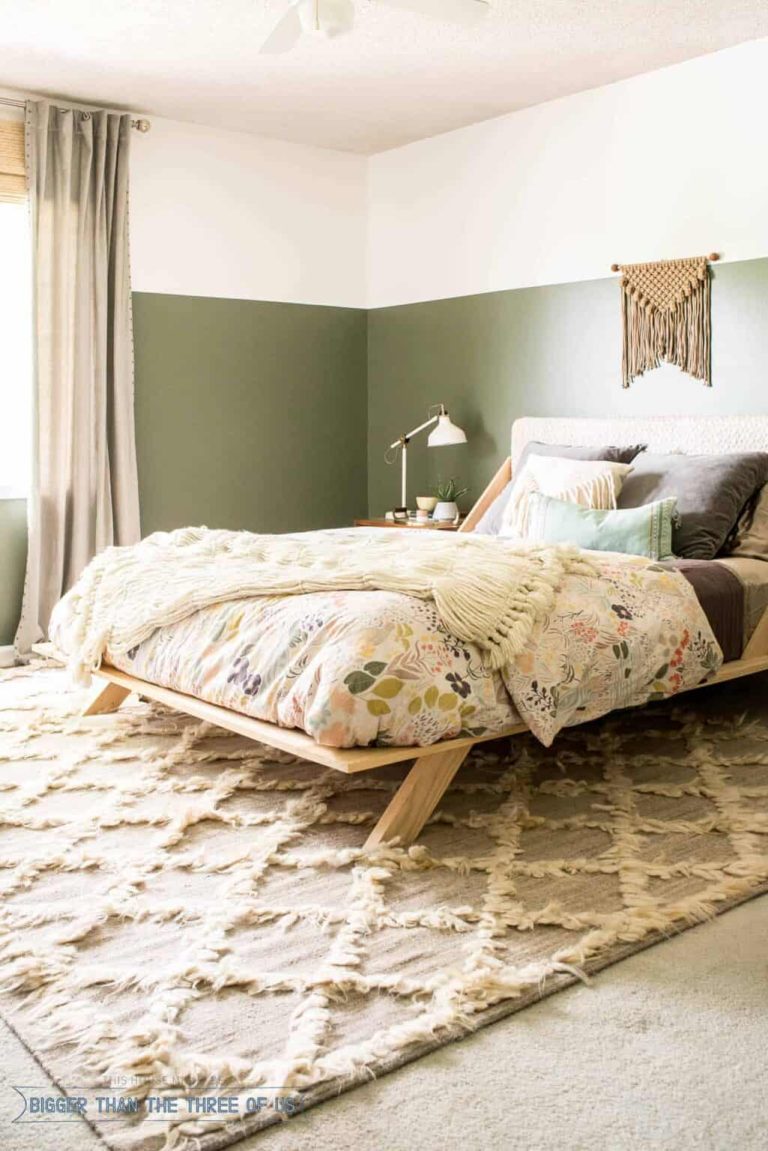
Here she is in all of her glory.
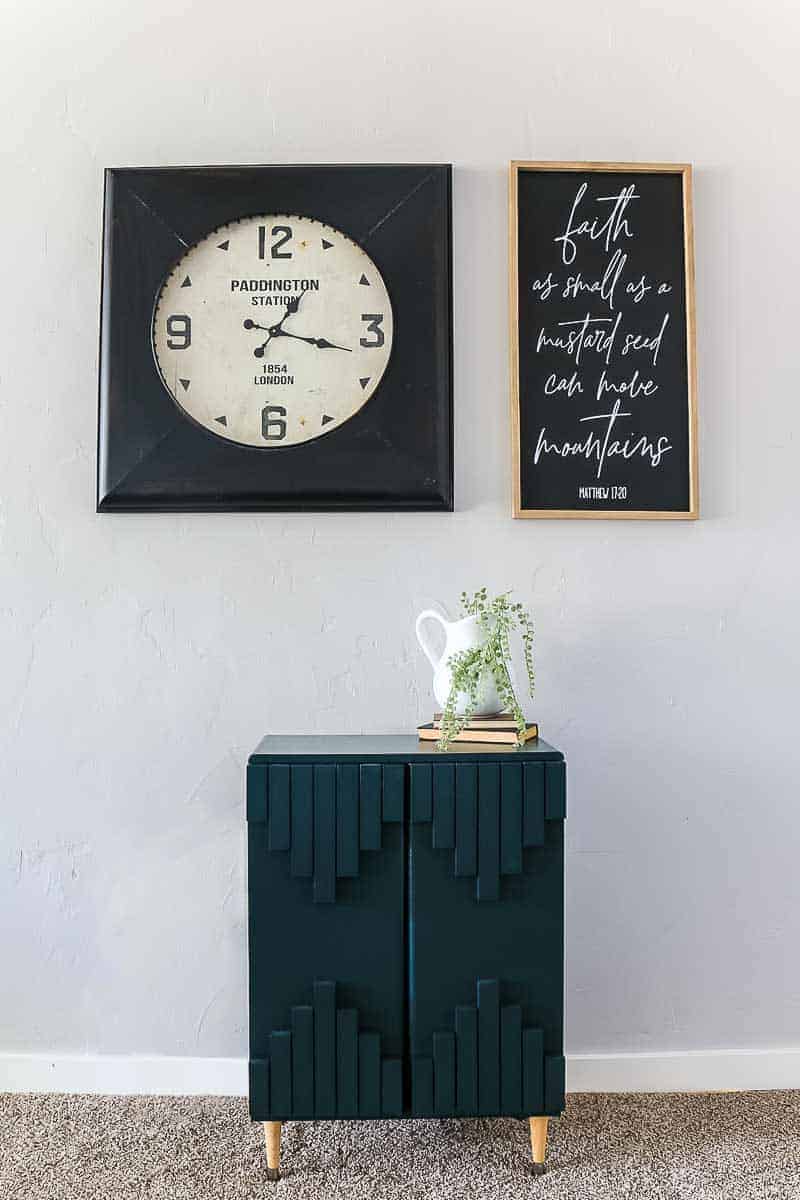
I’m sorta kind of obsessed with it. Looks so cute with the decorative books and white farmhouse pitcher on top, huh?
Let’s take a look inside, shall we?
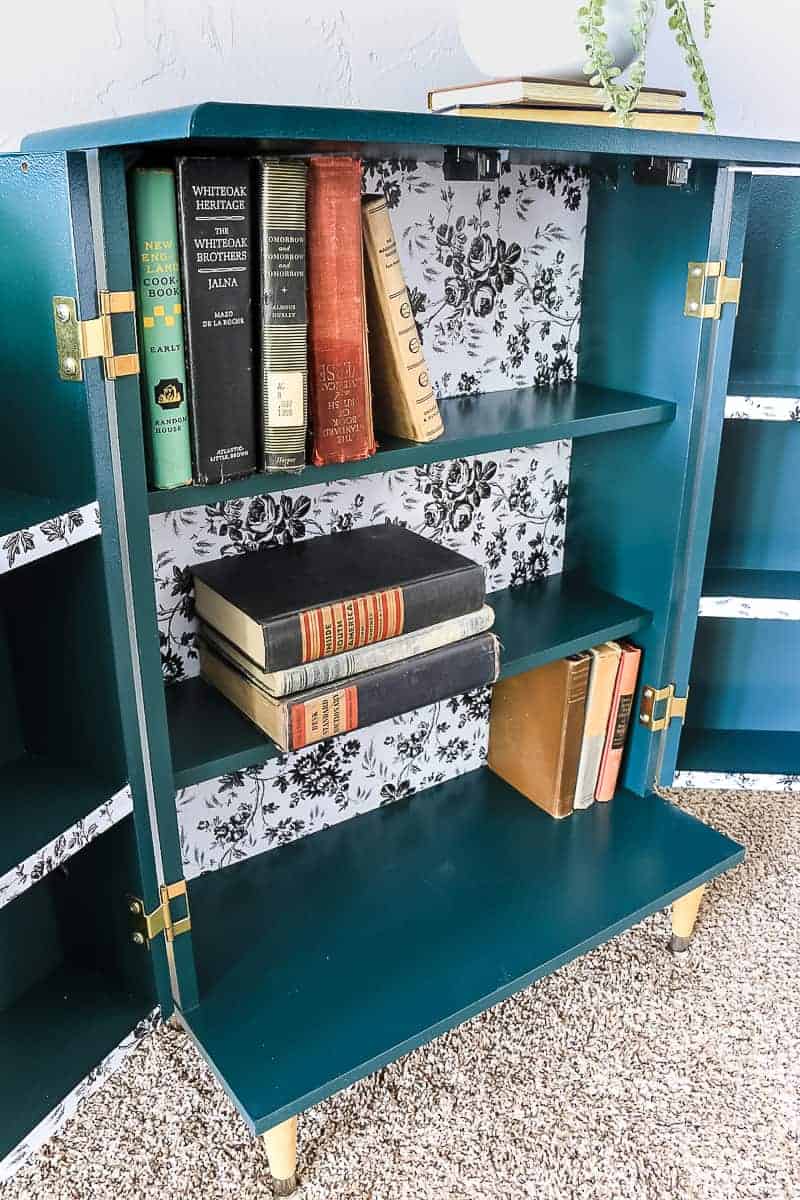
I’m SO glad I decided to add the contact paper rather than paint the back. I think it adds so much extra character.
Next time you see a cheap piece of laminate at the thrift store…. don’t pass it by. Here’s proof that with a little bit of love, you can totally do a DIY laminate cabinet makeover and turn it into something with character and charm that fits right in with your home decor style.
UPDATE – 2 YEARS LATER
Ready for truth time? We’ve finished this laminate cabinet makeover about 2 years ago, and I still love it as much as I did when I first created it. Maybe you’ve even noticed it in our photos since then because it found a home in our hallway under our wicker basket wall, and it holds my vintage book inventory for my Etsy shop now!
It is holding up nicely with a bit of normal wear and tear that you can expect with painted furniture. No chips or scratches to the paint on the laminate cabinet makeover.
But those furniture legs DID NOT last long. The front of the cabinet is pretty heavy with all of the trim added, so when the doors are open, it got a little top-heavy (and front-heavy) and damages the legs. Maybe if you don’t have toddlers messing with your boho laminate cabinet makeover, the legs could last..but ours didn’t.
P.S. I’ll thank my kids for napping that Saturday afternoon for ya. 😉
Have you ever painted laminate cabinet makeover furniture? How did it go?
Let me know in the comments below!
Before you go, be sure to check out the other blogger’s thrift store challenge projects:
- Green With Decor – Repurposed Plant Stand
- Small Stuff Counts – Painted Tin Containers
- Love & Renovations – How to Turn Anything Into a Planter

How to Make A Boho Cabinet
I snagged this laminate cabinet at a thrift store for $3! Just wait til you see the crazy DIY laminate cabinet makeover. I absolutely LOVE how this dark green boho cabinet turned out.
Materials
- Behr’s Premium Plus Ultra semi-gloss sheen
- Rapid Fuse adhesive
- Wood filler (for nail holes)
- Furniture legs
- TSP cleaner
- Primer
- Pre-primed trim
- Nails
- Wood filler (for nail holes)
- Contact Paper
Tools
- Screwdriver
- Sandpaper
- Cleaning rag
- Paint brush
- Paint tray
- Paint roller
- Miter saw
- Brad Nail Gun
- Xacto knife
Instructions
- Sand cabinet.
- Clean cabinet.
- Apply primer to cabinet.
- Cut trim pieces for front of boho style cabinet.
- Paint one coat of paint on cabinet & trim pieces.
- Install trim.
- Fill nail holes.
- Paint entire cabinet.
- Add furniture legs.


You’re amazing!! This project is SO good. I really love the contact paper inside!
Thanks! Can you believe that contact paper is from the Dollar Store? !
Chelsea! It turned out SO SO GOOD!!!! I love it so much.
Thanks girl! I love how it turned out too 🙂
Great tutorial! I have the perfect cabinet, calling for a makeover!
My style is kinda boho-ish, with a strong Mexican influence (I’m Latina & live in Arizona; what can I say??). I’ll paint mine in a stronger, more vibrant color. Maybe turquoise? Have everything but the actual paint.
Thanks again for the inspiration!
So glad that this project inspired you Esther! The design on the front really pulls in that Southwestern vibe so I think it will be perfect with your style. Turquoise would be such a fun color! If you do it, be sure to post a picture and tag me @MakingManzanita or come back to the blog post here and share it! 🙂 Can’t wait to see.
Beautiful! Thank you so much for sharing. Blessings to Y’all!
Can you tell me your feelings regarding the use of “liquid sand” instead of sanding… especially on laminate cabinets, shelving, etc.?
I have honestly never even HEARD of that!! Sorry. If I were you and considering trying it, I’d get a cheap piece of furniture from the thrift store first to try it out before doing it on something you love.
I tried it on laminate bookshelves, and it didn’t work at all.
Good to know, thanks for sharing! Becca, did you ever end up trying it?
Well done on the cabinet! It looks amazing! Fyi that cabinet was to hold VHS tapes. My parents still have one and it’s still full of old VHD movies, even though they no longer have a VCR haha ?
Haha! I knew there was SOMETHING familiar about the size of the cabinet!!
Nicely done! I love it when you can reimagine a piece like this. Some of them you can look at for years and never come up with something for it. This probably would have been one of those pieces for me…lol. I see more of a western flare in this…like someone mentioned they live in Arizona with the more Aztec look. Mine would be very colorful! I will now have my eye out for one of these old vcr cabinets. Yours is amazing!!!
Thanks! Good luck finding something!
That’s a vhs cabinet.
Thanks for the inspiration and the how to. I picked up an entertainment center yesterday for free! It’s in good shape but needs a facelift. Thanks!
Awesome, have fun with your makeover!!
I can’t believe how great this turned out! I’ve seen so much laminate furniture that I’d love to refurbish but I wasn’t sure it could be done. Thanks for showing that it can! I originally clicked on this blog post to find out where you found that awesome Paddington Station clock. Is it vintage or a reproduction I could purchase somewhere?
Thanks, I love my cabinet! The clock is a reproduction was purchased from a local shop and I haven’t been able to find it online, but here’s similar style: https://amzn.to/3b7RpDR
Just found your awesome blog! Love this project and following:)
Welcome Tanya! 🙂
hi! I saw this beautiful DIY and as luck would have I found the exact cabinet on Facebook marketplace, so of course, I got it! I’ve gathered most of my materials and now I only have the legs to get, but I was wondering how this beautiful cabinet was holding up, rather, standing up? This will be my first “big” diy and I keep seeing these “surface plates” to (I think) screw the legs into, but I noticed you didn’t use them. If you could I’d love your opinion on whether or not it would be worth adding them. I’ll be moving with this cabinet a few times (I’m not sure if that matters) and I want to make it as durable as possible because of that. Thanks in advance!
Hi there! So glad you were able to find the cabinet and you’re giving this makeover a try. Truth be told, the legs didn’t last long on this. Because of the added weight to the front with the trim, it becomes front heavy when opened. My legs that I originally tried were just too tall. I think it would work with a shorter leg for sure. And yes, I’d use a surface plate to screw the legs into for some extra durability. If do add legs, try nothing taller than 2-3 inches. Hope that helps! Once you finish, I’d love to see your finished product. Tag me @MakingManzanita on social media or pop me an email!
What is the exact color of green you used? I love this!
Here’s the color: http://homedepot.sjv.io/qGPn5
Hello. I love this transformation! I found this exact cabinet and plan on doing a similar transformation. What thickness of trim did you use? Thanks.
Awesome, glad you’re going to give this a try. I used pre-primed 1×2 trim (so that is 3/4″ thick) because that’s what we had on hand and we were trying to use up leftover supplies. If I were to do this project again, I’d probably with go with something thinner so there would be less weight. The doors are a little front heavy when opened because of the extra trim added to the them, which made it hard to keep the cabinet up on the legs that I added. Since building, I’ve removed the legs. Hope that helps! Good luck! 🙂
I have this exact cabinet! We bought it new in the early 90s for our VHS collection 😉
It is in my storage room holding my extra small decor pieces. I can’t wait to give it a spruce up and welcome it back to main living!
Yes, I’ve heard from some many that have this exact cabinet. It must have been pretty popular in the 90s 🙂 ! So fun to see them all getting new life.
Thanks for the tutorial…… another thought as an alternative would be a bar….I could see the liquor in the middle and glasses and bar accessories on the side doors after adding a small lip to the shelves…… well done.
Yes, great idea!
I absolutely love this diy. Excellently job!
Thanks, this one is still one of my favorites!
For those of us without all the tools and ability I think sanding then collaging or using peel and stick paper would be a good option.
Yes there are definitely tons of other ways to upcycle a cabinet like this! Great ideas.
Hi! This is such a great upcycling project! We actually have one of these exact cabinets (along with many others!) at our local ReStore, where I run a nonprofit classroom teaching repair, refinishing, and repurposing. We’re planning to host a class on this very project next month. Would you mind if I borrowed one of your images to use on our page? Of course I would credit you and link to your site, if you like. I’ve added our website below. Thanks so much!
Yes, that is fine! Please just include no more than one image and link back to this post. Appreciate you asking 🙂 Have a great day.