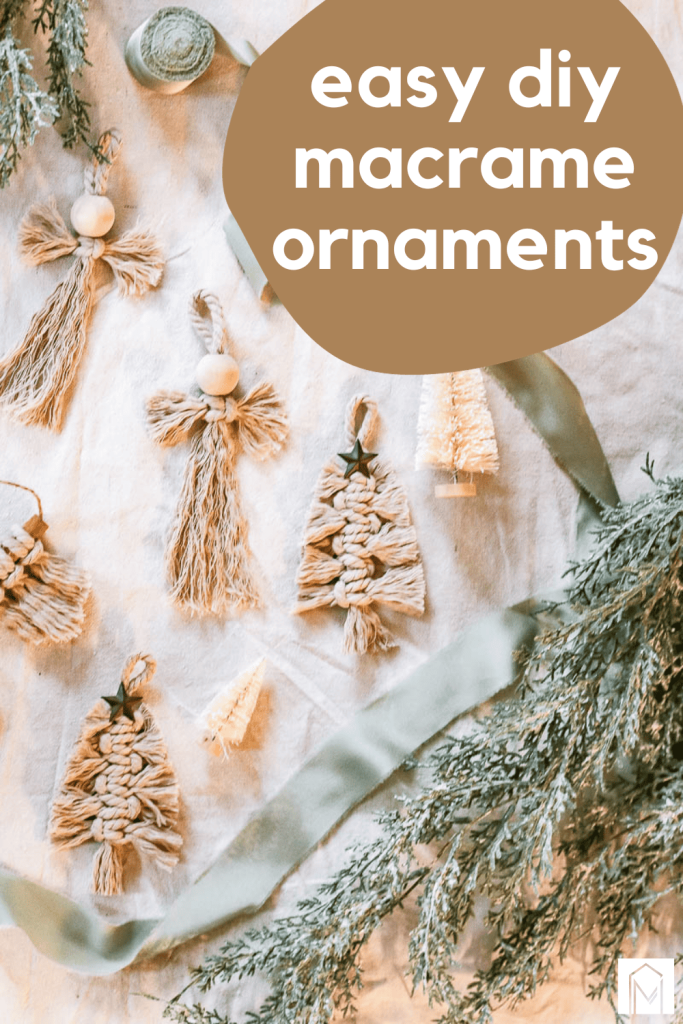
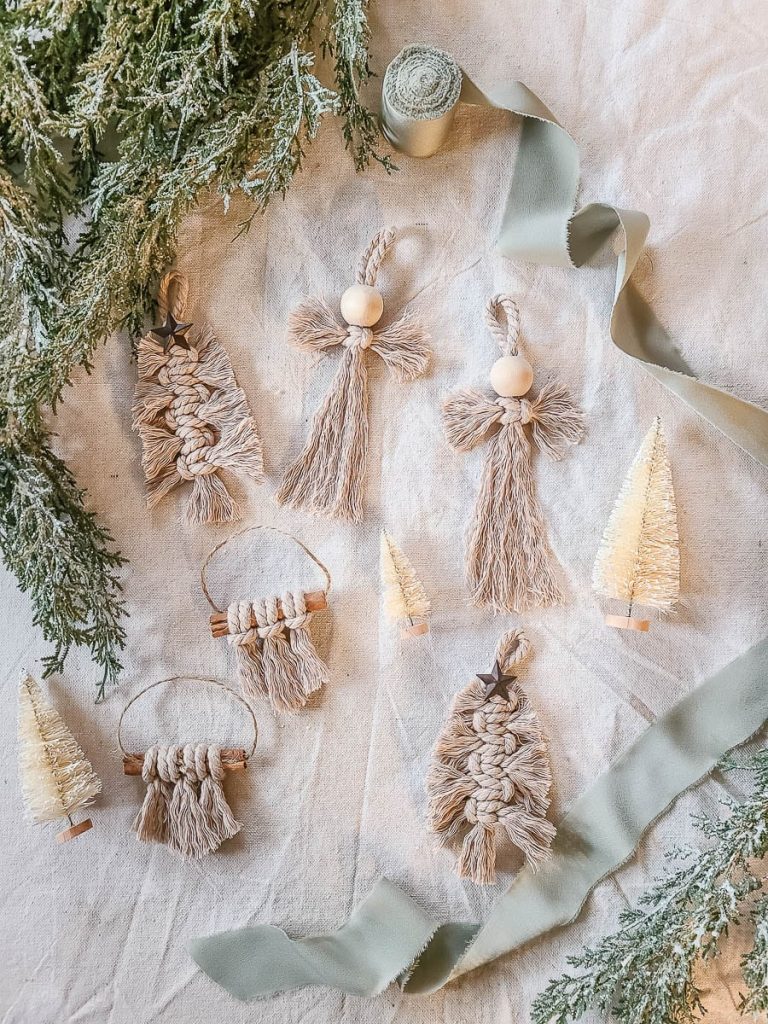
Macrame Christmas Ornaments: 3 Easy Versions

Looking for boho tree decorations? Make these easy DIY macrame Christmas ornaments! Follow along with each step-by-step tutorial to make three different ornaments with macrame!
When I knew I was going to add a Christmas tree to decorate my bedroom for the holiday season, I knew I wanted to make it all boho! I had so much fun getting creative with ornaments for the tree – like these textured ornaments, mercury glass ornaments, and wood bead ornaments.
But what is more boho than macrame projects? I had some leftover macrame cording from this macrame feather project, so I put that cord to work with three different versions of macrame Christmas ornaments!
Table of Contents
Never done macrame before? No worries! We’re using super basic techniques here that require no macrame experience! And I’m going to break it all down for you with detailed step-by-step instructions.
Not only am I including written tutorials below, but we’re also including detailed instructions in a video format – which is sometimes easier with active craft like this. We shared these projects in both individual step-by-step tutorials on our YouTube channel and combined together into one video if you prefer to watch them all at once, which is at the end of the tutorials below.
Each of these macrame Christmas ornaments is SUPER simple and should only take you about 5-10 minutes a piece. So put on a good Christmas movie and make a bunch.
They would look great added to your holiday decor or as handmade Christmas ornaments. Adding them to the front of a wrapped present in place of a bow is a great idea for a little extra touch!
This DIY macrame Christmas ornaments tutorial contains affiliate links, but nothing that I wouldn’t recommend wholeheartedly. Read my full disclosure here.
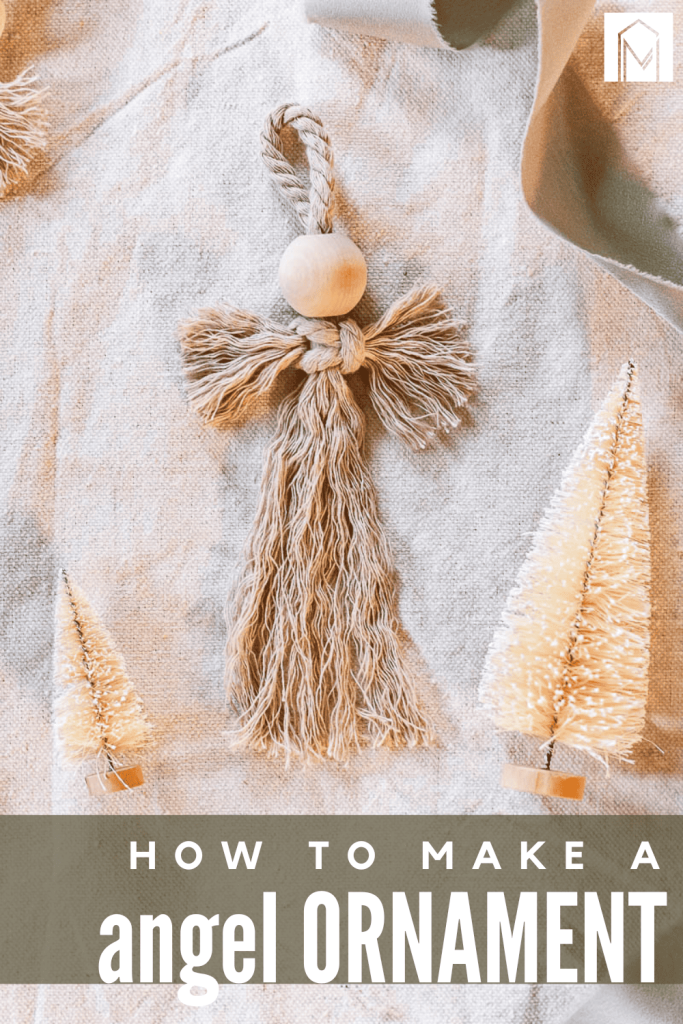
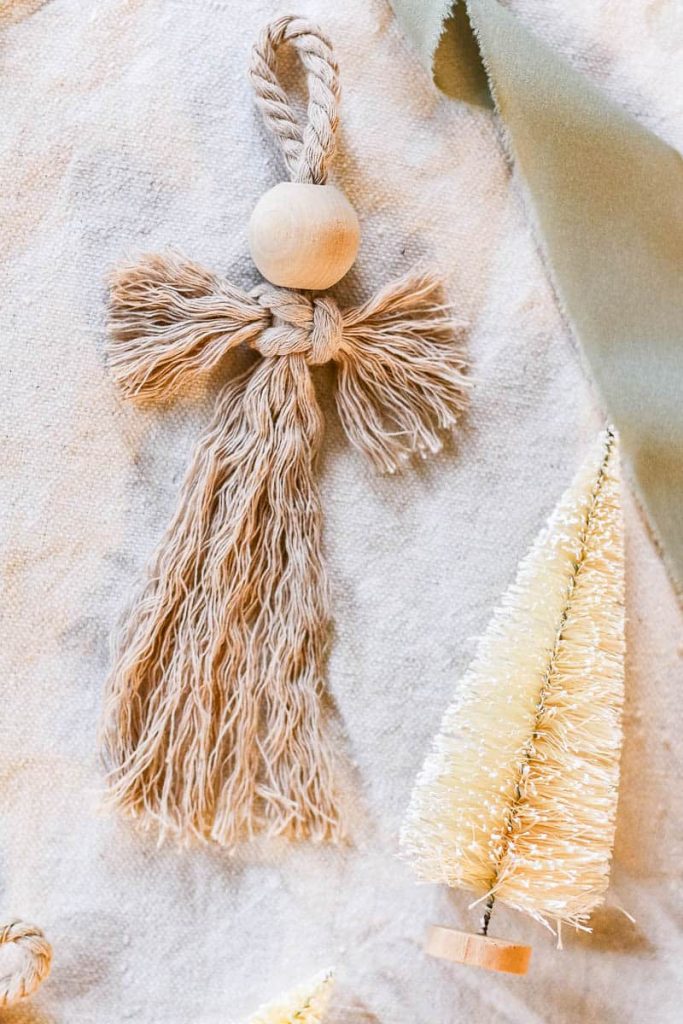
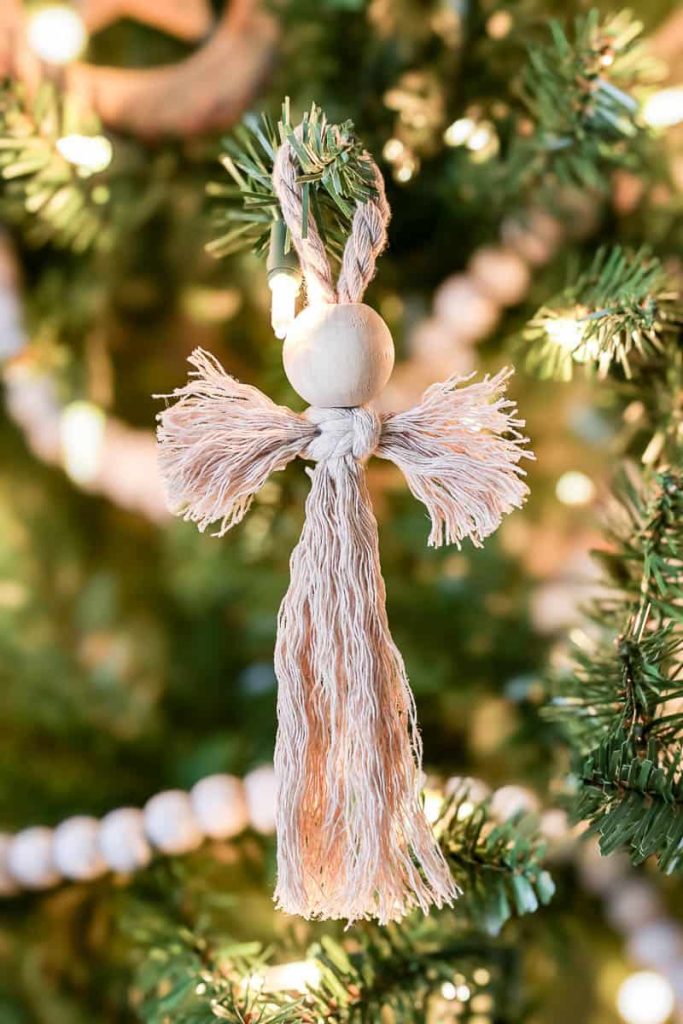
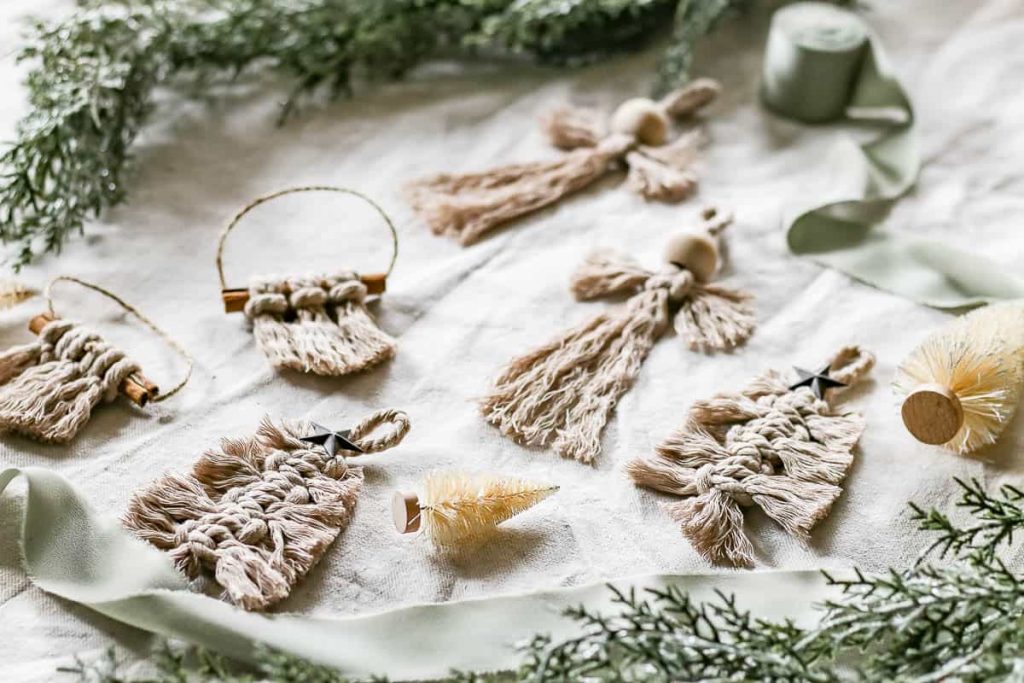
Ornament #1: Macrame Angel
Video Tutorial
If you love DIY videos, don’t forget to subscribe to our YouTube channel!
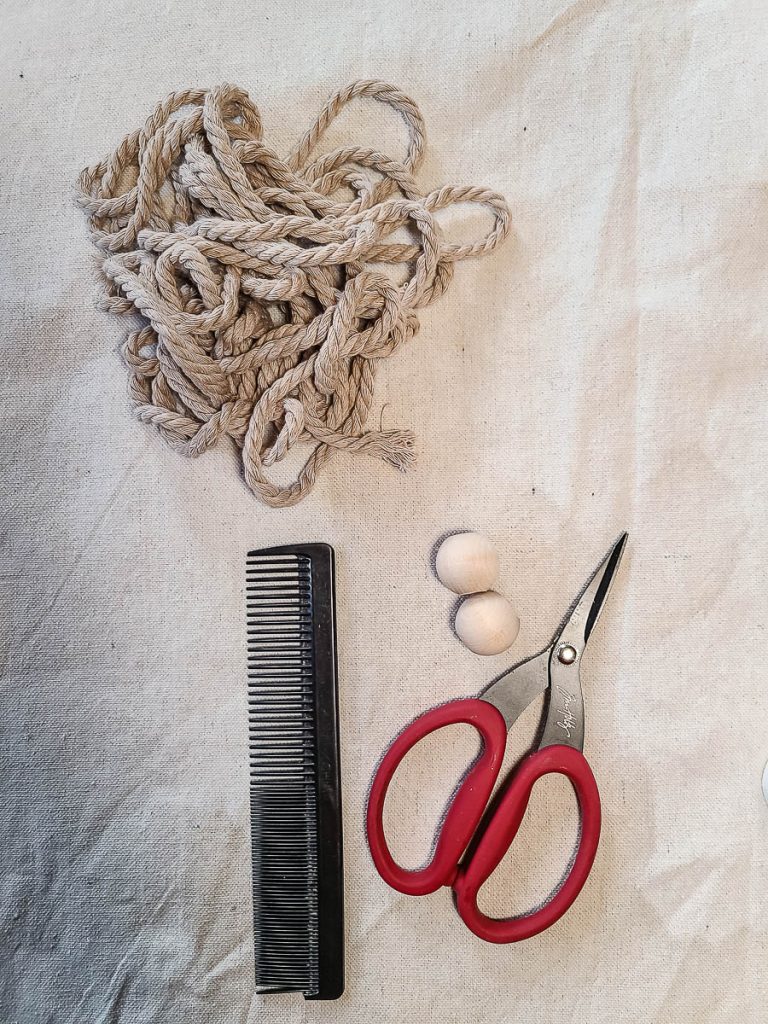
Supplies for macrame angel ornament
- 5mm macrame cording
- Wood bead with a hole at least 3/8″ – I used 25mm with a 3/8″ hole
- Scissors
- Measuring tape or ruler
- Comb (or pet brush)
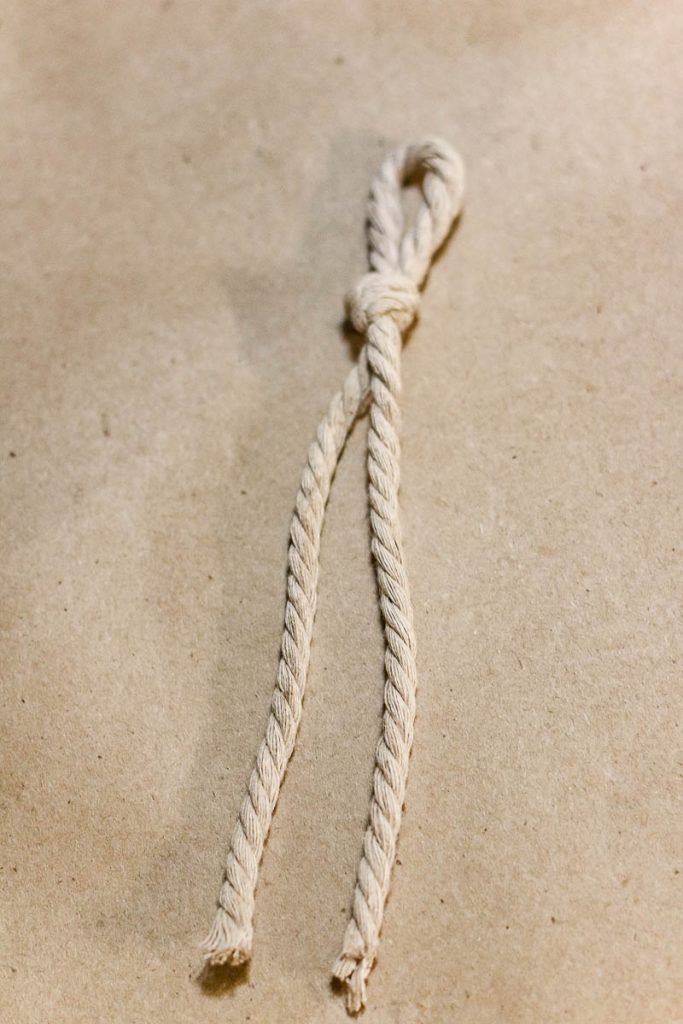
Step 1: Cut macrame
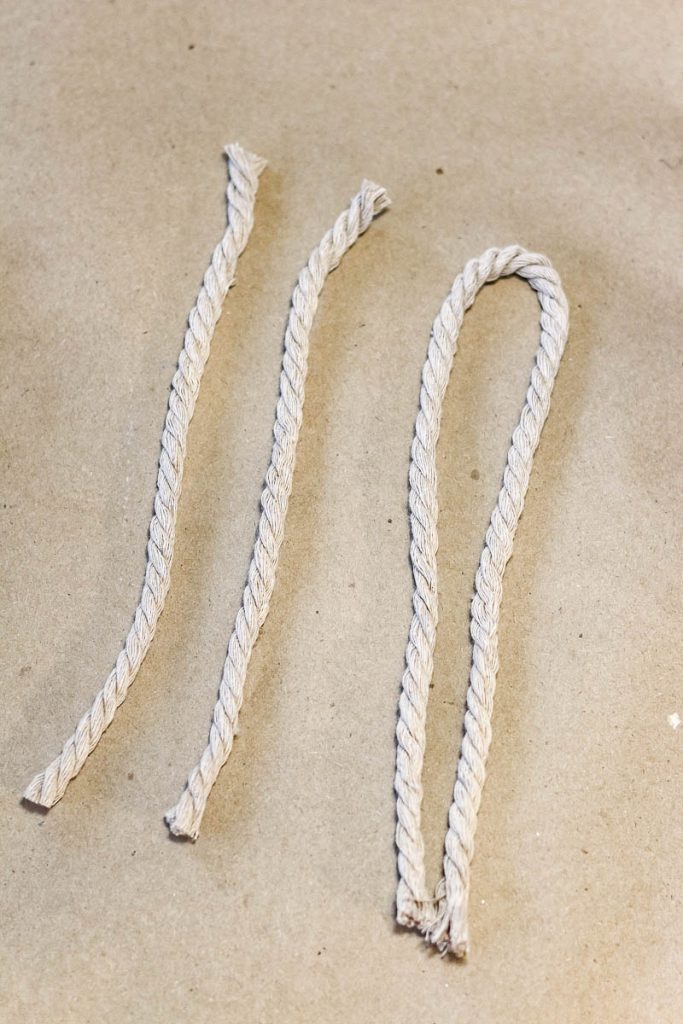
Using scissors and a ruler or measuring tape, cut one piece of macrame approximately 14″ long and two pieces of macrame approximately 7″ long.
Step 2: Add wood bead
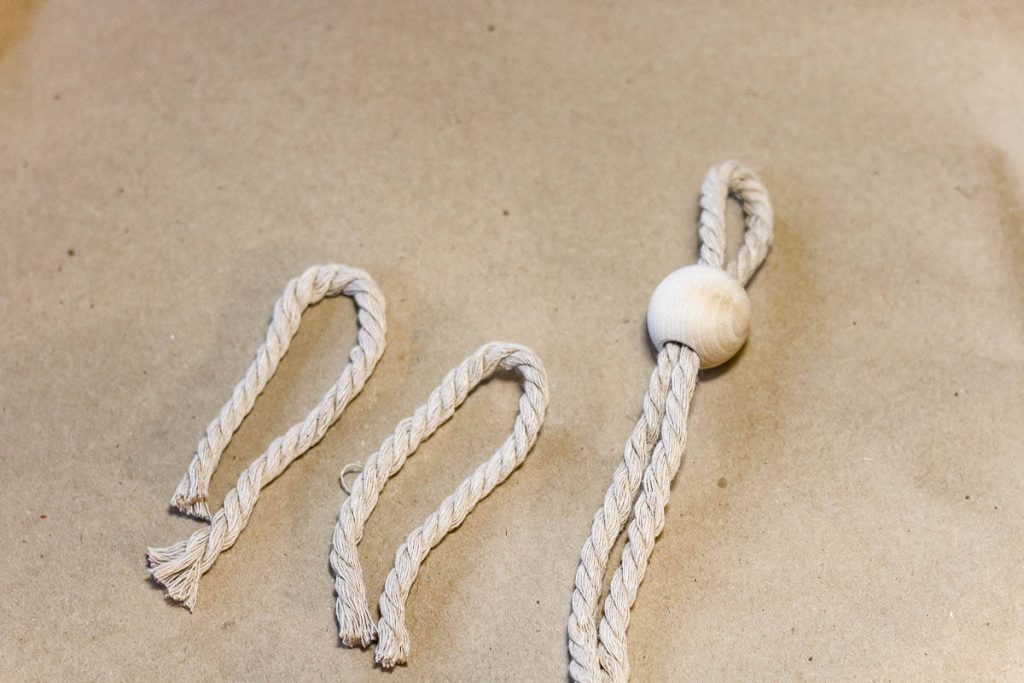
Fold the 14-inch piece in half and push the wood bead onto the folded end of the macrame cord. Push the wood down about an inch or two.
The part of the macrame that is above the wood bead will be what is used to hang the ornament on the tree, so make sure it is big enough to comfortably do that. I found that I need about two inches of the top of the ornament.
Step 3: Add wings
Now, this part can look kind of confusing, but I promise you’ll quickly get the hang of it quickly once you try it.
It may be easier for you to see it in action by watching the YouTube video that I put above the supply list. That breaks the whole square knotting process down slowly.
If you want to get “technical” here, the type of knot that you are using on this is a square knot. And square knots are one of the most basic macrame knots!
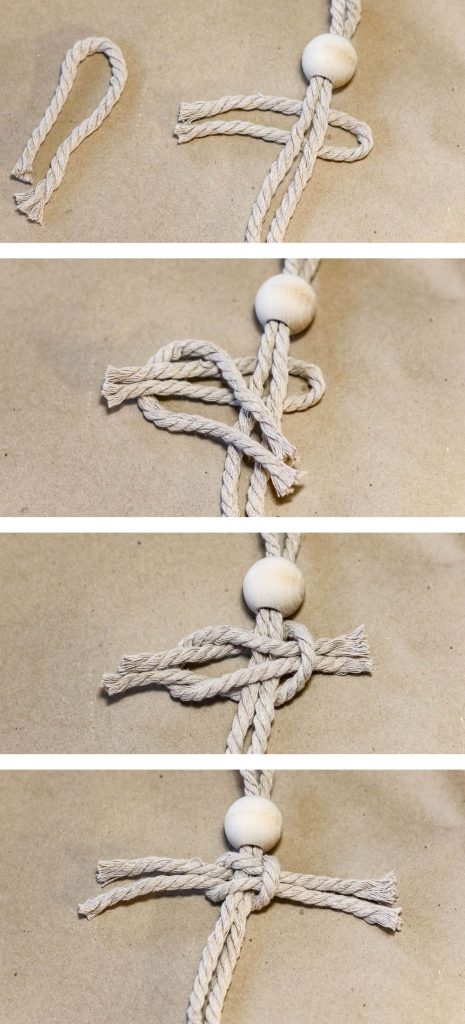
But here’s the general process of the square knot:
- Take the 2 pieces of 7″ macrame yarn. Let’s call these Piece A and Piece B.
- Fold both pieces in half
- Put one short piece (Piece A) under the center cord, positioned horizontally
- Take the loose ends of Piece A and put them through the folded end of Piece B (coming up from the backside)
- On the other side of the center cord, take the loose ends of Piece B and put them through the folded end of Piece A (coming down from the front side)
- Lay both Pieces A and B flat
- Gently pull both pieces taut, grabbing the loose ends and pulling outwards each in the opposite direction
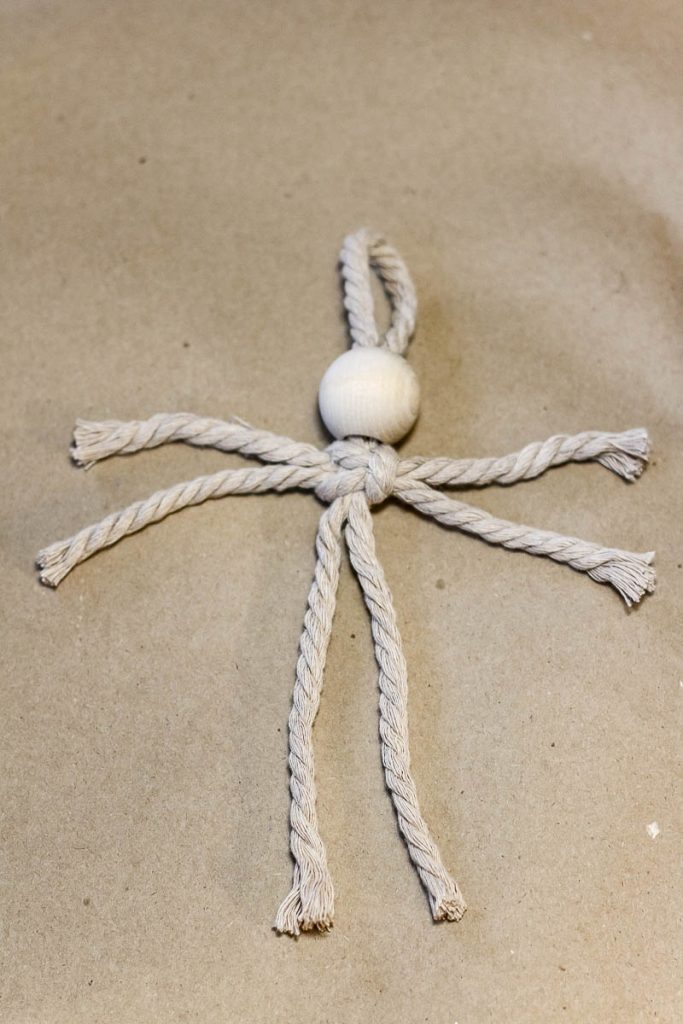
Step 4: Unravel macrame with a comb
Gently unravel the macrame on the bottom and on both sides.
To untangle the macrame cording, a comb did the trick for me. I also tested a pet hair brush too—because I saw others do it. But hey, the comb won me over because it seemed way easier.
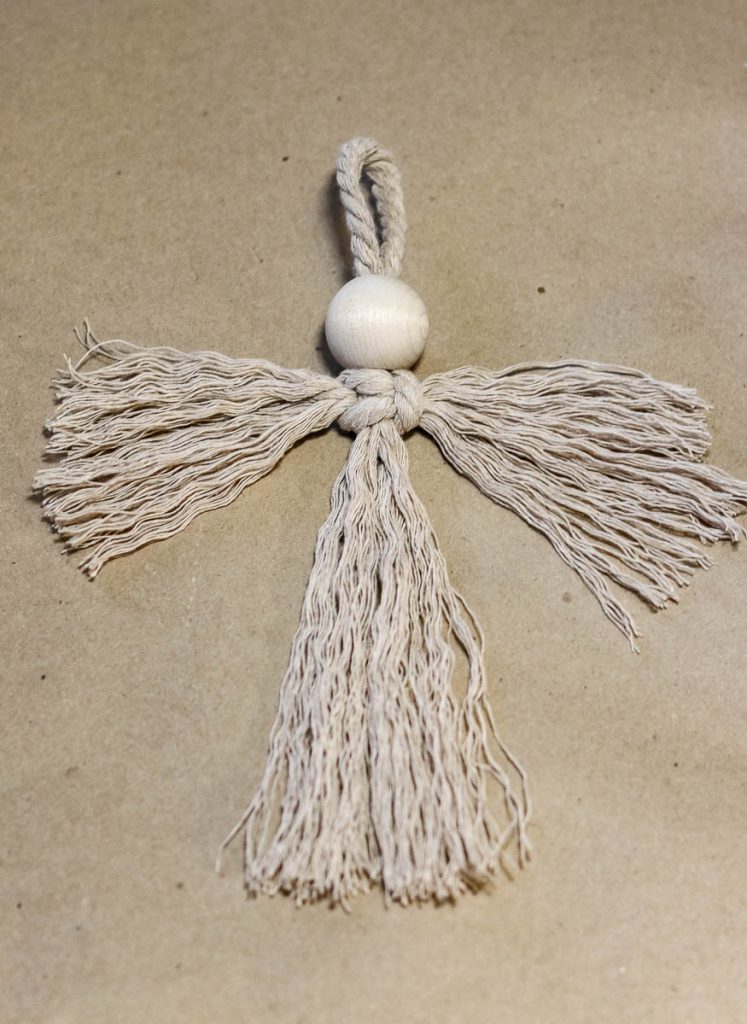
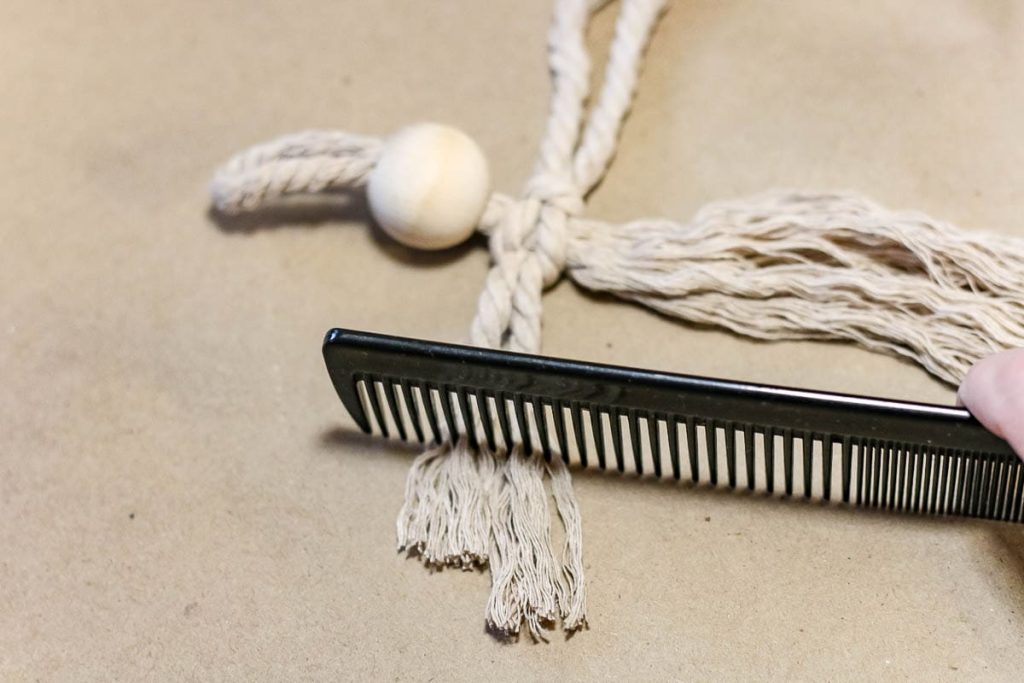
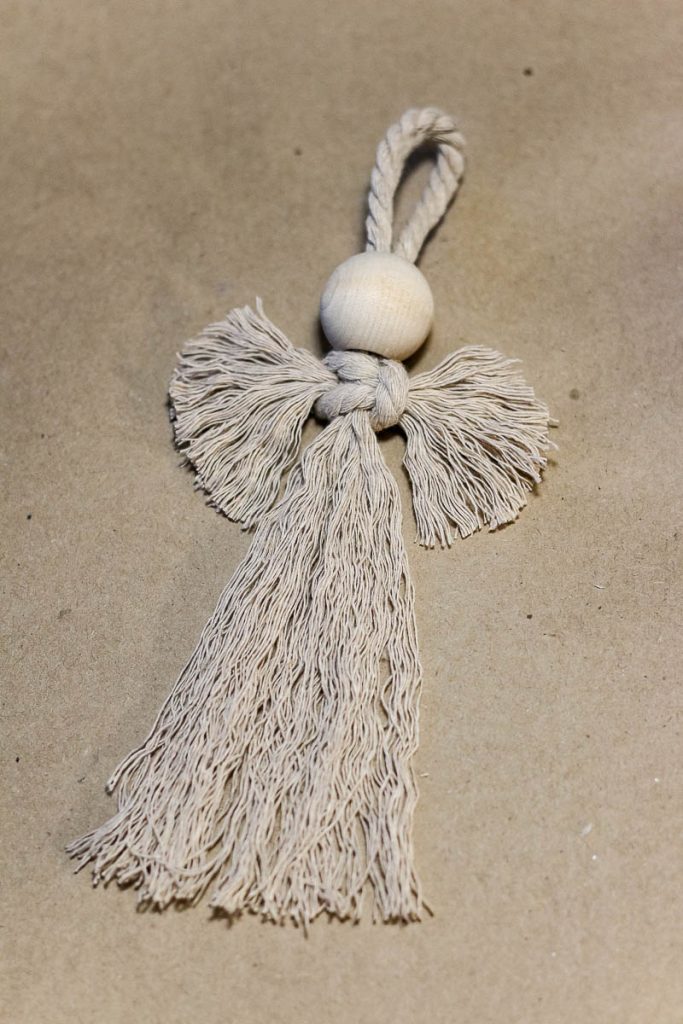
Step 5: Trim macrame
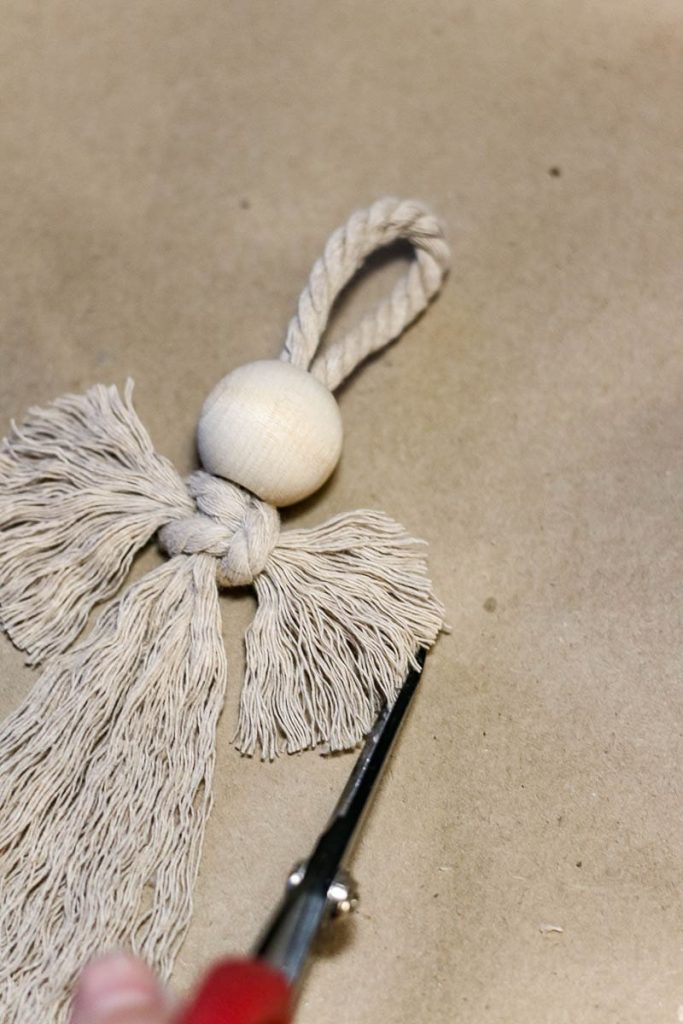
Trim up the bottom of the tassel with scissors so the bottoms are nice and uniform.
For the wings of the macrame angel, I trimmed them each down to about an inch and a half to 2 inches, rounding them at the top and bottom towards the middle.
Any longer than this and they will probably not stand up straight when hanging because they will be too heavy.
If you do want them longer, you can use a fabric stiffener spray, like I did on these macrame feathers, to help keep their shape.
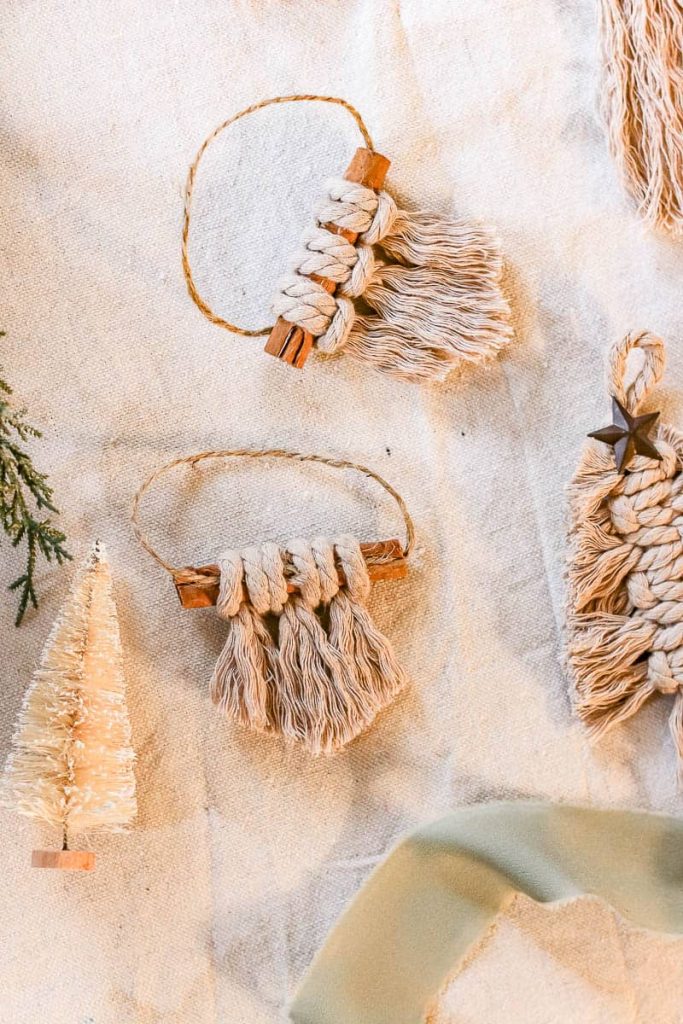
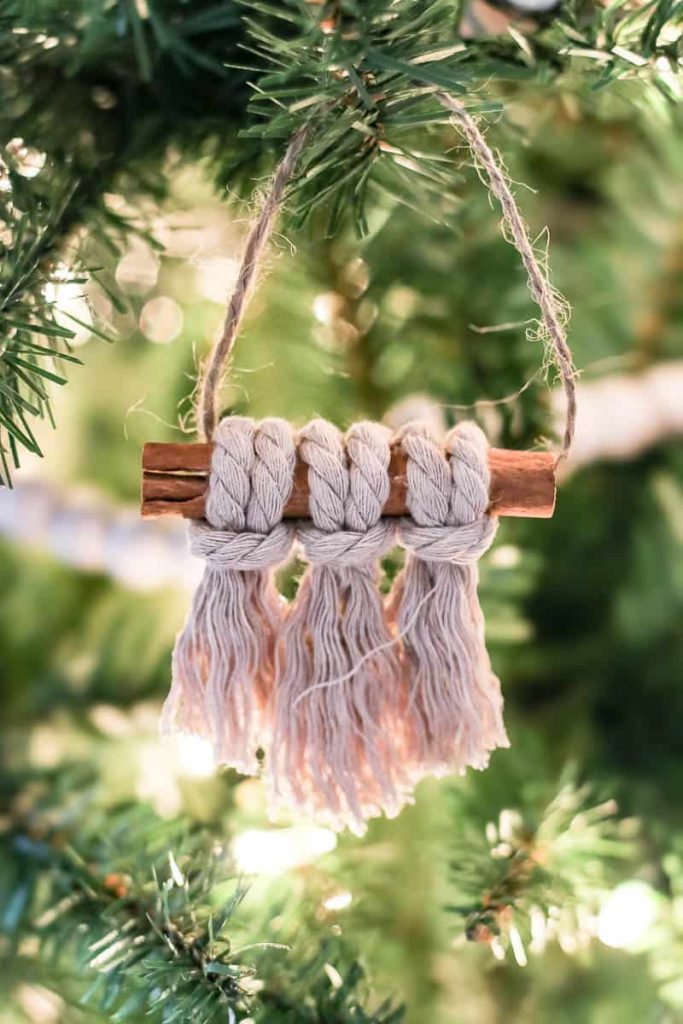
Ornament #2: Macrame Ornament with Cinnamon Stick

Video Tutorial
If you love DIY videos, don’t forget to subscribe to our YouTube channel!
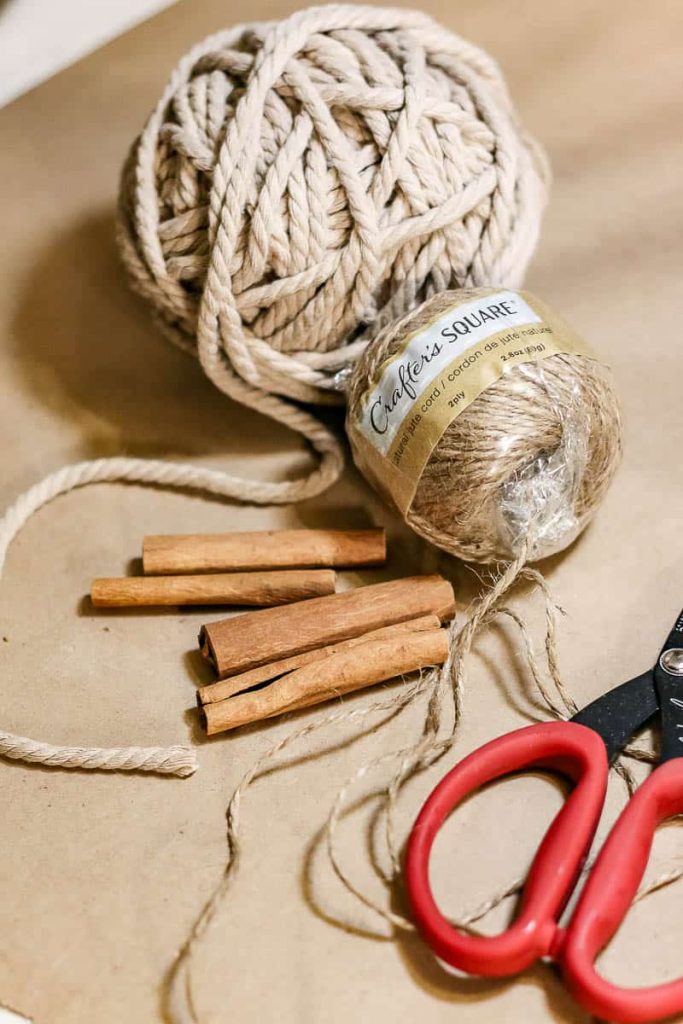
Supplies for cinnamon stick ornament:
- 5mm macrame cord
- Jute twine
- Cinnamon stick
- Scissors
- Measuring tape or ruler
- Comb (or pet brush)
Step 1: Add hanger to cinnamon stick
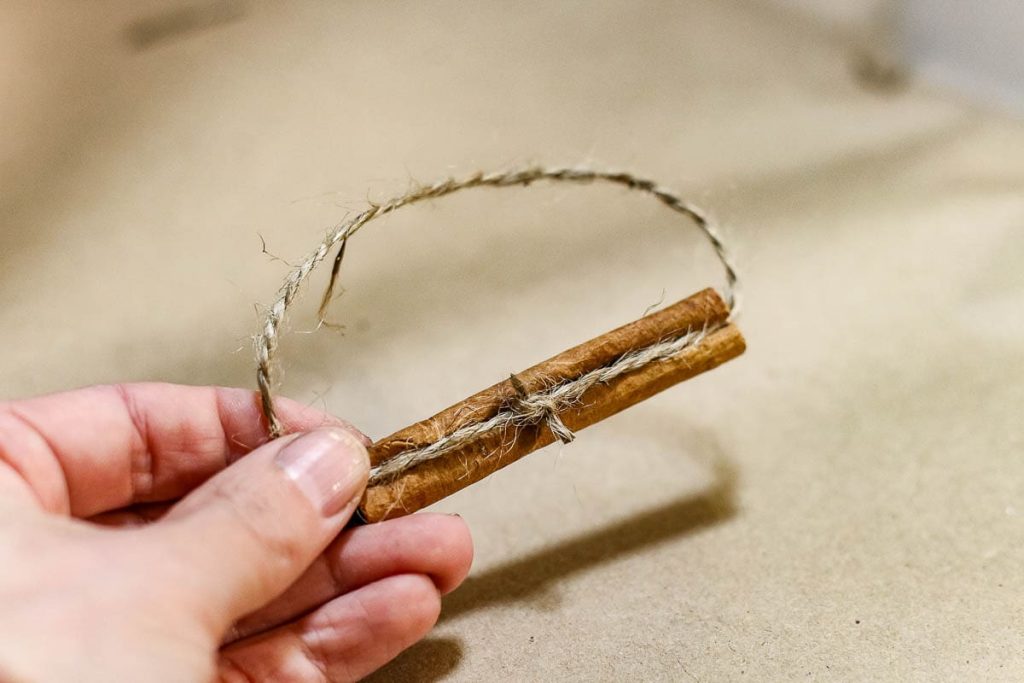
Push a small piece of jute twine into the groove of the cinnamon stick and tie it at the top in a simple knot.
You can also opt to hide the knot down by the cinnamon stick, which will be covered by the macrame cording. This piece of twine will be the hanger to add this ornament to your Christmas tree.
Step 2: Cut macrame
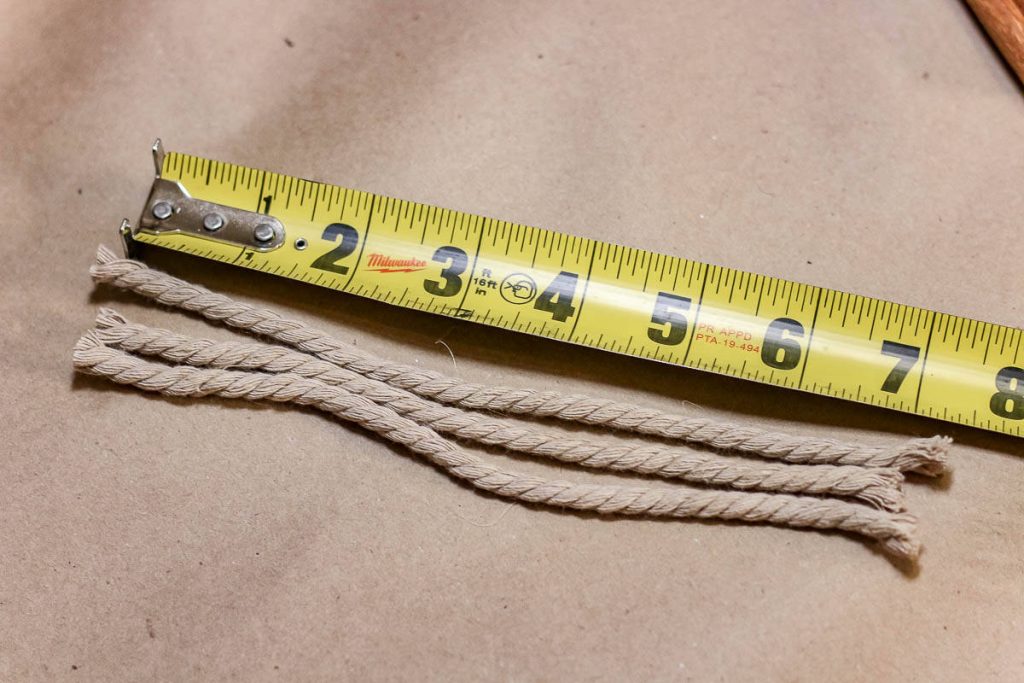
With scissors, cut three pieces of macrame cording all about 7 inches long.
Since this one uses only small pieces of short pieces of cording, this is a great way to use up scrap macrame cord that you may have left over from another project.
Step 3: Add macrame to cinnamon stick
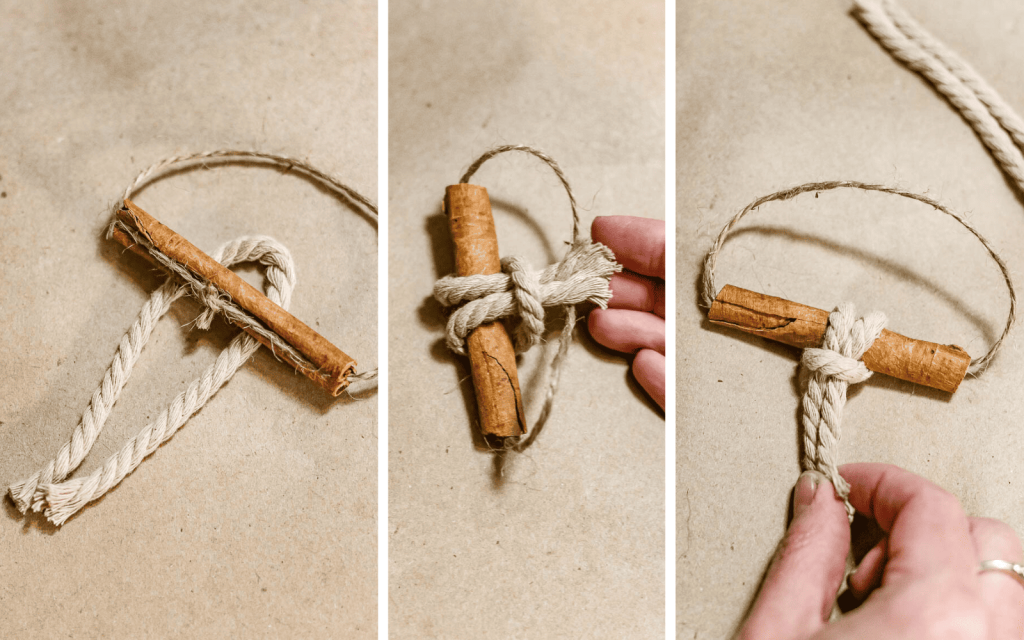
To tie the small macrame pieces of the cinnamon stick, we’re using a lark’s head knot – another one of the basic knots in the art of macrame. Don’t worry it is REALLY easy!
Fold the piece of macrame in half and put the folded end under the cinnamon stick. Pull up the two other ends of the cord and loop them over the cinnamon stick and through the loop at the folded end.
Then cinch it up and pull the two ends snug.
Repeat with the other two pieces of macrame, adding all three to the cinnamon stick with this type of knot.
Step 4: Unravel macrame
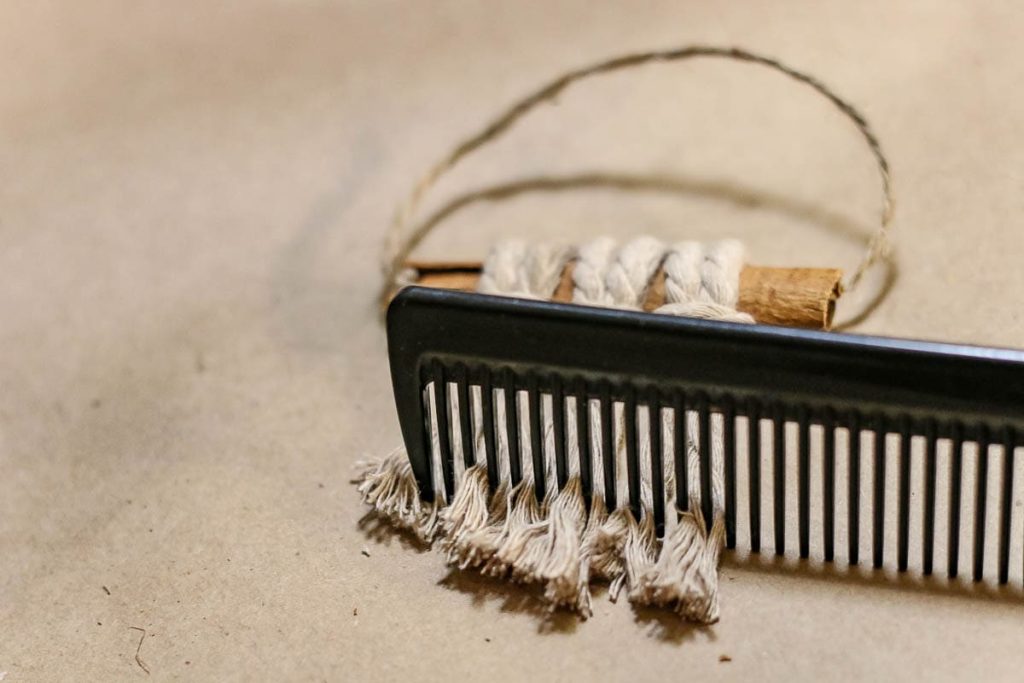
Gently unravel the ends of the macrame with a plastic comb so they are nice and fluffy.
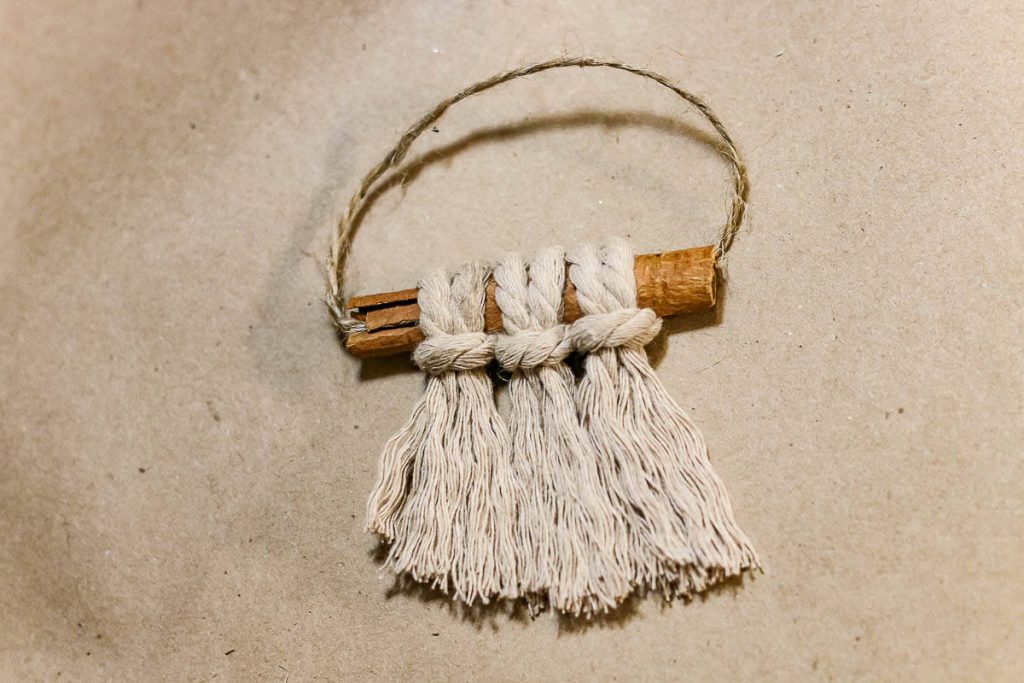
Step 5: Cut macrame ends
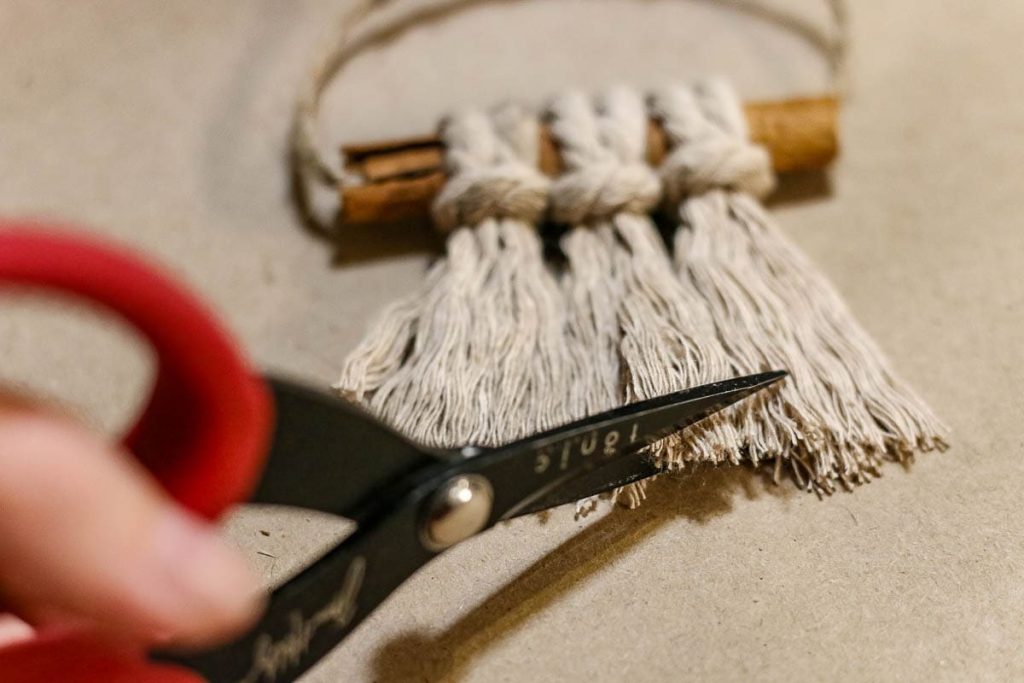
Now you can cut the ends of the macrame however you’d like. The easiest way to do this is by holding the cord in between your middle finger and index finger.

You could do straight, angled, or triangular. I opted to cut the ends in a triangle shape with a point in the middle.
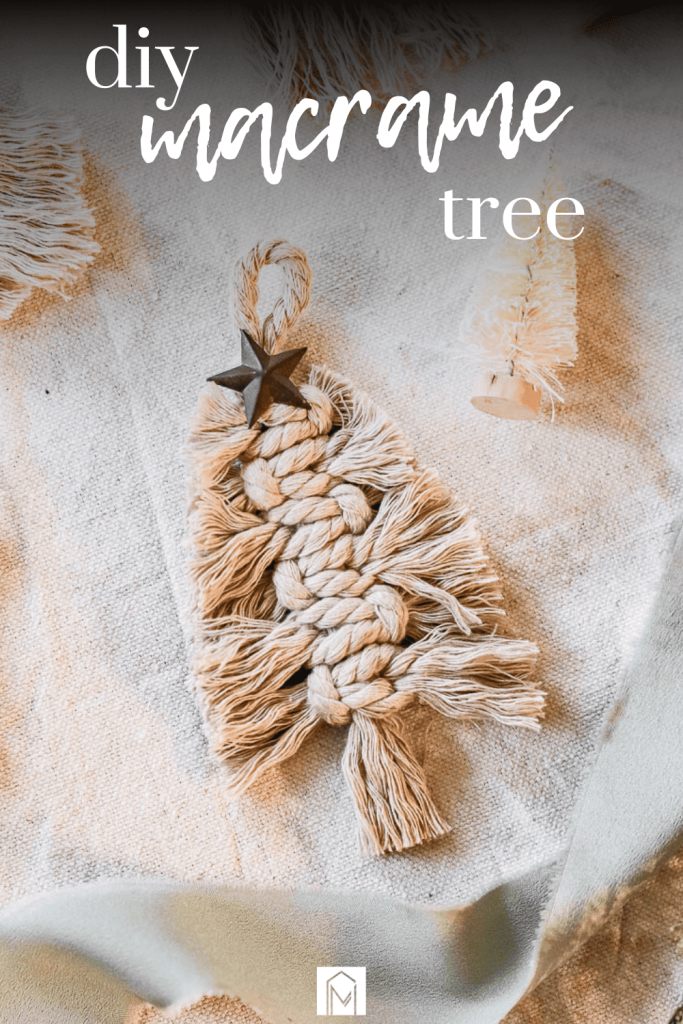
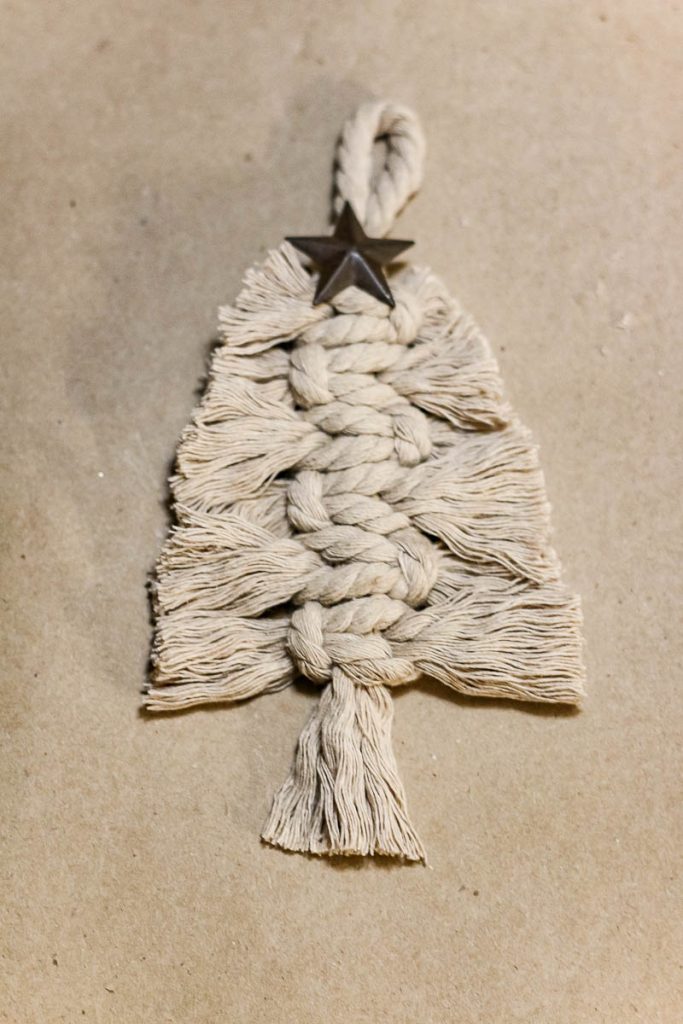
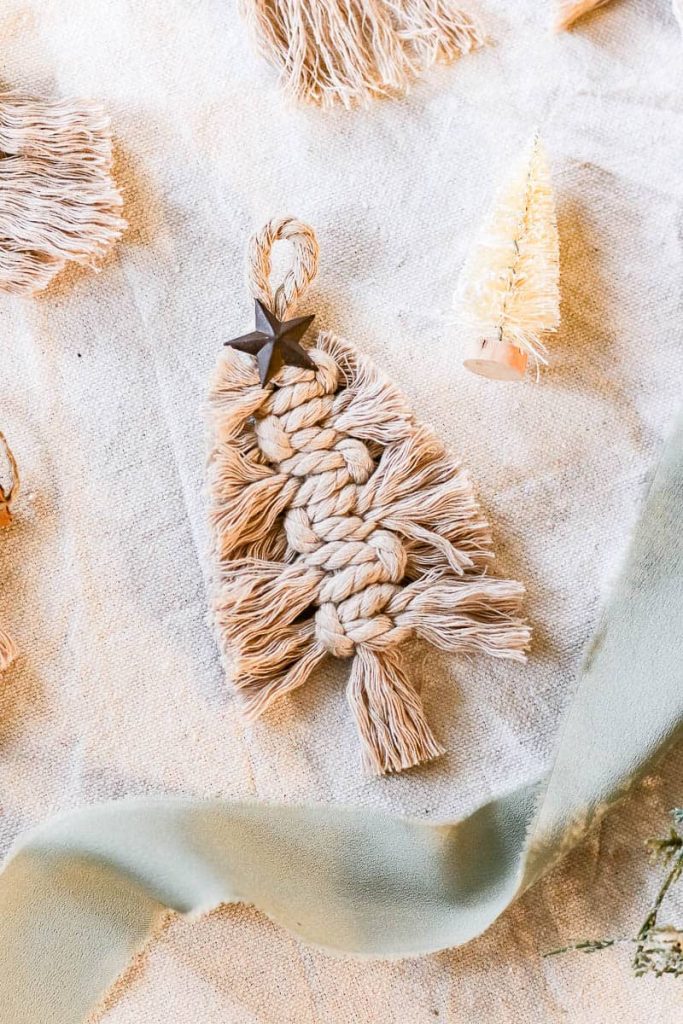
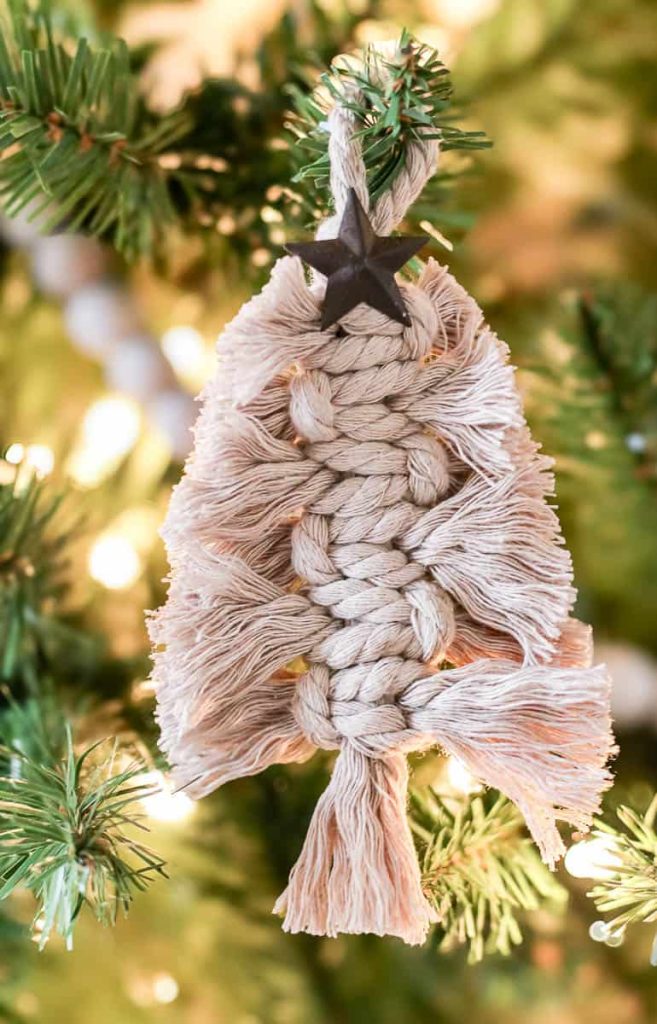
Ornament #3: Macrame Christmas Tree Ornament
Video Tutorial
If you love DIY videos, don’t forget to subscribe to our YouTube channel!
Supplies for macrame tree ornament:
- 5mm macrame yarn
- Scissors – you’ll want some extra sharp detail scissors for this one, like these
- Measuring tape or ruler
- Comb (or pet brush)
- Small metal star
- RapidFuse Super Glue
Step 1: Cut macrame
Cut one piece of macrame approximately 16 inches long for the center and 12 pieces 6 or 7 inches long for the branches of the mini Christmas tree.
Step 2: Prepare the center cord
Fold the longest piece of cord in half and tie a simple overhand knot at the top about 2 inches from the top. This is how your macrame ornament will hang from the Christmas tree.
Step 3: Tie the cords to the center piece
This process of adding the knotted cord to the center piece for the tree branches is called the square knot.
This is the exact same process as attaching the wings on the macrame angel that was made earlier in this article. The only difference here is that you’ll keep going after the first one.
Remember although it looks a little complicated, it really is pretty simple! For this one, you get the chance to repeat the knot several times so you’ll get it down quickly. It is one of the simplest knots!
It may be easier for you to see it in action by watching the YouTube video tutorial that I put above the supply list. That breaks the whole square knotting process down slowly.
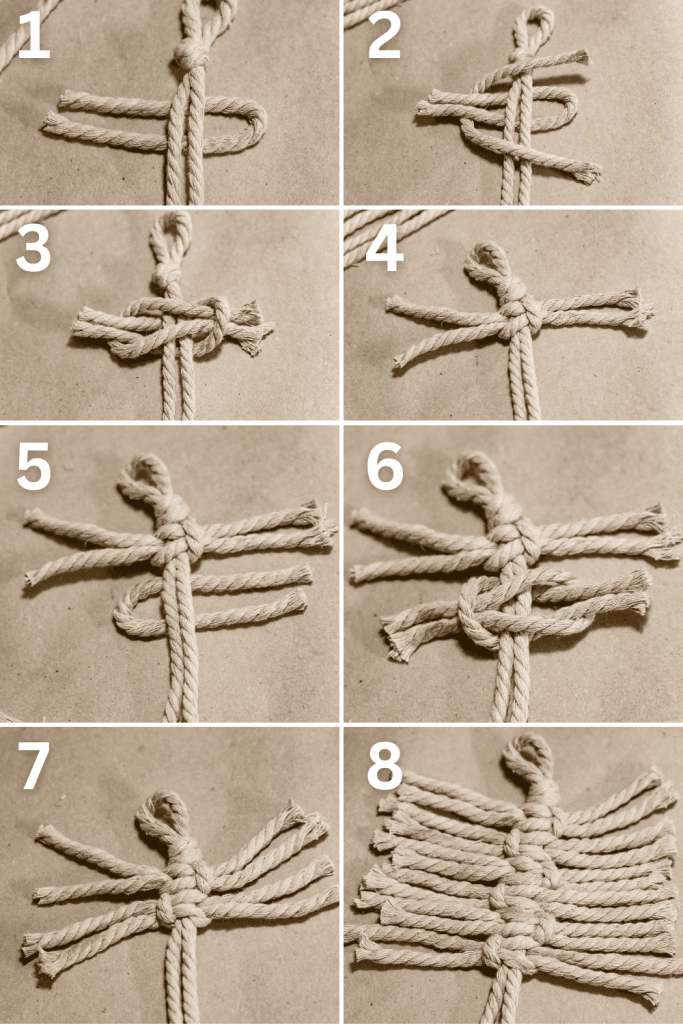
If you need a refresher, here’s the square knot process broken down:
- Take 2 pieces of cording from the pile that you cut in the previous step. Let’s call these Piece A and Piece B.
- Fold both pieces in half
- Put one piece (Piece A) under the center cord, positioned horizontally
- Take the loose ends of Piece A and put them through the folded end of Piece B (coming up from the backside)
- On the other side of the center cord, take the loose ends of Piece B and put them through the folded end of Piece A (coming down from the front side)
- Lay both Pieces A and B flat
- Gently pull both pieces taut, grabbing the loose ends and pulling outwards
- Repeat the entire process, but this time position Piece A going the opposite direction under the center cord.
- As you continue tying pieces of the center cord, push them up toward the top.
Step 4: Unravel macrame
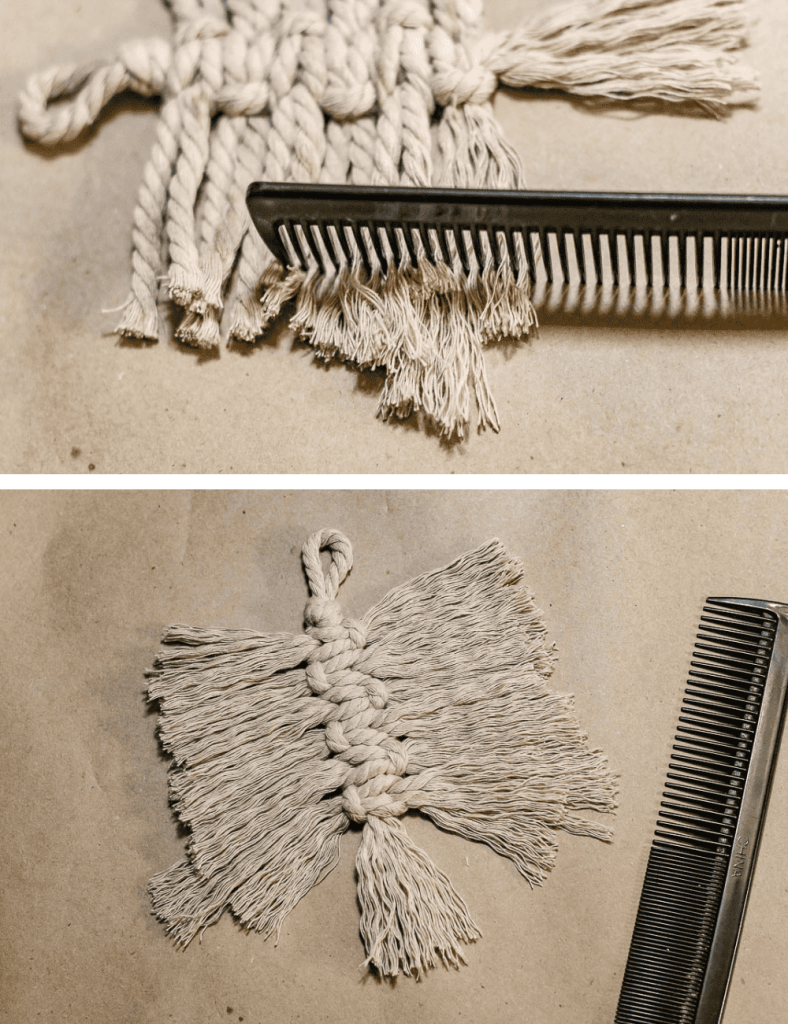
Gently unravel the ends of the macrame with a plastic comb, just like you have done for the other DIY macrame ornaments.
Step 5: Trim macrame
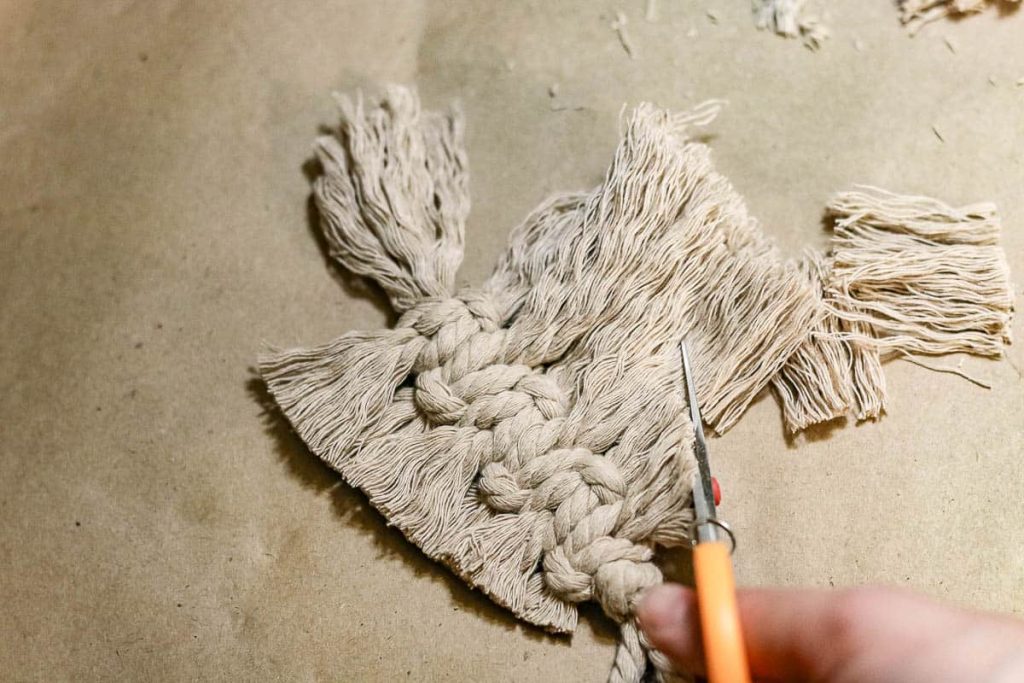
Trim up the sides of the macrame so they are in the shape of a Christmas tree, getting smaller at the top. I found that it was easiest to trim off most of the excess cording roughly first and then clean up after that.
I also trimmed the bottom part which would be the “stump” of the tree so it was nice and uniform across the bottom.
Step 6: Add a star
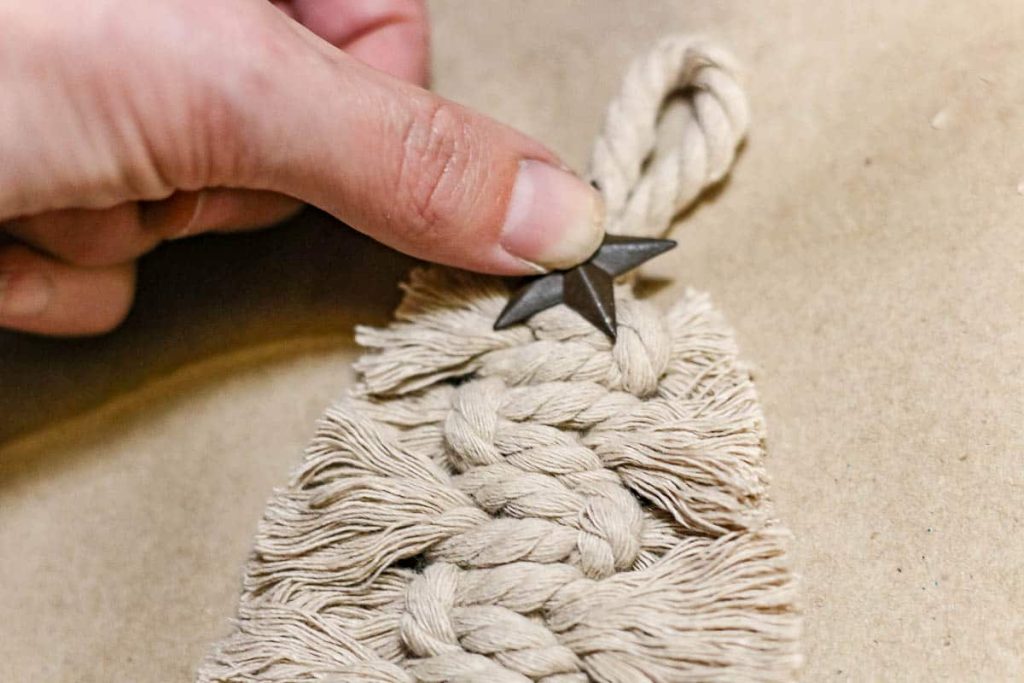
To make this macrame ornament look a little more like a Christmas tree, it helps to add a star to the top! This is just an extra special touch that is not 100% necessary.
I had these small metal stars in my craft supplies and they worked perfectly. I simply added it to the top of the ornament with a little bit of RapidFuse Super Glue on the back.
If you’re looking for a holiday project this year to get in the Christmas spirit, these easy macrame Christmas ornaments are perfect! You don’t need much experience with macrame or have many supplies on hand.
Macrame Christmas Ornaments – Watch All Video Tutorials
If you love DIY videos, don’t forget to subscribe to our YouTube channel!
Which of these macrame Christmas ornaments is your favorite?
Want to see more Christmas craft projects? Check out these posts!
- Fake Gingerbread House with Dollar Tree Dollhouse
- DIY Wood Nativity Scene
- How To Make A Christmas Tree Star with Yarn and Cardboard
- Wood Bead Ornaments: 3 Easy Tutorials
- Macrame Christmas Ornaments: 3 Easy Versions
- How To Make Easy Faux DIY Mercury Glass Christmas Ornaments
- DIY Matte Textured Ornaments with Dollar Tree Ornaments
- Homemade Mulling Spices for Christmas Gifts with Free Printable Tag
- Easy DIY Stovetop Potpourri Gift Idea with Free Printable Tags
- How To Make Cheap and Easy Paper Bag Snowflakes with Lunch Bags
- How To Make Cotton Ball Garland for Less Than $5
- DIY Stocking Tags | Cheap & Easy Idea Anyone Can Do
- Easy DIY Gnome for Christmas Decor Using Dollar Store Materials
- Easy Boho DIY Yarn Christmas Trees
- DIY Christmas Village Makeover For Less Than $10
- Handmade Christmas Ornament with Farmhouse Style
- DIY Wrapping Paper For Christmas Gift Wrap
- How To Make Christmas Gift Tags With The Silhouette Mint
- DIY Dreamcatcher Ornament for Boho Christmas Tree
- Easy Leather Christmas Ornaments – Circles with Wood Beads
- DIY Leather Ornaments – Mini Christmas Tree with Wood Beads
- How To Make A Fabric Christmas Tree
- Rustic Christmas Advent Calendar
- Fabric Christmas Ornaments Made With Homespun Fabric – 4 Different Tutorials
- Cozy Sweater Covered Vases