
DIY Cabinet Pull Out Shelves for Kitchen (with free plans)
Build your own DIY cabinet pull out shelves for your kitchen with this step-by-step tutorial using plywood and pocket holes. Perfect for adding easy kitchen storage! Don't forget to download the free woodworking plans to make this build easier.
Thank you to Kreg for sponsoring these DIY cabinet pull out shelves! All opinions are entirely my own. This post also contains affiliate links, but nothing that I wouldn’t recommend wholeheartedly. Read my full disclosure here.
If your kitchen cabinets feel like a black hole where things disappear, this easy woodworking project is about to fix that.
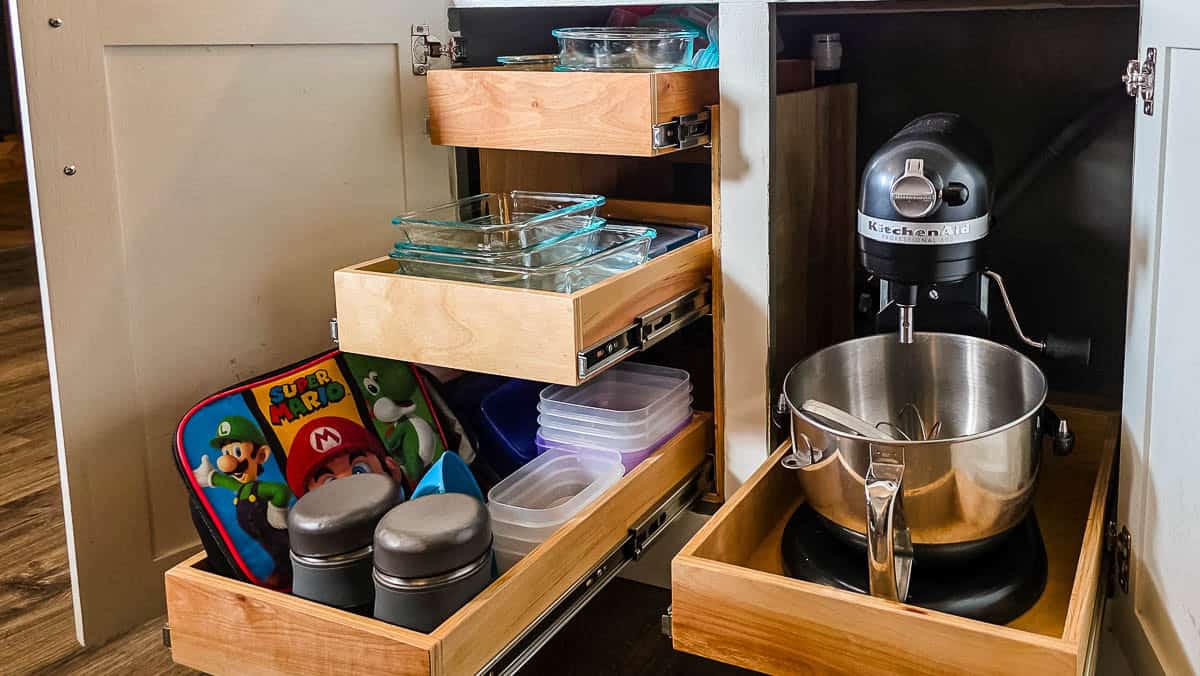
We built a set of custom pull-out drawers to make our kitchen island cabinet actually work for us.

One drawer is heavy-duty and designed to hold our KitchenAid stand mixer, so no more taking everything out of the cabinet just to get to the back where to pull the mixer out every time we want to use it.
Right next to it, we added a vertical tower of pull-out shelves to organize food storage containers and create a grab-and-go spot for the kids’ lunch supplies.
Everything is built from plywood and assembled with pocket holes, so it’s a very doable project even if you’re newer to woodworking. And using the Kreg Rebel made the process faster and way more straightforward.
If you’re tired of digging through deep cabinets and want a simple, functional upgrade, this is one of those wood projects that makes everyday life a whole lot easier.
Kreg Rebel Pocket Hole Joiner
If you’ve been around here for a while, you know we’re big fans of pocket holes when it comes to woodworking projects.
We’ve built a lot of projects with our older pocket hole jigs, like the 720Pro and 520, and even shared a full guide for how to choose the best pocket hole jig for you if you need it. Over the years, Kreg has continued to improve its jigs, making them easier and faster to use.

But the Kreg Rebel is a whole different ball game.
This isn’t just an upgraded jig. It’s an all-in-one pocket hole tool. No separate drill. No clamping your jig down. No back-and-forth steps.
You just place it, pull the handle, and it drills the pocket hole for you.
It takes one of the easiest woodworking methods out there and makes it even simpler and faster.
If you’re new to woodworking, pocket hole joinery is already one of the most beginner-friendly ways to build.
This tool just removes even more of the guesswork. Less setup, less hassle, more time actually building.
We teamed up with our friends Kreg again for these DIY cabinet pull out shelves and we’re sharing them online for free, now available on KregTool.com!
Kreg’s website is packed with easy-to-follow, free woodworking plans. You’ll find no shortage of ideas; it’s seriously a goldmine for inspiration.
DIY Pull Out Shelving for Kitchen Cabinets: Video Tutorial
YouTube video coming soon!
If you love DIY videos, don’t forget to subscribe to our YouTube channel!
DIY Cabinet Pull Out Shelves: Step-by-Step Instructions
Tools & materials you’ll need
Step 1. Cut wood

Cut the plywood pieces to size using the cut list in the plans, which you can download for free here. We used the Kreg Adaptive Cutting System, but a table saw or Rip-Cut works too.

Step 2. Drill pocket holes
Drill pocket holes where indicated in the plans.
We used the Kreg Rebel.
Step 3. Assemble the drawers

Attach the bottoms to the drawer sides and bases using 1” pocket hole screws.
Since this is ½” plywood, don’t overtighten or the screws can go through.
Attach the front and back pieces with wood glue and clamp until dry. Once dry, reinforce with pin nails.
Lastly, attach the support piece to the tower base with pin nails.
Step 4. Sand

Sand everything smooth using 120-grit, then 220-grit sandpaper with an orbital sander.
Step 5. Add wood filler

Fill nail holes, seams, and any imperfections with wood filler. Let dry, then sand smooth.
Step 6. Seal with lacquer

Spray with lacquer and let it dry. You could also stain or paint, but we kept ours natural.

Step 7. Attach the drawer slides

Install drawer slides on the drawers and bases per the manufacturer’s instructions.

We used heavy-duty slides (rated for 100 lbs) for the mixer drawer because the stand mixer is pretty heavy, but the others are 50-lb capacity and are soft-close.
Step 8. Install pull out shelves in the cabinet

Install inside your cabinet, using shims or blocks if needed. Secure with 1½” trim screws.


Don’t they look great? We ended up moving some things around a bit in the kitchen, adjusting the food storage containers down here to the pull out drawers and moving the mixing bowls into an upper cabinet.

We also made the bottom pull out drawer designated for lunch making supplies for the kids. It is nice to have this stuff all in one spot so it is easy to make lunches in the mornings.

If you want to build your own DIY pull out shelves for your kitchen cabinets, we’ve done all the hard work for you! All you need to do is hop over to Kreg’s website and check out the full tutorial.
At the bottom of the tutorial on Kreg’s website, you’ll also see a link to download the free plans to get all of the detailed measurements and a cut list!


Related – Projects that use a pocket hole jig
- Kid’s Cabin Bed
- Table Top
- Planter Box for Front Porch
- Outdoor Plant Wall
- Farmhouse Sink Cabinet
- Mudroom Lockers
- DIY Desk Calendar & Wooden Pencil Holder
- DIY Dress Up Storage for Kids
- Picture Ledge DIY
- DIY Firewood Rack with Roof
- Wood Bench with Cushion
- DIY Cane Headboard
- Boho Nightstand with Cane
- DIY Behind the Couch Table with Outlet
- DIY Headphone Stand
- DIY Cookbook Stand
- Easy DIY Grill Utensil Holder
- DIY Deck Box for Outdoor Toys
- DIY Towel Rack Made With One Board
- DIY Tool Organizer for Kreg Tool Stand
- DIY Mail and Key Holder
- DIY Step Stool for Toddler
- DIY Trash Can
- DIY Spice Rack
- DIY Book Holder
- Easy DIY Magazine Shelf
- DIY Clamp Rack
- DIY Chicknic Table
- DIY Bike Rack
- Small Bookshelf
- DIY Laptop Tray
- DIY TV Frame
- Rolling Tool Cart with Pegboard
- DIY Giant Tic Tac Toe Board
- DIY Hidden Picture Frame Storage
- DIY Cabinet Pull Out Shelves